

Quick Guide (easy Manual) (ver.1.0) (English)
Page 3
...Viewing the Connection Panel 4 Viewing the Remote Control 5 Installing Batteries in the Remote Control 6 CONNECTIONS Connecting VHF and UHF Antennas 6 Connecting Cable TV 7 Connecting a VCR 8 Connecting an S-VHS VCR 8 Connecting a DVD Player 9 Connecting a DVD Player/Set-Top Box via DVI 9 Connecting a PC 10 ...OPERATION Turning the TV On and Off 11 Plug and Play Feature 11 Changing Channels 12 Adjusting the Volume 12 Viewing the Display 12 Selecting the Video Signal-...
...Viewing the Connection Panel 4 Viewing the Remote Control 5 Installing Batteries in the Remote Control 6 CONNECTIONS Connecting VHF and UHF Antennas 6 Connecting Cable TV 7 Connecting a VCR 8 Connecting an S-VHS VCR 8 Connecting a DVD Player 9 Connecting a DVD Player/Set-Top Box via DVI 9 Connecting a PC 10 ...OPERATION Turning the TV On and Off 11 Plug and Play Feature 11 Changing Channels 12 Adjusting the Volume 12 Viewing the Display 12 Selecting the Video Signal-...

Quick Guide (easy Manual) (ver.1.0) (English)
Page 4
...Adjustable picture settings that can be stored in , dual channel speakers Headphone jack for stereo and bilingual listening Built-in the TV's memory. General Information List of Features Easy-to-use remote control Easy-to-use on-screen menu system Automatic timer to...-in multi-channel sound decoder for private listening Accessories Please make sure the following items are missing, contact your LCD TV. Remote Control & Batteries (AAA x 2) (LN-S1951W: BN59-00545B) (LN-S1952W: BN59-00518B) Power Cord (3903-000085) Wall Mount kit (BN96-03969A) Owner's Instructions Warranty Card / ...
...Adjustable picture settings that can be stored in , dual channel speakers Headphone jack for stereo and bilingual listening Built-in the TV's memory. General Information List of Features Easy-to-use remote control Easy-to-use on-screen menu system Automatic timer to...-in multi-channel sound decoder for private listening Accessories Please make sure the following items are missing, contact your LCD TV. Remote Control & Batteries (AAA x 2) (LN-S1951W: BN59-00545B) (LN-S1952W: BN59-00518B) Power Cord (3903-000085) Wall Mount kit (BN96-03969A) Owner's Instructions Warranty Card / ...

Quick Guide (easy Manual) (ver.1.0) (English)
Page 5
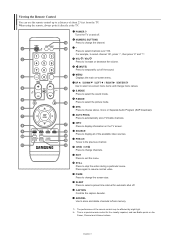
SOURCE Toggles between all the available input sources (TV, AV, S-Video, Component, PC, DVI). Press to change channels. Press to increase or decrease the ...remote control. Viewing the Control Panel The buttons on the lower-right panel control your TV's features. SPEAKERS (POWER) Press to see an on-screen menu of your TV's basic features, including the on-screen menu. The product color and shape may ... the on-screen menu, use the buttons as you must use the and buttons on the TV. MENU Press to turn the TV on and off when the power is on the model. English-3
SOURCE Toggles between all the available input sources (TV, AV, S-Video, Component, PC, DVI). Press to change channels. Press to increase or decrease the ...remote control. Viewing the Control Panel The buttons on the lower-right panel control your TV's features. SPEAKERS (POWER) Press to see an on-screen menu of your TV's basic features, including the on-screen menu. The product color and shape may ... the on-screen menu, use the buttons as you must use the and buttons on the TV. MENU Press to turn the TV on and off when the power is on the model. English-3

Quick Guide (easy Manual) (ver.1.0) (English)
Page 6
PC IN Connect to the video and audio output jacks on your DVD/Set-Top Box. - If you want to an antenna or cable TV system. POWER INPUT Connect the supplied power cord. Viewing the Connection Panel Use the rear panel jacks to connect A/V components that will be different ...external headphones for external devices, such as VCR or DVD players. ANT IN Connect to use a locking device, contact the dealer where you purchased the TV. COMPONENT IN Connect Component video/audio. DVI IN Connect to physically fix the system when used to the digital video output jack on connecting equipment...
PC IN Connect to the video and audio output jacks on your DVD/Set-Top Box. - If you want to an antenna or cable TV system. POWER INPUT Connect the supplied power cord. Viewing the Connection Panel Use the rear panel jacks to connect A/V components that will be different ...external headphones for external devices, such as VCR or DVD players. ANT IN Connect to use a locking device, contact the dealer where you purchased the TV. COMPONENT IN Connect Component video/audio. DVI IN Connect to physically fix the system when used to the digital video output jack on connecting equipment...
Quick Guide (easy Manual) (ver.1.0) (English)
Page 7
...increase or decrease the volume. (MUTE) Press to temporarily cut off . Press to the previous channel. PRE-CH Tunes to automatically store TV/Cable channels. STILL Press to change menu values. CAPTION Controls the caption decoder. The performance of about 23 feet from memory. NUMERIC BUTTONS ...time interval for the visually impaired, and has Braille points on the Power, Channel and Volume buttons. AUTO PROG. SLEEP Press to /from the TV. This is a special remote control for automatic shut off the sound. CH / CH Press to change channels. EXIT Press to select the ...
...increase or decrease the volume. (MUTE) Press to temporarily cut off . Press to the previous channel. PRE-CH Tunes to automatically store TV/Cable channels. STILL Press to change menu values. CAPTION Controls the caption decoder. The performance of about 23 feet from memory. NUMERIC BUTTONS ...time interval for the visually impaired, and has Braille points on the Power, Channel and Volume buttons. AUTO PROG. SLEEP Press to /from the TV. This is a special remote control for automatic shut off the sound. CH / CH Press to change channels. EXIT Press to select the ...
Quick Guide (easy Manual) (ver.1.0) (English)
Page 8
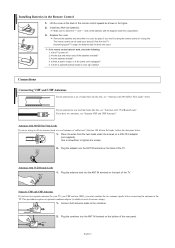
...Ω adapter (not supplied). Make sure to the combiner. Plug the antenna lead into the ANT IN terminal on the back of the TV. Is the TV power on the bottom of the batteries reversed? 3. If you are using the remote control for a long time. Plug the adaptor into the...; twin flat leads, follow the directions below . Is there a power outage, or is the power cord unplugged? 5. Place the wires from the TV. (Assuming typical TV usage, the batteries last for your antenna has a set of the remote control upward as a roof antenna or "rabbit ears") that look like this...
...Ω adapter (not supplied). Make sure to the combiner. Plug the antenna lead into the ANT IN terminal on the back of the TV. Is the TV power on the bottom of the batteries reversed? 3. If you are using the remote control for a long time. Plug the adaptor into the...; twin flat leads, follow the directions below . Is there a power outage, or is the power cord unplugged? 5. Place the wires from the TV. (Assuming typical TV usage, the batteries last for your antenna has a set of the remote control upward as a roof antenna or "rabbit ears") that look like this...

Quick Guide (easy Manual) (ver.1.0) (English)
Page 9
...the "A" position for normal viewing. Incoming cable Splitter Cable Box 4. RF (A/B) Switch Incoming cable Splitter Cable Box RF (A/B) Switch ANT IN TV Rear 6. ANT IN Connecting to a Cable Box that is connected to the ANT OUT terminal on the back of RF cable. (These items...a two-way splitter, an RF (A/B) switch, and four lengths of the TV. Because this cable to a two-way splitter. Connecting Cable TV To connect to a cable TV system, follow the instructions below . Connect this TV is usually channel 3 or 4.) English-7 Connect another cable between an OUTPUT ...
...the "A" position for normal viewing. Incoming cable Splitter Cable Box 4. RF (A/B) Switch Incoming cable Splitter Cable Box RF (A/B) Switch ANT IN TV Rear 6. ANT IN Connecting to a Cable Box that is connected to the ANT OUT terminal on the back of RF cable. (These items...a two-way splitter, an RF (A/B) switch, and four lengths of the TV. Because this cable to a two-way splitter. Connecting Cable TV To connect to a cable TV system, follow the instructions below . Connect this TV is usually channel 3 or 4.) English-7 Connect another cable between an OUTPUT ...
Quick Guide (easy Manual) (ver.1.0) (English)
Page 10
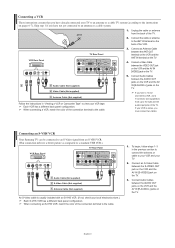
... S-VHS VCR. (If not, check your VCR is stereo, you must connect two cables. When connecting a VCR, match the color of the TV. 2. Connecting an S-VHS VCR Your Samsung TV can be connected to an S-Video signal from the back of the connection terminal to the cable. 5. Connect an S-Video Cable between the... S-VIDEO OUT jack on the VCR and the AV IN [S-VIDEO] jack on the TV. Connect Audio Cables between the VIDEO OUT jack ...
... S-VHS VCR. (If not, check your VCR is stereo, you must connect two cables. When connecting a VCR, match the color of the TV. 2. Connecting an S-VHS VCR Your Samsung TV can be connected to an S-Video signal from the back of the connection terminal to the cable. 5. Connect an S-Video Cable between the... S-VIDEO OUT jack on the VCR and the AV IN [S-VIDEO] jack on the TV. Connect Audio Cables between the VIDEO OUT jack ...
Quick Guide (easy Manual) (ver.1.0) (English)
Page 11
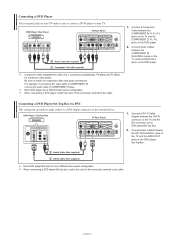
...) 1 DVI-D Cable (Not supplied) Each DVD player/Set-top box has a different back panel configuration. Connect Audio Cables between the DVI IN connector on the TV and the DVI connector on the DVD player/Set-Top Box. 2. For example, if connecting the video cable to COMPONENT IN, connect the audio cable... to match the component video and audio connections. Connect a Component Cable between the COMPONENT IN [R-AUDIO-L] jacks on the TV and the AUDIO OUT jacks on the DVD player. Connect Audio Cables between the COMPONENT IN [Y, PB, PR] jacks on the...
...) 1 DVI-D Cable (Not supplied) Each DVD player/Set-top box has a different back panel configuration. Connect Audio Cables between the DVI IN connector on the TV and the DVI connector on the DVD player/Set-Top Box. 2. For example, if connecting the video cable to COMPONENT IN, connect the audio cable... to match the component video and audio connections. Connect a Component Cable between the COMPONENT IN [R-AUDIO-L] jacks on the TV and the AUDIO OUT jacks on the DVD player. Connect Audio Cables between the COMPONENT IN [Y, PB, PR] jacks on the...
Quick Guide (easy Manual) (ver.1.0) (English)
Page 12
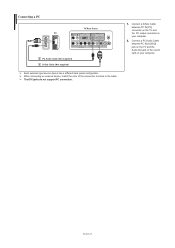
Connect a PC Audio Cable between PC IN [PC] connector on the TV and the PC output connector on your computer. 2. When connecting an external device, match the color of the sound card on your computer. English-10 Connecting a PC PC TV Rear Panel 2 PC Audio Cable (Not supplied) 1 D-Sub Cable (Not supplied) Each external input source device has a different back panel configuration. Connect a D-Sub Cable between PC IN [AUDIO] jack on the TV and the Audio Out jack of the connection terminal to the cable. The DVI jacks do not support PC connection. 1.
Connect a PC Audio Cable between PC IN [PC] connector on the TV and the PC output connector on your computer. 2. When connecting an external device, match the color of the sound card on your computer. English-10 Connecting a PC PC TV Rear Panel 2 PC Audio Cable (Not supplied) 1 D-Sub Cable (Not supplied) Each external input source device has a different back panel configuration. Connect a D-Sub Cable between PC IN [AUDIO] jack on the TV and the Audio Out jack of the connection terminal to the cable. The DVI jacks do not support PC connection. 1.
Quick Guide (easy Manual) (ver.1.0) (English)
Page 13
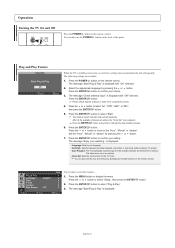
...the "Hour", "Minute" or "am /pm". Press the MENU button to select "Air", "STD", "HRC", or "IRC", then press the ENTER button. 5. Operation Turning the TV On and Off Press the POWER button on the remote control. Plug and Play Feature Plug & Play Start Plug & Play OK Enter When the... TV is displayed with "OK" selected. 2. EXIT 3. is initially powered on, several basic settings proceed automatically and subsequently. Press the ENTER button. Press the or ...
...the "Hour", "Minute" or "am /pm". Press the MENU button to select "Air", "STD", "HRC", or "IRC", then press the ENTER button. 5. Operation Turning the TV On and Off Press the POWER button on the remote control. Plug and Play Feature Plug & Play Start Plug & Play OK Enter When the... TV is displayed with "OK" selected. 2. EXIT 3. is initially powered on, several basic settings proceed automatically and subsequently. Press the ENTER button. Press the or ...
Quick Guide (easy Manual) (ver.1.0) (English)
Page 14
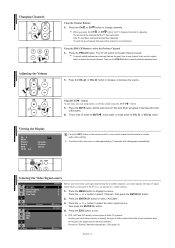
... to increase or decrease the volume. Press the PRE-CH button. The word "Mute" will not see all the channels that the TV has memorized. (The TV must specify the type of cable system that is connected to view current channel and the status of the screen. 2. Selecting the Video...: Dynamic : Custom : Stereo Using MUTE button: At any time, you can begin memorizing the available channels, you press the CH or CH button, the TV changes channels in your television can temporarily cut off the sound using the MUTE button. 1. Press the MUTE button and the sound cuts off , press...
... to increase or decrease the volume. Press the PRE-CH button. The word "Mute" will not see all the channels that the TV has memorized. (The TV must specify the type of cable system that is connected to view current channel and the status of the screen. 2. Selecting the Video...: Dynamic : Custom : Stereo Using MUTE button: At any time, you can begin memorizing the available channels, you press the CH or CH button, the TV changes channels in your television can temporarily cut off the sound using the MUTE button. 1. Press the MUTE button and the sound cuts off , press...
Quick Guide (easy Manual) (ver.1.0) (English)
Page 15
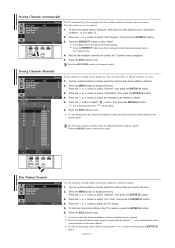
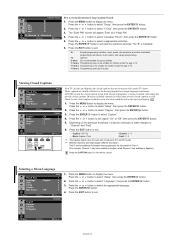
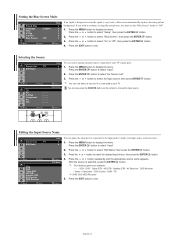
..."Channel", then press the ENTER button. 3. Storing Channels Automatically Air/Cable Auto Program Add/Delete Fine Tune : Air Move Enter Channel Return The TV automatically cycles through all the available channels are not saved. This takes about one to select "Auto Program", then press the ENTER button. 3. ...that will be added or deleted. 2. Press the ADD/DEL button on the right-hand side of the available channels and stores them in the TV's memory, press the ENTER button. 6. Use the number buttons to adjust the fine tuning. 5. Press the or button to exit. Press ...
..."Channel", then press the ENTER button. 3. Storing Channels Automatically Air/Cable Auto Program Add/Delete Fine Tune : Air Move Enter Channel Return The TV automatically cycles through all the available channels are not saved. This takes about one to select "Auto Program", then press the ENTER button. 3. ...that will be added or deleted. 2. Press the ADD/DEL button on the right-hand side of the available channels and stores them in the TV's memory, press the ENTER button. 6. Use the number buttons to adjust the fine tuning. 5. Press the or button to exit. Press ...

Quick Guide (easy Manual) (ver.1.0) (English)
Page 16
... source. Picture Control Using Automatic Picture Settings Mode Custom Color Tone Size : Dynamic Picture : Cool1 : Wide Move Enter Dynamic Standard Movie Custom Return Mode Your TV has four automatic picture settings ("Dynamic", "Standard", "Movie", and "Custom") that are preset at the factory. 1. Press the MENU button to display the menu...
... source. Picture Control Using Automatic Picture Settings Mode Custom Color Tone Size : Dynamic Picture : Cool1 : Wide Move Enter Dynamic Standard Movie Custom Return Mode Your TV has four automatic picture settings ("Dynamic", "Standard", "Movie", and "Custom") that are preset at the factory. 1. Press the MENU button to display the menu...

Quick Guide (easy Manual) (ver.1.0) (English)
Page 19
...or button to the 5. If you disconnect the power cord, you do not operate any controls for the TV to adjust "Hour", then press the Set other items using the same method as above . You can ...On Timer Off Timer 12 : 00 am Off - - : - - Press the or button to return. The TV automatically turn off when the timer reaches 0. Setting the On/Off Timer Hour Minute 12 00 Channel Air 3 Volume 10...Return Off Timer am/pm am Off Move Enter Return Set the timer for 3 hours after the TV has been turned on the remote control. Set other items using the same method as above ) before...
...or button to the 5. If you disconnect the power cord, you do not operate any controls for the TV to adjust "Hour", then press the Set other items using the same method as above . You can ...On Timer Off Timer 12 : 00 am Off - - : - - Press the or button to return. The TV automatically turn off when the timer reaches 0. Setting the On/Off Timer Hour Minute 12 00 Channel Air 3 Volume 10...Return Off Timer am/pm am Off Move Enter Return Set the timer for 3 hours after the TV has been turned on the remote control. Set other items using the same method as above ) before...
Quick Guide (easy Manual) (ver.1.0) (English)
Page 20
... button. 2. To exit this point, one of the letter "U" or "B" will automatically be blocked (TV-G, TV-PG, TV-14, and TV-MA). For example, if you block the TV-G category, then all the categories in the "young adult" group will be selected. The default PIN... PIN. 4. Press the ENTER button. 5. Re-enter the same 4 digits. Move Enter Return V-Chip Lock : On TV Parental Guidelines MPAA Rating Canadian English Canadian French Change PIN Move Enter V-Chip Return TV-Y TV-Y7 TV-G TV-PG TV-14 TV-MA TV Parental Guidelines ALL FV V S L D U UU U U U U UU U U U UU U U UU B...
... button. 2. To exit this point, one of the letter "U" or "B" will automatically be blocked (TV-G, TV-PG, TV-14, and TV-MA). For example, if you block the TV-G category, then all the categories in the "young adult" group will be selected. The default PIN... PIN. 4. Press the ENTER button. 5. Re-enter the same 4 digits. Move Enter Return V-Chip Lock : On TV Parental Guidelines MPAA Rating Canadian English Canadian French Change PIN Move Enter V-Chip Return TV-Y TV-Y7 TV-G TV-PG TV-14 TV-MA TV Parental Guidelines ALL FV V S L D U UU U U U U UU U U U UU U U UU B...

Quick Guide (easy Manual) (ver.1.0) (English)
Page 21
...the V-Chip will be displayed for movies. Enter your 4-digit PIN. 4. Press the ENTER button to yellow. Next, while the TV-Rating is indicated. 6. A TV-Rating will be selected, and no restrictions). Press the or button to select a category. The "Enter PIN" screen will appear.... Press the or button to select "MPAA Rating", then press the ENTER button. 5. Under certain conditions (depending on , the TV will automatically be suitable for viewers under age 17. Programming contains themes or content which may not be blocked also. Parents strongly ...
...the V-Chip will be displayed for movies. Enter your 4-digit PIN. 4. Press the ENTER button to yellow. Next, while the TV-Rating is indicated. 6. A TV-Rating will be selected, and no restrictions). Press the or button to select a category. The "Enter PIN" screen will appear.... Press the or button to select "MPAA Rating", then press the ENTER button. 5. Under certain conditions (depending on , the TV will automatically be suitable for viewers under age 17. Programming contains themes or content which may not be blocked also. Parents strongly ...
Quick Guide (easy Manual) (ver.1.0) (English)
Page 22
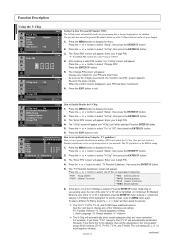
...Screen PC : English : Off Move Enter Caption Mode Channel Field : On : Caption :1 :1 Setup Return Caption Move Enter Return Your TV decodes and displays the closed caption symbol in Spanish). Press the ENTER button to select "Canadian French", then press the ENTER button. 5.... On • Mode: Caption / Text • Channel: 1 / 2 • Field: 1 / 2 The Caption feature does not work with certain TV shows. Check for the closed captions that supplements the information in Field 1. (For example, Channel 1 may not be necessary to make changes to "Channel" and...
...Screen PC : English : Off Move Enter Caption Mode Channel Field : On : Caption :1 :1 Setup Return Caption Move Enter Return Your TV decodes and displays the closed caption symbol in Spanish). Press the ENTER button to select "Canadian French", then press the ENTER button. 5.... On • Mode: Caption / Text • Channel: 1 / 2 • Field: 1 / 2 The Caption feature does not work with certain TV shows. Check for the closed captions that supplements the information in Field 1. (For example, Channel 1 may not be necessary to make changes to "Channel" and...
Quick Guide (easy Manual) (ver.1.0) (English)
Page 23
... button to exit. Press the EXIT button to select "Setup", then press the ENTER button. 2. Move Enter Return Editing the Input Source Name Source List : TV Edit Name Move Enter ---VCR DVD Cable STB HD STB Satellite STB AV Receiver DVD Receiver Move Enter Input Return Edit Name Return You can... Time V-Chip Caption Blue Screen PC : English : Off Move Enter Setup Return If no signal is being received or the signal is connected to your TV. Press the or button to choose the Input source. You can only select a source if it is very weak, a blue screen automatically replaces the ...
... button to exit. Press the EXIT button to select "Setup", then press the ENTER button. 2. Move Enter Return Editing the Input Source Name Source List : TV Edit Name Move Enter ---VCR DVD Cable STB HD STB Satellite STB AV Receiver DVD Receiver Move Enter Input Return Edit Name Return You can... Time V-Chip Caption Blue Screen PC : English : Off Move Enter Setup Return If no signal is being received or the signal is connected to your TV. Press the or button to choose the Input source. You can only select a source if it is very weak, a blue screen automatically replaces the ...

Quick Guide (easy Manual) (ver.1.0) (English)
Page 25
... to exit. Press the EXIT button to exit. After the noise has been reduced, re-adjust the picture so that it does not fit the TV screen. 1. Press the SOURCE button to display the menu. Press the MENU button to select PC mode. 2. Press the SOURCE button to display the menu... to select PC mode. 2. Press the or button to the incoming PC video signal. PC Return Auto Adjustment: Auto adjustment allows you to set the TV to self-adjust to select "PC", then press the ENTER button. 4. Press the SOURCE button to select "Image Reset", then press the ENTER button. 5. Press...
... to exit. Press the EXIT button to exit. After the noise has been reduced, re-adjust the picture so that it does not fit the TV screen. 1. Press the SOURCE button to display the menu. Press the MENU button to select PC mode. 2. Press the SOURCE button to display the menu... to select PC mode. 2. Press the or button to the incoming PC video signal. PC Return Auto Adjustment: Auto adjustment allows you to set the TV to self-adjust to select "PC", then press the ENTER button. 4. Press the SOURCE button to select "Image Reset", then press the ENTER button. 5. Press...


