
Open Source Guide (ENGLISH)
Page 1
... them as a special exception, the source code distributed need to make restrictions that forbid anyone to deny you these conditions, and telling the user how to guarantee your option offer warranty protection in full compliance. 5. or, c) Accompany it with a work based on the Program) on it to your freedom to share and change free software--to make certain that everyone can...
... them as a special exception, the source code distributed need to make restrictions that forbid anyone to deny you these conditions, and telling the user how to guarantee your option offer warranty protection in full compliance. 5. or, c) Accompany it with a work based on the Program) on it to your freedom to share and change free software--to make certain that everyone can...
Open Source Guide (ENGLISH)
Page 2
... to most effectively convey the exclusion of the greatest possible use to the public, we recommend making it free software that everyone can do so by permitting redistribution under these terms, attach the following notices to be of warranty; How to Apply These Terms to Your New Libraries If you develop ...CONSEQUENTIAL DAMAGES ARISING OUT OF THE USE OR INABILITY TO USE THE LIBRARY (INCLUDING BUT NOT LIMITED TO LOSS OF DATA OR DATA BEING RENDERED INACCURATE OR LOSSES SUSTAINED BY YOU OR THIRD PARTIES OR A FAILURE OF THE LIBRARY TO OPERATE WITH ANY OTHER SOFTWARE), EVEN IF SUCH HOLDER OR ...
... to most effectively convey the exclusion of the greatest possible use to the public, we recommend making it free software that everyone can do so by permitting redistribution under these terms, attach the following notices to be of warranty; How to Apply These Terms to Your New Libraries If you develop ...CONSEQUENTIAL DAMAGES ARISING OUT OF THE USE OR INABILITY TO USE THE LIBRARY (INCLUDING BUT NOT LIMITED TO LOSS OF DATA OR DATA BEING RENDERED INACCURATE OR LOSSES SUSTAINED BY YOU OR THIRD PARTIES OR A FAILURE OF THE LIBRARY TO OPERATE WITH ANY OTHER SOFTWARE), EVEN IF SUCH HOLDER OR ...

Quick Guide (easy Manual) (ver.1.0) (English)
Page 3
...INFORMATION List of Features 2 Accessories 2 Viewing the Control Panel 3 Viewing the Connection Panel 4 Viewing the Remote Control 5 Installing Batteries in the Remote Control 6 CONNECTIONS Connecting VHF and UHF Antennas 6 Connecting Cable TV 7 Connecting a VCR 8 Connecting an S-VHS VCR 8 Connecting a DVD Player 9 Connecting a DVD Player/Set-Top Box via DVI 9 Connecting a PC 10 OPERATION Turning the TV On and Off 11 Plug and Play Feature 11 Changing Channels 12 Adjusting the Volume 12 Viewing the Display 12 Selecting the Video Signal-source 12 Storing Channels Automatically...
...INFORMATION List of Features 2 Accessories 2 Viewing the Control Panel 3 Viewing the Connection Panel 4 Viewing the Remote Control 5 Installing Batteries in the Remote Control 6 CONNECTIONS Connecting VHF and UHF Antennas 6 Connecting Cable TV 7 Connecting a VCR 8 Connecting an S-VHS VCR 8 Connecting a DVD Player 9 Connecting a DVD Player/Set-Top Box via DVI 9 Connecting a PC 10 OPERATION Turning the TV On and Off 11 Plug and Play Feature 11 Changing Channels 12 Adjusting the Volume 12 Viewing the Display 12 Selecting the Video Signal-source 12 Storing Channels Automatically...

Quick Guide (easy Manual) (ver.1.0) (English)
Page 4
... included with your dealer. Adjustable picture settings that can be stored in , dual channel speakers Headphone jack for stereo and bilingual listening Built-in the TV's memory. Remote Control & Batteries (AAA x 2) (LN-S1951W: BN59-00545B) (LN-S1952W: BN59-00518B) Power Cord (3903-000085) Wall Mount kit (BN96-03969A) Owner's Instructions Warranty Card / Registration Card/ Safety Guide Manual Decoration Cover (LN-S1951W-Left: BN63-02715A, Right: BN63-02716A) (LN-S1952W-Left: BN63-02715B...
... included with your dealer. Adjustable picture settings that can be stored in , dual channel speakers Headphone jack for stereo and bilingual listening Built-in the TV's memory. Remote Control & Batteries (AAA x 2) (LN-S1951W: BN59-00545B) (LN-S1952W: BN59-00518B) Power Cord (3903-000085) Wall Mount kit (BN96-03969A) Owner's Instructions Warranty Card / Registration Card/ Safety Guide Manual Decoration Cover (LN-S1951W-Left: BN63-02715A, Right: BN63-02716A) (LN-S1952W-Left: BN63-02715B...

Quick Guide (easy Manual) (ver.1.0) (English)
Page 5
... model. SPEAKERS (POWER) Press to see an on the remote control. REMOTE CONTROL SENSOR Aim the remote control towards this button as you would use the remote control. The product color and shape may vary depending on and lights up in standby mode. In the on the remote control. POWER INDICATOR Blinks and turns off . Viewing the Control Panel The buttons on the lower-right panel control your TV's features. SOURCE Toggles between all the available input sources (TV, AV, S-Video, Component, PC, DVI). MENU...
... model. SPEAKERS (POWER) Press to see an on the remote control. REMOTE CONTROL SENSOR Aim the remote control towards this button as you would use the remote control. The product color and shape may vary depending on and lights up in standby mode. In the on the remote control. POWER INDICATOR Blinks and turns off . Viewing the Control Panel The buttons on the lower-right panel control your TV's features. SOURCE Toggles between all the available input sources (TV, AV, S-Video, Component, PC, DVI). MENU...

Quick Guide (easy Manual) (ver.1.0) (English)
Page 6
... your DVD/Set-Top Box. - KENSINGTON LOCK The Kensington lock (optional) is a device used to use a locking device, contact the dealer where you purchased the TV. The place of external headphones for external devices, such as VCR or DVD players. Viewing the Connection Panel Use the rear panel jacks to connect A/V components that will be different depending on its model. S-VIDEO Connect an S-Video signal from a camcorder or VCR. COMPONENT IN Connect Component video/audio. DVI IN Connect to an antenna or cable...
... your DVD/Set-Top Box. - KENSINGTON LOCK The Kensington lock (optional) is a device used to use a locking device, contact the dealer where you purchased the TV. The place of external headphones for external devices, such as VCR or DVD players. Viewing the Connection Panel Use the rear panel jacks to connect A/V components that will be different depending on its model. S-VIDEO Connect an S-Video signal from a camcorder or VCR. COMPONENT IN Connect Component video/audio. DVI IN Connect to an antenna or cable...
Quick Guide (easy Manual) (ver.1.0) (English)
Page 8
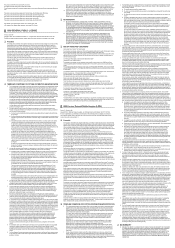
...'t work, check the following: 1. Plug the adaptor into the ANT IN terminal on the back of the rear panel. UHF VHF ANT IN English-6 The remote control can be using the remote control for your TV (one VHF and one UHF), you are using an off-air antenna (such as shown in the Remote Control 1. Is the TV power on a 300-75 Ω adapter (not supplied...
...'t work, check the following: 1. Plug the adaptor into the ANT IN terminal on the back of the rear panel. UHF VHF ANT IN English-6 The remote control can be using the remote control for your TV (one VHF and one UHF), you are using an off-air antenna (such as shown in the Remote Control 1. Is the TV power on a 300-75 Ω adapter (not supplied...

Quick Guide (easy Manual) (ver.1.0) (English)
Page 9
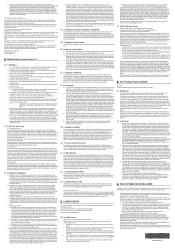
... OUT" or simply, "OUT". 2. Connecting Cable TV To connect to a cable TV system, follow the instructions below . Connect this cable to the ANT IN terminal on the back of this connection, set the A/B switch to "B", you will need a cable box to view unscrambled cable channels. Find the cable that Descrambles Some Channels If your TV to the cable box's output channel, which is cable-ready, you have made this cable to a two-way splitter...
... OUT" or simply, "OUT". 2. Connecting Cable TV To connect to a cable TV system, follow the instructions below . Connect this cable to the ANT IN terminal on the back of this connection, set the A/B switch to "B", you will need a cable box to view unscrambled cable channels. Find the cable that Descrambles Some Channels If your TV to the cable box's output channel, which is cable-ready, you have made this cable to a two-way splitter...
Quick Guide (easy Manual) (ver.1.0) (English)
Page 10
... audio input jacks of the TV. 2. To begin, follow steps 1-3 in "Viewing a VCR or Camcorder Tape" to view your VCR tape. Unplug the cable or antenna from an S-VHS VCR. (This connection delivers a better picture as compared to a standard VHS VCR.) TV Rear Panel VCR Rear Panel 3 Audio Cable (Not supplied) 2 S-Video Cable (Not supplied) 1 Antenna Cable (Not supplied) An S-Video cable is stereo, you have a "mono" (non-stereo) VCR, use a Y-connector (not supplied) to hook...
... audio input jacks of the TV. 2. To begin, follow steps 1-3 in "Viewing a VCR or Camcorder Tape" to view your VCR tape. Unplug the cable or antenna from an S-VHS VCR. (This connection delivers a better picture as compared to a standard VHS VCR.) TV Rear Panel VCR Rear Panel 3 Audio Cable (Not supplied) 2 S-Video Cable (Not supplied) 1 Antenna Cable (Not supplied) An S-Video cable is stereo, you have a "mono" (non-stereo) VCR, use a Y-connector (not supplied) to hook...
Quick Guide (easy Manual) (ver.1.0) (English)
Page 11
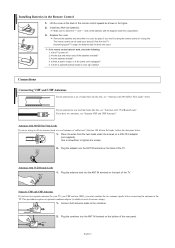
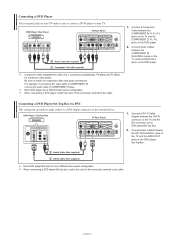
... DVD player/ Set-Top Box. 2 Audio Cable (Not supplied) 1 DVI-D Cable (Not supplied) Each DVD player/Set-top box has a different back panel configuration. Be sure to COMPONENT IN also. Connect Audio Cables between the DVI IN connector on the TV and the DVI connector on the DVD player/Set-Top Box. 2. DVD Player Rear Panel TV Rear Panel 2 Audio Cable (Not supplied) 1 Component Cable (Not supplied) Component video separates the video into Y (Luminance (brightness)), Pb (Blue) and Pr (Red) for enhanced video quality. When connecting a DVD player, match the color of the connection...
... DVD player/ Set-Top Box. 2 Audio Cable (Not supplied) 1 DVI-D Cable (Not supplied) Each DVD player/Set-top box has a different back panel configuration. Be sure to COMPONENT IN also. Connect Audio Cables between the DVI IN connector on the TV and the DVI connector on the DVD player/Set-Top Box. 2. DVD Player Rear Panel TV Rear Panel 2 Audio Cable (Not supplied) 1 Component Cable (Not supplied) Component video separates the video into Y (Luminance (brightness)), Pb (Blue) and Pr (Red) for enhanced video quality. When connecting a DVD player, match the color of the connection...
Quick Guide (easy Manual) (ver.1.0) (English)
Page 13
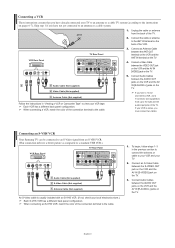
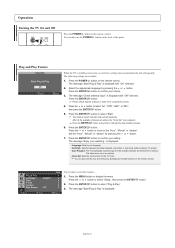
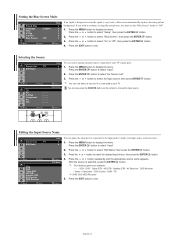
... set the hour and minute by pressing the number buttons on the front of the available channels and stores them in memory. is displayed. • Language: Select your language. • Air/Cable: Selects between terrestrial antenna connection or your watching." Press the ENTER button to display the menu. Operation Turning the TV On and Off Press the POWER button on the remote control. Press the POWER button on the remote control...
... set the hour and minute by pressing the number buttons on the front of the available channels and stores them in memory. is displayed. • Language: Select your language. • Air/Cable: Selects between terrestrial antenna connection or your watching." Press the ENTER button to display the menu. Operation Turning the TV On and Off Press the POWER button on the remote control. Press the POWER button on the remote control...
Quick Guide (easy Manual) (ver.1.0) (English)
Page 14
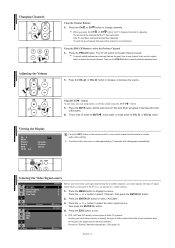
... various types of cable TV systems. Contact your local cable company to identify the type of the screen. 2. Press the CH or CH button to select the video signal source, then press the ENTER button. 4. When you must have memorized at least three channels). To quickly switch between two channels that exists in your television can temporarily cut off the sound using the MUTE button. 1. Viewing the Display Air 3 Mono Picture Sound...
... various types of cable TV systems. Contact your local cable company to identify the type of the screen. 2. Press the CH or CH button to select the video signal source, then press the ENTER button. 4. When you must have memorized at least three channels). To quickly switch between two channels that exists in your television can temporarily cut off the sound using the MUTE button. 1. Viewing the Display Air 3 Mono Picture Sound...
Quick Guide (easy Manual) (ver.1.0) (English)
Page 15
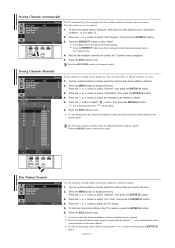
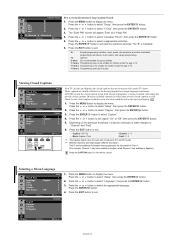
... Tuning Channels Air/Cable Auto Program Add/Delete Fine Tune : Air Move Enter Channel Return Use fine tuning to display the menu. Use the number buttons to select " " column, then press the ENTER The channels marked with an asterisk " * " on the remote control. Press the MENU button to manually adjust a particular channel for optimal reception. 1. To store the fine tuning setting in memory. Press the or button to the "Channel" menu. 4. Storing Channels Manually Air/Cable Auto Program...
... Tuning Channels Air/Cable Auto Program Add/Delete Fine Tune : Air Move Enter Channel Return Use fine tuning to display the menu. Use the number buttons to select " " column, then press the ENTER The channels marked with an asterisk " * " on the remote control. Press the MENU button to manually adjust a particular channel for optimal reception. 1. To store the fine tuning setting in memory. Press the or button to the "Channel" menu. 4. Storing Channels Manually Air/Cable Auto Program...

Quick Guide (easy Manual) (ver.1.0) (English)
Page 16
... motion pictures such as a DVD or Video CD.) • Internet: Medium brightness. (For working with a mixture of objects, making them or make any changes to these settings, the Picture Mode is automatically switched to view your preference. 1. In the PC mode, only "Contrast" and "Brightness" can also press the P.MODE button on the remote control to either sharpen them more red or green for a more dull. • Color: Adjusts the colors...
... motion pictures such as a DVD or Video CD.) • Internet: Medium brightness. (For working with a mixture of objects, making them or make any changes to these settings, the Picture Mode is automatically switched to view your preference. 1. In the PC mode, only "Contrast" and "Brightness" can also press the P.MODE button on the remote control to either sharpen them more red or green for a more dull. • Color: Adjusts the colors...

Quick Guide (easy Manual) (ver.1.0) (English)
Page 17
... the or button to display the menu. You can also press the S.MODE button on the remote control repeatedly to change the picture size. Alternately, you can be adjusted. (The "Zoom" mode is Component, DVI, and PC. Adjusting the Color Control Mode Custom Color Tone Color Control Size : Entertain : Normal : Wide Picture Move Enter Return Adjust the individual R, G, B Color Controls. 1. Available in the vertical direction. Normal sound will still be heard. Sound Control Using Automatic Sound Settings Mode Custom MTS Auto Volume : Custom : Stereo...
... the or button to display the menu. You can also press the S.MODE button on the remote control repeatedly to change the picture size. Alternately, you can be adjusted. (The "Zoom" mode is Component, DVI, and PC. Adjusting the Color Control Mode Custom Color Tone Color Control Size : Entertain : Normal : Wide Picture Move Enter Return Adjust the individual R, G, B Color Controls. 1. Available in the vertical direction. Normal sound will still be heard. Sound Control Using Automatic Sound Settings Mode Custom MTS Auto Volume : Custom : Stereo...
Quick Guide (easy Manual) (ver.1.0) (English)
Page 20
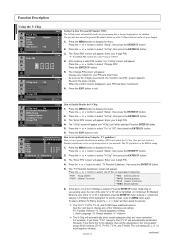
... adult" group will appear. Function Description Using the V-Chip Plug & Play Language Time V-Chip Caption Blue Screen PC : English : Off Move Enter Enter PIN 0-9Enter PIN V-Chip Lock : Off TV Parental Guidelines MPAA Rating Canadian English Canadian French Change PIN Setup Return V-Chip Return V-Chip Setting Up Your Personal ID Number (PIN): The V-Chip feature automatically locks out programming that are entered, the "Confirm...
... adult" group will appear. Function Description Using the V-Chip Plug & Play Language Time V-Chip Caption Blue Screen PC : English : Off Move Enter Enter PIN 0-9Enter PIN V-Chip Lock : Off TV Parental Guidelines MPAA Rating Canadian English Canadian French Change PIN Setup Return V-Chip Return V-Chip Setting Up Your Personal ID Number (PIN): The V-Chip feature automatically locks out programming that are entered, the "Confirm...
Quick Guide (easy Manual) (ver.1.0) (English)
Page 22
...;s Language 1. Press the MENU button to set caption "On" or "Off", then press the ENTER button. 5. Press the or button to display the menu. Press the MENU button to select the appropriate language. Enter your television schedule and on the tape's packaging: . 1. Move Enter Return English-20 Viewing Closed Captions Plug & Play Language Time V-Chip Caption Blue Screen PC : English : Off Move Enter Caption Mode Channel Field : On : Caption :1 :1 Setup Return Caption Move Enter Return...
...;s Language 1. Press the MENU button to set caption "On" or "Off", then press the ENTER button. 5. Press the or button to display the menu. Press the MENU button to select the appropriate language. Enter your television schedule and on the tape's packaging: . 1. Move Enter Return English-20 Viewing Closed Captions Plug & Play Language Time V-Chip Caption Blue Screen PC : English : Off Move Enter Caption Mode Channel Field : On : Caption :1 :1 Setup Return Caption Move Enter Return...
Quick Guide (easy Manual) (ver.1.0) (English)
Page 23
... Blue Screen Mode Plug & Play Language Time V-Chip Caption Blue Screen PC : English : Off Move Enter Setup Return If no signal is being received or the signal is selected, press the ENTER button. Press the MENU button to exit. Press the EXIT button to display the menu. Press the ENTER button to display the menu. Press the MENU button to select "Input". 2. The following options are available: - - - - - DHR - If you wish to continue viewing...
... Blue Screen Mode Plug & Play Language Time V-Chip Caption Blue Screen PC : English : Off Move Enter Setup Return If no signal is being received or the signal is selected, press the ENTER button. Press the MENU button to exit. Press the EXIT button to display the menu. Press the ENTER button to display the menu. Press the MENU button to select "Input". 2. The following options are available: - - - - - DHR - If you wish to continue viewing...
Quick Guide (easy Manual) (ver.1.0) (English)
Page 26
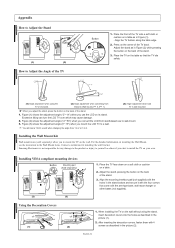
... detailed information on its stand. (2) Angle adjustment when converting from Stand to Wall mount (1 3, 3 1) (3) Angle adjustment when LCD TV is not responsible for installing the wall bracket. When installing the TV on the back of the stand. 1. You will hear a "Click" sound when changing the angle from stand-based use the LCD on installing the Wall Mount, see the instruction in Figure (1). - Adjust the stand as described in the picture (2). Installing VESA compliant mounting devices Button Mounting pad (Sold separately...
... detailed information on its stand. (2) Angle adjustment when converting from Stand to Wall mount (1 3, 3 1) (3) Angle adjustment when LCD TV is not responsible for installing the wall bracket. When installing the TV on the back of the stand. 1. You will hear a "Click" sound when changing the angle from stand-based use the LCD on installing the Wall Mount, see the instruction in Figure (1). - Adjust the stand as described in the picture (2). Installing VESA compliant mounting devices Button Mounting pad (Sold separately...

Quick Guide (easy Manual) (ver.1.0) (English)
Page 27
...Solution Poor picture Try another channel. Try another channel. / Adjust the antenna. / Check all wire connections. Check all wire connections. Remote control malfunctions Replace the remote control batteries. "Check signal cable." The image is a Class B digital apparatus. These pixels will have a problem, first try operating it again. Specifications Model Name Screen Size (Diagonal) Power Supply Power Consumption PC Resolution Sound Output Dimension (WxDxH) Body With stand Weight Without stand With stand Environmental Considerations Operating Temperature Operating Humidity...
...Solution Poor picture Try another channel. Try another channel. / Adjust the antenna. / Check all wire connections. Check all wire connections. Remote control malfunctions Replace the remote control batteries. "Check signal cable." The image is a Class B digital apparatus. These pixels will have a problem, first try operating it again. Specifications Model Name Screen Size (Diagonal) Power Supply Power Consumption PC Resolution Sound Output Dimension (WxDxH) Body With stand Weight Without stand With stand Environmental Considerations Operating Temperature Operating Humidity...


