

Quick Guide (easy Manual) (ver.1.0) (English)
Page 4
...the Lower-Right Part of the Panel 2 Rear Panel Jacks 3 Remote Control 4 Installing Batteries in the Remote Control 6 If the remote control doesn't work 6 Chapter 2: Connections Connecting VHF and UHF Antennas 7 Antennas with 300-ohm Flat Twin Leads 7 Antennas with 75-ohm Round Leads 8 Separate VHF ... 9 Connecting a VCR 11 Connecting an S-VHS VCR 13 Connecting a DVD/Set-top box via DVI 14 Connecting a DVD/Set-top box via HDMI 14 Connecting a DVD Player 15 Connecting a Digital Audio System 15 Connecting an Amplifier/DVD Home Theater 16 Connecting a PC 16 Connecting Cable CARD 17...
...the Lower-Right Part of the Panel 2 Rear Panel Jacks 3 Remote Control 4 Installing Batteries in the Remote Control 6 If the remote control doesn't work 6 Chapter 2: Connections Connecting VHF and UHF Antennas 7 Antennas with 300-ohm Flat Twin Leads 7 Antennas with 75-ohm Round Leads 8 Separate VHF ... 9 Connecting a VCR 11 Connecting an S-VHS VCR 13 Connecting a DVD/Set-top box via DVI 14 Connecting a DVD/Set-top box via HDMI 14 Connecting a DVD Player 15 Connecting a Digital Audio System 15 Connecting an Amplifier/DVD Home Theater 16 Connecting a PC 16 Connecting Cable CARD 17...
Quick Guide (easy Manual) (ver.1.0) (English)
Page 8
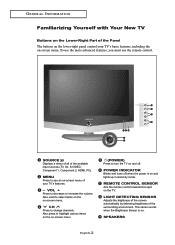
...your TV's basic features, including the on-screen menu. LIGHT DETECTING SENSOR Adjusts the brightness of the screen automatically by mode. This sensor works when the Brightness Sensor is on and lights up in stand-by detecting brightness of the available input sources (TV, AV, S-VIDEO, Component ...1, Component 2, HDMI, PC). VOL + Press to change channels. CH Press to decrease or increase the volume. SPEAKERS English-2 To use the more advanced features, you...
...your TV's basic features, including the on-screen menu. LIGHT DETECTING SENSOR Adjusts the brightness of the screen automatically by mode. This sensor works when the Brightness Sensor is on and lights up in stand-by detecting brightness of the available input sources (TV, AV, S-VIDEO, Component ...1, Component 2, HDMI, PC). VOL + Press to change channels. CH Press to decrease or increase the volume. SPEAKERS English-2 To use the more advanced features, you...

Quick Guide (easy Manual) (ver.1.0) (English)
Page 90
...Similar to select submenu (CC1~CC4 or Text1~Text4) you want, the press the ENTER button. Note • The Caption feature doesn't work in the program. CC1 : The Primary Synchronous Caption Service. Alternate program-related caption data, typically second language captions. These are captions in ... "CC1". Press the EXIT button to exit. • The default is intended to augment information carried in COMPONENT(480p, 720p, 1080i), HDMI modes. • The availability of captions depends on the program being broadcast. English-84 FUNCTION DESCRIPTION 4 Press the UP/DOWN buttons to a...
...Similar to select submenu (CC1~CC4 or Text1~Text4) you want, the press the ENTER button. Note • The Caption feature doesn't work in the program. CC1 : The Primary Synchronous Caption Service. Alternate program-related caption data, typically second language captions. These are captions in ... "CC1". Press the EXIT button to exit. • The default is intended to augment information carried in COMPONENT(480p, 720p, 1080i), HDMI modes. • The availability of captions depends on the program being broadcast. English-84 FUNCTION DESCRIPTION 4 Press the UP/DOWN buttons to a...


