
User Manual (ENGLISH)
Page 4
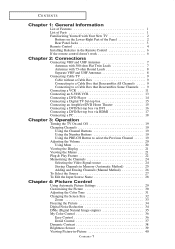
...an Amplifier/DVD Home Theater 15 Connecting a DVD/Set-top box via DVI 16 Connecting a DVD/Set-top box via HDMI 17 Connecting a PC 18 Chapter 3: Operation Turning the TV On and Off 19 Changing Channels 19 Using the Channel Buttons 19 Using the Number Buttons 19 Using the PRE-CH...Source Name 28 Chapter 4: Picture Control Using Automatic Picture Settings 29 Customizing the Picture 30 Adjusting the Color Tone 31 Changing the Screen Size 32 Zoom 33 Freezing the Picture 34 Digital Noise Reduction 34 DNIe (Digital Natural Image engine 35 My Color Control 36 Easy Control 36 Detail ...
...an Amplifier/DVD Home Theater 15 Connecting a DVD/Set-top box via DVI 16 Connecting a DVD/Set-top box via HDMI 17 Connecting a PC 18 Chapter 3: Operation Turning the TV On and Off 19 Changing Channels 19 Using the Channel Buttons 19 Using the Number Buttons 19 Using the PRE-CH...Source Name 28 Chapter 4: Picture Control Using Automatic Picture Settings 29 Customizing the Picture 30 Adjusting the Color Tone 31 Changing the Screen Size 32 Zoom 33 Freezing the Picture 34 Digital Noise Reduction 34 DNIe (Digital Natural Image engine 35 My Color Control 36 Easy Control 36 Detail ...
User Manual (ENGLISH)
Page 6
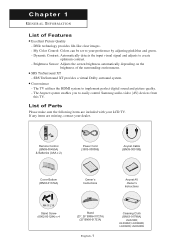
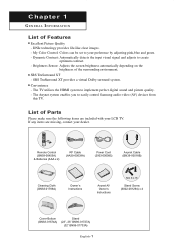
...TV utilizes the HDMI system to easily control Samsung audio-video (AV) devices from this TV. Remote Control (BN59-00455A) & Batteries (AAA x 2) Power Cord (3903-000085) Anynet Cable (BN39-00518B) Cover-Bottom (BN63-01674A) Owner's Instructions Anynet AV Owner's Instructions M4 X L16 Stand Screw (6002-001294) x 4 Stand (23", 26" BN96-01727A) (32..." BN96-01733A) English-1 Cleaning Cloth (BN63-01798A) LN-R238W, LN-R268W, LN-R2668W, LN-R328W, LN-R3228W If any items are included with your LCD TV. Convenience - The Anynet system enables you to ...
...TV utilizes the HDMI system to easily control Samsung audio-video (AV) devices from this TV. Remote Control (BN59-00455A) & Batteries (AAA x 2) Power Cord (3903-000085) Anynet Cable (BN39-00518B) Cover-Bottom (BN63-01674A) Owner's Instructions Anynet AV Owner's Instructions M4 X L16 Stand Screw (6002-001294) x 4 Stand (23", 26" BN96-01727A) (32..." BN96-01733A) English-1 Cleaning Cloth (BN63-01798A) LN-R238W, LN-R268W, LN-R2668W, LN-R328W, LN-R3228W If any items are included with your LCD TV. Convenience - The Anynet system enables you to ...
User Manual (ENGLISH)
Page 7
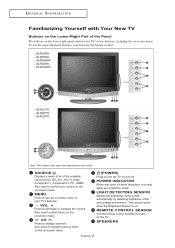
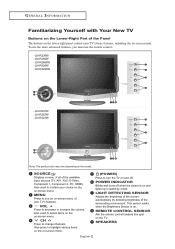
.... - This sensor works when the Brightness Sensor is on and lights up in stand-by detecting brightness of the available input sources (TV, AV1, AV2, S-Video, Component 1, Component 2, PC, HDMI). LN-R238W - LN-R328W - Also used to decrease or increase the volume. VOL + Press to select items on the on-screen menu. To use the...
.... - This sensor works when the Brightness Sensor is on and lights up in stand-by detecting brightness of the available input sources (TV, AV1, AV2, S-Video, Component 1, Component 2, PC, HDMI). LN-R238W - LN-R328W - Also used to decrease or increase the volume. VOL + Press to select items on the on-screen menu. To use the...
User Manual (ENGLISH)
Page 8
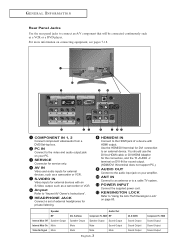
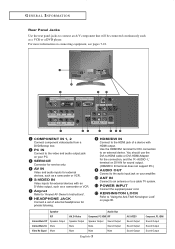
... set of a device with an S-Video output, such as a camcorder or VCR. HDMI/DVI IN Connect to connect an A/V component that will be connected continuously such as a ... panel jacks to the HDMI jack of external headphones for external devices, such as a camcorder or VCR. PC IN Connect to -HDMI cable or DVI-HDMI Adapter for the connection,... and the 'R -AUDIO -L' terminal on DVI-IN for external devices with HDMI...PC, HDMI RF Speaker Output Sound Output Mute..., PC, HDMI Sound Output ...inputs for sound output. (HDMI/DVI IN terminal does not ...
... set of a device with an S-Video output, such as a camcorder or VCR. HDMI/DVI IN Connect to connect an A/V component that will be connected continuously such as a ... panel jacks to the HDMI jack of external headphones for external devices, such as a camcorder or VCR. PC IN Connect to -HDMI cable or DVI-HDMI Adapter for the connection,... and the 'R -AUDIO -L' terminal on DVI-IN for external devices with HDMI...PC, HDMI RF Speaker Output Sound Output Mute..., PC, HDMI Sound Output ...inputs for sound output. (HDMI/DVI IN terminal does not ...

User Manual (ENGLISH)
Page 21
DVD Player Rear Panel TV Rear Panel DVI-to-HDMI Cable (Option) 2 Connect an audio cable between the HDMI/DVI connector on the TV and the DVI connector on the DVD player/Set-top box. DVD Player Rear Panel TV Rear Panel Audio Cable (Option) DVI-to-HDMI Cable (Option) English-16 CONNECTIONS Connecting a DVD/Set-top box via DVI This can be applied only if there is the DVI Output connector on the external device. 1 Connect a DVI-to-HDMI cable or DVI-HDMI adapter between the DVI IN [R-AUDIO-L] jack on the TV and the AUDIO OUT jacks on the DVD player/Set-top box.
DVD Player Rear Panel TV Rear Panel DVI-to-HDMI Cable (Option) 2 Connect an audio cable between the HDMI/DVI connector on the TV and the DVI connector on the DVD player/Set-top box. DVD Player Rear Panel TV Rear Panel Audio Cable (Option) DVI-to-HDMI Cable (Option) English-16 CONNECTIONS Connecting a DVD/Set-top box via DVI This can be applied only if there is the DVI Output connector on the external device. 1 Connect a DVI-to-HDMI cable or DVI-HDMI adapter between the DVI IN [R-AUDIO-L] jack on the TV and the AUDIO OUT jacks on the DVD player/Set-top box.

User Manual (ENGLISH)
Page 22
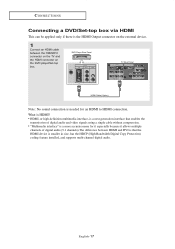
... can be applied only if there is a more accurate name for an HDMI to HDMI connection. English-17 DVD Player Rear Panel TV Rear Panel HDMI Cable (Option) Note: No sound connection is needed for it especially because it allows multiple channels of digital audio and ...interface that enables the transmission of digital audio (5.1 channels).The difference between the HDMI/DVI connector on the TV and the HDMI connector on the external device. 1 Connect an HDMI cable between HDMI and DVI is that the HDMI device is smaller in size, has the HDCP (High Bandwidth Digital Copy Protection)...
... can be applied only if there is a more accurate name for an HDMI to HDMI connection. English-17 DVD Player Rear Panel TV Rear Panel HDMI Cable (Option) Note: No sound connection is needed for it especially because it allows multiple channels of digital audio and ...interface that enables the transmission of digital audio (5.1 channels).The difference between the HDMI/DVI connector on the TV and the HDMI connector on the external device. 1 Connect an HDMI cable between HDMI and DVI is that the HDMI device is smaller in size, has the HDCP (High Bandwidth Digital Copy Protection)...
User Manual (ENGLISH)
Page 33
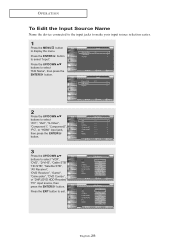
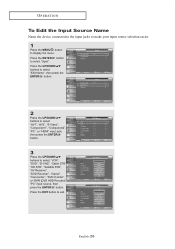
.../DOWN buttons to select "Edit Name", then press the ENTER button. 2 Press the UP/DOWN buttons to select "AV1", "AV2", "S-Video", "Component1", "Component2", "PC", or "HDMI" input jack, then press the ENTER button. 3 Press the UP/DOWN buttons to select "Input".
.../DOWN buttons to select "Edit Name", then press the ENTER button. 2 Press the UP/DOWN buttons to select "AV1", "AV2", "S-Video", "Component1", "Component2", "PC", or "HDMI" input jack, then press the ENTER button. 3 Press the UP/DOWN buttons to select "Input".
User Manual (ENGLISH)
Page 46
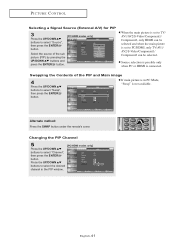
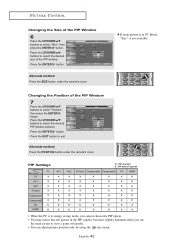
... ENTER button. If main picture is in the PIP window. Changing the PIP Channel 5 [PC/HDMI modes only] Press the UP/DOWN buttons to select "Source", then press the ENTER button. [PC/HDMI modes only] Select the source of the PIP and Main image 4 Press the UP/DOWN buttons ..." is connected. Source selection is possible only when PC or HDMI is not available. English-41 When the main picture is set to TV/ AV1/AV2/S-Video/Component1/ Component2, only HDMI can be selected and when the main picture is set to PC/HDMI, only TV/AV1/ AV2/S-Video/Component1/ Component2 can be selected.
... ENTER button. If main picture is in the PIP window. Changing the PIP Channel 5 [PC/HDMI modes only] Press the UP/DOWN buttons to select "Source", then press the ENTER button. [PC/HDMI modes only] Select the source of the PIP and Main image 4 Press the UP/DOWN buttons ..." is connected. Source selection is possible only when PC or HDMI is not available. English-41 When the main picture is set to TV/ AV1/AV2/S-Video/Component1/ Component2, only HDMI can be selected and when the main picture is set to PC/HDMI, only TV/AV1/ AV2/S-Video/Component1/ Component2 can be selected.
User Manual (ENGLISH)
Page 47
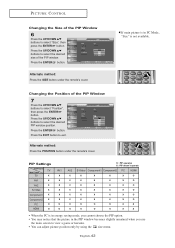
... the UP/DOWN buttons to view a game or karaoke. • You can adjust picture position only by using the size menu. PIP Settings Sub Picture TV Main Picture TV X AV1 X AV2 X S-Video X Component1 X Component2 X PC O HDMI O AV1 X X X X X X O O AV2 X X X X X X O O O : PIP operates X : PIP doesn't operate S-Video Component1 Component2 PC...
... the UP/DOWN buttons to view a game or karaoke. • You can adjust picture position only by using the size menu. PIP Settings Sub Picture TV Main Picture TV X AV1 X AV2 X S-Video X Component1 X Component2 X PC O HDMI O AV1 X X X X X X O O AV2 X X X X X X O O O : PIP operates X : PIP doesn't operate S-Video Component1 Component2 PC...
User Manual (ENGLISH)
Page 4
...an Amplifier/DVD Home Theater 15 Connecting a DVD/Set-top box via DVI 16 Connecting a DVD/Set-top box via HDMI 17 Connecting a PC 18 Chapter 3: Operation Turning the TV On and Off 19 Changing Channels 19 Using the Channel Buttons 19 Using the Number Buttons 19 Using the PRE-CH...Source Name 28 Chapter 4: Picture Control Using Automatic Picture Settings 29 Customizing the Picture 30 Adjusting the Color Tone 31 Changing the Screen Size 32 Zoom 33 Freezing the Picture 34 Digital Noise Reduction 34 DNIe (Digital Natural Image engine 35 My Color Control 36 Easy Control 36 Detail ...
...an Amplifier/DVD Home Theater 15 Connecting a DVD/Set-top box via DVI 16 Connecting a DVD/Set-top box via HDMI 17 Connecting a PC 18 Chapter 3: Operation Turning the TV On and Off 19 Changing Channels 19 Using the Channel Buttons 19 Using the Number Buttons 19 Using the PRE-CH...Source Name 28 Chapter 4: Picture Control Using Automatic Picture Settings 29 Customizing the Picture 30 Adjusting the Color Tone 31 Changing the Screen Size 32 Zoom 33 Freezing the Picture 34 Digital Noise Reduction 34 DNIe (Digital Natural Image engine 35 My Color Control 36 Easy Control 36 Detail ...
User Manual (ENGLISH)
Page 6
... The TV utilizes the HDMI system to create optimum contrast. - My Color Control: Colors can be set to easily control Samsung audio-video (AV) devices from this TV. The...Screw (6002-001294) x 4 Cover-Bottom (BN63-01674A) Stand (23", 26" BN96-01727A) (32" BN96-01733A) English-1 Brightness Sensor: Adjusts the screen brightness automatically depending on the brightness of Features... Excellent Picture Quality - List of Parts Please make sure the following items are missing, contact your LCD TV. Chapter 1 G E N E R A L I N F O R M AT I O N List of the...
... The TV utilizes the HDMI system to create optimum contrast. - My Color Control: Colors can be set to easily control Samsung audio-video (AV) devices from this TV. The...Screw (6002-001294) x 4 Cover-Bottom (BN63-01674A) Stand (23", 26" BN96-01727A) (32" BN96-01733A) English-1 Brightness Sensor: Adjusts the screen brightness automatically depending on the brightness of Features... Excellent Picture Quality - List of Parts Please make sure the following items are missing, contact your LCD TV. Chapter 1 G E N E R A L I N F O R M AT I O N List of the...
User Manual (ENGLISH)
Page 7
... surrounding environment. This sensor works when the Brightness Sensor is on . LN-R328W - LN-R267W - SPEAKERS English-2 LN-R238W - VOL + Press to select items on the on-screen menu. LIGHT DETECTING SENSOR Adjusts the brightness of the available input sources (TV, AV1, AV2, S-Video, Component 1, Component 2, PC, HDMI). Also used to decrease or increase the volume...
... surrounding environment. This sensor works when the Brightness Sensor is on . LN-R328W - LN-R267W - SPEAKERS English-2 LN-R238W - VOL + Press to select items on the on-screen menu. LIGHT DETECTING SENSOR Adjusts the brightness of the available input sources (TV, AV1, AV2, S-Video, Component 1, Component 2, PC, HDMI). Also used to decrease or increase the volume...
User Manual (ENGLISH)
Page 8
... video and audio output jack on your PC. PC IN Connect to the HDMI jack of external headphones for service only. COMPONENT IN 1, 2 Connect component video/audio from a DVD/Set-top box. Anynet Refer to a cable TV system. HEADPHONE JACK Connect a set of a device with an S-Video output..., such as a camcorder or VCR. Use the HDMI/DVI terminal for sound output. (HDMI/DVI IN terminal does not support PC.) AUDIO OUT Connect to an external...
... video and audio output jack on your PC. PC IN Connect to the HDMI jack of external headphones for service only. COMPONENT IN 1, 2 Connect component video/audio from a DVD/Set-top box. Anynet Refer to a cable TV system. HEADPHONE JACK Connect a set of a device with an S-Video output..., such as a camcorder or VCR. Use the HDMI/DVI terminal for sound output. (HDMI/DVI IN terminal does not support PC.) AUDIO OUT Connect to an external...

User Manual (ENGLISH)
Page 21
CONNECTIONS Connecting a DVD/Set-top box via DVI This can be applied only if there is the DVI Output connector on the external device. 1 Connect a DVI-to -HDMI Cable (Option) 2 Connect an audio cable between the HDMI/DVI connector on the TV and the DVI connector on the DVD player/Set-top box. DVD Player Rear Panel TV Rear Panel DVI-to -HDMI cable or DVI-HDMI adapter between the DVI IN [R-AUDIO-L] jack on the TV and the AUDIO OUT jacks on the DVD player/Set-top box. DVD Player Rear Panel TV Rear Panel Audio Cable (Option) DVI-to-HDMI Cable (Option) English-16
CONNECTIONS Connecting a DVD/Set-top box via DVI This can be applied only if there is the DVI Output connector on the external device. 1 Connect a DVI-to -HDMI Cable (Option) 2 Connect an audio cable between the HDMI/DVI connector on the TV and the DVI connector on the DVD player/Set-top box. DVD Player Rear Panel TV Rear Panel DVI-to -HDMI cable or DVI-HDMI adapter between the DVI IN [R-AUDIO-L] jack on the TV and the AUDIO OUT jacks on the DVD player/Set-top box. DVD Player Rear Panel TV Rear Panel Audio Cable (Option) DVI-to-HDMI Cable (Option) English-16
User Manual (ENGLISH)
Page 22
...has the HDCP (High Bandwidth Digital Copy Protection) coding feature installed, and supports multi-channel digital audio. DVD Player Rear Panel TV Rear Panel HDMI Cable (Option) Note: No sound connection is needed for it especially because it allows multiple channels of digital audio (5.1 channels).The... difference between HDMI and DVI is that the HDMI device is the HDMI Output connector on the external device. 1 Connect an HDMI cable between the HDMI/DVI connector on the TV and the HDMI connector on the DVD player/Set-top box.
...has the HDCP (High Bandwidth Digital Copy Protection) coding feature installed, and supports multi-channel digital audio. DVD Player Rear Panel TV Rear Panel HDMI Cable (Option) Note: No sound connection is needed for it especially because it allows multiple channels of digital audio (5.1 channels).The... difference between HDMI and DVI is that the HDMI device is the HDMI Output connector on the external device. 1 Connect an HDMI cable between the HDMI/DVI connector on the TV and the HDMI connector on the DVD player/Set-top box.
User Manual (ENGLISH)
Page 33
.../DOWN buttons to select "Edit Name", then press the ENTER button. 2 Press the UP/DOWN buttons to select "AV1", "AV2", "S-Video", "Component1", "Component2", "PC", or "HDMI" input jack, then press the ENTER button. 3 Press the UP/DOWN buttons to display the menu.
.../DOWN buttons to select "Edit Name", then press the ENTER button. 2 Press the UP/DOWN buttons to select "AV1", "AV2", "S-Video", "Component1", "Component2", "PC", or "HDMI" input jack, then press the ENTER button. 3 Press the UP/DOWN buttons to display the menu.

User Manual (ENGLISH)
Page 46
...button. English-41 Source selection is possible only when PC or HDMI is set to PC/HDMI, only TV/AV1/ AV2/S-Video/Component1/ Component2 can be selected. When the main picture is set to TV/ AV1/AV2/S-Video/Component1/ Component2, only HDMI can be selected and when the main picture is connected. ...Alternate method: Press the SWAP button under the remote's cover. Press the UP/DOWN buttons to select "Source", then press the ENTER button. [PC/HDMI modes only] Select the source of the PIP and Main image 4 Press the UP/DOWN buttons to select "Channel", then press the ENTER button....
...button. English-41 Source selection is possible only when PC or HDMI is set to PC/HDMI, only TV/AV1/ AV2/S-Video/Component1/ Component2 can be selected. When the main picture is set to TV/ AV1/AV2/S-Video/Component1/ Component2, only HDMI can be selected and when the main picture is connected. ...Alternate method: Press the SWAP button under the remote's cover. Press the UP/DOWN buttons to select "Source", then press the ENTER button. [PC/HDMI modes only] Select the source of the PIP and Main image 4 Press the UP/DOWN buttons to select "Channel", then press the ENTER button....
User Manual (ENGLISH)
Page 47
... the remote's cover. English-42 Press the UP/DOWN buttons to exit. PIP Settings Sub Picture TV Main Picture TV X AV1 X AV2 X S-Video X Component1 X Component2 X PC O HDMI O AV1 X X X X X X O O AV2 X X X X X X O O O : PIP operates X : PIP doesn't operate S-Video Component1 Component2 PC HDMI X X X X O X X X X O X X X X O X X X X O X X X X O X X X X O O O O X X O O O X X • When the PC is not available. Changing the Position of the PIP window. PICTURE...
... the remote's cover. English-42 Press the UP/DOWN buttons to exit. PIP Settings Sub Picture TV Main Picture TV X AV1 X AV2 X S-Video X Component1 X Component2 X PC O HDMI O AV1 X X X X X X O O AV2 X X X X X X O O O : PIP operates X : PIP doesn't operate S-Video Component1 Component2 PC HDMI X X X X O X X X X O X X X X O X X X X O X X X X O X X X X O O O O X X O O O X X • When the PC is not available. Changing the Position of the PIP window. PICTURE...


