
User Manual (ENGLISH)
Page 4
... Connecting VHF and UHF Antennas 7 Antennas with 300-ohm Flat Twin Leads 7 Antennas with 75-ohm Round Leads 8 Separate VHF and UHF Antennas 8 Connecting Cable TV 9 Cable without a Cable Box 9 Connecting to a Cable Box that Descrambles All Channels . . . . . 9 Connecting to a Cable Box that Descrambles Some ... 27 To Edit the Input Source Name 28 Chapter 4: Picture Control Using Automatic Picture Settings 29 Customizing the Picture 30 Adjusting the Color Tone 31 Changing the Screen Size 32 Zoom 33 Freezing the Picture 34 Digital Noise Reduction 34 DNIe (Digital Natural Image engine...
... Connecting VHF and UHF Antennas 7 Antennas with 300-ohm Flat Twin Leads 7 Antennas with 75-ohm Round Leads 8 Separate VHF and UHF Antennas 8 Connecting Cable TV 9 Cable without a Cable Box 9 Connecting to a Cable Box that Descrambles All Channels . . . . . 9 Connecting to a Cable Box that Descrambles Some ... 27 To Edit the Input Source Name 28 Chapter 4: Picture Control Using Automatic Picture Settings 29 Customizing the Picture 30 Adjusting the Color Tone 31 Changing the Screen Size 32 Zoom 33 Freezing the Picture 34 Digital Noise Reduction 34 DNIe (Digital Natural Image engine...
User Manual (ENGLISH)
Page 5
CONTENTS Activating Picture-in-Picture 40 Selecting a Signal Source (External A/V) for PIP 41 Swapping the Contents...Main or Sub (PIP) Sound 49 Chapter 6: Channel Control Fine Tuning Channels 50 Chapter 7: PC Display Using Your TV as a Computer (PC) Display 51 Setting Up Your PC Software (Based on Windows XP 51 How to Auto... 77 Installing the Wall Mount Kit (LN-R238W / LN-R237W / LN-R268W / LN-R2668W / LN-R267W) . . . 78 Installing the Wall Mount Kit (LN-R328W / LN-R3228W / LN-R327W 79 Using the Anti-Theft Kensington Lock 80 Using Your TV in Another Country 80 Specifications 81 Display...
CONTENTS Activating Picture-in-Picture 40 Selecting a Signal Source (External A/V) for PIP 41 Swapping the Contents...Main or Sub (PIP) Sound 49 Chapter 6: Channel Control Fine Tuning Channels 50 Chapter 7: PC Display Using Your TV as a Computer (PC) Display 51 Setting Up Your PC Software (Based on Windows XP 51 How to Auto... 77 Installing the Wall Mount Kit (LN-R238W / LN-R237W / LN-R268W / LN-R2668W / LN-R267W) . . . 78 Installing the Wall Mount Kit (LN-R328W / LN-R3228W / LN-R327W 79 Using the Anti-Theft Kensington Lock 80 Using Your TV in Another Country 80 Specifications 81 Display...
User Manual (ENGLISH)
Page 6
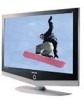
...(32" BN96-01733A) English-1 Cleaning Cloth (BN63-01798A) LN-R238W, LN-R268W, LN-R2668W, LN-R328W, LN-R3228W... SRS TruSurround XT provides a virtual Dolby surround system. Convenience - List of Parts Please make sure the following items are missing, contact your dealer. Dynamic Contrast: Automatically detects the input visual signal and adjusts to easily control Samsung audio-video (AV) devices from this TV...implement perfect digital sound and picture quality. - The TV utilizes the HDMI system to your LCD TV. If any items are included with your...
...(32" BN96-01733A) English-1 Cleaning Cloth (BN63-01798A) LN-R238W, LN-R268W, LN-R2668W, LN-R328W, LN-R3228W... SRS TruSurround XT provides a virtual Dolby surround system. Convenience - List of Parts Please make sure the following items are missing, contact your dealer. Dynamic Contrast: Automatically detects the input visual signal and adjusts to easily control Samsung audio-video (AV) devices from this TV...implement perfect digital sound and picture quality. - The TV utilizes the HDMI system to your LCD TV. If any items are included with your...

User Manual (ENGLISH)
Page 9
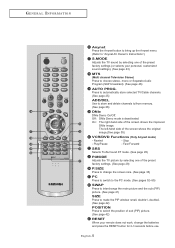
...Displays the main on-screen menu. (See page 21) CAPTION Controls the caption decoder. (See page 71) PIP Picture-in-Picture ON/OFF. (See page 40) SLEEP Press to select a time for the TV to turn off . (See page 19) STILL Press to stop the action during a particular scene. English-4 When... using the remote, always point it directly at the TV. G E N E R A L I N F O R M AT I O N Remote Control You can use the remote control up...
...Displays the main on-screen menu. (See page 21) CAPTION Controls the caption decoder. (See page 71) PIP Picture-in-Picture ON/OFF. (See page 40) SLEEP Press to select a time for the TV to turn off . (See page 19) STILL Press to stop the action during a particular scene. English-4 When... using the remote, always point it directly at the TV. G E N E R A L I N F O R M AT I O N Remote Control You can use the remote control up...
User Manual (ENGLISH)
Page 10
.... The left-hand side of the screen shows the improved DNIe image. Fast Forward SRS Selects TruSurround XT mode. (See page 45) P.MODE Adjusts the TV picture by selecting one of the preset factory settings. (See page 29) P.SIZE Press to change the batteries and press the RESET button for 2-3 seconds before... screen size. (See page 33) PC Press to switch to the PC mode. (See pages 52~55) SWAP Press to interchange the main picture and the sub (PIP) picture. (See page 41) SIZE Press to make the PIP window small, double1, double2. (See page 42) POSITION Press to select the position of...
.... The left-hand side of the screen shows the improved DNIe image. Fast Forward SRS Selects TruSurround XT mode. (See page 45) P.MODE Adjusts the TV picture by selecting one of the preset factory settings. (See page 29) P.SIZE Press to change the batteries and press the RESET button for 2-3 seconds before... screen size. (See page 33) PC Press to switch to the PC mode. (See pages 52~55) SWAP Press to interchange the main picture and the sub (PIP) picture. (See page 41) SIZE Press to make the PIP window small, double1, double2. (See page 42) POSITION Press to select the position of...

User Manual (ENGLISH)
Page 18
... RF Cable (Option) 3 Connect an S-Video cable between the AUDIO OUT jacks on the VCR and the AV IN [R-AUDIO-L] jacks on the TV. VCR Rear Panel TV Rear Panel RF Cable (Option) 2 Connect an audio cable between the S-VIDEO OUT jack on the VCR and the S-VIDEO IN jack on the... TV. CONNECTIONS Connecting an S-VHS VCR Your Samsung TV can be connected to an S-Video signal from an S-VHS VCR. (This connection delivers a better picture as compared to a standard VHS VCR.) 1 To begin, follow steps 1-3 in the previous ...
... RF Cable (Option) 3 Connect an S-Video cable between the AUDIO OUT jacks on the VCR and the AV IN [R-AUDIO-L] jacks on the TV. VCR Rear Panel TV Rear Panel RF Cable (Option) 2 Connect an audio cable between the S-VIDEO OUT jack on the VCR and the S-VIDEO IN jack on the... TV. CONNECTIONS Connecting an S-VHS VCR Your Samsung TV can be connected to an S-Video signal from an S-VHS VCR. (This connection delivers a better picture as compared to a standard VHS VCR.) 1 To begin, follow steps 1-3 in the previous ...
User Manual (ENGLISH)
Page 26
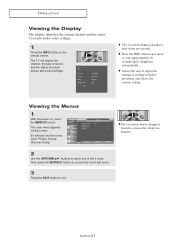
... automatically. Viewing the Menus 1 With the power on the screen. The main menu appears on , press the MENU button. English-21 The TV will display the channel, the type of sound, and the status of the 5 icons. Allows the user to adjust the settings according to exit... the EXIT button to his/her preference and shows the current settings. It's left side has five icons: Input, Picture, Sound, Channel, Setup. 2 Use the UP/DOWN buttons to select one of certain picture and sound settings. The on-screen menus disappear from the screen after about two minutes. O P E R AT I...
... automatically. Viewing the Menus 1 With the power on the screen. The main menu appears on , press the MENU button. English-21 The TV will display the channel, the type of sound, and the status of the 5 icons. Allows the user to adjust the settings according to exit... the EXIT button to his/her preference and shows the current settings. It's left side has five icons: Input, Picture, Sound, Channel, Setup. 2 Use the UP/DOWN buttons to select one of certain picture and sound settings. The on-screen menus disappear from the screen after about two minutes. O P E R AT I...

User Manual (ENGLISH)
Page 34
... you want to adjust the settings according to display the menu. Press the EXIT button to increase the clarity and sharpness of the picture. • Choose Standard for the standard factory settings. • Choose Movie when watching movies. • Choose Custom if you ...Simply press the P.MODE button on the remote control to select one of the standard picture settings. • Choose Dynamic to exit. English-29 Chapter 4 PICTURE CONTROL Using Automatic Picture Settings Your TV has four automatic picture settings ("Dynamic", "Standard", "Movie", and "Custom") that are preset at the factory...
... you want to adjust the settings according to display the menu. Press the EXIT button to increase the clarity and sharpness of the picture. • Choose Standard for the standard factory settings. • Choose Movie when watching movies. • Choose Custom if you ...Simply press the P.MODE button on the remote control to select one of the standard picture settings. • Choose Dynamic to exit. English-29 Chapter 4 PICTURE CONTROL Using Automatic Picture Settings Your TV has four automatic picture settings ("Dynamic", "Standard", "Movie", and "Custom") that are preset at the factory...
User Manual (ENGLISH)
Page 35
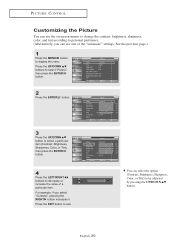
PICTURE CONTROL Customizing the Picture You can use the on-screen menus to change the contrast, brightness, sharpness, color, and tint according to personal preference. (Alternatively, you select "Contrast", pressing .... Press the EXIT button to display the menu. See the previous page.) 1 Press the MENU button to exit. Press the UP/DOWN buttons to select "Picture", then press the ENTER button. 2 Press the ENTER button. 3 Press the UP/DOWN button to select a particular item (Contrast, Brightness, Sharpness, Color, or Tint), then...
PICTURE CONTROL Customizing the Picture You can use the on-screen menus to change the contrast, brightness, sharpness, color, and tint according to personal preference. (Alternatively, you select "Contrast", pressing .... Press the EXIT button to display the menu. See the previous page.) 1 Press the MENU button to exit. Press the UP/DOWN buttons to select "Picture", then press the ENTER button. 2 Press the ENTER button. 3 Press the UP/DOWN button to select a particular item (Contrast, Brightness, Sharpness, Color, or Tint), then...
User Manual (ENGLISH)
Page 36
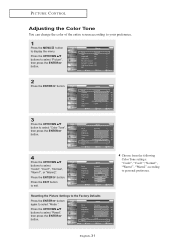
... Press the EXIT button to select "Cool2", "Cool1", "Normal", "Warm1", or "Warm2". Press the UP/DOWN buttons to display the menu. PICTURE CONTROL Adjusting the Color Tone You can change the color of the entire screen according to your preference. 1 Press the MENU button to select "Reset...", then press the ENTER button. Resetting the Picture Settings to the Factory Defaults Press the ENTER button again to personal preference. Press the ENTER button. English-31 Choose from the following Color...
... Press the EXIT button to select "Cool2", "Cool1", "Normal", "Warm1", or "Warm2". Press the UP/DOWN buttons to display the menu. PICTURE CONTROL Adjusting the Color Tone You can change the color of the entire screen according to your preference. 1 Press the MENU button to select "Reset...", then press the ENTER button. Resetting the Picture Settings to the Factory Defaults Press the ENTER button again to personal preference. Press the ENTER button. English-31 Choose from the following Color...
User Manual (ENGLISH)
Page 37
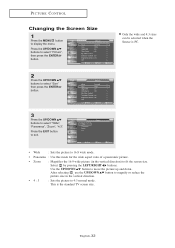
...Panorama : Use this mode for the wide aspect ratio of a panoramic picture. • Zoom : Magnifies the 16:9 wide picture (in the vertical direction. PICTURE CONTROL Changing the Screen Size 1 Press the MENU button to 4:3 normal mode. English-32 Only the wide and 4:3 sizes can be selected when the Source is ...the standard TV screen size. Press the EXIT button to exit. • Wide : Sets the picture to fit the screen size. Press the UP/DOWN buttons ...
...Panorama : Use this mode for the wide aspect ratio of a panoramic picture. • Zoom : Magnifies the 16:9 wide picture (in the vertical direction. PICTURE CONTROL Changing the Screen Size 1 Press the MENU button to 4:3 normal mode. English-32 Only the wide and 4:3 sizes can be selected when the Source is ...the standard TV screen size. Press the EXIT button to exit. • Wide : Sets the picture to fit the screen size. Press the UP/DOWN buttons ...
User Manual (ENGLISH)
Page 38
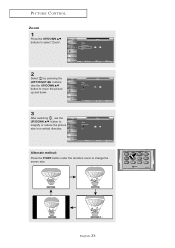
Alternate method: Press the P.SIZE button under the remote's cover to select "Zoom". 2 Select by pressing the LEFT/RIGHT buttons. English-33 PICTURE CONTROL Zoom 1 Press the UP/DOWN buttons to change the screen size. Use the UP/DOWN button to move the picture up and down. 3 After selecting , use the UP/DOWN button to magnify or reduce the picture size in a vertical direction.
Alternate method: Press the P.SIZE button under the remote's cover to select "Zoom". 2 Select by pressing the LEFT/RIGHT buttons. English-33 PICTURE CONTROL Zoom 1 Press the UP/DOWN buttons to change the screen size. Use the UP/DOWN button to move the picture up and down. 3 After selecting , use the UP/DOWN button to magnify or reduce the picture size in a vertical direction.

User Manual (ENGLISH)
Page 39
... select "Digital NR", then press the ENTER button. 3 Press the UP/DOWN buttons to freeze a moving picture. • Normal sound will still be heard. English-34 PICTURE CONTROL Freezing the Picture 1 Press the STILL button to select "Off". Press the EXIT button to display the menu. Digital Noise ...Reduction If the broadcast signal received by your TV is weak, you can activate the Digital Noise Reduction ...
... select "Digital NR", then press the ENTER button. 3 Press the UP/DOWN buttons to freeze a moving picture. • Normal sound will still be heard. English-34 PICTURE CONTROL Freezing the Picture 1 Press the STILL button to select "Off". Press the EXIT button to display the menu. Digital Noise ...Reduction If the broadcast signal received by your TV is weak, you can activate the Digital Noise Reduction ...
User Manual (ENGLISH)
Page 40
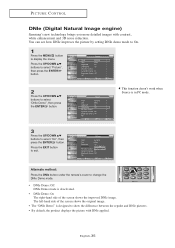
...; By default, the product displays the picture with contrast, white enhancement and 3D noise reduction. Press the EXIT button to select "DNIe Demo", then press the ENTER button. PICTURE CONTROL DNIe (Digital Natural Image engine) Samsung's new technology brings you more detailed images with DNle ...applied. English-35 Press the UP/DOWN buttons to select "Picture", then press the ENTER button. 2 Press the UP/DOWN...
...; By default, the product displays the picture with contrast, white enhancement and 3D noise reduction. Press the EXIT button to select "DNIe Demo", then press the ENTER button. PICTURE CONTROL DNIe (Digital Natural Image engine) Samsung's new technology brings you more detailed images with DNle ...applied. English-35 Press the UP/DOWN buttons to select "Picture", then press the ENTER button. 2 Press the UP/DOWN...
User Manual (ENGLISH)
Page 41
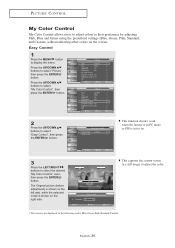
The Original picture (before adjustment) is shown on the left side, while the selected mode is set to their preference by adjusting Pink, Blue and Green using the ... "Easy Control", then press the ENTER button. Press the UP/DOWN buttons to adjust the color. * The sources are displayed in a still image to select "Picture", then press the ENTER button. This captures the current screen in the following order: Blue-Green-Pink-Standard-Custom English-36...
The Original picture (before adjustment) is shown on the left side, while the selected mode is set to their preference by adjusting Pink, Blue and Green using the ... "Easy Control", then press the ENTER button. Press the UP/DOWN buttons to adjust the color. * The sources are displayed in a still image to select "Picture", then press the ENTER button. This captures the current screen in the following order: Blue-Green-Pink-Standard-Custom English-36...
User Manual (ENGLISH)
Page 42
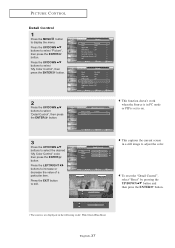
... buttons to increase or decrease the value of a particular item. This captures the current screen in the following order: Pink-Green-Blue-Reset English-37 PICTURE CONTROL Detail Control 1 Press the MENU button to adjust the color. Press the UP/DOWN buttons to select...
... buttons to increase or decrease the value of a particular item. This captures the current screen in the following order: Pink-Green-Blue-Reset English-37 PICTURE CONTROL Detail Control 1 Press the MENU button to adjust the color. Press the UP/DOWN buttons to select...
User Manual (ENGLISH)
Page 43
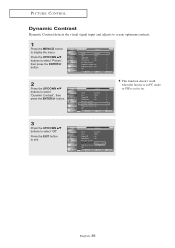
This function doesn't work when the Source is in PC mode or PIP is set to on. 3 Press the UP/DOWN buttons to select "Dynamic Contrast", then press the ENTER button. English-38 Press the UP/DOWN buttons to select "Picture", then press the ENTER button. 2 Press the UP/DOWN buttons to select "Off". Press the EXIT button to display the menu. PICTURE CONTROL Dynamic Contrast Dynamic Contrast detects the visual signal input and adjusts to create optimum contrast. 1 Press the MENU button to exit.
This function doesn't work when the Source is in PC mode or PIP is set to on. 3 Press the UP/DOWN buttons to select "Dynamic Contrast", then press the ENTER button. English-38 Press the UP/DOWN buttons to select "Picture", then press the ENTER button. 2 Press the UP/DOWN buttons to select "Off". Press the EXIT button to display the menu. PICTURE CONTROL Dynamic Contrast Dynamic Contrast detects the visual signal input and adjusts to create optimum contrast. 1 Press the MENU button to exit.
User Manual (ENGLISH)
Page 44
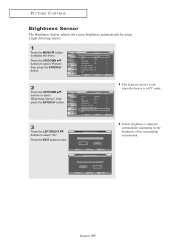
Screen brightness is in PC mode. 3 Press the LEFT/RIGHT buttons to select "Brightness Sensor", then press the ENTER button. PICTURE CONTROL Brightness Sensor The Brightness Sensor adjusts the screen brightness automatically by using a light detecting sensor. 1 Press the MENU button to exit. ...Press the EXIT button to display the menu. Press the UP/DOWN buttons to select "Picture", then press the ENTER button. 2 Press the UP/DOWN buttons to select "On". English-39 This function doesn't work when the Source is adjusted ...
Screen brightness is in PC mode. 3 Press the LEFT/RIGHT buttons to select "Brightness Sensor", then press the ENTER button. PICTURE CONTROL Brightness Sensor The Brightness Sensor adjusts the screen brightness automatically by using a light detecting sensor. 1 Press the MENU button to exit. ...Press the EXIT button to display the menu. Press the UP/DOWN buttons to select "Picture", then press the ENTER button. 2 Press the UP/DOWN buttons to select "On". English-39 This function doesn't work when the Source is adjusted ...

User Manual (ENGLISH)
Page 45
... it on the remote control repeatedly to select "On". Activating Picture-in the PIP screen. Press the UP/DOWN buttons to activate or deactivate the PIP. English-40 You can use the PIP feature to simultaneously watch one TV channel in the main screen, and a different one built-in... allow PIP to function in PIP mode and turn the TV off while watching in the same mode. Alternate method: Press the PIP button on again, the PIP window will disappear. PICTURE CONTROL Viewing Picture-in-Picture This product has one in -Picture 1 Press the MENU button to display the menu. Please...
... it on the remote control repeatedly to select "On". Activating Picture-in the PIP screen. Press the UP/DOWN buttons to activate or deactivate the PIP. English-40 You can use the PIP feature to simultaneously watch one TV channel in the main screen, and a different one built-in... allow PIP to function in PIP mode and turn the TV off while watching in the same mode. Alternate method: Press the PIP button on again, the PIP window will disappear. PICTURE CONTROL Viewing Picture-in-Picture This product has one in -Picture 1 Press the MENU button to display the menu. Please...
User Manual (ENGLISH)
Page 46
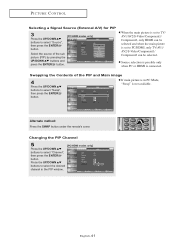
...method: Press the SWAP button under the remote's cover. English-41 Swapping the Contents of the sub picture (PIP) by pressing the UP/DOWN buttons and press the ENTER button. Press the UP/DOWN buttons to TV/ AV1/AV2/S-Video/Component1/ Component2, only HDMI can be selected and when the main... picture is connected. Source selection is possible only when PC or HDMI is set to select the desired ...
...method: Press the SWAP button under the remote's cover. English-41 Swapping the Contents of the sub picture (PIP) by pressing the UP/DOWN buttons and press the ENTER button. Press the UP/DOWN buttons to TV/ AV1/AV2/S-Video/Component1/ Component2, only HDMI can be selected and when the main... picture is connected. Source selection is possible only when PC or HDMI is set to select the desired ...


