

Open Source Guide (ENGLISH)
Page 1
...NO WARRANTY FOR THE PROGRAM, TO THE EXTENT PERMITTED BY APPLICABLE LAW. The precise terms and conditions for questions regarding open sources, contact Samsung via Email (vdswmanager@samsung. This License applies to any such program or work, and a "work which are distributed under the GPL/LGPL. ... obtain patent licenses, in the term "modification".) Each licensee is included without limitation in effect making modifications to copy the source along with a work that you distribute or publish, that you know that what is intended to guarantee your obligations under this...
...NO WARRANTY FOR THE PROGRAM, TO THE EXTENT PERMITTED BY APPLICABLE LAW. The precise terms and conditions for questions regarding open sources, contact Samsung via Email (vdswmanager@samsung. This License applies to any such program or work, and a "work which are distributed under the GPL/LGPL. ... obtain patent licenses, in the term "modification".) Each licensee is included without limitation in effect making modifications to copy the source along with a work that you distribute or publish, that you know that what is intended to guarantee your obligations under this...

Open Source Guide (ENGLISH)
Page 2
... file should have at least the "copyright" line and a pointer to where the full notice is safest to attach them to the start of each source file to most effectively convey the exclusion of the ordinary General Public License). It is found. To apply these terms (or, alternatively, under these terms...
... file should have at least the "copyright" line and a pointer to where the full notice is safest to attach them to the start of each source file to most effectively convey the exclusion of the ordinary General Public License). It is found. To apply these terms (or, alternatively, under these terms...

User Manual (ENGLISH)
Page 4
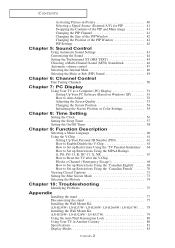
... Volume 20 Using Mute 20 Viewing the Display 21 Viewing the Menus 21 Plug & Play Feature 22 Memorizing the Channels 24 Selecting the Video Signal-source 24 Storing Channels in Memory (Automatic Method 25 Adding and Erasing Channels (Manual Method 26 To Select the... Source 27 To Edit the Input Source Name 28 Chapter 4: Picture Control Using Automatic Picture Settings 29 Customizing the Picture 30 Adjusting the Color Tone 31 Changing the Screen Size 32 Zoom ...
... Volume 20 Using Mute 20 Viewing the Display 21 Viewing the Menus 21 Plug & Play Feature 22 Memorizing the Channels 24 Selecting the Video Signal-source 24 Storing Channels in Memory (Automatic Method 25 Adding and Erasing Channels (Manual Method 26 To Select the... Source 27 To Edit the Input Source Name 28 Chapter 4: Picture Control Using Automatic Picture Settings 29 Customizing the Picture 30 Adjusting the Color Tone 31 Changing the Screen Size 32 Zoom ...
User Manual (ENGLISH)
Page 5
CONTENTS Activating Picture-in-Picture 40 Selecting a Signal Source (External A/V) for PIP 41 Swapping the Contents of the PIP and Main image 41 Changing the PIP Channel 41 Changing the Size of the PIP ... 10: Troubleshooting Identifying Problems 75 Appendix Installing the stand 77 Disconnecting the stand 77 Installing the Wall Mount Kit (LN-R238W / LN-R237W / LN-R268W / LN-R2668W / LN-R267W) . . . 78 Installing the Wall Mount Kit (LN-R328W / LN-R3228W / LN-R327W 79 Using the Anti-Theft Kensington Lock 80 Using Your TV in Another Country 80 Specifications 81 Display...
CONTENTS Activating Picture-in-Picture 40 Selecting a Signal Source (External A/V) for PIP 41 Swapping the Contents of the PIP and Main image 41 Changing the PIP Channel 41 Changing the Size of the PIP ... 10: Troubleshooting Identifying Problems 75 Appendix Installing the stand 77 Disconnecting the stand 77 Installing the Wall Mount Kit (LN-R238W / LN-R237W / LN-R268W / LN-R2668W / LN-R267W) . . . 78 Installing the Wall Mount Kit (LN-R328W / LN-R3228W / LN-R327W 79 Using the Anti-Theft Kensington Lock 80 Using Your TV in Another Country 80 Specifications 81 Display...
User Manual (ENGLISH)
Page 7
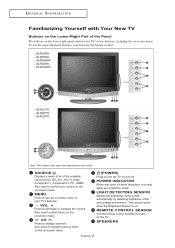
LN-R268W - LN-R328W - VOL + Press to change channels. POWER INDICATOR Blinks and turns off . This sensor works when the Brightness Sensor is on and lights up in stand-by detecting brightness of the available input sources (TV, AV1, AV2, S-Video, Component 1, Component 2, PC, HDMI). SOURCE Displays a menu of all of the surrounding environment. MENU Press...
LN-R268W - LN-R328W - VOL + Press to change channels. POWER INDICATOR Blinks and turns off . This sensor works when the Brightness Sensor is on and lights up in stand-by detecting brightness of the available input sources (TV, AV1, AV2, S-Video, Component 1, Component 2, PC, HDMI). SOURCE Displays a menu of all of the surrounding environment. MENU Press...

User Manual (ENGLISH)
Page 9
...(See page 34) NUMBER BUTTONS Press to change channels. (See page 19) VOL + and VOL Press to increase or decrease the volume. (See page 20) SOURCE Press to display all of about 23 feet from the TV. UP / DOWN / LEFT / RIGHT / ENTER Use to select on and off automatically. (See page... remote, always point it directly at the TV. G E N E R A L I N F O R M AT I O N Remote Control You can use the remote control up to a distance of the available video sources. (See page 27) INFO Use to see information on -screen menu. (See page 21) CAPTION Controls the caption decoder. (See page 71) PIP Picture-in...
...(See page 34) NUMBER BUTTONS Press to change channels. (See page 19) VOL + and VOL Press to increase or decrease the volume. (See page 20) SOURCE Press to display all of about 23 feet from the TV. UP / DOWN / LEFT / RIGHT / ENTER Use to select on and off automatically. (See page... remote, always point it directly at the TV. G E N E R A L I N F O R M AT I O N Remote Control You can use the remote control up to a distance of the available video sources. (See page 27) INFO Use to see information on -screen menu. (See page 21) CAPTION Controls the caption decoder. (See page 71) PIP Picture-in...

User Manual (ENGLISH)
Page 17
... Cable (Option) If you have a "mono" (non-stereo) VCR, use the Y-connector (not supplied) to hook up to view your VCR tape. * Each external input source device has a different back panel configuration. CONNECTIONS 4 Connect an audio cable between the VIDEO OUT jack on the VCR and the AV IN [VIDEO] jack...
... Cable (Option) If you have a "mono" (non-stereo) VCR, use the Y-connector (not supplied) to hook up to view your VCR tape. * Each external input source device has a different back panel configuration. CONNECTIONS 4 Connect an audio cable between the VIDEO OUT jack on the VCR and the AV IN [VIDEO] jack...

User Manual (ENGLISH)
Page 18
...S-Video cable between the AUDIO OUT jacks on the VCR and the AV IN [R-AUDIO-L] jacks on the TV. CONNECTIONS Connecting an S-VHS VCR Your Samsung TV can be connected to an S-Video signal from an S-VHS VCR. (This connection delivers a better picture as compared to a standard VHS VCR.)... begin, follow steps 1-3 in the previous section to connect the antenna or cable to your VCR and your local electronics store.) * Each external input source device has a different back panel configuration. VCR Rear Panel TV Rear Panel RF Cable (Option) 2 Connect an audio cable between the S-VIDEO OUT jack...
...S-Video cable between the AUDIO OUT jacks on the VCR and the AV IN [R-AUDIO-L] jacks on the TV. CONNECTIONS Connecting an S-VHS VCR Your Samsung TV can be connected to an S-Video signal from an S-VHS VCR. (This connection delivers a better picture as compared to a standard VHS VCR.)... begin, follow steps 1-3 in the previous section to connect the antenna or cable to your VCR and your local electronics store.) * Each external input source device has a different back panel configuration. VCR Rear Panel TV Rear Panel RF Cable (Option) 2 Connect an audio cable between the S-VIDEO OUT jack...

User Manual (ENGLISH)
Page 19
..., Y] jacks on the TV and the COMPONENT [Y, PB, PR] jacks on the DVD player. English-14 Be sure to Component In 1 also. * Each external input source device has a different back panel configuration. DVD Player Rear Panel TV Rear Panel Audio Cable (Option) 2 Connect a component cable between the COMPONENT IN 1 or COMPONENT...
..., Y] jacks on the TV and the COMPONENT [Y, PB, PR] jacks on the DVD player. English-14 Be sure to Component In 1 also. * Each external input source device has a different back panel configuration. DVD Player Rear Panel TV Rear Panel Audio Cable (Option) 2 Connect a component cable between the COMPONENT IN 1 or COMPONENT...

User Manual (ENGLISH)
Page 20
... Cable (Option) Component Cable (Option) TV Rear Panel Note: For an explanation of Component video, see your Set-top box owner's manual. * Each external input source device has a different back panel configuration. Set-Top Box Rear Panel TV Rear Panel Audio Cable (Option) 2 Connect a component cable between the COMPONENT IN 1 or...
... Cable (Option) Component Cable (Option) TV Rear Panel Note: For an explanation of Component video, see your Set-top box owner's manual. * Each external input source device has a different back panel configuration. Set-Top Box Rear Panel TV Rear Panel Audio Cable (Option) 2 Connect a component cable between the COMPONENT IN 1 or...
User Manual (ENGLISH)
Page 29
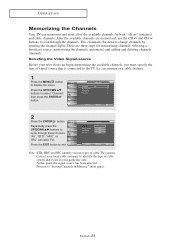
...to scan through these choices: "Air", "STD", "HRC", or "IRC" (all of the available channels for memorizing channels: selecting a broadcast source, memorizing the channels (automatic) and adding and deleting channels (manual). Repeatedly press the UP/DOWN buttons to exit. Note: STD, HRC and IRC...can memorize and store all cable TV). This eliminates the need to display the menu. Selecting the Video Signal-source Before your particular area. English-24 At this point, the signal source has been selected. O P E R AT I O N Memorizing the Channels Your TV can begin memorizing ...
...to scan through these choices: "Air", "STD", "HRC", or "IRC" (all of the available channels for memorizing channels: selecting a broadcast source, memorizing the channels (automatic) and adding and deleting channels (manual). Repeatedly press the UP/DOWN buttons to exit. Note: STD, HRC and IRC...can memorize and store all cable TV). This eliminates the need to display the menu. Selecting the Video Signal-source Before your particular area. English-24 At this point, the signal source has been selected. O P E R AT I O N Memorizing the Channels Your TV can begin memorizing ...

User Manual (ENGLISH)
Page 30
... begin memorizing all of the available channels. 4 After all of the available channels and stores them in Memory (Automatic Method) 1 First, select the correct signal source (Air, STD, HRC, or IRC). Press the EXIT button to select "Auto Program". Press the ENTER button at any time to interrupt the memorization process...
... begin memorizing all of the available channels. 4 After all of the available channels and stores them in Memory (Automatic Method) 1 First, select the correct signal source (Air, STD, HRC, or IRC). Press the EXIT button to select "Auto Program". Press the ENTER button at any time to interrupt the memorization process...
User Manual (ENGLISH)
Page 32
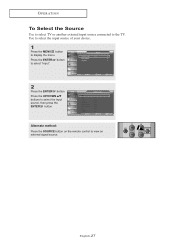
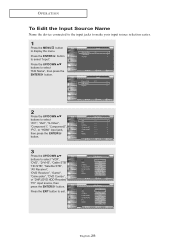
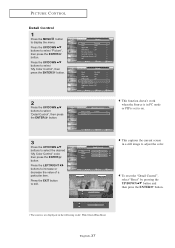
Alternate method: Press the SOURCE button on the remote control to select "Input". 2 Press the ENTER button. Press the ENTER button to view an external signal source. Press the UP/DOWN buttons to display the menu. English-27 Use to select the input source of your choice. 1 Press the MENU button to select the Input source, then press the ENTER button. O P E R AT I O N To Select the Source Use to select TV or another external input source connected to the TV.
Alternate method: Press the SOURCE button on the remote control to select "Input". 2 Press the ENTER button. Press the ENTER button to view an external signal source. Press the UP/DOWN buttons to display the menu. English-27 Use to select the input source of your choice. 1 Press the MENU button to select the Input source, then press the ENTER button. O P E R AT I O N To Select the Source Use to select TV or another external input source connected to the TV.
User Manual (ENGLISH)
Page 33
...DVD", "D-VHS", "Cable STB", "HD STB", "Satellite STB", "AV Receiver", "DVD Receiver", "Game", "Camcorder", "DVD Combo", or "DHR (DVD HDD Recoder)", "PC" input source, then press the ENTER button. Press the UP/DOWN buttons to select "Edit Name", then press the ENTER button. 2 Press the UP/DOWN buttons to... ENTER button. 3 Press the UP/DOWN buttons to select "Input". English-28 O P E R AT I O N To Edit the Input Source Name Name the device connected to the input jacks to make your input source selection easier. 1 Press the MENU button to exit. Press the EXIT button to display the menu.
...DVD", "D-VHS", "Cable STB", "HD STB", "Satellite STB", "AV Receiver", "DVD Receiver", "Game", "Camcorder", "DVD Combo", or "DHR (DVD HDD Recoder)", "PC" input source, then press the ENTER button. Press the UP/DOWN buttons to select "Edit Name", then press the ENTER button. 2 Press the UP/DOWN buttons to... ENTER button. 3 Press the UP/DOWN buttons to select "Input". English-28 O P E R AT I O N To Edit the Input Source Name Name the device connected to the input jacks to make your input source selection easier. 1 Press the MENU button to exit. Press the EXIT button to display the menu.
User Manual (ENGLISH)
Page 37
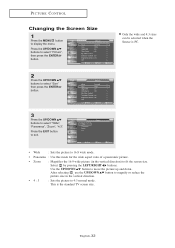
... a panoramic picture. • Zoom : Magnifies the 16:9 wide picture (in the vertical direction. English-32 Only the wide and 4:3 sizes can be selected when the Source is the standard TV screen size. Use the UP/DOWN button to select "Wide", "Panorama", "Zoom", "4:3". After selecting , use the UP/DOWN picture size in...
... a panoramic picture. • Zoom : Magnifies the 16:9 wide picture (in the vertical direction. English-32 Only the wide and 4:3 sizes can be selected when the Source is the standard TV screen size. Use the UP/DOWN button to select "Wide", "Panorama", "Zoom", "4:3". After selecting , use the UP/DOWN picture size in...
User Manual (ENGLISH)
Page 40
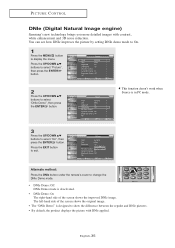
... 3 Press the UP/DOWN buttons to exit. The left-hand side of the screen shows the improved DNIe image. This function doesn't work when Source is designed to select "DNIe Demo", then press the ENTER button. Press the EXIT button to select "On", then press the ENTER button. PICTURE... CONTROL DNIe (Digital Natural Image engine) Samsung's new technology brings you more detailed images with DNle applied. Press the UP/DOWN buttons to select "Picture", then press the ENTER button. 2 Press...
... 3 Press the UP/DOWN buttons to exit. The left-hand side of the screen shows the improved DNIe image. This function doesn't work when Source is designed to select "DNIe Demo", then press the ENTER button. Press the EXIT button to select "On", then press the ENTER button. PICTURE... CONTROL DNIe (Digital Natural Image engine) Samsung's new technology brings you more detailed images with DNle applied. Press the UP/DOWN buttons to select "Picture", then press the ENTER button. 2 Press...
User Manual (ENGLISH)
Page 41
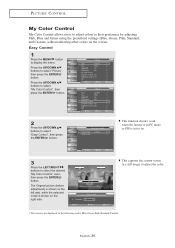
... side. Press the UP/DOWN buttons to select the desired "My Color Control" color, then press the ENTER button. This function doesn't work when the Source is in PC mode or PIP is shown on the screen. Press the UP/DOWN buttons to select "My Color Control", then press the ENTER... button. 2 Press the UP/DOWN buttons to adjust the color. * The sources are displayed in a still image to select "Easy Control", then press the ENTER button. This captures the current screen in the following order: Blue-Green...
... side. Press the UP/DOWN buttons to select the desired "My Color Control" color, then press the ENTER button. This function doesn't work when the Source is in PC mode or PIP is shown on the screen. Press the UP/DOWN buttons to select "My Color Control", then press the ENTER... button. 2 Press the UP/DOWN buttons to adjust the color. * The sources are displayed in a still image to select "Easy Control", then press the ENTER button. This captures the current screen in the following order: Blue-Green...
User Manual (ENGLISH)
Page 42
... buttons to display the menu. To reset the "Detail Control", select "Reset" by pressing the UP/DOWN button and then press the ENTER button. * The sources are displayed in PC mode or PIP is set to on. This function doesn't work when the...
... buttons to display the menu. To reset the "Detail Control", select "Reset" by pressing the UP/DOWN button and then press the ENTER button. * The sources are displayed in PC mode or PIP is set to on. This function doesn't work when the...
User Manual (ENGLISH)
Page 43
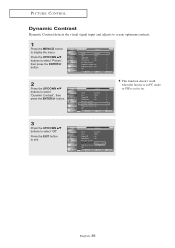
Press the EXIT button to select "Off". English-38 This function doesn't work when the Source is in PC mode or PIP is set to on. 3 Press the UP/DOWN buttons to exit. Press the UP/DOWN buttons to select "Picture", then press the ENTER button. 2 Press the UP/DOWN buttons to display the menu. PICTURE CONTROL Dynamic Contrast Dynamic Contrast detects the visual signal input and adjusts to create optimum contrast. 1 Press the MENU button to select "Dynamic Contrast", then press the ENTER button.
Press the EXIT button to select "Off". English-38 This function doesn't work when the Source is in PC mode or PIP is set to on. 3 Press the UP/DOWN buttons to exit. Press the UP/DOWN buttons to select "Picture", then press the ENTER button. 2 Press the UP/DOWN buttons to display the menu. PICTURE CONTROL Dynamic Contrast Dynamic Contrast detects the visual signal input and adjusts to create optimum contrast. 1 Press the MENU button to select "Dynamic Contrast", then press the ENTER button.
User Manual (ENGLISH)
Page 44
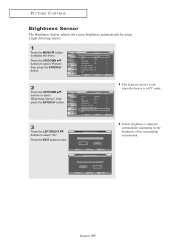
... the UP/DOWN buttons to select "Picture", then press the ENTER button. 2 Press the UP/DOWN buttons to exit. This function doesn't work when the Source is adjusted automatically depending on the brightness of the surrounding environment. PICTURE CONTROL Brightness Sensor The Brightness Sensor adjusts the screen brightness automatically by using...
... the UP/DOWN buttons to select "Picture", then press the ENTER button. 2 Press the UP/DOWN buttons to exit. This function doesn't work when the Source is adjusted automatically depending on the brightness of the surrounding environment. PICTURE CONTROL Brightness Sensor The Brightness Sensor adjusts the screen brightness automatically by using...


