
User Manual (ENGLISH)
Page 4
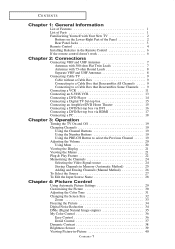
... Features 1 List of Parts 1 Familiarizing Yourself with Your New TV 2 Buttons on the Lower-Right Part of the Panel 2 Rear Panel Jacks 3 Remote Control 4 Installing Batteries in the Remote Control 6 If the remote control doesn't work 6 Chapter 2: Connections Connecting VHF and UHF Antennas 7 Antennas with 300...17 Connecting a PC 18 Chapter 3: Operation Turning the TV On and Off 19 Changing Channels 19 Using the Channel Buttons 19 Using the Number Buttons 19 Using the PRE-CH Button to select the Previous Channel . . . . . 19 Adjusting the Volume 20 Using Mute 20 Viewing the Display...
... Features 1 List of Parts 1 Familiarizing Yourself with Your New TV 2 Buttons on the Lower-Right Part of the Panel 2 Rear Panel Jacks 3 Remote Control 4 Installing Batteries in the Remote Control 6 If the remote control doesn't work 6 Chapter 2: Connections Connecting VHF and UHF Antennas 7 Antennas with 300...17 Connecting a PC 18 Chapter 3: Operation Turning the TV On and Off 19 Changing Channels 19 Using the Channel Buttons 19 Using the Number Buttons 19 Using the PRE-CH Button to select the Previous Channel . . . . . 19 Adjusting the Volume 20 Using Mute 20 Viewing the Display...
User Manual (ENGLISH)
Page 7
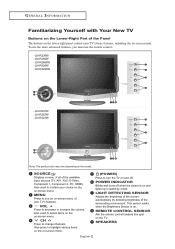
... on the on-screen menu. This sensor works when the Brightness Sensor is on and lights up in stand-by detecting brightness of the surrounding environment. SPEAKERS English-2 LIGHT DETECTING SENSOR Adjusts the brightness of the screen automatically by mode. LN-R3228W - To use the more advanced features...items on the on-screen menu. (POWER) Press to decrease or increase the volume. G E N E R A L I N F O R M AT I O N Familiarizing Yourself with Your New TV Buttons on the Lower-Right Part of the Panel The buttons on the lower-right panel control your choice on the on-screen menu.
... on the on-screen menu. This sensor works when the Brightness Sensor is on and lights up in stand-by detecting brightness of the surrounding environment. SPEAKERS English-2 LIGHT DETECTING SENSOR Adjusts the brightness of the screen automatically by mode. LN-R3228W - To use the more advanced features...items on the on-screen menu. (POWER) Press to decrease or increase the volume. G E N E R A L I N F O R M AT I O N Familiarizing Yourself with Your New TV Buttons on the Lower-Right Part of the Panel The buttons on the lower-right panel control your choice on the on-screen menu.
User Manual (ENGLISH)
Page 10
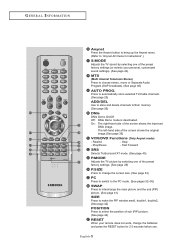
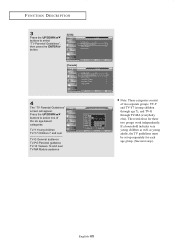
...- G E N E R A L I N F O R M AT I O N Anynet Press the Anynet button to bring up the Anynet menu. (Refer to "Anynet AV Owner's Instructions".) S.MODE Adjusts the TV sound by selecting one of the preset factory settings (or selects your remote does not work, change the screen size. (See page 33) PC Press to...the TV picture by selecting one of the preset factory settings. (See page 29) P.SIZE Press to change the batteries and press the RESET button for 2-3 seconds before use. Stop - English-5 Press to automatically store selected TV/Cable channels. (See page 25) ADD/DEL Use to...
...- G E N E R A L I N F O R M AT I O N Anynet Press the Anynet button to bring up the Anynet menu. (Refer to "Anynet AV Owner's Instructions".) S.MODE Adjusts the TV sound by selecting one of the preset factory settings (or selects your remote does not work, change the screen size. (See page 33) PC Press to...the TV picture by selecting one of the preset factory settings. (See page 29) P.SIZE Press to change the batteries and press the RESET button for 2-3 seconds before use. Stop - English-5 Press to automatically store selected TV/Cable channels. (See page 25) ADD/DEL Use to...
User Manual (ENGLISH)
Page 40
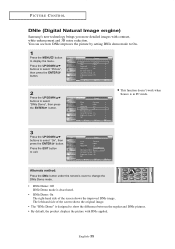
...work when Source is designed to select "On", then press the ENTER button. The left-hand side of the screen shows the improved DNIe image. Press the EXIT button to select "DNIe Demo", then press the ENTER button. English-35 Press the UP/DOWN buttons to select "Picture", then press the ENTER button.... 2 Press the UP/DOWN buttons to exit. Alternate method: Press the DNIe button under the remote's cover to display the menu. PICTURE CONTROL DNIe (Digital Natural Image engine) Samsung's...
...work when Source is designed to select "On", then press the ENTER button. The left-hand side of the screen shows the improved DNIe image. Press the EXIT button to select "DNIe Demo", then press the ENTER button. English-35 Press the UP/DOWN buttons to select "Picture", then press the ENTER button.... 2 Press the UP/DOWN buttons to exit. Alternate method: Press the DNIe button under the remote's cover to display the menu. PICTURE CONTROL DNIe (Digital Natural Image engine) Samsung's...
User Manual (ENGLISH)
Page 41
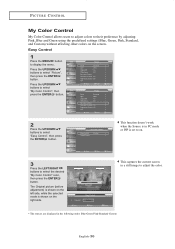
... Original picture (before adjustment) is shown on the left side, while the selected mode is set to on. 3 Press the LEFT/RIGHT buttons to their preference by adjusting Pink, Blue and Green using the predefined settings (Blue, Green, Pink, Standard, and Custom) without affecting other... colors on the right side. This function doesn't work when the Source is in the following order: Blue-Green-Pink-Standard-Custom English-36 PICTURE CONTROL My Color Control My Color Control allows users...
... Original picture (before adjustment) is shown on the left side, while the selected mode is set to on. 3 Press the LEFT/RIGHT buttons to their preference by adjusting Pink, Blue and Green using the predefined settings (Blue, Green, Pink, Standard, and Custom) without affecting other... colors on the right side. This function doesn't work when the Source is in the following order: Blue-Green-Pink-Standard-Custom English-36 PICTURE CONTROL My Color Control My Color Control allows users...
User Manual (ENGLISH)
Page 42
...the value of a particular item. Press the LEFT/RIGHT buttons to select the desired "My Color Control" color, then press the ENTER button. Press the EXIT button to select "Picture", then press the ENTER button. This function doesn't work when the Source is in the following order: Pink-Green...-Blue-Reset English-37 Press the UP/DOWN buttons to exit. To reset the "Detail Control",...
...the value of a particular item. Press the LEFT/RIGHT buttons to select the desired "My Color Control" color, then press the ENTER button. Press the EXIT button to select "Picture", then press the ENTER button. This function doesn't work when the Source is in the following order: Pink-Green...-Blue-Reset English-37 Press the UP/DOWN buttons to exit. To reset the "Detail Control",...
User Manual (ENGLISH)
Page 43
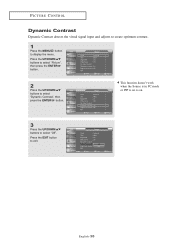
English-38 Press the EXIT button to select "Off". This function doesn't work when the Source is in PC mode or PIP is set to on. 3 Press the UP/DOWN buttons to exit. Press the UP/DOWN buttons to select "Picture", then press the ENTER button. 2 Press the UP/DOWN buttons to display the menu. PICTURE CONTROL Dynamic Contrast Dynamic Contrast detects the visual signal input and adjusts to create optimum contrast. 1 Press the MENU button to select "Dynamic Contrast", then press the ENTER button.
English-38 Press the EXIT button to select "Off". This function doesn't work when the Source is in PC mode or PIP is set to on. 3 Press the UP/DOWN buttons to exit. Press the UP/DOWN buttons to select "Picture", then press the ENTER button. 2 Press the UP/DOWN buttons to display the menu. PICTURE CONTROL Dynamic Contrast Dynamic Contrast detects the visual signal input and adjusts to create optimum contrast. 1 Press the MENU button to select "Dynamic Contrast", then press the ENTER button.
User Manual (ENGLISH)
Page 44
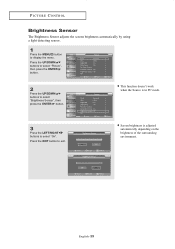
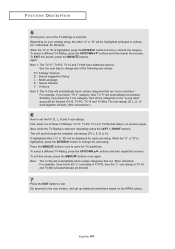
... PC mode. 3 Press the LEFT/RIGHT buttons to select "Brightness Sensor", then press the ENTER button. Press the EXIT button to display the menu. English-39 Press the UP/DOWN buttons to select "Picture", then press the ENTER button. 2 Press the UP/DOWN buttons to select "On". This function doesn't work when the Source is adjusted automatically...
... PC mode. 3 Press the LEFT/RIGHT buttons to select "Brightness Sensor", then press the ENTER button. Press the EXIT button to display the menu. English-39 Press the UP/DOWN buttons to select "Picture", then press the ENTER button. 2 Press the UP/DOWN buttons to select "On". This function doesn't work when the Source is adjusted automatically...
User Manual (ENGLISH)
Page 70
...these two groups work independently: If a household includes very young children as well as young adults, the TV guidelines must be set up separately for each age group. (See next step.) English-65 Press the UP/DOWN buttons to select "TV Parental Guidelines", then press the ENTER button. [USA] ...[Canada] 4 The "TV Parental Guidelines" screen will appear. FUNCTION DESCRIPTION 3 Press the UP/DOWN buttons to select one of the six age-based categories: TV-Y...
...these two groups work independently: If a household includes very young children as well as young adults, the TV guidelines must be set up separately for each age group. (See next step.) English-65 Press the UP/DOWN buttons to select "TV Parental Guidelines", then press the ENTER button. [USA] ...[Canada] 4 The "TV Parental Guidelines" screen will appear. FUNCTION DESCRIPTION 3 Press the UP/DOWN buttons to select one of the six age-based categories: TV-Y...
User Manual (ENGLISH)
Page 71
...you block "TV-Y" category, then TV-Y7 will be displayed for each sub-rating. Next, while the TV-Rating is highlighted, press the ENTER button to change any of the following sub-ratings: FV: Fantasy Violence D : Sexual suggestive Dialog L : Adult Language S : Sexual situation V :... TV-PG, TV-14 and TV-MA). Note: The V-chip will automatically block certain categories that are "more restrictive." The sub-ratings (D, L, S, V) work together similarly. (See next section.) 6 How to yellow). (U= Unblocked, B= Blocked) When the "U" or "B" is selected. While the "U" or "B" is...
...you block "TV-Y" category, then TV-Y7 will be displayed for each sub-rating. Next, while the TV-Rating is highlighted, press the ENTER button to change any of the following sub-ratings: FV: Fantasy Violence D : Sexual suggestive Dialog L : Adult Language S : Sexual situation V :... TV-PG, TV-14 and TV-MA). Note: The V-chip will automatically block certain categories that are "more restrictive." The sub-ratings (D, L, S, V) work together similarly. (See next section.) 6 How to yellow). (U= Unblocked, B= Blocked) When the "U" or "B" is selected. While the "U" or "B" is...
User Manual (ENGLISH)
Page 76
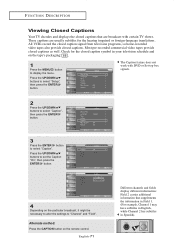
... the hearing impaired or foreign-language translations. The Caption feature does not work with certain TV shows. These are broadcast with DVD or Set-top box signals. 2 Press the UP/DOWN buttons to display the menu. Alternate method: Press the CAPTION button on the particular broadcast, it might be a PsremsasllthdeelUayP/bDeOfoWreNcaptions appear buwtthoenns...
... the hearing impaired or foreign-language translations. The Caption feature does not work with certain TV shows. These are broadcast with DVD or Set-top box signals. 2 Press the UP/DOWN buttons to display the menu. Alternate method: Press the CAPTION button on the particular broadcast, it might be a PsremsasllthdeelUayP/bDeOfoWreNcaptions appear buwtthoenns...


