
Quick Guide (easy Manual) (ver.1.0) (English)
Page 5
... Selecting the Melody 74 Chapter 10: Troubleshooting Identifying Problems 75 Appendix Installing the stand 77 Disconnecting the stand 77 Installing the Wall Mount Kit (LN-R237W / LN-R237W1 / LN-R238W / LN-R238WA / LN-R2668W / LN-R267W / LN-R268W) . . . 78 Installing the Wall Mount Kit (LN-R3228W / LN-R327W / LN-R328W 79 Using the Anti-Theft Kensington Lock 80 Using Your TV in Another...
... Selecting the Melody 74 Chapter 10: Troubleshooting Identifying Problems 75 Appendix Installing the stand 77 Disconnecting the stand 77 Installing the Wall Mount Kit (LN-R237W / LN-R237W1 / LN-R238W / LN-R238WA / LN-R2668W / LN-R267W / LN-R268W) . . . 78 Installing the Wall Mount Kit (LN-R3228W / LN-R327W / LN-R328W 79 Using the Anti-Theft Kensington Lock 80 Using Your TV in Another...
Quick Guide (easy Manual) (ver.1.0) (English)
Page 6
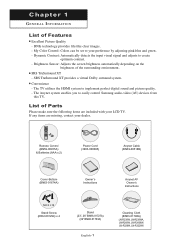
...-00518B) Cover-Bottom (BN63-01674A) Owner's Instructions Anynet AV Owner's Instructions M4 X L16 Stand Screw (6002-001294) x 4 Stand (23", 26" BN96-01727A) (32" BN96-01733A) English-1 Cleaning Cloth (BN63-01798A) LN-R238W, LN-R238WA, LN-R268W, LN-R2668W, LN-R328W, LN-R3228W Brightness Sensor: Adjusts the screen brightness automatically depending on the brightness of Features Excellent Picture... pink,blue and green. - SRS TruSurround XT provides a virtual Dolby surround system. My Color Control: Colors can be set to easily control Samsung audio-video (AV) devices from this TV.
...-00518B) Cover-Bottom (BN63-01674A) Owner's Instructions Anynet AV Owner's Instructions M4 X L16 Stand Screw (6002-001294) x 4 Stand (23", 26" BN96-01727A) (32" BN96-01733A) English-1 Cleaning Cloth (BN63-01798A) LN-R238W, LN-R238WA, LN-R268W, LN-R2668W, LN-R328W, LN-R3228W Brightness Sensor: Adjusts the screen brightness automatically depending on the brightness of Features Excellent Picture... pink,blue and green. - SRS TruSurround XT provides a virtual Dolby surround system. My Color Control: Colors can be set to easily control Samsung audio-video (AV) devices from this TV.
Quick Guide (easy Manual) (ver.1.0) (English)
Page 7
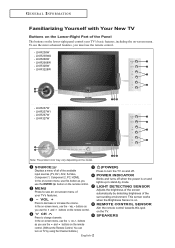
... is on the lower-right panel control your TV's features. - To use the more advanced features, you use the remote control. - LN-R238WA - MENU Press to turn on TV by detecting brightness of the surrounding environment. REMOTE CONTROL SENSOR Aim the remote control towards this button as... and buttons on the remote control. In the on the model. This sensor works when the Brightness Sensor is on and lights up in stand-by mode. LN-R328W - G E N E R A L I N F O R M AT I O N Familiarizing Yourself with Your New TV Buttons on the Lower-Right Part of the screen automatically by ...
... is on the lower-right panel control your TV's features. - To use the more advanced features, you use the remote control. - LN-R238WA - MENU Press to turn on TV by detecting brightness of the surrounding environment. REMOTE CONTROL SENSOR Aim the remote control towards this button as... and buttons on the remote control. In the on the model. This sensor works when the Brightness Sensor is on and lights up in stand-by mode. LN-R328W - G E N E R A L I N F O R M AT I O N Familiarizing Yourself with Your New TV Buttons on the Lower-Right Part of the screen automatically by ...
Quick Guide (easy Manual) (ver.1.0) (English)
Page 82
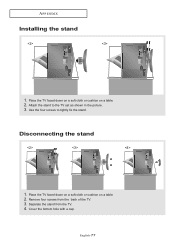
Separate the stand from the back of the TV. 3. Attach the stand to tightly fix the stand. Place the TV faced down on a soft cloth or cushion on a table. 2. Disconnecting the stand 1. Place the TV faced down on a soft cloth or cushion on a table. 2. Cover the bottom hole with a cap. Remove four screws from the TV. 4. Use the four screws to the TV set as shown in the picture. 3. APPENDIX Installing the stand 1. English-77
Separate the stand from the back of the TV. 3. Attach the stand to tightly fix the stand. Place the TV faced down on a soft cloth or cushion on a table. 2. Disconnecting the stand 1. Place the TV faced down on a soft cloth or cushion on a table. 2. Cover the bottom hole with a cap. Remove four screws from the TV. 4. Use the four screws to the TV set as shown in the picture. 3. APPENDIX Installing the stand 1. English-77
Quick Guide (easy Manual) (ver.1.0) (English)
Page 86
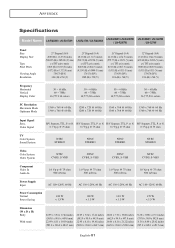
H/V Separate, TTL, P. or N. or N. H/V Separate, TTL, P. APPENDIX Specifications Model Name LN-R238W / LN-R237W1 LN-R237W / LN-R238WA LN-R268W / LN-R2668W / LN-R267W LN-R328W / LN-3228W / LN-327W Panel Size Display Size Type Pixel Pitch Viewing Angle Resolution 23" Diagonal (16:9) 20.00 (H) x 11.25 (V) inches (...AC 110~120V, 60 Hz 100 W < 1.5 W AC 110~120V, 60 Hz 14 0 W < 1.5 W AC 110~120V, 60 Hz 170 W < 1.5 W Dimension (W x D x H) Body With stand 22.95 x 3.54 x 17.44 inches (583.0 x 90.0 x 443.0 mm) 22.95 x 8.11 x 19.10 inches (583.0 x 206.0 x 484.7 mm) 22.95 x 3.54 x ...
H/V Separate, TTL, P. or N. or N. H/V Separate, TTL, P. APPENDIX Specifications Model Name LN-R238W / LN-R237W1 LN-R237W / LN-R238WA LN-R268W / LN-R2668W / LN-R267W LN-R328W / LN-3228W / LN-327W Panel Size Display Size Type Pixel Pitch Viewing Angle Resolution 23" Diagonal (16:9) 20.00 (H) x 11.25 (V) inches (...AC 110~120V, 60 Hz 100 W < 1.5 W AC 110~120V, 60 Hz 14 0 W < 1.5 W AC 110~120V, 60 Hz 170 W < 1.5 W Dimension (W x D x H) Body With stand 22.95 x 3.54 x 17.44 inches (583.0 x 90.0 x 443.0 mm) 22.95 x 8.11 x 19.10 inches (583.0 x 206.0 x 484.7 mm) 22.95 x 3.54 x ...
Quick Guide (easy Manual) (ver.1.0) (English)
Page 87
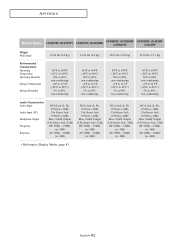
English-82 APPENDIX Model Name LN-R238W / LN-R237W1 LN-R237W / LN-R238WA LN-R268W / LN-R2668W / LN-R267W LN-R328W / LN-3228W / LN-327W Weight With Stand 18.96 lbs (8.6 kg) 18.96 lbs (8.6 kg) 33.07 lbs (15.0 kg) 39.02 lbs (17.7 kg) Environmental Considerations Operating Temperature Operating Humidity Storage ...
English-82 APPENDIX Model Name LN-R238W / LN-R237W1 LN-R237W / LN-R238WA LN-R268W / LN-R2668W / LN-R267W LN-R328W / LN-3228W / LN-327W Weight With Stand 18.96 lbs (8.6 kg) 18.96 lbs (8.6 kg) 33.07 lbs (15.0 kg) 39.02 lbs (17.7 kg) Environmental Considerations Operating Temperature Operating Humidity Storage ...


