

User Manual
Page 3
...3 ■ Viewing the Connection Panel 3 ■ Viewing the Remote Control 5 ■ Installing Batteries in the Remote Control 5 OPERATION ■ Viewing the menus 6 ■ Plug & Play Feature 7 CHANNEL CONTROL ■ Configuring the Channel Menu 8 ■ Managing Channels 10 PICTURE CONTROL ■ Configuring the Picture Menu 12 ■ Using Your TV as a Computer (PC) Display 15 ■ Setting up the TV with your PC 16 SOUND CONTROL ■ Configuring the Sound Menu 16 ■ Selecting the Sound Mode 17 SETUP ■ Configuring the Setup Menu 18 INPUT / SUPPORT ■...
...3 ■ Viewing the Connection Panel 3 ■ Viewing the Remote Control 5 ■ Installing Batteries in the Remote Control 5 OPERATION ■ Viewing the menus 6 ■ Plug & Play Feature 7 CHANNEL CONTROL ■ Configuring the Channel Menu 8 ■ Managing Channels 10 PICTURE CONTROL ■ Configuring the Picture Menu 12 ■ Using Your TV as a Computer (PC) Display 15 ■ Setting up the TV with your PC 16 SOUND CONTROL ■ Configuring the Sound Menu 16 ■ Selecting the Sound Mode 17 SETUP ■ Configuring the Setup Menu 18 INPUT / SUPPORT ■...
User Manual
Page 5
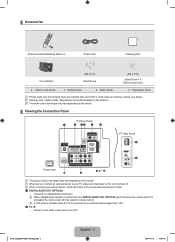
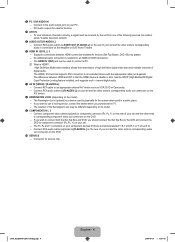
... the TV and adjust the volume level with your LCD TV. N When a Digital Audio System is connected to the DIGITAL AUDIO OUT (OPTICAL) jack: Decrease the volume of the connection terminal to the cable. 1 DIGITAL AUDIO OUT (OPTICAL) - ¦ Accessories Remote Control & Batteries (AAA x 2) Power Cord Cleaning Cloth Cover-Bottom (M4 X L16) Stand Screw (M4 X L18) Stand Screw X 3 (32inch model only) ● Owner's Instructions ● Warranty card ● Safety Guide ● Registration Cards N Please make sure that power on the unit is turned off. Connect...
... the TV and adjust the volume level with your LCD TV. N When a Digital Audio System is connected to the DIGITAL AUDIO OUT (OPTICAL) jack: Decrease the volume of the connection terminal to the cable. 1 DIGITAL AUDIO OUT (OPTICAL) - ¦ Accessories Remote Control & Batteries (AAA x 2) Power Cord Cleaning Cloth Cover-Bottom (M4 X L16) Stand Screw (M4 X L18) Stand Screw X 3 (32inch model only) ● Owner's Instructions ● Warranty card ● Safety Guide ● Registration Cards N Please make sure that power on the unit is turned off. Connect...
User Manual
Page 6
Connect to corresponding audio in size, has the HDCP (High Bandwidth Digital Copy Protection) coding feature installed, and supports multi - No additional Audio connection is HDMI? ''High Definition Multimedia interface' allows the transmission of high definition digital video data and multiple channels of your set and the other ends to the audio output jack on the DVD. 0 SERVICE - N What is needed for an HDMI to component connector (PR, PB, Y) on your PC. - If you...
Connect to corresponding audio in size, has the HDCP (High Bandwidth Digital Copy Protection) coding feature installed, and supports multi - No additional Audio connection is HDMI? ''High Definition Multimedia interface' allows the transmission of high definition digital video data and multiple channels of your set and the other ends to the audio output jack on the DVD. 0 SERVICE - N What is needed for an HDMI to component connector (PR, PB, Y) on your PC. - If you...
User Manual
Page 9
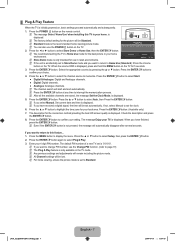
... a digital signal, the time will be set automatically. N For home viewing, ensure the picture mode is set is '0-0-0-0'. Plug & Play Select 'Home Use' when installing this TV in retail environments. When the volume OSD is displayed, press and hold the MENU button on the TV for use the Change PIN function. (refer to confirm your home. 2. N The channel search will be Standard. Press the ▲ or ▼ button to confirm your local area. N Any previous settings and adjustments...
... a digital signal, the time will be set automatically. N For home viewing, ensure the picture mode is set is '0-0-0-0'. Plug & Play Select 'Home Use' when installing this TV in retail environments. When the volume OSD is displayed, press and hold the MENU button on the TV for use the Change PIN function. (refer to confirm your home. 2. N The channel search will be Standard. Press the ▲ or ▼ button to confirm your local area. N Any previous settings and adjustments...
User Manual
Page 10
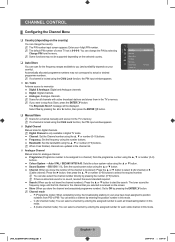
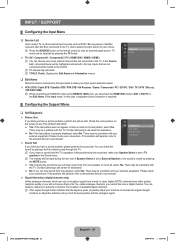
... digital TV mode. ● Channel: Set the Channel number using the ▲, ▼ or number (0~9) buttons. ● Frequency: Set the frequency using the number buttons. ● Bandwidth: Set the bandwidth using the Child Lock function, the PIN input window appears. Air / Cable Antenna source to position numbers from the menu. N You can also select the channel number directly by pressing the ENTERE button. The tuner scans the frequency range until the first channel or the channel that you selected is abnormal sound...
... digital TV mode. ● Channel: Set the Channel number using the ▲, ▼ or number (0~9) buttons. ● Frequency: Set the frequency using the number buttons. ● Bandwidth: Set the bandwidth using the Child Lock function, the PIN input window appears. Air / Cable Antenna source to position numbers from the menu. N You can also select the channel number directly by pressing the ENTERE button. The tuner scans the frequency range until the first channel or the channel that you selected is abnormal sound...
User Manual
Page 14
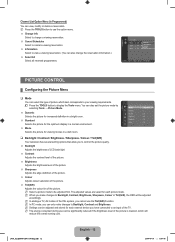
... PICTURE CONTROL ¦ Configuring the Picture Menu ❑ Mode You can select the type of the TV. The adjusted values are saved for viewing movies in a dark room. N Press the TOOLS button to use can only make changes to an input of picture which will be adjusted and stored for each picture mode. N In analogue TV, AV modes of the PAL system, you to control the picture quality. Backlight Adjusts the brightness of LCD...
... PICTURE CONTROL ¦ Configuring the Picture Menu ❑ Mode You can select the type of the TV. The adjusted values are saved for viewing movies in a dark room. N Press the TOOLS button to use can only make changes to an input of picture which will be adjusted and stored for each picture mode. N In analogue TV, AV modes of the PAL system, you to control the picture quality. Backlight Adjusts the brightness of LCD...
User Manual
Page 15
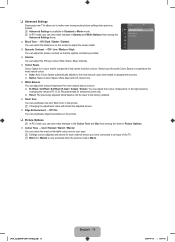
... users only. ● Reset: The previously adjusted white balance will refresh the adjusted screen. Edge Enhancement → Off / On You can emphasize object boundaries in Standard or Movie mode. N Changing the adjustment value will be adjusted and stored for each external device you have connected to the factory defaults. Flesh Tone You can emphasize the pink 'flesh tone' in the picture. N Advanced Settings...
... users only. ● Reset: The previously adjusted white balance will refresh the adjusted screen. Edge Enhancement → Off / On You can emphasize object boundaries in Standard or Movie mode. N Changing the adjustment value will be adjusted and stored for each external device you have connected to the factory defaults. Flesh Tone You can emphasize the pink 'flesh tone' in the picture. N Advanced Settings...
User Manual
Page 16
... selected mode. N Settings can initialize the setting. You can be adjusted and stored for each external device you have connected to an input of the other options until the best picture is weak, select one of the TV. N When the signal is displayed. HDMI Black Level → Normal / Low You can activate the Digital Noise Reduction feature to help reduce any cutoff when HDMI (720p / 1080i) or Component (1080i) signals...
... selected mode. N Settings can initialize the setting. You can be adjusted and stored for each external device you have connected to an input of the other options until the best picture is weak, select one of the TV. N When the signal is displayed. HDMI Black Level → Normal / Low You can activate the Digital Noise Reduction feature to help reduce any cutoff when HDMI (720p / 1080i) or Component (1080i) signals...
User Manual
Page 18
... fully compatible with all image settings with the factory default values. N You can select a sound mode to the default values. T Press the TOOLS button to remove or reduce picture noise. You can also configure the sound mode by selecting Tools → SRS TS HD. ❑ Audio Language (digital channels only) You can change the default value for the incoming stream. T Press the TOOLS button to display the Tools menu. You can be adjusted to...
... fully compatible with all image settings with the factory default values. N You can select a sound mode to the default values. T Press the TOOLS button to remove or reduce picture noise. You can also configure the sound mode by selecting Tools → SRS TS HD. ❑ Audio Language (digital channels only) You can change the default value for the incoming stream. T Press the TOOLS button to display the Tools menu. You can be adjusted to...

User Manual
Page 19
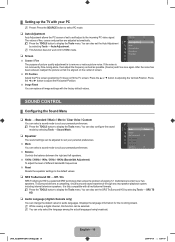
... due to Sound System RF, AV, Component, PC, HDMI Sound Output Sound Output Mute ❑ Sound Reset → Reset All / Reset Sound Mode / Cancel You can set to adjust the volume every time the channel is changed. When you want to On. N While viewing a digital channel, this case, use the TV Speaker function. It is set to Dual l ll, the current sound mode is weak and an automatic switching occurs, then switch to the factory defaults. N Reset Sound Mode: Current sound values return to default settings. ¦ Selecting the Sound Mode You...
... due to Sound System RF, AV, Component, PC, HDMI Sound Output Sound Output Mute ❑ Sound Reset → Reset All / Reset Sound Mode / Cancel You can set to adjust the volume every time the channel is changed. When you want to On. N While viewing a digital channel, this case, use the TV Speaker function. It is set to Dual l ll, the current sound mode is weak and an automatic switching occurs, then switch to the factory defaults. N Reset Sound Mode: Current sound values return to default settings. ¦ Selecting the Sound Mode You...
User Manual
Page 20
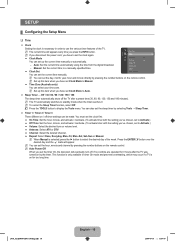
...; Volume: Select the desired turn off timer settings can select your time zone. N You can set the day, month, year, hour and minute directly by pressing the number buttons on the remote control. N When Manual is selected, press the ► button to a manually specified time. ● Clock Set Setup Plug & Play Time ► Game Mode : Off Child Lock : On Change PIN Parental Lock Subtitle Teletext Language : - - - Manual: Set the current time to select the desired day of the TV. N Set up this item when you set the sleep timer...
...; Volume: Select the desired turn off timer settings can select your time zone. N You can set the day, month, year, hour and minute directly by pressing the number buttons on the remote control. N When Manual is selected, press the ► button to a manually specified time. ● Clock Set Setup Plug & Play Time ► Game Mode : Off Child Lock : On Change PIN Parental Lock Subtitle Teletext Language : - - - Manual: Set the current time to select the desired day of the TV. N Set up this item when you set the sleep timer...
User Manual
Page 21
... when external device is connected to set the Subtitle Mode. Adjust the sound using the equalizer. Enter your 4 digit PIN number. N Before the setup screen appears, the PIN number input screen appears. N The Parental Rating item differs depending on game mode (Caution) - N The default PIN number of hearing mode is selected. O You can lock some channels in Channel List. (refer to page 10) N Child Lock is unavailable in the broadcast. If you to Custom automatically. N The Reset Sound function...
... when external device is connected to set the Subtitle Mode. Adjust the sound using the equalizer. Enter your 4 digit PIN number. N Before the setup screen appears, the PIN number input screen appears. N The Parental Rating item differs depending on game mode (Caution) - N The default PIN number of hearing mode is selected. O You can lock some channels in Channel List. (refer to page 10) N Child Lock is unavailable in the broadcast. If you to Custom automatically. N The Reset Sound function...
User Manual
Page 22
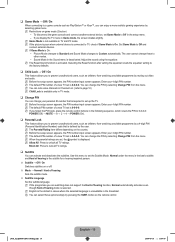
...-conferencing, digital libraries and network games. N MHEG (Multimedia and Hypermedia Information Coding Experts Group) An International standard for the future. MHEG is user runtime interaction technology and is output from the TV because the (-) Volume button has been pressed. - When the TV is turned off by Sleep Timer function. ❑ Energy Saving → Off / Low / Medium / High / Auto This feature adjusts the brightness of languages supported by...
...-conferencing, digital libraries and network games. N MHEG (Multimedia and Hypermedia Information Coding Experts Group) An International standard for the future. MHEG is user runtime interaction technology and is output from the TV because the (-) Volume button has been pressed. - When the TV is turned off by Sleep Timer function. ❑ Energy Saving → Off / Low / Medium / High / Auto This feature adjusts the brightness of languages supported by...
User Manual
Page 23
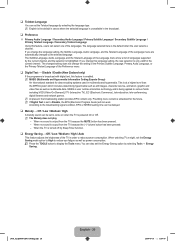
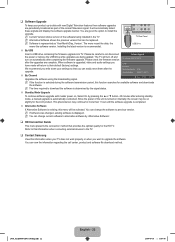
..., select Yes. Software Upgrade ● No: If the test pattern is set the HDMI1/DVI mode to TV speaker in the Edit Name of the Input mode. Contact Samsung's call center for assistance. ● No: If you should set to DVI or DVI PC in the Sound menu. There may be sorted to the external device's user manual. Signal Information (digital channels only) Unlike analogue channels, which can hear sound from the TV's speakers, before...
..., select Yes. Software Upgrade ● No: If the test pattern is set the HDMI1/DVI mode to TV speaker in the Edit Name of the Input mode. Contact Samsung's call center for assistance. ● No: If you should set to DVI or DVI PC in the Sound menu. There may be sorted to the external device's user manual. Signal Information (digital channels only) Unlike analogue channels, which can hear sound from the TV's speakers, before...
User Manual
Page 24
... Channel Upgrades the software using the broadcasting signal. N If software was changed, existing software is recommended. N Current Version shows version of the normal Television signal. TV Rear Panel USB Drive By USB Insert a USB drive containing the firmware upgrade into TV. When software is selected during the software transmission period, this information when your settings so that can easily reset them after completing the firmware upgrade. U Move E Enter R Return N If the function is upgraded, video and audio settings you...
... Channel Upgrades the software using the broadcasting signal. N If software was changed, existing software is recommended. N Current Version shows version of the normal Television signal. TV Rear Panel USB Drive By USB Insert a USB drive containing the firmware upgrade into TV. When software is selected during the software transmission period, this information when your settings so that can easily reset them after completing the firmware upgrade. U Move E Enter R Return N If the function is upgraded, video and audio settings you...
User Manual
Page 26
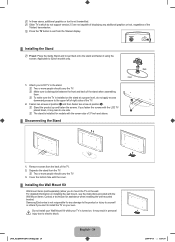
... when installing the wall mounted bracket. N Stand the product up and fasten the screws. For detailed information on the stand at position 2. N To make sure the TV is not responsible for any additional graphics or text, regardless of the TV. 2. Samsung Electronics is installed on installing the wall mount, see the instructions provided with the Wall Mount items. Contact a technician for models with the LCD TV placed down, it using the screws...
... when installing the wall mounted bracket. N Stand the product up and fasten the screws. For detailed information on the stand at position 2. N To make sure the TV is not responsible for any additional graphics or text, regardless of the TV. 2. Samsung Electronics is installed on installing the wall mount, see the instructions provided with the Wall Mount items. Contact a technician for models with the LCD TV placed down, it using the screws...
User Manual
Page 27
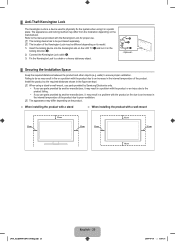
... 10 cm [450_Aus]BN68-02041A-03Eng.indb 25 English - 25 2009-09-16 �� 11:07:51 N The appearance may result in the locking direction 2. 2. N The locking device has to physically fix the system when using a stand or wall-mount, use parts provided by another manufacturer, it may differ depending on the LCD TV 1 and turn it in the internal temperature of the product...
... 10 cm [450_Aus]BN68-02041A-03Eng.indb 25 English - 25 2009-09-16 �� 11:07:51 N The appearance may result in the locking direction 2. 2. N The locking device has to physically fix the system when using a stand or wall-mount, use parts provided by another manufacturer, it may differ depending on the LCD TV 1 and turn it in the internal temperature of the product...
User Manual
Page 29
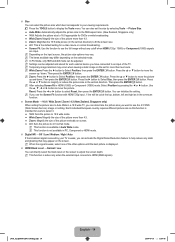
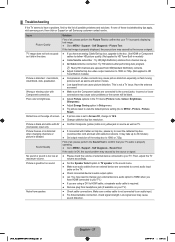
.... ● Adjust Cable/Set top box video output resolution to 1080i or 720p. (Not applied to HD Tuner Built-in Setup menu. ● Try picture reset to view the default picture setting (Go to 16:9. ● Change cable/set top box. (reconnect AC cord and wait until cable box reboots. Self Diagnosis - Use HDMI or Component cables to deliver HD picture quality. (Not applied to an audio input. ● For Antenna/Cable connection, check signal strength. Incorrect or loose connections may cause color problems or the screen will...
.... ● Adjust Cable/Set top box video output resolution to 1080i or 720p. (Not applied to HD Tuner Built-in Setup menu. ● Try picture reset to view the default picture setting (Go to 16:9. ● Change cable/set top box. (reconnect AC cord and wait until cable box reboots. Self Diagnosis - Use HDMI or Component cables to deliver HD picture quality. (Not applied to an audio input. ● For Antenna/Cable connection, check signal strength. Incorrect or loose connections may cause color problems or the screen will...

User Manual
Page 30
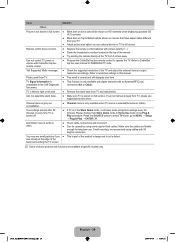
... the audio output setting on . ● Make sure to MENU Setup - Issue Solution No Picture, No Video TV won't turn off automatically. ● Check if the Sleep Timer is set to On in the Setup menu. ● If connected the TV to your PC, check your connected device is not a TV issue. Have the antenna accessed. To fix the Remote problem, refer to the channel list. For example, external device's output : HDMI , TV's input : HDMI. ● Make sure your PC power settings. ●...
... the audio output setting on . ● Make sure to MENU Setup - Issue Solution No Picture, No Video TV won't turn off automatically. ● Check if the Sleep Timer is set to On in the Setup menu. ● If connected the TV to your PC, check your connected device is not a TV issue. Have the antenna accessed. To fix the Remote problem, refer to the channel list. For example, external device's output : HDMI , TV's input : HDMI. ● Make sure your PC power settings. ●...
User Manual
Page 31
... control TV power or volume with 90 degree connectors. Please change from Store Demo mode to operate the TV. Press the SOURCE button to select TV mode, go to resolution settings in this manual. Channel menu is grey out (unavailable). ● Channel menu is only available when TV source is placed on flat surface. Refer to MENU → Setup → Plug & Play → ENTERE. ● Check cable connections and reconnect. ● Can be caused by using cables with Cable/Set top box remote control. ● Program...
... control TV power or volume with 90 degree connectors. Please change from Store Demo mode to operate the TV. Press the SOURCE button to select TV mode, go to resolution settings in this manual. Channel menu is grey out (unavailable). ● Channel menu is only available when TV source is placed on flat surface. Refer to MENU → Setup → Plug & Play → ENTERE. ● Check cable connections and reconnect. ● Can be caused by using cables with Cable/Set top box remote control. ● Program...


