User Manual (user Manual) (ver.1.0) (English)
Page 2
... camera button to avoid disappointment. Setting up the application software To use this manual are registered trademarks of their respective companies. Ä For Open Source License information, refer to use it on. Take a picture Take a picture. (p.22) Insert the USB cable Insert the supplied USB cable into the PC's USB port and the camera's USB connection terminal. (p.108) Check the camera's power. Check [Removable Disk] Open Windows's EXPLORER and search for [Removable Disk]. (p.109) Thank you for buying a Samsung Digital Camera...
... camera button to avoid disappointment. Setting up the application software To use this manual are registered trademarks of their respective companies. Ä For Open Source License information, refer to use it on. Take a picture Take a picture. (p.22) Insert the USB cable Insert the supplied USB cable into the PC's USB port and the camera's USB connection terminal. (p.108) Check the camera's power. Check [Removable Disk] Open Windows's EXPLORER and search for [Removable Disk]. (p.109) Thank you for buying a Samsung Digital Camera...
User Manual (user Manual) (ver.1.0) (English)
Page 4
... not move the camera while it continuously. Do not insert the battery with hands or objects. Then make sure that any connector cords or cables to the USB port of features 008 Front & Top 009 Back 011 Bottom 011 Smart dial 012 Self-timer lamp 012 Camera Status Lamp 012 Mode icon 013 Connecting to a Power Source 016 Inserting the memory card 017 Instructions on , if you...
... not move the camera while it continuously. Do not insert the battery with hands or objects. Then make sure that any connector cords or cables to the USB port of features 008 Front & Top 009 Back 011 Bottom 011 Smart dial 012 Self-timer lamp 012 Camera Status Lamp 012 Mode icon 013 Connecting to a Power Source 016 Inserting the memory card 017 Instructions on , if you...
User Manual (user Manual) (ver.1.0) (English)
Page 6
... Display Bright 067 Quick view 067 Display Save 068 Settings 068 Formatting a memory 068 Initialization 068 Language 069 Setting up the Date / Time / Date type 069 Time Zone 069 File name 070 Imprinting the recording date 070 Auto power off 071 Auto Focus lamp 071 Anynet+ (HDMI-CEC) 072 HDMI Size 073 Selecting Video out type 073 Setting the USB PLAY 074 Starting play mode 074 Playing back a still image 074 Playing back a movie clip 075 Movie clip capture function 075 On camera movie trimming 075 Playing back a recorded...
... Display Bright 067 Quick view 067 Display Save 068 Settings 068 Formatting a memory 068 Initialization 068 Language 069 Setting up the Date / Time / Date type 069 Time Zone 069 File name 070 Imprinting the recording date 070 Auto power off 071 Auto Focus lamp 071 Anynet+ (HDMI-CEC) 072 HDMI Size 073 Selecting Video out type 073 Setting the USB PLAY 074 Starting play mode 074 Playing back a still image 074 Playing back a movie clip 075 Movie clip capture function 075 On camera movie trimming 075 Playing back a recorded...
User Manual (user Manual) (ver.1.0) (English)
Page 25
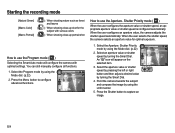
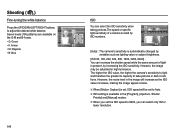
... functions. 1. An " " icon will configure the camera with optimal settings. Select an aperture value or shutter speed by using the LCD monitor. 5. Select the aperture value or shutter speed by pressing the left or right button and then adjust a desired value by using the Mode dial. (p.22) 2. How to use the Program mode ( ) Selecting the Smart Auto mode will appear on the selected item. 3. Starting the recording mode [Natural Green] ( [Macro Color] ( [Macro Portrait] ( ) : When shooting...
... functions. 1. An " " icon will configure the camera with optimal settings. Select an aperture value or shutter speed by using the LCD monitor. 5. Select the aperture value or shutter speed by pressing the left or right button and then adjust a desired value by using the Mode dial. (p.22) 2. How to use the Program mode ( ) Selecting the Smart Auto mode will appear on the selected item. 3. Starting the recording mode [Natural Green] ( [Macro Color] ( [Macro Portrait] ( ) : When shooting...

User Manual (user Manual) (ver.1.0) (English)
Page 29
... the movie shooting button once more, the function for recording high-quality videos.) - Movie clips will still be taken with the guide framing the sides of the memory capacity allows. 1. Movie clip file type: H.264(MPEG4.AVC) - If you choose. 1. Take a picture from the recording menu during video recording to disable the recording of the picture. Point the camera towards the subject and compose the image by using the LCD monitor. 3. Starting the recording mode...
... the movie shooting button once more, the function for recording high-quality videos.) - Movie clips will still be taken with the guide framing the sides of the memory capacity allows. 1. Movie clip file type: H.264(MPEG4.AVC) - If you choose. 1. Take a picture from the recording menu during video recording to disable the recording of the picture. Point the camera towards the subject and compose the image by using the LCD monitor. 3. Starting the recording mode...
User Manual (user Manual) (ver.1.0) (English)
Page 31
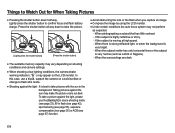
... take the picture. [Lightly press the shutter button] [Press the shutter button] å The available memory capacity may vary depending on shooting conditions and camera settings. å When shooting a low lighting conditions, the camera shake warning indicator ( Ã ) may appear on a solid surface or change to flash shot mode. å Shooting against the light : It is best to confirm focus and flash battery charge. Taking pictures against the light, please use a tripod, support the camera...
... take the picture. [Lightly press the shutter button] [Press the shutter button] å The available memory capacity may vary depending on shooting conditions and camera settings. å When shooting a low lighting conditions, the camera shake warning indicator ( Ã ) may appear on a solid surface or change to flash shot mode. å Shooting against the light : It is best to confirm focus and flash battery charge. Taking pictures against the light, please use a tripod, support the camera...
User Manual (user Manual) (ver.1.0) (English)
Page 34
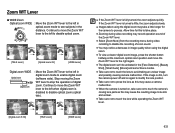
... the camera is fully turned, the zoom adjusts quickly. Stop moving lens parts as this to take place. å Zooming during video recording may record operation sound of the Zoom W/T lever. å Select [Zoom Mute] from the recording menu during video recording to disable the recording of digital zoom. Allow time for the camera to press the lens as this may cause the resulting image to be activated in the [Face Detection], [Beauty Shot], [Smart Auto], [Movie] and some Scene modes. å Take...
... the camera is fully turned, the zoom adjusts quickly. Stop moving lens parts as this to take place. å Zooming during video recording may record operation sound of the Zoom W/T lever. å Select [Zoom Mute] from the recording menu during video recording to disable the recording of digital zoom. Allow time for the camera to press the lens as this may cause the resulting image to be activated in the [Face Detection], [Beauty Shot], [Smart Auto], [Movie] and some Scene modes. å Take...
User Manual (user Manual) (ver.1.0) (English)
Page 37
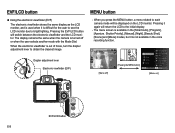
... used when it is turned off ] [Pressing the MENU button] Shooting Sound Display Settings Exit White Balance WB Fine-tuning ISO Face Detection Smart FR Edit Photo Size Quality Change [Menu on the LCD monitor. When the electronic viewfinder is available in the voice recording function. [Menu off or when the user selects another mode with the Mode Dial. When you press the MENU button, a menu related to obtain the clearest image. Shutter Priority], [Manual], [Night], [Beauty Shot...
... used when it is turned off ] [Pressing the MENU button] Shooting Sound Display Settings Exit White Balance WB Fine-tuning ISO Face Detection Smart FR Edit Photo Size Quality Change [Menu on the LCD monitor. When the electronic viewfinder is available in the voice recording function. [Menu off or when the user selects another mode with the Mode Dial. When you press the MENU button, a menu related to obtain the clearest image. Shutter Priority], [Manual], [Night], [Beauty Shot...
User Manual (user Manual) (ver.1.0) (English)
Page 49
... image may be set the ISO speed to 6400, you set to Auto. Ä ISO setting is present, by increasing the ISO sensitivity. Back Move [Auto] : The camera's sensitivity is automatically changed by ISO ISO numbers. Shooting ( ) Fine-tuning the white balance Press the UP/DOWN/LEFT/RIGHT buttons to take pictures in dark conditions. The higher the ISO value, the higher the camera's sensitivity to light and therefore the greater its capacity to adjust...
... image may be set the ISO speed to 6400, you set to Auto. Ä ISO setting is present, by increasing the ISO sensitivity. Back Move [Auto] : The camera's sensitivity is automatically changed by ISO ISO numbers. Shooting ( ) Fine-tuning the white balance Press the UP/DOWN/LEFT/RIGHT buttons to take pictures in dark conditions. The higher the ISO value, the higher the camera's sensitivity to light and therefore the greater its capacity to adjust...
User Manual (user Manual) (ver.1.0) (English)
Page 64
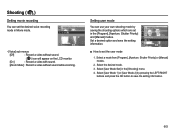
... [Aperture. Shutter Priority] or [Manual] modes. 2. Voice Back Move - [Voice] sub menus [Off] : Record a video without sound. ( ) icon will appear on the LCD monitor. [On] : Record a video with sound. [Zoom Mute] : Record a video without sound while zooming. User Mode Set Set a desired option and save the setting information. 063 Setting user mode You can set the desired voice recording mode in the [Shooting] menu. 4. Shooting ( ) Setting movie recording You can use your own shooting mode by pressing the LEFT/RIGHT buttons and press the OK button to set the user mode...
... [Aperture. Shutter Priority] or [Manual] modes. 2. Voice Back Move - [Voice] sub menus [Off] : Record a video without sound. ( ) icon will appear on the LCD monitor. [On] : Record a video with sound. [Zoom Mute] : Record a video without sound while zooming. User Mode Set Set a desired option and save the setting information. 063 Setting user mode You can set the desired voice recording mode in the [Shooting] menu. 4. Shooting ( ) Setting movie recording You can use your own shooting mode by pressing the LEFT/RIGHT buttons and press the OK button to set the user mode...
User Manual (user Manual) (ver.1.0) (English)
Page 70
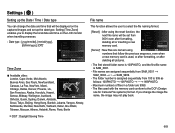
... a new memory card. [Series]* : New files are named using the reset function, the Format next file name will be set up the date type. Imprint Back :English :2009/01/01 Rese:Ltondon Serie:Sseries :Off Set numbers that will be displayed on the LCD monitor when travelling overseas. - Settings ( ) Setting up the Date / Time / Date type You can change the image file name, the image may not play back...
... a new memory card. [Series]* : New files are named using the reset function, the Format next file name will be set up the date type. Imprint Back :English :2009/01/01 Rese:Ltondon Serie:Sseries :Off Set numbers that will be displayed on the LCD monitor when travelling overseas. - Settings ( ) Setting up the Date / Time / Date type You can change the image file name, the image may not play back...
User Manual (user Manual) (ver.1.0) (English)
Page 95
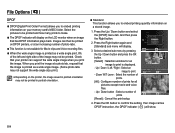
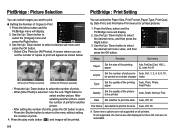
... 1 Quantity 3 5 Set 0 Quantity Set 4. Delete Protect Face LSisetleEcdt iItmage Voice memo Select :Off All DPOF Reset Copy to make. Ê The DPOF indicator will display on the LCD monitor when an image that your printer can then be printed on your memory card's MISC folder. Images can support the wide angle image when you print the image. And then press the Right button. 2. Press the Right button again and [Standard] sub menu will show...
... 1 Quantity 3 5 Set 0 Quantity Set 4. Delete Protect Face LSisetleEcdt iItmage Voice memo Select :Off All DPOF Reset Copy to make. Ê The DPOF indicator will display on the LCD monitor when an image that your printer can then be printed on your memory card's MISC folder. Images can support the wide angle image when you print the image. And then press the Right button. 2. Press the Right button again and [Standard] sub menu will show...
User Manual (user Manual) (ver.1.0) (English)
Page 97
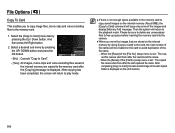
... image of the last copied folder is displayed. When the [Reset] of the [File No.] setup menu is set : The copied file names start from after the [Copying] message is displayed on the internal memory (About 8MB), the [Copy to Card] command will return to play mode. å If there is set : The copied file names start from after the last stored file name. - And then press the Right button. 2. Then the system will be sure to delete...
... image of the last copied folder is displayed. When the [Reset] of the [File No.] setup menu is set : The copied file names start from after the [Copying] message is displayed on the internal memory (About 8MB), the [Copy to Card] command will return to play mode. å If there is set : The copied file names start from after the last stored file name. - And then press the Right button. 2. Then the system will be sure to delete...
User Manual (user Manual) (ver.1.0) (English)
Page 99
... print will be printed Auto, Draft, Normal, Fine Date Set whether to print the date Auto, Off, On File Name Set whether to Print Images 1. Press the Up / Down button to select the number of Copies to print the file name Auto, Off, On Ä Some menu options are not supported on the LCD, but are still displayed on all printers. You can set the number of prints for printed pictures. 1. Use the Up / Down button to print. Ê Setting the Number of prints. - A screen...
... print will be printed Auto, Draft, Normal, Fine Date Set whether to print the date Auto, Off, On File Name Set whether to Print Images 1. Press the Up / Down button to select the number of Copies to print the file name Auto, Off, On Ä Some menu options are not supported on the LCD, but are still displayed on all printers. You can set the number of prints for printed pictures. 1. Use the Up / Down button to print. Ê Setting the Number of prints. - A screen...
User Manual (user Manual) (ver.1.0) (English)
Page 100
... button to select Date :Auto the [Reset] menu tab. Doing so may result in hot weather. - To avoid dangerous electrical shocks, never hold or operate the camera with your printer's default setting, refer to cameras. - Areas exposed to direct sunlight or the inside the camera when using it to observe the following locations. - Never drop the camera or subject it on the printer manufacturer. Protect the large size LCD...
... button to select Date :Auto the [Reset] menu tab. Doing so may result in hot weather. - To avoid dangerous electrical shocks, never hold or operate the camera with your printer's default setting, refer to cameras. - Areas exposed to direct sunlight or the inside the camera when using it to observe the following locations. - Never drop the camera or subject it on the printer manufacturer. Protect the large size LCD...
User Manual (user Manual) (ver.1.0) (English)
Page 101
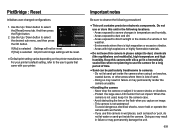
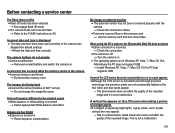
... flash unit to remove the battery and the memory card if you should check the camera condition. - If this happens, turn the camera off the camera and remove the memory card. In this case, reset the date and time correctly before trying the transfer again. å Before an important event or going on the surface of the image sensor. - In this case, disconnect and re-connect the USB cable before the recording...
... flash unit to remove the battery and the memory card if you should check the camera condition. - If this happens, turn the camera off the camera and remove the memory card. In this case, reset the date and time correctly before trying the transfer again. å Before an important event or going on the surface of the image sensor. - In this case, disconnect and re-connect the USB cable before the recording...
User Manual (user Manual) (ver.1.0) (English)
Page 104
... default settings ÃReset the date and time correctly The camera buttons do not operate åCamera malfunction à Remove/re-insert battery and switch the camera on A card error has occurred while the memory card is in the camera. åIncorrect memory card format à Re-format the memory card The images don't play back åIncorrect file name (Violation of DCF format) à Do not change the image file name Color of image is different to PC that has correct files When using...
... default settings ÃReset the date and time correctly The camera buttons do not operate åCamera malfunction à Remove/re-insert battery and switch the camera on A card error has occurred while the memory card is in the camera. åIncorrect memory card format à Re-format the memory card The images don't play back åIncorrect file name (Violation of DCF format) à Do not change the image file name Color of image is different to PC that has correct files When using...
User Manual (user Manual) (ver.1.0) (English)
Page 109
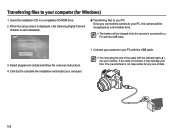
... is not responsible for Windows) 1. When the setup screen is displayed, click Samsung Digital Camera Installer to start installation. Ê Transferring files to your PC Once you connect the camera to your PC, the camera will be recognized as a removable drive. å The battery will be charged while the camera is reversed, it may damage your files. If the cable is connected to a PC with the indicator light (Ÿ) into your camera. Click Exit to...
... is not responsible for Windows) 1. When the setup screen is displayed, click Samsung Digital Camera Installer to start installation. Ê Transferring files to your PC Once you connect the camera to your PC, the camera will be recognized as a removable drive. å The battery will be charged while the camera is reversed, it may damage your files. If the cable is connected to a PC with the indicator light (Ÿ) into your camera. Click Exit to...

User Manual (user Manual) (ver.1.0) (English)
Page 112
... Windows) Icon Description 1 Open menus 2 Display files in the selected folder 3 Change to the Photo edit mode 4 Change to the Video edit mode 5 Change to the Sharing mode (You can transfer files directly from the camera to a Macintosh computer, the computer will recognize the device automatically. Transferring files to your computer (for Mac) For Mac users When you connect the camera to the computer without installing any programs. Ê Installing programs Hardware and software requirements Item Requirements CPU Power Mac...
... Windows) Icon Description 1 Open menus 2 Display files in the selected folder 3 Change to the Photo edit mode 4 Change to the Video edit mode 5 Change to the Sharing mode (You can transfer files directly from the camera to a Macintosh computer, the computer will recognize the device automatically. Transferring files to your computer (for Mac) For Mac users When you connect the camera to the computer without installing any programs. Ê Installing programs Hardware and software requirements Item Requirements CPU Power Mac...

User Manual (user Manual) (ver.1.0) (English)
Page 117
... 5 Are other USB cable, and connect only one USB cable to temporarily disable the program. Transfer the file again. In this case, disconnect the other USB cables connected to the PC? Ã The camera may not recognize the camera as another USB cable. Refer to the security program instructions about how to the camera. Case 1 USB cable is not connected or it is not recognized by clicking Start (Settings) Control Panel (Performance and...
... 5 Are other USB cable, and connect only one USB cable to temporarily disable the program. Transfer the file again. In this case, disconnect the other USB cables connected to the PC? Ã The camera may not recognize the camera as another USB cable. Refer to the security program instructions about how to the camera. Case 1 USB cable is not connected or it is not recognized by clicking Start (Settings) Control Panel (Performance and...


