
User Manual
Page 1
TO receive more complete service, please register your product at www.samsung.com/global/register the possibilities ThanKyou for Durcnaslngthis Samsung product.
TO receive more complete service, please register your product at www.samsung.com/global/register the possibilities ThanKyou for Durcnaslngthis Samsung product.
User Manual
Page 2
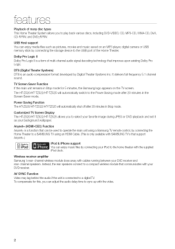
... Home Theater. Instead,the rearspeakersconnect to a compact wireless modulethat communicates with the supplied iPod dock. The HT-Z520/HT-TZ522/HT-TZ525 will automaticallyshut off after 20 minutes in Stop mode for 5 minutes, the Samsung logo...home theater with your favorite image during JPEG or DVD playback and set it as pictures, movies and music saved on the TV screen. Customized TV Screen Display The HT-Z520/HT-TZ522/HT-TZ525 allows you can be used to operate the main unit using a SamsungTV remote control, by Digital Theater Systems Inc. Wireless receiver amplifier Samsung...
... Home Theater. Instead,the rearspeakersconnect to a compact wireless modulethat communicates with the supplied iPod dock. The HT-Z520/HT-TZ522/HT-TZ525 will automaticallyshut off after 20 minutes in Stop mode for 5 minutes, the Samsung logo...home theater with your favorite image during JPEG or DVD playback and set it as pictures, movies and music saved on the TV screen. Customized TV Screen Display The HT-Z520/HT-TZ522/HT-TZ525 allows you can be used to operate the main unit using a SamsungTV remote control, by Digital Theater Systems Inc. Wireless receiver amplifier Samsung...

User Manual
Page 3
WHAT'S INCLUDED Check for the supplied accessories below. SWA-4100 Wireless Receiver Module (AH97-03207A) TX Card (AH40-00149A) Speaker Cable (2EA) (AH81-02137A)
WHAT'S INCLUDED Check for the supplied accessories below. SWA-4100 Wireless Receiver Module (AH97-03207A) TX Card (AH40-00149A) Speaker Cable (2EA) (AH81-02137A)

User Manual
Page 4
REFER SERVICING TO QULAIFIED SERVICE PERSONNEL. WARNING • To reduce the risk of fire or electric shock, do not expose this appliance to rain or moisture. • To prevent injury, this apparatus must be securely attached to the floor/wall in accordance with the installation instructions. • If this power supply is used as radios and televisions, use caution when moving the cart/apparatus combination to avoid injury from tip-over. 13) Unplug this equipment may void the user's authority to which can radiate radio frequency energy and, if not installed and used in ...
REFER SERVICING TO QULAIFIED SERVICE PERSONNEL. WARNING • To reduce the risk of fire or electric shock, do not expose this appliance to rain or moisture. • To prevent injury, this apparatus must be securely attached to the floor/wall in accordance with the installation instructions. • If this power supply is used as radios and televisions, use caution when moving the cart/apparatus combination to avoid injury from tip-over. 13) Unplug this equipment may void the user's authority to which can radiate radio frequency energy and, if not installed and used in ...

User Manual
Page 5
Make sure the ventilation slots are harmful to overheating and malfunction of the player. Do not place the player on the back of your player. Switching off the DVD player to disconnect the player completely from the power supply, remove the main plug from moisture (i.e. Use of batteries in cold temperatures. If transporting the player during the winter, wait approximately 2 hours until the unit has reached room temperature before using. This product is covered by the following U.S. and 5,583,936. patents: US4,930,15U8S4,930,160 5 Before moving the player, ensure the disc ...
Make sure the ventilation slots are harmful to overheating and malfunction of the player. Do not place the player on the back of your player. Switching off the DVD player to disconnect the player completely from the power supply, remove the main plug from moisture (i.e. Use of batteries in cold temperatures. If transporting the player during the winter, wait approximately 2 hours until the unit has reached room temperature before using. This product is covered by the following U.S. and 5,583,936. patents: US4,930,15U8S4,930,160 5 Before moving the player, ensure the disc ...
User Manual
Page 6
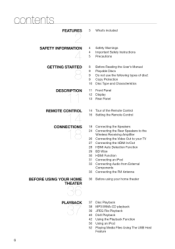
... Panel 12 Display 13 Rear Panel REMOTE CONTROL 14 Tour of the Remote Control 16 Setting the Remote Control CONNECTIONS i , BEFORE USING YOUR HOME THEATER 18 Connecting the Speakers 24 Connecting the Rear Speakers to the Wireless Receiving Amplifier 26 Connecting the Video Out to your TV 27 Connecting the...29 BD Wise 30 HDMI Function 31 Connecting an iPod 33 Connecting Audio from External Components 35 Connecting the FM Antenna 36 Before using your home theater / PLAYBACK Jf 37 Disc Playback 38 MP3/WMA-CD playback 39 JPEG File Playback 40 DivX Playback 42 Using the Playback Function 50 ...
... Panel 12 Display 13 Rear Panel REMOTE CONTROL 14 Tour of the Remote Control 16 Setting the Remote Control CONNECTIONS i , BEFORE USING YOUR HOME THEATER 18 Connecting the Speakers 24 Connecting the Rear Speakers to the Wireless Receiving Amplifier 26 Connecting the Video Out to your TV 27 Connecting the...29 BD Wise 30 HDMI Function 31 Connecting an iPod 33 Connecting Audio from External Components 35 Connecting the FM Antenna 36 Before using your home theater / PLAYBACK Jf 37 Disc Playback 38 MP3/WMA-CD playback 39 JPEG File Playback 40 DivX Playback 42 Using the Playback Function 50 ...
User Manual
Page 7
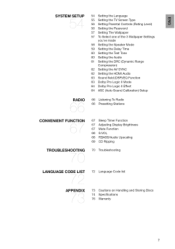
SYSTEM SETUP 54 Setting the Language 55 Setting the TV Screen Type 56 Setting Parental Controls (Rating Level) 56 Setting the Password 57 Setting The Wallpaper ...
SYSTEM SETUP 54 Setting the Language 55 Setting the TV Screen Type 56 Setting Parental Controls (Rating Level) 56 Setting the Password 57 Setting The Wallpaper ...

User Manual
Page 8
...-RW) This involves a case where a function does not operate or settings may be reproduced or copied without the prior written permission of Samsung Electronics Co.,Ltd. 8 This involves tips or instructions on the page that help each function operate. _ In this manual, the instructions ...the use of this product. (See pages 4-5) 2) If a problem occurs, check the Troubleshooting. (See pages 70-71) Copyright ©2008 Samsung Electronics Co.,Ltd. aett na started k._../ k._../ BEFORE READING THE USER'S MANUAL Make sure to check the following terms before using this user's manual ...
...-RW) This involves a case where a function does not operate or settings may be reproduced or copied without the prior written permission of Samsung Electronics Co.,Ltd. 8 This involves tips or instructions on the page that help each function operate. _ In this manual, the instructions ...the use of this product. (See pages 4-5) 2) If a problem occurs, check the Troubleshooting. (See pages 70-71) Copyright ©2008 Samsung Electronics Co.,Ltd. aett na started k._../ k._../ BEFORE READING THE USER'S MANUAL Make sure to check the following terms before using this user's manual ...

User Manual
Page 9
... played on this player. DVD(Digital Versatile Disc) offersfantasticaudio andvideo,thanksto DolbyDigital surroundsound and MPEG-2video compressiontechnology.Now you can enjoy these VIDEO realisticeffectsin the home,as if you were in orderfor the disc to play. Ifsuch discs are played, a Ifthe codesdo not match, the disc will not play.
... played on this player. DVD(Digital Versatile Disc) offersfantasticaudio andvideo,thanksto DolbyDigital surroundsound and MPEG-2video compressiontechnology.Now you can enjoy these VIDEO realisticeffectsin the home,as if you were in orderfor the disc to play. Ifsuch discs are played, a Ifthe codesdo not match, the disc will not play.

User Manual
Page 10
Ifthere is a blank segment in the Multisession disc, the disc can be played only up to the blank segment. • A maximum of 9,999 images can be stored on the disc recording device (CD-Recorder or PC) and the condition of 300 folders can be able to start playing or may not play at all of the recorded files may skip during playback. • A maximum of the recorded files may be played. • Only CD-R discs with JPEG files in ISO 9660 or Joliet format can be played. • JPEG file names should be 8 characters or less in length and contain no blank spaces or special ...
Ifthere is a blank segment in the Multisession disc, the disc can be played only up to the blank segment. • A maximum of 9,999 images can be stored on the disc recording device (CD-Recorder or PC) and the condition of 300 folders can be able to start playing or may not play at all of the recorded files may skip during playback. • A maximum of the recorded files may be played. • Only CD-R discs with JPEG files in ISO 9660 or Joliet format can be played. • JPEG file names should be 8 characters or less in length and contain no blank spaces or special ...

User Manual
Page 13
ConnecytourTV'sVideoInputjack(VIDEOIN)to theVIDEOOUTjack. UsetheHDMcI able,connecthisHDMoI utputterminatlothe HDMiInput terminaol nyourTVforthe bestqualitypicture. Connectthefront,centerspeakersandsubwoofer. Usethisto connecet xternael quipmenctapableofdigitaol utput. Connecat TVwithComponenvtideoinputstothesejacks. Connectthe FMantenna. Thefan alwaysrevolvews henthepowerison.Ensurea minimumof 4 inchesofclearspaceonallsidesofthefanwheninstallingtheproduct. Fastenthe speakewr ires. 13 Connectthe HDMINjackofthisunitandtheHDMOI UTjackofa Set-Top/CabBleox. ...
ConnecytourTV'sVideoInputjack(VIDEOIN)to theVIDEOOUTjack. UsetheHDMcI able,connecthisHDMoI utputterminatlothe HDMiInput terminaol nyourTVforthe bestqualitypicture. Connectthefront,centerspeakersandsubwoofer. Usethisto connecet xternael quipmenctapableofdigitaol utput. Connecat TVwithComponenvtideoinputstothesejacks. Connectthe FMantenna. Thefan alwaysrevolvews henthepowerison.Ensurea minimumof 4 inchesofclearspaceonallsidesofthefanwheninstallingtheproduct. Fastenthe speakewr ires. 13 Connectthe HDMINjackofthisunitandtheHDMOI UTjackofa Set-Top/CabBleox. ...

User Manual
Page 14
rnot_ Gontro TOUR OF THE REMOTE CONTROL % % % % % % 14
rnot_ Gontro TOUR OF THE REMOTE CONTROL % % % % % % 14

User Manual
Page 15
attention to (-). _ Use the correct type of the arrow. ...... Follow these precautions to avoid leaking or cracking cells: _ Place batteries in voltage. _ Always replace both batteries at the same time. _ Do not expose the batteries to heat or a flame. 15 Batteries that look similar may differ in the remote control so they match the polarity : (+) to (+) and (-) to the correct polarities (+and cover. POWER button UVURECEIVEbRutton TV button _41 Number (0~9) buttons _51 AUDIO STEP button _ Tuning Preset/CD Skip buttons I81 VOLUME button MENU button [_ Cursor/ENTER button INFO ...
attention to (-). _ Use the correct type of the arrow. ...... Follow these precautions to avoid leaking or cracking cells: _ Place batteries in voltage. _ Always replace both batteries at the same time. _ Do not expose the batteries to heat or a flame. 15 Batteries that look similar may differ in the remote control so they match the polarity : (+) to (+) and (-) to the correct polarities (+and cover. POWER button UVURECEIVEbRutton TV button _41 Number (0~9) buttons _51 AUDIO STEP button _ Tuning Preset/CD Skip buttons I81 VOLUME button MENU button [_ Cursor/ENTER button INFO ...

User Manual
Page 16
... listed for your brand of TV, the remote control will work on your TV with this remote control. Press the "IV button to turn on a Samsung TV by default. If the TV turns off, the setting is more than one at a horizontal angle of up to 30° from the remote... on some brands of your brand of the Remote Control The remote control can be operated at a time to determine which code works. ,$ I Example : For a Samsung TV While holdingdown the POWER button, use the TV POWER, VOLUME, CHANNEL, and Numeric buttons (0-9).
... listed for your brand of TV, the remote control will work on your TV with this remote control. Press the "IV button to turn on a Samsung TV by default. If the TV turns off, the setting is more than one at a horizontal angle of up to 30° from the remote... on some brands of your brand of the Remote Control The remote control can be operated at a time to determine which code works. ,$ I Example : For a Samsung TV While holdingdown the POWER button, use the TV POWER, VOLUME, CHANNEL, and Numeric buttons (0-9).

User Manual
Page 18
... or installing the product, be heard from them slightlyin front of the center speakers. conn cton This section involves various methods of connecting the Digital Home Theater to other . Alignthe front face of the front speakerswith the front face of the center speaker or place them all the time, Sound will be...
... or installing the product, be heard from them slightlyin front of the center speakers. conn cton This section involves various methods of connecting the Digital Home Theater to other . Alignthe front face of the front speakerswith the front face of the center speaker or place them all the time, Sound will be...

User Manual
Page 19
...@@ FRONT (AH81-04670A) FRONT L (AH81-04972A) CENTER R(AH81-04676A) (AH81-04973A) SUBWOOFER SPEAKER CABLE CRADLESTAND/ (AH81-04975A) (AH81-04976A) __ WALLMOUNT HT-TZ522 (L) (R) (L) (R) REAR L (AH81-04974B) R(AH81-04677B) SCREW(Small1):0EA (Am81-04984B) SCREW(Large2)E: A (AH81-04983B) FRONT L (AH81-...04980B) CENTER STAND SUBWOOFER SPEAKER CABLE STAND BASE R(AH81-04681B) (AH81-0497%) (AH81-04981A) (AH81-04975A) (AH81-04976A) (AH81-04982A) HT-TZ525 (L) (R) (L) (R) CENTER (AH81-04973A) SCREW(Small2):0EA SCREW(Large4)E: A (AH81-04984A) (AH81-0498%) @® FRONT REAR L (AH81-...
...@@ FRONT (AH81-04670A) FRONT L (AH81-04972A) CENTER R(AH81-04676A) (AH81-04973A) SUBWOOFER SPEAKER CABLE CRADLESTAND/ (AH81-04975A) (AH81-04976A) __ WALLMOUNT HT-TZ522 (L) (R) (L) (R) REAR L (AH81-04974B) R(AH81-04677B) SCREW(Small1):0EA (Am81-04984B) SCREW(Large2)E: A (AH81-04983B) FRONT L (AH81-...04980B) CENTER STAND SUBWOOFER SPEAKER CABLE STAND BASE R(AH81-04681B) (AH81-0497%) (AH81-04981A) (AH81-04975A) (AH81-04976A) (AH81-04982A) HT-TZ525 (L) (R) (L) (R) CENTER (AH81-04973A) SCREW(Small2):0EA SCREW(Large4)E: A (AH81-04984A) (AH81-0498%) @® FRONT REAR L (AH81-...

User Manual
Page 20
This is the completion of the stand installation. 2O Turn the stand clockwise to lock it. (Turningit counter-clockwise will loosen it fits into the hole as described inthe figure. 2. conn cton Installing the Cradle Stand (HT-Z520 - Front Speakers) 1. Insert the stand so that it .) 3.
This is the completion of the stand installation. 2O Turn the stand clockwise to lock it. (Turningit counter-clockwise will loosen it fits into the hole as described inthe figure. 2. conn cton Installing the Cradle Stand (HT-Z520 - Front Speakers) 1. Insert the stand so that it .) 3.

User Manual
Page 21
Turn the wall mount counter clockwise to install the speaker on the wall. Insert the wall mount so that it . (This is hung properly to avoid accidents or injury. 21 Use the wall mount hole (bracket) to fix it fits into the rear hole of the cradle stand installation.) 3. Make sure the speaker is inthe reverse direction of the speaker as in the figure. 2. Front Speakers Wall Mount Installation Installing the Wall Mount HT-Z520 - Front Speakers 1.
Turn the wall mount counter clockwise to install the speaker on the wall. Insert the wall mount so that it . (This is hung properly to avoid accidents or injury. 21 Use the wall mount hole (bracket) to fix it fits into the rear hole of the cradle stand installation.) 3. Make sure the speaker is inthe reverse direction of the speaker as in the figure. 2. Front Speakers Wall Mount Installation Installing the Wall Mount HT-Z520 - Front Speakers 1.

User Manual
Page 22
Turn the STAND upside-down and connect it to Install the Speaker on the rear of the speaker marked with arrow using a screwdriver. 22 conn cton Front/Rear Tallboy Stand How to the STAND BASE. 2. Insert another large SCREW into the hole on the Stand HT-TZ522 - Front/Rear Speakers 1. InsertfivesmallSCREWSintothe five holes markedwith arrowsusinga screwdriveras shown inthe illustration. % 3. ConnectupperSPEAKERto the assembled STAND. 4. Front Speakers HT-TZ525 -
Turn the STAND upside-down and connect it to Install the Speaker on the rear of the speaker marked with arrow using a screwdriver. 22 conn cton Front/Rear Tallboy Stand How to the STAND BASE. 2. Insert another large SCREW into the hole on the Stand HT-TZ522 - Front/Rear Speakers 1. InsertfivesmallSCREWSintothe five holes markedwith arrowsusinga screwdriveras shown inthe illustration. % 3. ConnectupperSPEAKERto the assembled STAND. 4. Front Speakers HT-TZ525 -
User Manual
Page 23
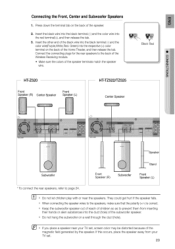
Press down the terminal tab on a wall through the duct (hole). HT-Z520 Front Speaker(R) Center Speaker Front Speaker (L) HT-TZ522/TZ525 Center Speaker I Black Red Speaker Subwoo_r Stand Front Speaker (R) Subwoofer Front Speaker (L) * To connect the rear speakers, refer... near the speakers. W Do not let children play with or near your TV set , screen color may be distorted because of the Home Theater,and then releasethe tab. Connectingthe Front,Centerand SubwooferSpeakers 1. If this occurs, place the speaker away from inserting their hands or alien substances into...
Press down the terminal tab on a wall through the duct (hole). HT-Z520 Front Speaker(R) Center Speaker Front Speaker (L) HT-TZ522/TZ525 Center Speaker I Black Red Speaker Subwoo_r Stand Front Speaker (R) Subwoofer Front Speaker (L) * To connect the rear speakers, refer... near the speakers. W Do not let children play with or near your TV set , screen color may be distorted because of the Home Theater,and then releasethe tab. Connectingthe Front,Centerand SubwooferSpeakers 1. If this occurs, place the speaker away from inserting their hands or alien substances into...