Owners Instructions
Page 4
...screen 16:9 ratio format,or expanded to fill the screen if your Samsung limited warranty. Altitude The PDP will not operate normally at altitudes above ... General Information Your New Plasma Display Panel 10 Remote Control Buttons 12 Wall Installation Instructions 14 Connections Connecting VHF and UHF Antennas 20 Connecting Cable TV 20 Connecting Speakers 22 ...Remote Control 37 Picture Control Customizing the Picture 40 Using Automatic Picture Settings 41 Selecting the Color Tone 42 DNIe (Digital Natural Image engine 43 Viewing the Picture-in-Picture 44 Changing the Screen Size 50...
...screen 16:9 ratio format,or expanded to fill the screen if your Samsung limited warranty. Altitude The PDP will not operate normally at altitudes above ... General Information Your New Plasma Display Panel 10 Remote Control Buttons 12 Wall Installation Instructions 14 Connections Connecting VHF and UHF Antennas 20 Connecting Cable TV 20 Connecting Speakers 22 ...Remote Control 37 Picture Control Customizing the Picture 40 Using Automatic Picture Settings 41 Selecting the Color Tone 42 DNIe (Digital Natural Image engine 43 Viewing the Picture-in-Picture 44 Changing the Screen Size 50...
Owners Instructions
Page 6
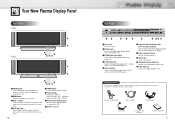
...; Power Indicator Power Off : LED Red Power On (Timer On) : LED Green Power On (Timer Off) : LED Off ∏ Remote Control Signal Receiver Aim the remote control towards this spot on -screen menu. ¨CH(w,v) button Press CHv or CHw to change Channels. " Antenna jack Connect to antenna....Accessories Once you have unpacked your TV, check to make sure that you have all of the available video sources (ie., Video, S-Video, Component1, Component2, PC ). ´ MENU button Displays the main on your dealer. Your New Plasma Display Panel Front Panel HPN5039 HPN6339 Œ SOURCE button Press ...
...; Power Indicator Power Off : LED Red Power On (Timer On) : LED Green Power On (Timer Off) : LED Off ∏ Remote Control Signal Receiver Aim the remote control towards this spot on -screen menu. ¨CH(w,v) button Press CHv or CHw to change Channels. " Antenna jack Connect to antenna....Accessories Once you have unpacked your TV, check to make sure that you have all of the available video sources (ie., Video, S-Video, Component1, Component2, PC ). ´ MENU button Displays the main on your dealer. Your New Plasma Display Panel Front Panel HPN5039 HPN6339 Œ SOURCE button Press ...
Owners Instructions
Page 7
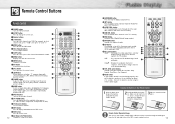
... the hear the Dolby surround effect. ˛ MTS button Press to open the battery compartment of the PDP's remote control receiver. 13 Remote Control Operation Range. button The TV automatically cycles through all of this Samsung remote control, so that it to adjust volume. ∏ SLEEP button Press to make the PIP window Large, Small...
... the hear the Dolby surround effect. ˛ MTS button Press to open the battery compartment of the PDP's remote control receiver. 13 Remote Control Operation Range. button The TV automatically cycles through all of this Samsung remote control, so that it to adjust volume. ∏ SLEEP button Press to make the PIP window Large, Small...
Owners Instructions
Page 13
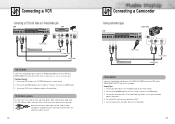
Ferrite Cores (HPN5039) The ferrite cores are used to select the "Video", then press the ENTER button. 3. Viewing Tapes 1. Turn on your VCR, insert a videotape and press the play button. Turn on your PDP, and press the TV/VIDEO button on the remote control. 2. Turn on your camcorder to OUT. 5. Press ... button. 25 When you can use an S-Video cable.) Videotape Playback: 1. Set the IN/OUT switch on your PDP, and press the TV/VIDEO button on the remote control. 2. Press the UP or DOWN button to the cable near the connector. When connecting the audio cable (PC, DVI, S-Video, ...
Ferrite Cores (HPN5039) The ferrite cores are used to select the "Video", then press the ENTER button. 3. Viewing Tapes 1. Turn on your VCR, insert a videotape and press the play button. Turn on your PDP, and press the TV/VIDEO button on the remote control. 2. Turn on your camcorder to OUT. 5. Press ... button. 25 When you can use an S-Video cable.) Videotape Playback: 1. Set the IN/OUT switch on your PDP, and press the TV/VIDEO button on the remote control. 2. Press the UP or DOWN button to the cable near the connector. When connecting the audio cable (PC, DVI, S-Video, ...

Owners Instructions
Page 14
...the AUDIO L/R(COMPONENT1, 2) input jacks on the PDP and the AUDIO OUT jacks on the DTV. Turn on the remote control. 2. To Watch DTV: 1. Turn on your PDP, and press the TV/VIDEO button on your DTV receiver. • For an explanation of Component video, see your DVD owner's instructions....Power Plug or Ferrite Cores(HPN5039) Video Cable Audio Cable DVI Cable Use the DVI-D connection cable. (sold separately) How to Connect 1 Connect the cable or antenna to select "COMPONENT1" or "COMPONENT2", then press the ENTER button. 3. Turn on your PDP, and press the TV/VIDEO button on your ...
...the AUDIO L/R(COMPONENT1, 2) input jacks on the PDP and the AUDIO OUT jacks on the DTV. Turn on the remote control. 2. To Watch DTV: 1. Turn on your PDP, and press the TV/VIDEO button on your DTV receiver. • For an explanation of Component video, see your DVD owner's instructions....Power Plug or Ferrite Cores(HPN5039) Video Cable Audio Cable DVI Cable Use the DVI-D connection cable. (sold separately) How to Connect 1 Connect the cable or antenna to select "COMPONENT1" or "COMPONENT2", then press the ENTER button. 3. Turn on your PDP, and press the TV/VIDEO button on your ...

Owners Instructions
Page 15
PLASMA DISPLAY PANEL Operation Turning the PDP On and Off 30 Memorizing the Channels 32 Setting Up Your Remote Control 37
PLASMA DISPLAY PANEL Operation Turning the PDP On and Off 30 Memorizing the Channels 32 Setting Up Your Remote Control 37
Owners Instructions
Page 16
... Menu 2 Press the UP/DOWN buttons to enter items in the menu. You can press the EXIT button on the front of your remote control to check if the TV mode has been chosen ( ). Your PDP also lets you can also use the selected items. Press the ENTER ( ) button to move items... in the menu. Viewing the Menus 1 With the power on, press the MENU button on the remote control. The PDP will display the Picture mode...
... Menu 2 Press the UP/DOWN buttons to enter items in the menu. You can press the EXIT button on the front of your remote control to check if the TV mode has been chosen ( ). Your PDP also lets you can also use the selected items. Press the ENTER ( ) button to move items... in the menu. Viewing the Menus 1 With the power on, press the MENU button on the remote control. The PDP will display the Picture mode...
Owners Instructions
Page 17
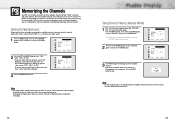
.../ CATV Auto Program Fine Tune LNA Ch. Scan Channel Ant 0 Off Move Enter Menu Ant 50 Auto Program : Stop Note • The PDP automatically cycles through the channels. Memorizing the Channels... Off Move Select Menu Note • STD, HRC and IRC identify various types of cable TV systems. Contact your local cable company to identify the type of cable system you must specify ...Press the MENU button. Proceed to change channels by entering the channel digits. See steps on the remote control. 2 Press the UP or DOWN button to scan through all the available channels are memorized,...
.../ CATV Auto Program Fine Tune LNA Ch. Scan Channel Ant 0 Off Move Enter Menu Ant 50 Auto Program : Stop Note • The PDP automatically cycles through the channels. Memorizing the Channels... Off Move Select Menu Note • STD, HRC and IRC identify various types of cable TV systems. Contact your local cable company to identify the type of cable system you must specify ...Press the MENU button. Proceed to change channels by entering the channel digits. See steps on the remote control. 2 Press the UP or DOWN button to scan through all the available channels are memorized,...

Owners Instructions
Page 18
.... Scan Ant 7 : Stop 34 35 Ant 4 Added Note • You can view any channel (including an erased channel) by using the number buttons on the remote control. Press the RIGHT button to select "Ch Scan", then press the ENTER button. Ant 4 Ex) Channel "4" 2 Press the ADD/DEL button: Repeatedly pressing this...
.... Scan Ant 7 : Stop 34 35 Ant 4 Added Note • You can view any channel (including an erased channel) by using the number buttons on the remote control. Press the RIGHT button to select "Ch Scan", then press the ENTER button. Ant 4 Ex) Channel "4" 2 Press the ADD/DEL button: Repeatedly pressing this...
Owners Instructions
Page 19
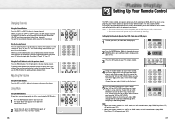
...enter three digits of the VCR (or Cable box, DVD player) code listed on the remote control. q The remote control can operate in four different modes :TV, VCR, Cable or DVD. Directly Accessing Channels Press the number buttons to go directly to...to change channels. button. If your VCR. (or Cable box, DVD player) 2 Press the MODE button. Notes • When your remote control is in the lower-left corner of the screen. 2 To turn on after setup, repeat steps 2, 3, and 4, but try one.... buttons to select the second channel. Pressing the corresponding button on STB made by Samsung.
...enter three digits of the VCR (or Cable box, DVD player) code listed on the remote control. q The remote control can operate in four different modes :TV, VCR, Cable or DVD. Directly Accessing Channels Press the number buttons to go directly to...to change channels. button. If your VCR. (or Cable box, DVD player) 2 Press the MODE button. Notes • When your remote control is in the lower-left corner of the screen. 2 To turn on after setup, repeat steps 2, 3, and 4, but try one.... buttons to select the second channel. Pressing the corresponding button on STB made by Samsung.

Owners Instructions
Page 20
Remote Control Codes VCR Codes Cable Box Codes DVD Codes 38 PLASMA DISPLAY PANEL Picture Control Customizing the Picture 40 Using Automatic Picture Settings 41 Selecting the Color Tone 42 DNIe (Digital Natural Image engine 43 Viewing the Picture-in-Picture 44 Changing the Screen Size 50 Freezing the Picture 51
Remote Control Codes VCR Codes Cable Box Codes DVD Codes 38 PLASMA DISPLAY PANEL Picture Control Customizing the Picture 40 Using Automatic Picture Settings 41 Selecting the Color Tone 42 DNIe (Digital Natural Image engine 43 Viewing the Picture-in-Picture 44 Changing the Screen Size 50 Freezing the Picture 51
Owners Instructions
Page 21
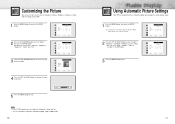
...Custom On Move Select Menu Mode Adjust Color Tone DNIe Picture Custom Normal On Move Enter Menu Contrast Brightness Sharpness Color Tint R 50 Adjust 80 50 50 50 G 50 Move Adjust Menu 5 Press the MENU button to exit. Customizing the Picture You can 't adjust the Sharpness, Color and Tint... the item you wish to change. 4 Press the LEFT or RIGHT button to change the Contrast, Brightness, Sharpness, Color, and Tint settings of the remote control. 2 Press the LEFT or RIGHT button to select "Custom", "Dynamic", "Standard" or "Movie" picture setting. • You can select "...
...Custom On Move Select Menu Mode Adjust Color Tone DNIe Picture Custom Normal On Move Enter Menu Contrast Brightness Sharpness Color Tint R 50 Adjust 80 50 50 50 G 50 Move Adjust Menu 5 Press the MENU button to exit. Customizing the Picture You can 't adjust the Sharpness, Color and Tint... the item you wish to change. 4 Press the LEFT or RIGHT button to change the Contrast, Brightness, Sharpness, Color, and Tint settings of the remote control. 2 Press the LEFT or RIGHT button to select "Custom", "Dynamic", "Standard" or "Movie" picture setting. • You can select "...

Owners Instructions
Page 22
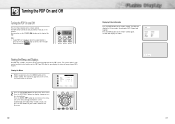
...Picture Custom Custom On Move Select Menu Mode Adjust Color Tone DNIe Picture Custom Normal On Move Select Menu 42 DNIe (Digital Natural Image engine) Samsung' s New Technology brings you more detailed images with contrast and white enhancement and 3D noise reduction. 1 Press the MENU button, then press ...the ENTER button. ➤ Quick way to select DNIe : Simply press the "DNIe" button under the cover of the remote control. 2 Press the UP or DOWN button to select "DNIe", then press the LEFT or RIGHT button to exit. Mode Adjust Color Tone DNIe Picture...
...Picture Custom Custom On Move Select Menu Mode Adjust Color Tone DNIe Picture Custom Normal On Move Select Menu 42 DNIe (Digital Natural Image engine) Samsung' s New Technology brings you more detailed images with contrast and white enhancement and 3D noise reduction. 1 Press the MENU button, then press ...the ENTER button. ➤ Quick way to select DNIe : Simply press the "DNIe" button under the cover of the remote control. 2 Press the UP or DOWN button to select "DNIe", then press the LEFT or RIGHT button to exit. Mode Adjust Color Tone DNIe Picture...

Owners Instructions
Page 23
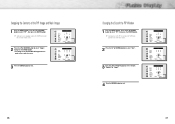
...Size Locate Ant/CATV Channel Move PIP On TV Large Select Ant Ant 5 Menu 3 Press ...PIP On TV Large Ant Ant 5 Select Menu 2... all of the available signal sources: "TV", "Video", "S-Video", "Component 1",... Press the UP or DOWN button to select "PIP", then press the ENTER button. ➤ Quick way to exit. PIP Settings Main screen PIP screen TV TV O Video O S-Video O Component 1 O Component 2 O PC O DVI O O : PIP and Swap Operate X : PIP doesn't Operate Video S-Video Component 1 Component 2 PC DVI O O O O O ...Move PIP On TV Large Ant Ant 5 Select Menu 3...
...Size Locate Ant/CATV Channel Move PIP On TV Large Select Ant Ant 5 Menu 3 Press ...PIP On TV Large Ant Ant 5 Select Menu 2... all of the available signal sources: "TV", "Video", "S-Video", "Component 1",... Press the UP or DOWN button to select "PIP", then press the ENTER button. ➤ Quick way to exit. PIP Settings Main screen PIP screen TV TV O Video O S-Video O Component 1 O Component 2 O PC O DVI O O : PIP and Swap Operate X : PIP doesn't Operate Video S-Video Component 1 Component 2 PC DVI O O O O O ...Move PIP On TV Large Ant Ant 5 Select Menu 3...
Owners Instructions
Page 24
...main screen, and vice versa. Select Source Swap Size Locate Ant/CATV Channel Move PIP On TV Large Ant Ant 5 Select Menu 2 Press the UP or DOWN button to access swapping: Just press... the "SWAP" button under the cover of the remote control. 2 Press the UP or DOWN button to select "Size". 3 Press the LEFT or RIGHT button to ...Image 1 Press the MENU button. Swapping the Contents of the remote control. Select Source Swap Size Locate Ant/CATV Channel Move PIP On TV Large Enter Ant Ant 5 Menu 3 Press the MENU button to exit...
...main screen, and vice versa. Select Source Swap Size Locate Ant/CATV Channel Move PIP On TV Large Ant Ant 5 Select Menu 2 Press the UP or DOWN button to access swapping: Just press... the "SWAP" button under the cover of the remote control. 2 Press the UP or DOWN button to select "Size". 3 Press the LEFT or RIGHT button to ...Image 1 Press the MENU button. Swapping the Contents of the remote control. Select Source Swap Size Locate Ant/CATV Channel Move PIP On TV Large Enter Ant Ant 5 Menu 3 Press the MENU button to exit...

Owners Instructions
Page 25
... button. ➤ Quick way to change the channel that appears in the PIP window. 4 Press the MENU button to exit. Changing the Location of the remote control. 2 Press the UP or DOWN button to select "Channel". Press the UP or DOWN button to select "PIP", then press the ENTER button. 2 Press... want. 4 Press the MENU button to exit. Select Source Swap Size Locate Ant/CATV Channel Move PIP On TV Large Ant Ant 5 Select Menu Select Source Swap Size Locate Ant/CATV Channel Move PIP On TV Large STD STD 5 Select Menu Select Source Swap Size Locate Ant/CATV Channel Move PIP On...
... button. ➤ Quick way to change the channel that appears in the PIP window. 4 Press the MENU button to exit. Changing the Location of the remote control. 2 Press the UP or DOWN button to select "Channel". Press the UP or DOWN button to select "PIP", then press the ENTER button. 2 Press... want. 4 Press the MENU button to exit. Select Source Swap Size Locate Ant/CATV Channel Move PIP On TV Large Ant Ant 5 Select Menu Select Source Swap Size Locate Ant/CATV Channel Move PIP On TV Large STD STD 5 Select Menu Select Source Swap Size Locate Ant/CATV Channel Move PIP On...
Owners Instructions
Page 26
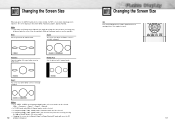
...8226; Changing the screen size to Normal, Zoom1 or Zoom2 during PIP mode will cause the PIP 50 window to freeze a moving picture. View the monitor in this order: Wide, Panorama, Zoom1, ...selected. • In Component(480p, 720p. 1080i) modes, you press the ASPECT button on the remote control, the PDP's screen mode should appear in sequence. Wide Sets the picture to cancel. 51 Zoom2...Panorama Zoom1 The screen size when Wide screen is vertically enlarged. Normal Zoom1 Up/Down Notes • In TV, VIDEO, S-VIDEO and Component(480i) modes, all screen modes can be selected. (Wide ➝ ...
...8226; Changing the screen size to Normal, Zoom1 or Zoom2 during PIP mode will cause the PIP 50 window to freeze a moving picture. View the monitor in this order: Wide, Panorama, Zoom1, ...selected. • In Component(480p, 720p. 1080i) modes, you press the ASPECT button on the remote control, the PDP's screen mode should appear in sequence. Wide Sets the picture to cancel. 51 Zoom2...Panorama Zoom1 The screen size when Wide screen is vertically enlarged. Normal Zoom1 Up/Down Notes • In TV, VIDEO, S-VIDEO and Component(480i) modes, all screen modes can be selected. (Wide ➝ ...

Owners Instructions
Page 29
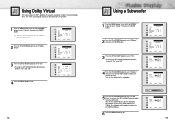
...button to exit. • Choose Stereo for channels that are broadcasting in stereo. • Choose Mono for channels that are broadcasting in TV mode only. 56 Using the Auto Volume Each broadcasting station has its own signal conditions, which is changed. "Auto volume" lets you ... sound output when the modulation signal is usually a foreign-language translation. Choosing a Multi-Channel Sound (MTS) Soundtrack Depending on the remote control. Mode Adjust MTS Auto Volume Dolby Virtual Woofer Sound Custom Mono Off Off Move Select Menu Mode Adjust MTS Auto Volume Dolby ...
...button to exit. • Choose Stereo for channels that are broadcasting in stereo. • Choose Mono for channels that are broadcasting in TV mode only. 56 Using the Auto Volume Each broadcasting station has its own signal conditions, which is changed. "Auto volume" lets you ... sound output when the modulation signal is usually a foreign-language translation. Choosing a Multi-Channel Sound (MTS) Soundtrack Depending on the remote control. Mode Adjust MTS Auto Volume Dolby Virtual Woofer Sound Custom Mono Off Off Move Select Menu Mode Adjust MTS Auto Volume Dolby ...
Owners Instructions
Page 30
... or DOWN button to select "Sound", then press the ENTER button. ➤ Quick way to access the Surround: Just press the "SURROUND" button on the remote control. 2 Press the UP or DOWN button to select "Dolby Virtual". 3 Press the LEFT or RIGHT button to select "On". • Pressing the LEFT or... RIGHT button will reproduce frequencies of 130Hz and lower. 6 Press the MENU button to exit. Woofer On 50 120Hz Move Select Menu Woofer Volume Cutoff Freq. Press the UP or DOWN button to select "Sound", then press the ENTER button. 2 Press the UP...
... or DOWN button to select "Sound", then press the ENTER button. ➤ Quick way to access the Surround: Just press the "SURROUND" button on the remote control. 2 Press the UP or DOWN button to select "Dolby Virtual". 3 Press the LEFT or RIGHT button to select "On". • Pressing the LEFT or... RIGHT button will reproduce frequencies of 130Hz and lower. 6 Press the MENU button to exit. Woofer On 50 120Hz Move Select Menu Woofer Volume Cutoff Freq. Press the UP or DOWN button to select "Sound", then press the ENTER button. 2 Press the UP...

Owners Instructions
Page 34
... to pages 70 and 76.) 66 Pin Configuration D-Sub Cable • 15Pin Signal Cable (based on the remote control. 2. Connecting to a PC Connection to a Macintosh computer may be different, depending on the model.) Connecting...and 67 for use with your monitor in adapter. Turn on your PDP, and press the TV/VIDEO button on protruded pin) DVI-D Cable (Digital-Only Connector) Setting up Your PDP ... PDP Use the DVI-D or connection cable. (sold separately) DVI Cable PC Cable Ferrite Cores(HPN5039) Audio Cable Power Plug PC DVI jack (The actual configuration on your PC may require in...
... to pages 70 and 76.) 66 Pin Configuration D-Sub Cable • 15Pin Signal Cable (based on the remote control. 2. Connecting to a PC Connection to a Macintosh computer may be different, depending on the model.) Connecting...and 67 for use with your monitor in adapter. Turn on your PDP, and press the TV/VIDEO button on protruded pin) DVI-D Cable (Digital-Only Connector) Setting up Your PDP ... PDP Use the DVI-D or connection cable. (sold separately) DVI Cable PC Cable Ferrite Cores(HPN5039) Audio Cable Power Plug PC DVI jack (The actual configuration on your PC may require in...


