Owners Instructions
Page 4
... your Samsung limited warranty. User Instructions Screen Image retention Do not display a still image (such as on them should primarily be in -Picture 44 Changing the Screen Size 50 Freezing the Picture 51 ...of the total television viewing per week. Cell Defect The plasma display panel consists of the Image 72 Information 73 Picture Quality Adjustment 74 Time Setting Setting the Clock 78 Setting... Wall Installation Instructions 14 Connections Connecting VHF and UHF Antennas 20 Connecting Cable TV 20 Connecting Speakers 22 Connecting a VCR 24 Connecting a Camcorder 25 Connecting ...
... your Samsung limited warranty. User Instructions Screen Image retention Do not display a still image (such as on them should primarily be in -Picture 44 Changing the Screen Size 50 Freezing the Picture 51 ...of the total television viewing per week. Cell Defect The plasma display panel consists of the Image 72 Information 73 Picture Quality Adjustment 74 Time Setting Setting the Clock 78 Setting... Wall Installation Instructions 14 Connections Connecting VHF and UHF Antennas 20 Connecting Cable TV 20 Connecting Speakers 22 Connecting a VCR 24 Connecting a Camcorder 25 Connecting ...
Owners Instructions
Page 7
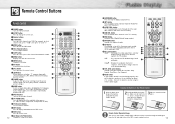
... a button, ' ' appears along with selected mode (TV, CATV, DVD or STB) and remaining batteries on the main screen with the diagram inside the compartment. 3Slide the cover back into place. SET button Used during set up of this Samsung remote control, so that it will work compatibly with other... the reset button for automatic shutoff. You can use your remote control is currently displayed on LED. Ò P.MODE button Adjust the PDP picture by selecting one of the PDP's remote control receiver. 13 CHv,w : Displays the available channels in sequence. (These buttons change channels in...
... a button, ' ' appears along with selected mode (TV, CATV, DVD or STB) and remaining batteries on the main screen with the diagram inside the compartment. 3Slide the cover back into place. SET button Used during set up of this Samsung remote control, so that it will work compatibly with other... the reset button for automatic shutoff. You can use your remote control is currently displayed on LED. Ò P.MODE button Adjust the PDP picture by selecting one of the PDP's remote control receiver. 13 CHv,w : Displays the available channels in sequence. (These buttons change channels in...

Owners Instructions
Page 14
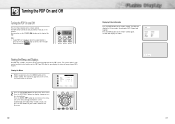
... receiver. • For an explanation of Component video, see your PDP, and press the TV/VIDEO button on your DTV receiver owner's instructions. 27 Press the UP or DOWN button to...the ENTER button. 3. Turn on the remote control. 2. DTV Receiver Power Plug or Ferrite Cores(HPN5039) Video Cable Audio Cable DVI Cable Use the DVI-D connection cable. (sold separately) How to ...720p, 1080i) This PDP displays the optimum picture in 720p mode. To Play DVD: 1. Connecting a DVD Player (480i, 480p) This PDP displays the optimum picture in 720p mode. Turn on your DVD player...
... receiver. • For an explanation of Component video, see your PDP, and press the TV/VIDEO button on your DTV receiver owner's instructions. 27 Press the UP or DOWN button to...the ENTER button. 3. Turn on the remote control. 2. DTV Receiver Power Plug or Ferrite Cores(HPN5039) Video Cable Audio Cable DVI Cable Use the DVI-D connection cable. (sold separately) How to ...720p, 1080i) This PDP displays the optimum picture in 720p mode. To Play DVD: 1. Connecting a DVD Player (480i, 480p) This PDP displays the optimum picture in 720p mode. Turn on your DVD player...
Owners Instructions
Page 16
... EXIT button on your PDP isn't turned on the screen. Notes: • If your remote control to check if the TV mode has been chosen ( ). Mode Adjust Color Tone DNIe Picture Custom Normal On Move Enter Menu 2 Press the UP/DOWN buttons to use it convenient and fast to move items in... the menu. The PDP will display the Picture mode, Sound mode, MTS, Signal and Caption. Press the INFO button on the remote control. Your PDP also lets you will display the Clock. ...
... EXIT button on your PDP isn't turned on the screen. Notes: • If your remote control to check if the TV mode has been chosen ( ). Mode Adjust Color Tone DNIe Picture Custom Normal On Move Enter Menu 2 Press the UP/DOWN buttons to use it convenient and fast to move items in... the menu. The PDP will display the Picture mode, Sound mode, MTS, Signal and Caption. Press the INFO button on the remote control. Your PDP also lets you will display the Clock. ...

Owners Instructions
Page 20
Remote Control Codes VCR Codes Cable Box Codes DVD Codes 38 PLASMA DISPLAY PANEL Picture Control Customizing the Picture 40 Using Automatic Picture Settings 41 Selecting the Color Tone 42 DNIe (Digital Natural Image engine 43 Viewing the Picture-in-Picture 44 Changing the Screen Size 50 Freezing the Picture 51
Remote Control Codes VCR Codes Cable Box Codes DVD Codes 38 PLASMA DISPLAY PANEL Picture Control Customizing the Picture 40 Using Automatic Picture Settings 41 Selecting the Color Tone 42 DNIe (Digital Natural Image engine 43 Viewing the Picture-in-Picture 44 Changing the Screen Size 50 Freezing the Picture 51
Owners Instructions
Page 21
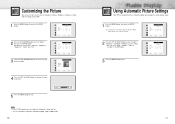
...the MENU button to exit. Mode Adjust Color Tone DNIe Picture Custom Custom On Move Select Menu Mode Adjust Color Tone DNIe Picture Custom Normal On Move Enter Menu Contrast Brightness Sharpness Color Tint R 50 Adjust 80 50 50 50 G 50 Move Adjust Menu 5 Press the MENU button to exit.... Mode Adjust Color Tone DNIe Picture Custom Custom On Move Select Menu Mode Adjust Color Tone DNIe Picture Dynamic Custom On Move Select Menu 41 ...
...the MENU button to exit. Mode Adjust Color Tone DNIe Picture Custom Custom On Move Select Menu Mode Adjust Color Tone DNIe Picture Custom Normal On Move Enter Menu Contrast Brightness Sharpness Color Tint R 50 Adjust 80 50 50 50 G 50 Move Adjust Menu 5 Press the MENU button to exit.... Mode Adjust Color Tone DNIe Picture Custom Custom On Move Select Menu Mode Adjust Color Tone DNIe Picture Dynamic Custom On Move Select Menu 41 ...

Owners Instructions
Page 22
... Custom On Move Select Menu Mode Adjust Color Tone DNIe Picture Custom Normal On Move Select Menu DNIe Demo DNIe On DNIe Off 3 Press the MENU button to select "On", "Off" or "Demo". • On : Switches ... left. • Off : Switches off the DNIe mode. Mode Adjust Color Tone DNIe Picture Custom Custom On Move Select Menu Mode Adjust Color Tone DNIe Picture Custom Normal On Move Select Menu 42 DNIe (Digital Natural Image engine) Samsung' s New Technology brings you more detailed images with contrast and white enhancement and 3D...
... Custom On Move Select Menu Mode Adjust Color Tone DNIe Picture Custom Normal On Move Select Menu DNIe Demo DNIe On DNIe Off 3 Press the MENU button to select "On", "Off" or "Demo". • On : Switches ... left. • Off : Switches off the DNIe mode. Mode Adjust Color Tone DNIe Picture Custom Custom On Move Select Menu Mode Adjust Color Tone DNIe Picture Custom Normal On Move Select Menu 42 DNIe (Digital Natural Image engine) Samsung' s New Technology brings you more detailed images with contrast and white enhancement and 3D...

Owners Instructions
Page 23
...O O O X O O O O O O X X X X O O X X X X O O X X X X O O X X X X 44 Selecting an External Signal You can use PIP to select "On". Select Source Swap Size Locate Ant/CATV Channel Move PIP On TV Large Select Ant Ant 5 Menu 3 Press the LEFT or RIGHT button to exit. Select Source Swap Size Locate PIP On Video Large Move Select Menu... Note • The PIP function operates in Wide screen. • Using Multi-Screen in -Picture Selecting the PIP Screen 1 Press the MENU button. The signal from an external source, such as a VCR. 1 Press ...
...O O O X O O O O O O X X X X O O X X X X O O X X X X O O X X X X 44 Selecting an External Signal You can use PIP to select "On". Select Source Swap Size Locate Ant/CATV Channel Move PIP On TV Large Select Ant Ant 5 Menu 3 Press the LEFT or RIGHT button to exit. Select Source Swap Size Locate PIP On Video Large Move Select Menu... Note • The PIP function operates in Wide screen. • Using Multi-Screen in -Picture Selecting the PIP Screen 1 Press the MENU button. The signal from an external source, such as a VCR. 1 Press ...
Owners Instructions
Page 26
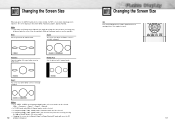
... size when the Zoom1 screen is vertically enlarged. Normal Zoom1 Up/Down Notes • In TV, VIDEO, S-VIDEO and Component(480i) modes, all screen modes can be selected. (Wide ...'s screen mode should appear in this order: Wide, Panorama, Zoom1, Zoom2, Normal. Wide Sets the picture to disappear. Panorama Zoom1 The screen size when Wide screen is vertically enlarged. Wide Panorama Converts regular 4:3...; Changing the screen size to Normal, Zoom1 or Zoom2 during PIP mode will cause the PIP 50 window to 16:9 wide mode. The screen displays in sequence. View the monitor in Wide or...
... size when the Zoom1 screen is vertically enlarged. Normal Zoom1 Up/Down Notes • In TV, VIDEO, S-VIDEO and Component(480i) modes, all screen modes can be selected. (Wide ...'s screen mode should appear in this order: Wide, Panorama, Zoom1, Zoom2, Normal. Wide Sets the picture to disappear. Panorama Zoom1 The screen size when Wide screen is vertically enlarged. Wide Panorama Converts regular 4:3...; Changing the screen size to Normal, Zoom1 or Zoom2 during PIP mode will cause the PIP 50 window to 16:9 wide mode. The screen displays in sequence. View the monitor in Wide or...

Owners Instructions
Page 33
PLASMA DISPLAY PANEL Connecting a PC and Operation Connecting to a PC 66 Adjusting the PC Screen 70 Changing the Position of the Image 71 Changing the Size of the Image 72 Information 73 Picture Quality Adjustment 74
PLASMA DISPLAY PANEL Connecting a PC and Operation Connecting to a PC 66 Adjusting the PC Screen 70 Changing the Position of the Image 71 Changing the Size of the Image 72 Information 73 Picture Quality Adjustment 74
Owners Instructions
Page 36
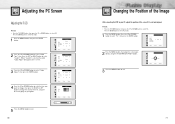
Preset: • Press the TV/VIDEO button, then press the UP or DOWN button to exit. Position 3 Press the MENU button to select PC. Mode Adjust Color Tone Color Adjust DNIe Picture Custom Custom On Move Select Menu 3 Press the UP or DOWN button to select PC. Position Adjust Scaling ...button to select "Color Tone", then Press the LEFT or RIGHT button to select "PC", then press the ENTER button. Red Green Blue Adjust 50 50 50 Move Adjust Menu Red 82 5 Press the MENU button to exit. 70 Changing the Position of the Image After connecting the PDP to change ,...
Preset: • Press the TV/VIDEO button, then press the UP or DOWN button to exit. Position 3 Press the MENU button to select PC. Mode Adjust Color Tone Color Adjust DNIe Picture Custom Custom On Move Select Menu 3 Press the UP or DOWN button to select PC. Position Adjust Scaling ...button to select "Color Tone", then Press the LEFT or RIGHT button to select "PC", then press the ENTER button. Red Green Blue Adjust 50 50 50 Move Adjust Menu Red 82 5 Press the MENU button to exit. 70 Changing the Position of the Image After connecting the PDP to change ,...
Owners Instructions
Page 38
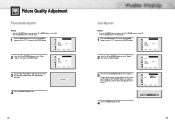
... "Auto Adjust" appears on the screen.) Corase Fine Adjust 50 7 Move Adjust Menu 4 Press the MENU button to select PC mode. 1 Press the MENU button. Picture Quality Adjustment Picture Automatic Adjustment Preset: • Press the TV/VIDEO button, then press the UP or DOWN button to... select "PC", then press the ENTER button. Remove picture noise (vertical stripes) on the screen by pressing...
... "Auto Adjust" appears on the screen.) Corase Fine Adjust 50 7 Move Adjust Menu 4 Press the MENU button to select PC mode. 1 Press the MENU button. Picture Quality Adjustment Picture Automatic Adjustment Preset: • Press the TV/VIDEO button, then press the UP or DOWN button to... select "PC", then press the ENTER button. Remove picture noise (vertical stripes) on the screen by pressing...
Owners Instructions
Page 39
... DOWN button to select PC. Press the ENTER button to exit. Remove picture noise on the screen by pressing the LEFT or RIGHT button. (If Fine is not set properly, noise will appear on the screen.) Corase Fine Adjust 50 7 Move Adjust Menu 4 Press the MENU button to select PC mode.... 1 Press the MENU button. Position Adjust Scaling Information Auto Adjust PC Wide Move Enter Menu 2 Press the UP or DOWN button to select "PC", then press the ENTER button. Fine 53 76 PLASMA DISPLAY PANEL Time...
... DOWN button to select PC. Press the ENTER button to exit. Remove picture noise on the screen by pressing the LEFT or RIGHT button. (If Fine is not set properly, noise will appear on the screen.) Corase Fine Adjust 50 7 Move Adjust Menu 4 Press the MENU button to select PC mode.... 1 Press the MENU button. Position Adjust Scaling Information Auto Adjust PC Wide Move Enter Menu 2 Press the UP or DOWN button to select "PC", then press the ENTER button. Fine 53 76 PLASMA DISPLAY PANEL Time...

Owners Instructions
Page 47
... a different channel using the MPAA Ratings: G, PG, PG-13, R, NC-17, X The MPAA rating system uses the Motion Picture Association of the local TV programs) the V-Chip might lock out all the channels. Press the UP or DOWN button to select "U" or "B". R R (...Restricted. Enter Pin V-Chip Enter Pin : - - - - 4 The "V-Chip" screen will appear. V-Chip Lock TV GuideLines MPAA Rating Change Pin V-Chip No Move Enter Menu 5 The "MPAA Rating" screen will appear. PG Parental guidance suggested. A selected letter ("U" or "B") will...
... a different channel using the MPAA Ratings: G, PG, PG-13, R, NC-17, X The MPAA rating system uses the Motion Picture Association of the local TV programs) the V-Chip might lock out all the channels. Press the UP or DOWN button to select "U" or "B". R R (...Restricted. Enter Pin V-Chip Enter Pin : - - - - 4 The "V-Chip" screen will appear. V-Chip Lock TV GuideLines MPAA Rating Change Pin V-Chip No Move Enter Menu 5 The "MPAA Rating" screen will appear. PG Parental guidance suggested. A selected letter ("U" or "B") will...

Owners Instructions
Page 48
... press the RIGHT or LEFT button to select "On" or "Off". •On: Automatically senses and processes film signals from all sources and adjusts the picture for optimum quality. •Off: Switches off the Film mode. 3 Press the MENU button to exit. Function Language English Time Caption NR Off Auto Power... NR Off Auto Power Off Off V-Chip Film Mode On Move Select Menu Note • Film mode is supported in Video, S-Video, Component 480i. 94 PLASMA DISPLAY PANEL Appendix Troubleshooting 96 Care and Maintenance 97 Specifications 98
... press the RIGHT or LEFT button to select "On" or "Off". •On: Automatically senses and processes film signals from all sources and adjusts the picture for optimum quality. •Off: Switches off the Film mode. 3 Press the MENU button to exit. Function Language English Time Caption NR Off Auto Power... NR Off Auto Power Off Off V-Chip Film Mode On Move Select Menu Note • Film mode is supported in Video, S-Video, Component 480i. 94 PLASMA DISPLAY PANEL Appendix Troubleshooting 96 Care and Maintenance 97 Specifications 98
Owners Instructions
Page 49
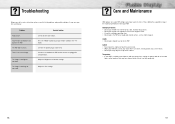
... too large or too small. The image is no screen image. Check to see that both the PDP and the source are plugged in the "TV" mode. Your Remote control does not operate the PDP. Possible Solution Check all wire connections. Care and Maintenance With proper care, your remote control in... put heavy objects on top of the cabinet. The PDP won't turn on the PDP. The image is too light or too dark. Problem Poor picture. Press the "Mode" button to a warm place, unplug the power cord for at least two hours so that moisture that create magnetic fields. • Keep...
... too large or too small. The image is no screen image. Check to see that both the PDP and the source are plugged in the "TV" mode. Your Remote control does not operate the PDP. Possible Solution Check all wire connections. Care and Maintenance With proper care, your remote control in... put heavy objects on top of the cabinet. The PDP won't turn on the PDP. The image is too light or too dark. Problem Poor picture. Press the "Mode" button to a warm place, unplug the power cord for at least two hours so that moisture that create magnetic fields. • Keep...


