Owners Instructions
Page 4
... 16:9 ratio format,or expanded to fill the screen if your Samsung limited warranty. Displaying stationary images that offer picture sizing features,use ...Connections Connecting VHF and UHF Antennas 20 Connecting Cable TV 20 Connecting Speakers 22 Connecting a VCR 24 Connecting ...plasma display panel consists of television formats used for viewing. Although the panels are not covered by your model offers this screen when displaying a still image. Displaying stationary graphics and images on screen, such as "screen burn". Be careful in -Picture 44 Changing the Screen Size 50...
... 16:9 ratio format,or expanded to fill the screen if your Samsung limited warranty. Displaying stationary images that offer picture sizing features,use ...Connections Connecting VHF and UHF Antennas 20 Connecting Cable TV 20 Connecting Speakers 22 Connecting a VCR 24 Connecting ...plasma display panel consists of television formats used for viewing. Although the panels are not covered by your model offers this screen when displaying a still image. Displaying stationary graphics and images on screen, such as "screen burn". Be careful in -Picture 44 Changing the Screen Size 50...
Owners Instructions
Page 17
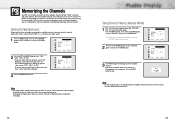
... change channels by entering the channel digits. At this point the signal source has been selected. Scan Channel Ant 0 Off Move Enter Menu Ant 50 Auto Program : Stop Note • The PDP automatically cycles through the channels. Ant/ CATV Auto Program Fine Tune LNA Ch. Ant/ CATV ...Memory (Automatic Method) 1 First, select the correct signal source (Ant, STD, HRC, IRC). Memorizing the Channels Your PDP can begin memorizing all of cable TV systems. Contact your cable company). 3 Press the MENU button to the display the type of cable system: "STD", "HRC", or "IRC". (If ...
... change channels by entering the channel digits. At this point the signal source has been selected. Scan Channel Ant 0 Off Move Enter Menu Ant 50 Auto Program : Stop Note • The PDP automatically cycles through the channels. Ant/ CATV Auto Program Fine Tune LNA Ch. Ant/ CATV ...Memory (Automatic Method) 1 First, select the correct signal source (Ant, STD, HRC, IRC). Memorizing the Channels Your PDP can begin memorizing all of cable TV systems. Contact your cable company). 3 Press the MENU button to the display the type of cable system: "STD", "HRC", or "IRC". (If ...

Owners Instructions
Page 20
Remote Control Codes VCR Codes Cable Box Codes DVD Codes 38 PLASMA DISPLAY PANEL Picture Control Customizing the Picture 40 Using Automatic Picture Settings 41 Selecting the Color Tone 42 DNIe (Digital Natural Image engine 43 Viewing the Picture-in-Picture 44 Changing the Screen Size 50 Freezing the Picture 51
Remote Control Codes VCR Codes Cable Box Codes DVD Codes 38 PLASMA DISPLAY PANEL Picture Control Customizing the Picture 40 Using Automatic Picture Settings 41 Selecting the Color Tone 42 DNIe (Digital Natural Image engine 43 Viewing the Picture-in-Picture 44 Changing the Screen Size 50 Freezing the Picture 51
Owners Instructions
Page 21
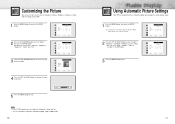
... Picture Custom Custom On Move Select Menu Mode Adjust Color Tone DNIe Picture Custom Normal On Move Enter Menu Contrast Brightness Sharpness Color Tint R 50 Adjust 80 50 50 50 G 50 Move Adjust Menu 5 Press the MENU button to exit. You will also see the items "Contrast", "Brightness", "Sharpness", "Color" and "Tint". 3 Press the UP...
... Picture Custom Custom On Move Select Menu Mode Adjust Color Tone DNIe Picture Custom Normal On Move Enter Menu Contrast Brightness Sharpness Color Tint R 50 Adjust 80 50 50 50 G 50 Move Adjust Menu 5 Press the MENU button to exit. You will also see the items "Contrast", "Brightness", "Sharpness", "Color" and "Tint". 3 Press the UP...
Owners Instructions
Page 26
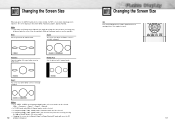
...) modes, you press the ASPECT button on the remote control, the PDP's screen mode should appear in sequence. Normal Zoom1 Up/Down Notes • In TV, VIDEO, S-VIDEO and Component(480i) modes, all screen modes can be selected. (Wide ➝ Panorama ➝ Zoom1 ➝ Zoom2 ➝ Normal). &#...or Downw button. (All screen modes) • Changing the screen size to Normal, Zoom1 or Zoom2 during PIP mode will cause the PIP 50 window to disappear. Changing the Screen Size When you can move the picture on the remote control to freeze a moving picture. The screen ...
...) modes, you press the ASPECT button on the remote control, the PDP's screen mode should appear in sequence. Normal Zoom1 Up/Down Notes • In TV, VIDEO, S-VIDEO and Component(480i) modes, all screen modes can be selected. (Wide ➝ Panorama ➝ Zoom1 ➝ Zoom2 ➝ Normal). &#...or Downw button. (All screen modes) • Changing the screen size to Normal, Zoom1 or Zoom2 during PIP mode will cause the PIP 50 window to disappear. Changing the Screen Size When you can move the picture on the remote control to freeze a moving picture. The screen ...
Owners Instructions
Page 28
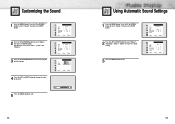
... Mono Off Off Move Select Menu Mode Adjust MTS Auto Volume Dolby Virtual Woofer Sound Custom Mono Off Off Move Enter Menu Adjust Bass 50 Treble 50 Balance L 50 R 50 Move Adjust Menu Bass 82 54 Using Automatic Sound Settings 1 Press the MENU button. Press the UP or DOWN button to select "Sound", then...
... Mono Off Off Move Select Menu Mode Adjust MTS Auto Volume Dolby Virtual Woofer Sound Custom Mono Off Off Move Enter Menu Adjust Bass 50 Treble 50 Balance L 50 R 50 Move Adjust Menu Bass 82 54 Using Automatic Sound Settings 1 Press the MENU button. Press the UP or DOWN button to select "Sound", then...
Owners Instructions
Page 30
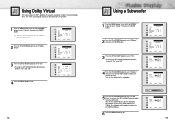
... optional L/R speakers to adjust the value of the item. The center and surround sounds are mixed into the L/R speakers. 1 Press the MENU button. Woofer On 50 130Hz Move Adjust Menu 59 This sets the cutoff frequency for the subwoofer. 5 Press the UP or DOWN button to select "Cutoff Freq.", then press... Select Menu Mode Adjust MTS Auto Volume Dolby Virtual Woofer Sound Standard Mono Off Off Move Enter Menu Woofer Volume Cutoff Freq. Woofer On 50 120Hz Move Adjust Menu Volume 65 Woofer Volume Cutoff Freq. This sets the volume for the subwoofer. Woofer On...
... optional L/R speakers to adjust the value of the item. The center and surround sounds are mixed into the L/R speakers. 1 Press the MENU button. Woofer On 50 130Hz Move Adjust Menu 59 This sets the cutoff frequency for the subwoofer. 5 Press the UP or DOWN button to select "Cutoff Freq.", then press... Select Menu Mode Adjust MTS Auto Volume Dolby Virtual Woofer Sound Standard Mono Off Off Move Enter Menu Woofer Volume Cutoff Freq. Woofer On 50 120Hz Move Adjust Menu Volume 65 Woofer Volume Cutoff Freq. This sets the volume for the subwoofer. Woofer On...
Owners Instructions
Page 36
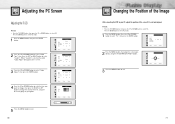
... Color Tone Color Adjust DNIe Picture Custom Custom On Move Select Menu 3 Press the UP or DOWN button to select PC. Red Green Blue Adjust 50 50 50 Move Adjust Menu Red 82 5 Press the MENU button to exit. 70 Changing the Position of the Image After connecting the PDP to change the... your PC, adjust the position of the item, using the UP/DOWN/LEFT/RIGHT button. Adjusting the PC Screen Adjusting the R.G.B Preset: • Press the TV/VIDEO button, then press the UP or DOWN button to select "Color Adjust", then press the ENTER button. Press the ENTER button to select PC...
... Color Tone Color Adjust DNIe Picture Custom Custom On Move Select Menu 3 Press the UP or DOWN button to select PC. Red Green Blue Adjust 50 50 50 Move Adjust Menu Red 82 5 Press the MENU button to exit. 70 Changing the Position of the Image After connecting the PDP to change the... your PC, adjust the position of the item, using the UP/DOWN/LEFT/RIGHT button. Adjusting the PC Screen Adjusting the R.G.B Preset: • Press the TV/VIDEO button, then press the UP or DOWN button to select "Color Adjust", then press the ENTER button. Press the ENTER button to select PC...
Owners Instructions
Page 38
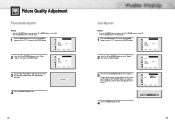
...Position Adjust Scaling Information Auto Adjust PC Wide Move Enter Menu 3 The message "Auto Adjust" appears on the screen.) Corase Fine Adjust 50 7 Move Adjust Menu 4 Press the MENU button to select PC. Coarse 53 75 Press the ENTER button to select "Adjust", then ...will appear on the screen and the picture adjustments are automatically activated. Picture Quality Adjustment Picture Automatic Adjustment Preset: • Press the TV/VIDEO button, then press the UP or DOWN button to select PC mode. 1 Press the MENU button. Position Adjust Scaling Information Auto...
...Position Adjust Scaling Information Auto Adjust PC Wide Move Enter Menu 3 The message "Auto Adjust" appears on the screen.) Corase Fine Adjust 50 7 Move Adjust Menu 4 Press the MENU button to select PC. Coarse 53 75 Press the ENTER button to select "Adjust", then ...will appear on the screen and the picture adjustments are automatically activated. Picture Quality Adjustment Picture Automatic Adjustment Preset: • Press the TV/VIDEO button, then press the UP or DOWN button to select PC mode. 1 Press the MENU button. Position Adjust Scaling Information Auto...
Owners Instructions
Page 39
...button. Press the UP or DOWN button to select PC mode. 1 Press the MENU button. Fine 53 76 PLASMA DISPLAY PANEL Time Setting Setting the Clock 78 Setting the Sleep Timer 79 Setting the Timers 80 Setting the Preferred ... Menu 2 Press the UP or DOWN button to select PC. Fine Tuning (Fine) Preset: • Press the TV/VIDEO button, then press the UP or DOWN button to select "Adjust", then press the ENTER button. Position Adjust ...is not set properly, noise will appear on the screen.) Corase Fine Adjust 50 7 Move Adjust Menu 4 Press the MENU button to select "Fine".
...button. Press the UP or DOWN button to select PC mode. 1 Press the MENU button. Fine 53 76 PLASMA DISPLAY PANEL Time Setting Setting the Clock 78 Setting the Sleep Timer 79 Setting the Timers 80 Setting the Preferred ... Menu 2 Press the UP or DOWN button to select PC. Fine Tuning (Fine) Preset: • Press the TV/VIDEO button, then press the UP or DOWN button to select "Adjust", then press the ENTER button. Position Adjust ...is not set properly, noise will appear on the screen.) Corase Fine Adjust 50 7 Move Adjust Menu 4 Press the MENU button to select "Fine".
Owners Instructions
Page 50
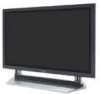
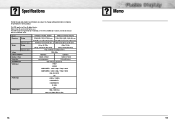
... areas as well as residential areas. So it can be used in terms of Pixels Screen Size ANTENNA input VIDEO input AUDIO input AUDIO output HPN5039 (TYPE NO: AX50P3) HPN6339 (TYPE NO: AX63P3) 1204.6(W) X 79(D) X 724(H) mm; 1503.4 (W) X 89(D) X 893.8(H) mm; 47.43(W) X 3.11(D) X 28.5(H)... stand)} (82kg ; 181lbs(with stand)) 134g ; 0.295 lbs (including batteries) 120V, 60Hz 400 Watts 630 Watts 1366(H) X 768(V) 1366(H) X 768(V) 127 cm/50 inches 159 cm/63 inches VHF, UHF (75Ω unbalanced) VIDEO S-VIDEO COMPONENT 1 - 480i / 480p / 720p / 1080i COMPONENT 2 - 480i / 480p / ...
... areas as well as residential areas. So it can be used in terms of Pixels Screen Size ANTENNA input VIDEO input AUDIO input AUDIO output HPN5039 (TYPE NO: AX50P3) HPN6339 (TYPE NO: AX63P3) 1204.6(W) X 79(D) X 724(H) mm; 1503.4 (W) X 89(D) X 893.8(H) mm; 47.43(W) X 3.11(D) X 28.5(H)... stand)} (82kg ; 181lbs(with stand)) 134g ; 0.295 lbs (including batteries) 120V, 60Hz 400 Watts 630 Watts 1366(H) X 768(V) 1366(H) X 768(V) 127 cm/50 inches 159 cm/63 inches VHF, UHF (75Ω unbalanced) VIDEO S-VIDEO COMPONENT 1 - 480i / 480p / 720p / 1080i COMPONENT 2 - 480i / 480p / ...


