
User Manual (ENGLISH)
Page 4
...9632; Setting the Function Help 57 ■ Upgrading the Software 58 PC DISPLAY ■ Using Your TV as a Computer (PC) Display .......... 59 ■ Display Modes 60 ■ Setting up the TV with your PC 61 ■ Changing the Picture Size (PC Mode 63 ■ Setting the Home ...a Multi-Channel Sound (MTS) Track - Analog 41 ■ Checking the Digital-Signal Strength - Analog 15 ■ Connecting a PC 16 OPERATION ■ Turning the TV On and Off 16 ■ Plug & Play Feature 17 ■ Changing Channels 18 ■ Adjusting the Volume 19 ■ Viewing the Display 19 ...
...9632; Setting the Function Help 57 ■ Upgrading the Software 58 PC DISPLAY ■ Using Your TV as a Computer (PC) Display .......... 59 ■ Display Modes 60 ■ Setting up the TV with your PC 61 ■ Changing the Picture Size (PC Mode 63 ■ Setting the Home ...a Multi-Channel Sound (MTS) Track - Analog 41 ■ Checking the Digital-Signal Strength - Analog 15 ■ Connecting a PC 16 OPERATION ■ Turning the TV On and Off 16 ■ Plug & Play Feature 17 ■ Changing Channels 18 ■ Adjusting the Volume 19 ■ Viewing the Display 19 ...

User Manual (ENGLISH)
Page 5
... your viewing comfort, please follow the guidelines below for ventilation purposes. List of the TV. In addition, it away from the side panel or remote control ● Automatic timer to turn the TV on and off at any time you choose ● Adjustable picture and sound settings ... sharpest picture possible ● A built-in multi-channel sound decoder for stereo and bilingual listening ● Built-in a shortened component life and degraded performance. 50˝ screen : At least 5.9 feet 56˝ screen : At least 6.6 feet 61˝ screen : At least 7.2 feet ➢ For optimal ...
... your viewing comfort, please follow the guidelines below for ventilation purposes. List of the TV. In addition, it away from the side panel or remote control ● Automatic timer to turn the TV on and off at any time you choose ● Adjustable picture and sound settings ... sharpest picture possible ● A built-in multi-channel sound decoder for stereo and bilingual listening ● Built-in a shortened component life and degraded performance. 50˝ screen : At least 5.9 feet 56˝ screen : At least 6.6 feet 61˝ screen : At least 7.2 feet ➢ For optimal ...
User Manual (ENGLISH)
Page 7
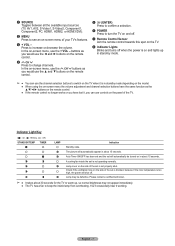
... hear it is in stand-by mode. ➢ ● You can use the + VOL - In the on-screen menu, use controls on the TV. 8 Indicator Lights Blinks and turns off . buttons as you would use the ▲ and ▼ buttons on the remote control. 5 (ENTER) Press to confirm a selection. 6 POWER Press to... turn the TV on and off. 7 Remote Control Sensor Aim the remote control towards this spot on the panel of the set is blocked, because if the inner ...
... hear it is in stand-by mode. ➢ ● You can use the + VOL - In the on-screen menu, use controls on the TV. 8 Indicator Lights Blinks and turns off . buttons as you would use the ▲ and ▼ buttons on the remote control. 5 (ENTER) Press to confirm a selection. 6 POWER Press to... turn the TV on and off. 7 Remote Control Sensor Aim the remote control towards this spot on the panel of the set is blocked, because if the inner ...

User Manual (ENGLISH)
Page 9
Remote Control You can also use your remote control to operate your VCR, Cable box, DVD player, or Set-Top Box. 1 POWER Turns the TV on and off. 2 Numeric Buttons Press to directly select a channel. 3 - Stop - e EXIT Press to exit from memory. g INFO Press to select "Air" or "Cable... S.MODE Press to change channels. c VCR/DVD Functions - m SRS Selects SRS TruSurround XT mode. When using the remote, always point it directly at the TV. i STILL Press to resume normal video. j P.SIZE Press to select the sound mode. ! n SLEEP Press to select a preset time interval for automatic shut...
Remote Control You can also use your remote control to operate your VCR, Cable box, DVD player, or Set-Top Box. 1 POWER Turns the TV on and off. 2 Numeric Buttons Press to directly select a channel. 3 - Stop - e EXIT Press to exit from memory. g INFO Press to select "Air" or "Cable... S.MODE Press to change channels. c VCR/DVD Functions - m SRS Selects SRS TruSurround XT mode. When using the remote, always point it directly at the TV. i STILL Press to resume normal video. j P.SIZE Press to select the sound mode. ! n SLEEP Press to select a preset time interval for automatic shut...

User Manual (ENGLISH)
Page 16
...on your computer. 2 Connect a 1Stereo/2RCA Cable between the PC IN [AUDIO] jack on the TV and the Audio Out jack of the connection terminal to the cable. TV Side Panel TV Side Panel Operation Turning the TV On and Off Press the POWER button on the remote control. Connecting a PC Using the D-Sub... Cable 1 Connect a D-Sub Cable between the PC IN [PC] jack on the TV and the PC output jack on your computer...
...on your computer. 2 Connect a 1Stereo/2RCA Cable between the PC IN [AUDIO] jack on the TV and the Audio Out jack of the connection terminal to the cable. TV Side Panel TV Side Panel Operation Turning the TV On and Off Press the POWER button on the remote control. Connecting a PC Using the D-Sub... Cable 1 Connect a D-Sub Cable between the PC IN [PC] jack on the TV and the PC output jack on your computer...

User Manual (ENGLISH)
Page 19
The word Mute is displayed on the screen. 2 To turn mute off . Press the INFO button on , press the MENU button. There are seven menu groups: Picture, Sound, Channel, Setup, Input, Application, and Menu Map. 2 ...
The word Mute is displayed on the screen. 2 To turn mute off . Press the INFO button on , press the MENU button. There are seven menu groups: Picture, Sound, Channel, Setup, Input, Application, and Menu Map. 2 ...

User Manual (ENGLISH)
Page 21
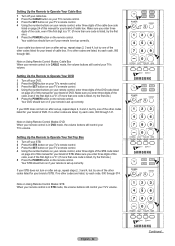
... in Memory (Automatic Method) 3 Press the ▲ or ▼ button to Operate Your VCR 1 Turn off your VCR. 2 Press the VCR button on your TV's remote control. 3 Press the SET button on your TV's remote control. 4 Using the number buttons on your remote control, enter three digits of the VCR code...VCR. Note on the remote control. Auto Program 4 Press the ◄ or ► button to identify the type of cable TV systems. Contact your remote control is displayed. Your VCR should turn on after set up , repeat steps 2, 3 and 4, but try each VCR code, 000 through 080. If you to ...
... in Memory (Automatic Method) 3 Press the ▲ or ▼ button to Operate Your VCR 1 Turn off your VCR. 2 Press the VCR button on your TV's remote control. 3 Press the SET button on your TV's remote control. 4 Using the number buttons on your remote control, enter three digits of the VCR code...VCR. Note on the remote control. Auto Program 4 Press the ◄ or ► button to identify the type of cable TV systems. Contact your remote control is displayed. Your VCR should turn on after set up , repeat steps 2, 3 and 4, but try each VCR code, 000 through 080. If you to ...
User Manual (ENGLISH)
Page 22
...try each code, 000 through 141. Setting Up the Remote to Operate Your Set Top Box 1 Turn off your cable box. 2 Press the CABLE button on your TV's remote control. 3 Press the SET button on your TV's remote control. 4 Using the number buttons on your remote control, enter three digits of the ... STB. Make sure you enter three digits of this manual for your TV's volume. Setting Up the Remote to Operate Your DVD 1 Turn off your DVD. 2 Press the DVD button on your TV's remote control. 3 Press the SET button on your TV's remote control. 4 Using the number buttons on your remote control, ...
...try each code, 000 through 141. Setting Up the Remote to Operate Your Set Top Box 1 Turn off your cable box. 2 Press the CABLE button on your TV's remote control. 3 Press the SET button on your TV's remote control. 4 Using the number buttons on your remote control, enter three digits of the ... STB. Make sure you enter three digits of this manual for your TV's volume. Setting Up the Remote to Operate Your DVD 1 Turn off your DVD. 2 Press the DVD button on your TV's remote control. 3 Press the SET button on your TV's remote control. 4 Using the number buttons on your remote control, ...
User Manual (ENGLISH)
Page 26
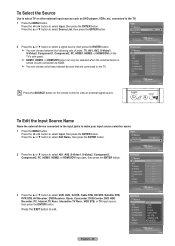
..., AV2, S-Video1, S-Video2, Component1, Component2, PC, HDMI1, HDMI2, or HDMI3/DVI on the TV's side panel. ➢ HDMI1, HDMI2, or HDMI3/DVI input can only be selected when the external device is turned on the remote control to select VCR, DVD, D-VHS, Cable STB, HD STB, Satellite STB, PVR STB..., AV Receiver, DVD Receiver, Game, Camcorder, DVD Combo, DVD HDD Recorder, PC, Internet TV Recv., Interactive TV Recv., VOD STB, or TV input source, then press the ...
..., AV2, S-Video1, S-Video2, Component1, Component2, PC, HDMI1, HDMI2, or HDMI3/DVI on the TV's side panel. ➢ HDMI1, HDMI2, or HDMI3/DVI input can only be selected when the external device is turned on the remote control to select VCR, DVD, D-VHS, Cable STB, HD STB, Satellite STB, PVR STB..., AV Receiver, DVD Receiver, Game, Camcorder, DVD Combo, DVD HDD Recorder, PC, Internet TV Recv., Interactive TV Recv., VOD STB, or TV input source, then press the ...

User Manual (ENGLISH)
Page 32
... this option, the colors of Picture Mode. Press the EXIT button to exit. ➢ This function is not available in PC mode. ➢ When you turn on -screen picture. 1 Press the MENU button. When the Picture Mode is set to exit. Normal: Normal Color Gamut offers flat and natural color...
... this option, the colors of Picture Mode. Press the EXIT button to exit. ➢ This function is not available in PC mode. ➢ When you turn on -screen picture. 1 Press the MENU button. When the Picture Mode is set to exit. Normal: Normal Color Gamut offers flat and natural color...
User Manual (ENGLISH)
Page 45
...PlayStationTM or XboxTM, you can turn on a specific channel or play back contents such as cave and room. Sports : It synchronizes image and sound when implementing fast moving pictures like sports games. Standard : Use this feature to set the TV to turn off if no controls are operated... for 3 hours after the TV was turned on or off at a desired time. 1 Press the MENU button. Press the ▲ or ▼ button...
...PlayStationTM or XboxTM, you can turn on a specific channel or play back contents such as cave and room. Sports : It synchronizes image and sound when implementing fast moving pictures like sports games. Standard : Use this feature to set the TV to turn off if no controls are operated... for 3 hours after the TV was turned on or off at a desired time. 1 Press the MENU button. Press the ▲ or ▼ button...
User Manual (ENGLISH)
Page 56
...the HDMI Black Level Using this function, you can turn on/off the blue LED on . In Watching: The blue LED lights when watching TV and it turns off when your TV is turned off when your eyes. 1 Press the MENU button...In Watching Normal Off On 2 Press the ▲ or ▼ button to 235). 1 Press the MENU button. Use it turns off . Always: The blue LED always lights. ➢ Set the Light Effect to Off to select Off, In ...is encountered by the HDMI input for saving power or when the LED dazzles your TV is turned on the front of TV according to the situation.
...the HDMI Black Level Using this function, you can turn on/off the blue LED on . In Watching: The blue LED lights when watching TV and it turns off when your TV is turned off when your eyes. 1 Press the MENU button...In Watching Normal Off On 2 Press the ▲ or ▼ button to 235). 1 Press the MENU button. Use it turns off . Always: The blue LED always lights. ➢ Set the Light Effect to Off to select Off, In ...is encountered by the HDMI input for saving power or when the LED dazzles your TV is turned on the front of TV according to the situation.
User Manual (ENGLISH)
Page 58
Upgrading the Software Samsung call center at 1-800-SAMSUNG to 30 seconds. The message Scanning for USB... It may take up to receive information about downloading upgrades and using a USB drive. It may be possible by country and region. The TV will be different by connecting a USB drive to the USB port located on... upgrade process may take up to select SW Upgrade, then press the ENTER button. USB drive 2 Press the MENU button. Upgrades will shut off and turn on the side of the...
Upgrading the Software Samsung call center at 1-800-SAMSUNG to 30 seconds. The message Scanning for USB... It may take up to receive information about downloading upgrades and using a USB drive. It may be possible by country and region. The TV will be different by connecting a USB drive to the USB port located on... upgrade process may take up to select SW Upgrade, then press the ENTER button. USB drive 2 Press the MENU button. Upgrades will shut off and turn on the side of the...

User Manual (ENGLISH)
Page 60
... x 960 1280 x 1024 1920 x 1080 Horizontal frequency (KHz) 31.46 31.46 31.46 35.00 37.86 37.50 37.87 43.75 48.07 46.87 48.36 56.47 57.67 79.99 53.70 63.00 64.87 67... x 480 800 x 600 1024 x 768 1280 x 1024 1920 x 1080 Horizontal frequency (KHz) 31.47 31.47 31.47 37.88 48.36 63.98 67.50 Vertical frequency (Hz) 70.00 70.00 60.00 60.00 60.00 60.00 60.00 Horizontal Polarity P N N P N P P Vertical Polarity N P N P N P N... is adjusted automatically. If so, press the SOURCE button on the remote control or SOURCE button on the TV screen when the PC power is turned off (or if the PC is connected.
... x 960 1280 x 1024 1920 x 1080 Horizontal frequency (KHz) 31.46 31.46 31.46 35.00 37.86 37.50 37.87 43.75 48.07 46.87 48.36 56.47 57.67 79.99 53.70 63.00 64.87 67... x 480 800 x 600 1024 x 768 1280 x 1024 1920 x 1080 Horizontal frequency (KHz) 31.47 31.47 31.47 37.88 48.36 63.98 67.50 Vertical frequency (Hz) 70.00 70.00 60.00 60.00 60.00 60.00 60.00 Horizontal Polarity P N N P N P P Vertical Polarity N P N P N P N... is adjusted automatically. If so, press the SOURCE button on the remote control or SOURCE button on the TV screen when the PC power is turned off (or if the PC is connected.

User Manual (ENGLISH)
Page 65
... press the ENTER button. Using the WISELINK Mode 1 Press the MENU button. To exit WISELINK mode, press the WISELINK button on the remote control to TV. Move Enter Return English - 65 Press the ◄ or ► button to select Photo, Music, or Setup, then press the ENTER button. Press the ▲... to select the corresponding USB Memory Device, then press the ENTER button. ➢ The WISELINK menu differs depending on the USB Memory Device connected to turn on the WISELINK mode. Enter Exit Press the WISELINK button on the remote control.
... press the ENTER button. Using the WISELINK Mode 1 Press the MENU button. To exit WISELINK mode, press the WISELINK button on the remote control to TV. Move Enter Return English - 65 Press the ◄ or ► button to select Photo, Music, or Setup, then press the ENTER button. Press the ▲... to select the corresponding USB Memory Device, then press the ENTER button. ➢ The WISELINK menu differs depending on the USB Memory Device connected to turn on the WISELINK mode. Enter Exit Press the WISELINK button on the remote control.
User Manual (ENGLISH)
Page 66
... Move Enter : Folder icon Photo Menu Return : Photo icon : Move to the previous folder stage icon Press the WISELINK button on the remote control to turn on the WISELINK mode. Using the Photo (JPEG) List You can zoom in and out or rotate the photo on the screen. (Refer to pages...
... Move Enter : Folder icon Photo Menu Return : Photo icon : Move to the previous folder stage icon Press the WISELINK button on the remote control to turn on the WISELINK mode. Using the Photo (JPEG) List You can zoom in and out or rotate the photo on the screen. (Refer to pages...

User Manual (ENGLISH)
Page 67
... is set to On. Slide Show Speed Background Music On/Off Background Music Setting List Exit Press the WISELINK button on the remote control to turn on page 70) Viewing a Slide Show 1 After switching the mode to WISELINK, select a memory device that you have installed. (Refer to page 65) 2 Press the...
... is set to On. Slide Show Speed Background Music On/Off Background Music Setting List Exit Press the WISELINK button on the remote control to turn on page 70) Viewing a Slide Show 1 After switching the mode to WISELINK, select a memory device that you have installed. (Refer to page 65) 2 Press the...

User Manual (ENGLISH)
Page 68
...show. The selected folder will not be highlighted. To exit WISELINK mode, press the WISELINK 709x531 2006-1-30 1/14 button on the left in the TV screen, such as the resolution, the size, the date modified and the order of the file in the current directory. 709x531 2006-1-30 1/14... While the slow show is pressed, the speed changes repeatedly. (Fast → Slow → Normal) Background Music On/Off: Select to choose whether you turn Off the Background Music, even if the Background Music Settings have been set up, the background music will be played. Fast Each time the ENTER...
...show. The selected folder will not be highlighted. To exit WISELINK mode, press the WISELINK 709x531 2006-1-30 1/14 button on the left in the TV screen, such as the resolution, the size, the date modified and the order of the file in the current directory. 709x531 2006-1-30 1/14... While the slow show is pressed, the speed changes repeatedly. (Fast → Slow → Normal) Background Music On/Off: Select to choose whether you turn Off the Background Music, even if the Background Music Settings have been set up, the background music will be played. Fast Each time the ENTER...

User Manual (ENGLISH)
Page 69
... ENTER button is pressed, the photo rotates repeatedly. (90° → 180° → 270° → 0°) ➢ Rotating directly from 90 degrees to turn on the remote control. ➢ The rotated file is not allowed. ➢ When rotating a photo, the edge of the screen). Icon Current OSD Function Rotating...
... ENTER button is pressed, the photo rotates repeatedly. (90° → 180° → 270° → 0°) ➢ Rotating directly from 90 degrees to turn on the remote control. ➢ The rotated file is not allowed. ➢ When rotating a photo, the edge of the screen). Icon Current OSD Function Rotating...

User Manual (ENGLISH)
Page 70
... To move the enlarged photo image up/down/left of the screen). Zoom (x 4) Zoom-in to a photo x4. Press the ▲ or ▼ button to turn on the WISELINK mode. Move Enter Photo Menu Return Slide Show Rotate Zoom Exit Press the WISELINK button on the remote control. ➢ The enlarged...
... To move the enlarged photo image up/down/left of the screen). Zoom (x 4) Zoom-in to a photo x4. Press the ▲ or ▼ button to turn on the WISELINK mode. Move Enter Photo Menu Return Slide Show Rotate Zoom Exit Press the WISELINK button on the remote control. ➢ The enlarged...


