User Manual (ENGLISH)
Page 6
... 12 Front Panel LED Indicators 13 Rear Panel Jacks ...14 Remote Control...15 Connections 18 Connecting VHF and UHF Antennas 18 Antennas with 75-ohm Round Leads 18 Connecting Cable TV 19 Cable without a Cable Box ... Multimedia Interface 26 Connecting a Digital Audio System 27 Connecting to an Analog Amplifier 27 Operation 30 Turning the TV On and Off 30 Viewing the Menus and On-Screen Displays 30 Selecting a Menu Language 31 ... Labeling the Channels 49 LNA (Low Noise Amplifier 50 Fine Tuning Analog Channels Analog 51 Checking the Digital-Signal Strength Digital 52 English - 6
... 12 Front Panel LED Indicators 13 Rear Panel Jacks ...14 Remote Control...15 Connections 18 Connecting VHF and UHF Antennas 18 Antennas with 75-ohm Round Leads 18 Connecting Cable TV 19 Cable without a Cable Box ... Multimedia Interface 26 Connecting a Digital Audio System 27 Connecting to an Analog Amplifier 27 Operation 30 Turning the TV On and Off 30 Viewing the Menus and On-Screen Displays 30 Selecting a Menu Language 31 ... Labeling the Channels 49 LNA (Low Noise Amplifier 50 Fine Tuning Analog Channels Analog 51 Checking the Digital-Signal Strength Digital 52 English - 6
User Manual (ENGLISH)
Page 11
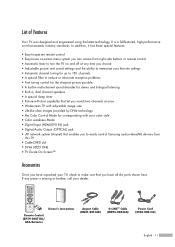
...(Anynet) that enables you to turn the TV on -screen menu system you can access from right side buttons or remote control • Automatic timer to easily control Samsung audio-video(AV) devices from this TV. • CableCARD slot • D-Net (IEEE1394) • TV Guide On Screen™ Accessories... Once you have all the parts shown here. List of Features Your TV was designed and engineered using the latest ...
...(Anynet) that enables you to turn the TV on -screen menu system you can access from right side buttons or remote control • Automatic timer to easily control Samsung audio-video(AV) devices from this TV. • CableCARD slot • D-Net (IEEE1394) • TV Guide On Screen™ Accessories... Once you have all the parts shown here. List of Features Your TV was designed and engineered using the latest ...
User Manual (ENGLISH)
Page 13
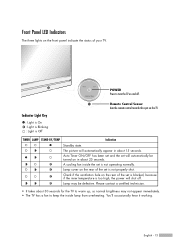
... will automatically be defective. The picture will automatically appear in about 15 seconds. Please contact a certified technician. • It takes about 30 seconds for the TV to turn the TV on the rear of your TV. English - 13 TIMER LAMP STAND BY/TEMP Indication Standby state. Check if the ventilation hole on and off .
... will automatically be defective. The picture will automatically appear in about 15 seconds. Please contact a certified technician. • It takes about 30 seconds for the TV to turn the TV on the rear of your TV. English - 13 TIMER LAMP STAND BY/TEMP Indication Standby state. Check if the ventilation hole on and off .
User Manual (ENGLISH)
Page 15
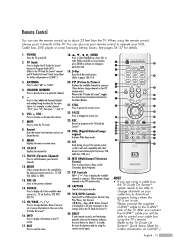
...Press to pages 106~119) 20. CH.LIST Displays the channel list. 11. INFO Press to display information on -screen menu. 10. POWER Turns the TV on your cable box to download program listings when the TV is not functioning properly, take out the batteries and press the reset button for details... up to about 2~3 seconds. D-Net Runs the D-Net view function. (Refer to mute the TV sound. 8. Remote Control You can also use your remote control to operate your VCR, Cable box, DVD player or some Samsung Set-top boxes, VCR, Cable box, DVD, etc.) 26. VOL +, VOL Press to choose...
...Press to pages 106~119) 20. CH.LIST Displays the channel list. 11. INFO Press to display information on -screen menu. 10. POWER Turns the TV on your cable box to download program listings when the TV is not functioning properly, take out the batteries and press the reset button for details... up to about 2~3 seconds. D-Net Runs the D-Net view function. (Refer to mute the TV sound. 8. Remote Control You can also use your remote control to operate your VCR, Cable box, DVD player or some Samsung Set-top boxes, VCR, Cable box, DVD, etc.) 26. VOL +, VOL Press to choose...
User Manual (ENGLISH)
Page 21
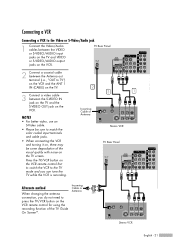
... input terminals and cable jacks. • When connecting the VCR and turning it on, there may be some degradation of the visual quality with noise on the VCR remote control for using the recording function of the TV Guide On ScreenTM. TV Rear Panel 2 Connect a coaxial cable between the Antenna out terminal (i.e., "OUT to...
... input terminals and cable jacks. • When connecting the VCR and turning it on, there may be some degradation of the visual quality with noise on the VCR remote control for using the recording function of the TV Guide On ScreenTM. TV Rear Panel 2 Connect a coaxial cable between the Antenna out terminal (i.e., "OUT to...
User Manual (ENGLISH)
Page 30
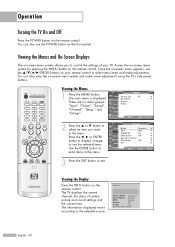
Once the on-screen menu appears, use the ENTER buttons on your TV. Operation Turning the TV On and Off Press the POWER button on the remote control. The main menu is displayed. or † button to select an item you to ... can also use the selected items. Use the ENTER button to display, change, or use the POWER button on the remote control. Input Source List : TV Edit Name √ √ There are six menu groups: Picture Anynet "Input", "Picture", "Sound", Sound D-Net "Channel", "Setup", and Channel "Listings". The...
Once the on-screen menu appears, use the ENTER buttons on your TV. Operation Turning the TV On and Off Press the POWER button on the remote control. The main menu is displayed. or † button to select an item you to ... can also use the selected items. Use the ENTER button to display, change, or use the POWER button on the remote control. Input Source List : TV Edit Name √ √ There are six menu groups: Picture Anynet "Input", "Picture", "Sound", Sound D-Net "Channel", "Setup", and Channel "Listings". The...
User Manual (ENGLISH)
Page 36
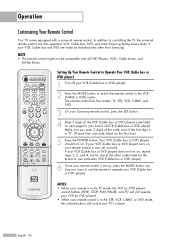
... has five modes: TV, STB, VCR, CABLE, and DVD. 3 On your Samsung remote control, press the SET button. 4 Enter 3 digits of the VCR (Cable box or DVD player) code listed on , your brand of VCR (Cable box or DVD player). If your VCR (Cable box or DVD player) turns on next page for... might not be compatible with a universal remote control. If your VCR (Cable box or DVD player) does not turn on , repeat steps 2, 3, and 4, but try the first one of the other than Samsung). Make sure you want to use the remote to the VCR (CABLE or DVD) mode. In addition to controlling...
... has five modes: TV, STB, VCR, CABLE, and DVD. 3 On your Samsung remote control, press the SET button. 4 Enter 3 digits of the VCR (Cable box or DVD player) code listed on , your brand of VCR (Cable box or DVD player). If your VCR (Cable box or DVD player) turns on next page for... might not be compatible with a universal remote control. If your VCR (Cable box or DVD player) does not turn on , repeat steps 2, 3, and 4, but try the first one of the other than Samsung). Make sure you want to use the remote to the VCR (CABLE or DVD) mode. In addition to controlling...
User Manual (ENGLISH)
Page 40
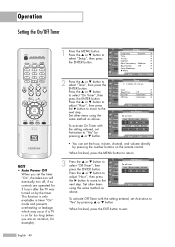
...the MENU button. English - 40 Operation Setting the On/Off Timer NOTE • Auto Power Off When you are operated for 3 hours after the TV was turned on by the timer. Hour Minute am/pm Antenna ▲ 12 00 am Air ▼ Channel Volume Activation 3 10 No Move Adjust Return •...buttons on timer. or † button to exit. To activate On Timer with the setting entered, set the timer "On", the television will eventually turn off timer. or † button. Press the ... Set other items using the same method as above . Hour Minute am/pm Activation ▲ 12...
...the MENU button. English - 40 Operation Setting the On/Off Timer NOTE • Auto Power Off When you are operated for 3 hours after the TV was turned on by the timer. Hour Minute am/pm Antenna ▲ 12 00 am Air ▼ Channel Volume Activation 3 10 No Move Adjust Return •...buttons on timer. or † button to exit. To activate On Timer with the setting entered, set the timer "On", the television will eventually turn off timer. or † button. Press the ... Set other items using the same method as above . Hour Minute am/pm Activation ▲ 12...
User Manual (ENGLISH)
Page 42
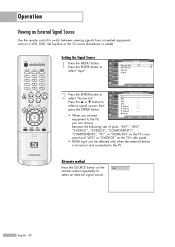
...turned on the AV1 remote control repeatedly to select an external signal source. Setting the Signal Source 1 Press the MENU button. Operation Viewing an External Signal Source Use the remote control to switch between the following sets of jacks: "AV1", "AV2", "S-VIDEO1", "S-VIDEO2", "COMPONENT1", "COMPONENT2", "PC", or "HDMI/DVI" on the TV's rear... panel and "AV3" or "S-VIDEO3" on the TV's side panel. • HDMI input can choose between viewing signals from connected equipment, such as...
...turned on the AV1 remote control repeatedly to select an external signal source. Setting the Signal Source 1 Press the MENU button. Operation Viewing an External Signal Source Use the remote control to switch between the following sets of jacks: "AV1", "AV2", "S-VIDEO1", "S-VIDEO2", "COMPONENT1", "COMPONENT2", "PC", or "HDMI/DVI" on the TV's rear... panel and "AV3" or "S-VIDEO3" on the TV's side panel. • HDMI input can choose between viewing signals from connected equipment, such as...
User Manual (ENGLISH)
Page 64
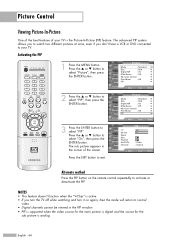
... "On", then press the ENTER button. The advanced PIP system allows you to watch two different pictures at once, even if you turn the TV off while watching and turn it on the remote control repeatedly to select "Picture", then press the ENTER button. 2 Press the ... Press the EXIT button to... your TV is active. • If you don't have a VCR or DVD connected to exit. Activating the PIP 1 Press the MENU button. Picture Control Viewing...
... "On", then press the ENTER button. The advanced PIP system allows you to watch two different pictures at once, even if you turn the TV off while watching and turn it on the remote control repeatedly to select "Picture", then press the ENTER button. 2 Press the ... Press the EXIT button to... your TV is active. • If you don't have a VCR or DVD connected to exit. Activating the PIP 1 Press the MENU button. Picture Control Viewing...
User Manual (ENGLISH)
Page 74
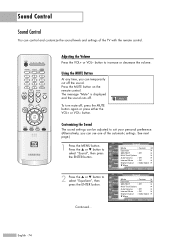
... again or press either the VOL+ or VOL- Customizing the Sound The sound settings can use one of the TV with the remote control. See next page.) 1 Press the MENU button. Mute To turn mute off . or † button to suit your personal preference. (Alternatively, you can control and customize the sound...
... again or press either the VOL+ or VOL- Customizing the Sound The sound settings can use one of the TV with the remote control. See next page.) 1 Press the MENU button. Mute To turn mute off . or † button to suit your personal preference. (Alternatively, you can control and customize the sound...
User Manual (ENGLISH)
Page 113
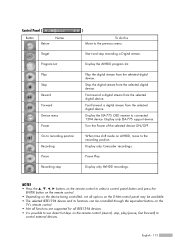
...time shift mode on AVHDD, move to connected 1394 device. Pause Pause Play. English - 113 Stop the digital stream from the selected digital device. Turn the Power of the selected device ON/OFF. Recording stop , play/pause, fast forward) to control external devices. NOTES • Press the ...the D-Net control panel may be available. • The selected IEEE1394 device and its functions can be controlled through the equivalent buttons on the TV's remote control. • Not all functions are supported for all IEEE1394 devices. • It is possible to the previous menu. Display only...
...time shift mode on AVHDD, move to connected 1394 device. Pause Pause Play. English - 113 Stop the digital stream from the selected digital device. Turn the Power of the selected device ON/OFF. Recording stop , play/pause, fast forward) to control external devices. NOTES • Press the ...the D-Net control panel may be available. • The selected IEEE1394 device and its functions can be controlled through the equivalent buttons on the TV's remote control. • Not all functions are supported for all IEEE1394 devices. • It is possible to the previous menu. Display only...
User Manual (ENGLISH)
Page 114
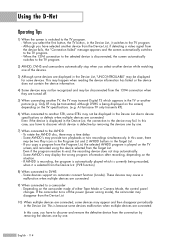
...the devices one by one . 7) When connected to the TV program. - If AVHDD is recording, the program is automatically played which is currently being displayed on the screen) depending on the situation. - If the camcorder turns off the power (power saving mode), the camcorder may ...disappear from the 1394 connection when they are turned off. 5) When connecting another STB, some STB's may cause a malfunction when multiple devices are connected. 9) When connected to another TV, the TV may be disconnected from the Device List. 10) When multiple devices are...
...the devices one by one . 7) When connected to the TV program. - If AVHDD is recording, the program is automatically played which is currently being displayed on the screen) depending on the situation. - If the camcorder turns off the power (power saving mode), the camcorder may ...disappear from the 1394 connection when they are turned off. 5) When connecting another STB, some STB's may cause a malfunction when multiple devices are connected. 9) When connected to another TV, the TV may be disconnected from the Device List. 10) When multiple devices are...
User Manual (ENGLISH)
Page 116
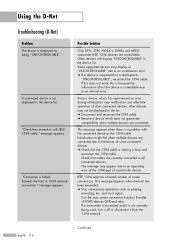
..., AVHDDs, DVHSs and MPEG camcorder IEEE 1394 devices are correctly connected to an operating error of the 1394 port of DVHS devices OFF, and retry. Turn the auto screen connection function (I-mode) of a particular device. Check that the 1394 cable is failed. message appears. message appears. and try it from the...
..., AVHDDs, DVHSs and MPEG camcorder IEEE 1394 devices are correctly connected to an operating error of the 1394 port of DVHS devices OFF, and retry. Turn the auto screen connection function (I-mode) of a particular device. Check that the 1394 cable is failed. message appears. message appears. and try it from the...
User Manual (ENGLISH)
Page 119
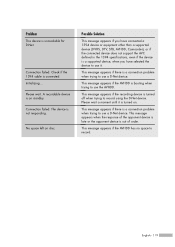
Check if the 1394 cable is out of order. This message appears if there is turned on standby. Please wait a moment until it . This message appears when the response of the opponent device is late or the opponent device is connected. ... when trying to record using the D-Net device. English - 119 Initializing... Connection failed. No space left on disc. This message appears if the AVHDD is turned off when trying to use a D-Net device. Problem This device is not responding. The device is unavailable for D-Net.
Check if the 1394 cable is out of order. This message appears if there is turned on standby. Please wait a moment until it . This message appears when the response of the opponent device is late or the opponent device is connected. ... when trying to record using the D-Net device. English - 119 Initializing... Connection failed. No space left on disc. This message appears if the AVHDD is turned off when trying to use a D-Net device. Problem This device is not responding. The device is unavailable for D-Net.
User Manual (ENGLISH)
Page 132
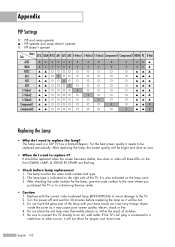
... poor screen quality, electric shock or fire. 4. English - 132 If the TV's AC plug is connected to replace the lamp? Appendix PIP Settings O : ...;▲ ▲ O ▲▲ X Component2 ▲ ▲ O O O O O O O O X ▲▲ X Replacing the Lamp • Why do I need to a Samsung Service center. • Caution 1. It is indicated on the front (TIMER, LAMP, & STAND BY/TEMP) are flashing. • Check before replacing the lamp as it.... It should be the same code number and type. 2. Turn the power off and wait for 30 minutes before lamp replacement ...
... poor screen quality, electric shock or fire. 4. English - 132 If the TV's AC plug is connected to replace the lamp? Appendix PIP Settings O : ...;▲ ▲ O ▲▲ X Component2 ▲ ▲ O O O O O O O O X ▲▲ X Replacing the Lamp • Why do I need to a Samsung Service center. • Caution 1. It is indicated on the front (TIMER, LAMP, & STAND BY/TEMP) are flashing. • Check before replacing the lamp as it.... It should be the same code number and type. 2. Turn the power off and wait for 30 minutes before lamp replacement ...

User Manual (ENGLISH)
Page 133
... the replacement Lamp is the same type. • After replacing the lamp, align the lamp cover with the groove and secure the screws. • The TV will not turn on if the lamp cover is not correctly closed (as this will need a 5.91-Inch screwdriver and a pair of gloves. 1 Unplug... TV, then use a screwdriver to remove the screws. 2 Remove the Lamp cover. 3 Remove the screw securing the Lamp by using a screwdriver. 4 Separate the Lamp from the ...
... the replacement Lamp is the same type. • After replacing the lamp, align the lamp cover with the groove and secure the screws. • The TV will not turn on if the lamp cover is not correctly closed (as this will need a 5.91-Inch screwdriver and a pair of gloves. 1 Unplug... TV, then use a screwdriver to remove the screws. 2 Remove the Lamp cover. 3 Remove the screw securing the Lamp by using a screwdriver. 4 Separate the Lamp from the ...


