User Manual (ENGLISH)
Page 2
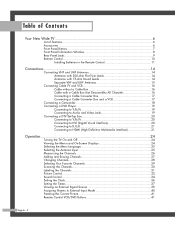
Table of Contents Your New Wide TV 6 List of Features ...6 Accessories ...6 Front Panel Buttons 7 Front Panel Information Window 8 Rear Panel Jacks ...9 Remote Control ...10 Installing Batteries in the Remote Control 11 Connections ...14 Connecting VHF and UHF Antennas 14 Antennas with ... 20 Connecting to Y,PB,PR 20 Connecting to DVI (Digital Visual Interface 20 Connecting to R,G,B 21 Connecting to HDMI (High Definition Multimedia Interface 21 Operation ...24 Turning the TV On and Off 24 Viewing the Menus and On-Screen Displays 24 Selecting the Menu Language 25 Selecting the Antenna...
Table of Contents Your New Wide TV 6 List of Features ...6 Accessories ...6 Front Panel Buttons 7 Front Panel Information Window 8 Rear Panel Jacks ...9 Remote Control ...10 Installing Batteries in the Remote Control 11 Connections ...14 Connecting VHF and UHF Antennas 14 Antennas with ... 20 Connecting to Y,PB,PR 20 Connecting to DVI (Digital Visual Interface 20 Connecting to R,G,B 21 Connecting to HDMI (High Definition Multimedia Interface 21 Operation ...24 Turning the TV On and Off 24 Viewing the Menus and On-Screen Displays 24 Selecting the Menu Language 25 Selecting the Antenna...
User Manual (ENGLISH)
Page 9
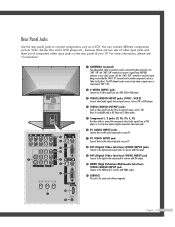
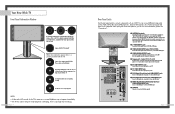
... the signal being received by the "ANT 1 IN" terminal out to receive a signal from a DVD player or a set of component video input jacks on your TV. English - 9 Use "ANT 1 IN" and "ANT 2 IN" terminals to another component (such as a Cable Set-Top Box). For more information, please see ... Connect to the digital video output jack of a device with HDMI output. Ô SERVICE This jack is for repair and software upgrades. Rear Panel Jacks Use the rear panel jacks to the HDMI jack of a device with DVI output. ˝ HDMI (High Definition Multimedia Interface) VIDEO/AUDIO INPUT jack Connect to...
... the signal being received by the "ANT 1 IN" terminal out to receive a signal from a DVD player or a set of component video input jacks on your TV. English - 9 Use "ANT 1 IN" and "ANT 2 IN" terminals to another component (such as a Cable Set-Top Box). For more information, please see ... Connect to the digital video output jack of a device with HDMI output. Ô SERVICE This jack is for repair and software upgrades. Rear Panel Jacks Use the rear panel jacks to the HDMI jack of a device with DVI output. ˝ HDMI (High Definition Multimedia Interface) VIDEO/AUDIO INPUT jack Connect to...
User Manual (ENGLISH)
Page 21
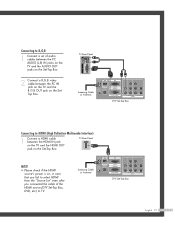
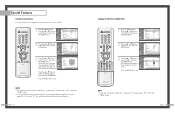
... - 21 TV Rear Panel Incoming Cable or Antenna DTV Set-Top Box Connecting to TV. Connecting to R,G,B 1 Connect a set of audio cables between the PC AUDIO (L,R) IN jacks on the TV and the AUDIO OUT jacks on the Set-Top Box. 2 Connect a R,G,B video cable between the HDMI IN jack on the TV and the HDMI OUT jack...
... - 21 TV Rear Panel Incoming Cable or Antenna DTV Set-Top Box Connecting to TV. Connecting to R,G,B 1 Connect a set of audio cables between the PC AUDIO (L,R) IN jacks on the TV and the AUDIO OUT jacks on the Set-Top Box. 2 Connect a R,G,B video cable between the HDMI IN jack on the TV and the HDMI OUT jack...

User Manual (ENGLISH)
Page 32
...button to select "Picture", then press the ENTER button. Input Picture Sound Channel Setup Mode Mode Contrast Brightness Sharpness Color Tint G 50 Reset : Standard √ 90 50 50 60 R 50 Move Enter Return 3 Press the ... Press the ... See next page.) Customizing the Picture 1 Press the MENU button. NOTE... • "Tint" doesn't operate in PC, DVI, HDMI or 480p-Component or higher modes. Resetting the Picture Settings to the...
...button to select "Picture", then press the ENTER button. Input Picture Sound Channel Setup Mode Mode Contrast Brightness Sharpness Color Tint G 50 Reset : Standard √ 90 50 50 60 R 50 Move Enter Return 3 Press the ... Press the ... See next page.) Customizing the Picture 1 Press the MENU button. NOTE... • "Tint" doesn't operate in PC, DVI, HDMI or 480p-Component or higher modes. Resetting the Picture Settings to the...

User Manual (ENGLISH)
Page 55
...; button to select "PIP", then press the ENTER button. Press the ... Viewing Picture-In-Picture One of the most best features of your TV. Activating the PIP 1 Press the MENU button. Press the ... or † button to select "Picture", then press the ENTER button. The...On √ My Color Control √ Film Mode : Off √ PIP √ Move Enter Return 2 Press the ... The sub picture appears in the "HDMI" mode. • If you don't have a VCR or DVD connected to exit. Input Picture Sound Channel Setup Picture Mode : Standard √ Color Tone : Warm1...
...; button to select "PIP", then press the ENTER button. Press the ... Viewing Picture-In-Picture One of the most best features of your TV. Activating the PIP 1 Press the MENU button. Press the ... or † button to select "Picture", then press the ENTER button. The...On √ My Color Control √ Film Mode : Off √ PIP √ Move Enter Return 2 Press the ... The sub picture appears in the "HDMI" mode. • If you don't have a VCR or DVD connected to exit. Input Picture Sound Channel Setup Picture Mode : Standard √ Color Tone : Warm1...

User Manual (ENGLISH)
Page 56
... √ Film Mode : Off √ PIP √ Move Enter Return 2 Press the ... If you select "TV", the sub picture will not appear. If you have not connected any equipment to the TV's input jacks, the signal from an external source, such as the main picture. Special Features Selecting an External...to select an external signal, then press the ENTER button. NOTES • The sub picture doesn't support "ANT 2 IN", "Component1", "Component2", "PC", "DVI" and "HDMI" modes. • For more information about external signals, see "Viewing an External Signal Source" (See page 39).
... √ Film Mode : Off √ PIP √ Move Enter Return 2 Press the ... If you select "TV", the sub picture will not appear. If you have not connected any equipment to the TV's input jacks, the signal from an external source, such as the main picture. Special Features Selecting an External...to select an external signal, then press the ENTER button. NOTES • The sub picture doesn't support "ANT 2 IN", "Component1", "Component2", "PC", "DVI" and "HDMI" modes. • For more information about external signals, see "Viewing an External Signal Source" (See page 39).

User Manual (ENGLISH)
Page 57
...; PIP √ Move Enter Return 3 Press the ... The sub picture appears in "ANT 2 IN", "Component1", "Component2", "PC", "DVI" and "HDMI" modes. or † button to select "Picture", then press the ENTER button. Input Picture Sound Channel Setup Picture Mode : Standard √ Color Tone :...; button to select "Swap", then press the ENTER button. English - 57 Input Picture Sound Channel Setup PIP PIP : On √ Source : TV √ Swap Size √ Position √ Channel : Air 11 √ Select Sound : Main √ Move Enter Return NOTE • Swap...
...; PIP √ Move Enter Return 3 Press the ... The sub picture appears in "ANT 2 IN", "Component1", "Component2", "PC", "DVI" and "HDMI" modes. or † button to select "Picture", then press the ENTER button. Input Picture Sound Channel Setup Picture Mode : Standard √ Color Tone :...; button to select "Swap", then press the ENTER button. English - 57 Input Picture Sound Channel Setup PIP PIP : On √ Source : TV √ Swap Size √ Position √ Channel : Air 11 √ Select Sound : Main √ Move Enter Return NOTE • Swap...

User Manual (ENGLISH)
Page 82
... Fine Position Auto Adjustment Recall Channel Setup Move Enter √ √ √ Return 5 Adjust the position of picture if it is input as "DVI" or "HDMI", the picture quality and position cannot be adjusted. or † button to select "PC", then press the ENTER button. Input Picture Sound Channel Setup Setup... "PC". 2 Press the MENU button. or † button to select "Setup", then press the ENTER button. PC Display Changing the Picture Position After connecting the TV to your PC, adjust the position of the picture by pressing the button.
... Fine Position Auto Adjustment Recall Channel Setup Move Enter √ √ √ Return 5 Adjust the position of picture if it is input as "DVI" or "HDMI", the picture quality and position cannot be adjusted. or † button to select "PC", then press the ENTER button. Input Picture Sound Channel Setup Setup... "PC". 2 Press the MENU button. or † button to select "Setup", then press the ENTER button. PC Display Changing the Picture Position After connecting the TV to your PC, adjust the position of the picture by pressing the button.
User Manual (ENGLISH)
Page 2
Table of Contents Your New Wide TV 6 List of Features ...6 Accessories ...6 Front Panel Buttons 7 Front Panel Information Window 8 Rear Panel Jacks ...9 Remote Control ...10 ...DVI (Digital Visual Interface 20 Connecting to R,G,B 21 Connecting to HDMI (High Definition Multimedia Interface 21 Operation ...24 Turning the TV On and Off 24 Viewing the Menus and On-Screen Displays 24...Noise Amplifier 47 Selecting the Color Tone 48 Changing the Picture Size 49 Digital Noise Reduction 50 DNIeTM (Digital Natural Image engine) 51 Setting the My Color Control Mode 52 Setting the...
Table of Contents Your New Wide TV 6 List of Features ...6 Accessories ...6 Front Panel Buttons 7 Front Panel Information Window 8 Rear Panel Jacks ...9 Remote Control ...10 ...DVI (Digital Visual Interface 20 Connecting to R,G,B 21 Connecting to HDMI (High Definition Multimedia Interface 21 Operation ...24 Turning the TV On and Off 24 Viewing the Menus and On-Screen Displays 24...Noise Amplifier 47 Selecting the Color Tone 48 Changing the Picture Size 49 Digital Noise Reduction 50 DNIeTM (Digital Natural Image engine) 51 Setting the My Color Control Mode 52 Setting the...
User Manual (ENGLISH)
Page 5
...video output jack of a device with DVI output. ˝ HDMI (High Definition Multimedia Interface) VIDEO/AUDIO INPUT jack Connect to the HDMI jack of a device with HDMI output. Ô SERVICE This jack is a possible problem with the TV. The TV's rear cover is not operating normally. NOTES • It takes ...about 30 seconds for the TV to warm up, so normal brightness may be...
...video output jack of a device with DVI output. ˝ HDMI (High Definition Multimedia Interface) VIDEO/AUDIO INPUT jack Connect to the HDMI jack of a device with HDMI output. Ô SERVICE This jack is a possible problem with the TV. The TV's rear cover is not operating normally. NOTES • It takes ...about 30 seconds for the TV to warm up, so normal brightness may be...

User Manual (ENGLISH)
Page 11
... PC IN jack on the TV and the R.G.B OUT jack on the SetTop Box. TV Rear Panel Incoming Cable or Antenna DTV Set-Top Box Connecting to HDMI (High Definition Multimedia Interface) 1 Connect a HDMI cable between the HDMI IN jack on the TV and the HDMI OUT jack on the Set-Top Box. TV Rear Panel 2 Connect a DVI... video cable between the DVI AUDIO (L,R) IN jacks on the TV and the AUDIO OUT jacks on the Set-Top Box. TV Rear Panel NOTE • Please check if the HDMI source's power is on, in case that you fail to TV. TV Rear Panel Incoming Cable or Antenna DTV Set-Top Box Connecting to ...
... PC IN jack on the TV and the R.G.B OUT jack on the SetTop Box. TV Rear Panel Incoming Cable or Antenna DTV Set-Top Box Connecting to HDMI (High Definition Multimedia Interface) 1 Connect a HDMI cable between the HDMI IN jack on the TV and the HDMI OUT jack on the Set-Top Box. TV Rear Panel 2 Connect a DVI... video cable between the DVI AUDIO (L,R) IN jacks on the TV and the AUDIO OUT jacks on the Set-Top Box. TV Rear Panel NOTE • Please check if the HDMI source's power is on, in case that you fail to TV. TV Rear Panel Incoming Cable or Antenna DTV Set-Top Box Connecting to ...

User Manual (ENGLISH)
Page 17
... the MENU button to display the "Mode" menu. Standard • Choose "Dynamic" for viewing the TV during the day or when there is a bright light in PC, DVI, HDMI or 480p-Component or higher modes. or † button to select "Reset", then press the ENTER ... Customizing the Picture 1 Press the MENU button. Input Picture Sound Channel Setup Mode Mode Contrast Brightness Sharpness Color Tint G 50 Reset : SDtaynnadmaircd Standard Cinema 90 50 50 60 R 50 Move Enter Return Alternate method Press the P.MODE button on -screen menus to change the "Contrast", "Brightness", "Sharpness", ...
... the MENU button to display the "Mode" menu. Standard • Choose "Dynamic" for viewing the TV during the day or when there is a bright light in PC, DVI, HDMI or 480p-Component or higher modes. or † button to select "Reset", then press the ENTER ... Customizing the Picture 1 Press the MENU button. Input Picture Sound Channel Setup Mode Mode Contrast Brightness Sharpness Color Tint G 50 Reset : SDtaynnadmaircd Standard Cinema 90 50 50 60 R 50 Move Enter Return Alternate method Press the P.MODE button on -screen menus to change the "Contrast", "Brightness", "Sharpness", ...

User Manual (ENGLISH)
Page 28
...PIP". or † button to normal video. The advanced PIP system allows you to watch two different pictures at once, even if you turn the TV off while watching and turn it on the remote control repeatedly to select "On", then press the ENTER button. NOTES • This feature doesn't ...function when the "V-Chip" or "Caption" is active. • This feature doesn't operate in the "HDMI" mode. • If you don't have a VCR or DVD connected to select "Film Mode", then press the ENTER button. Press the ... or † button to...
...PIP". or † button to normal video. The advanced PIP system allows you to watch two different pictures at once, even if you turn the TV off while watching and turn it on the remote control repeatedly to select "On", then press the ENTER button. NOTES • This feature doesn't ...function when the "V-Chip" or "Caption" is active. • This feature doesn't operate in the "HDMI" mode. • If you don't have a VCR or DVD connected to select "Film Mode", then press the ENTER button. Press the ... or † button to...
User Manual (ENGLISH)
Page 29
... Mode : Off √ PIP √ Move Enter Return 2 Press the ... Input Picture Sound Channel Setup PIP PIP : On √ Source : TV √ Swap Size √ Position √ Channel : Air 11 √ Select Sound : Main √ Move Enter Return NOTE • Swap does...", then press the ENTER button. NOTES • The sub picture doesn't support "ANT 2 IN", "Component1", "Component2", "PC", "DVI" and "HDMI" modes. • For more information about external signals, see "Viewing an External Signal Source" (See page 39). or † button to exit. ...
... Mode : Off √ PIP √ Move Enter Return 2 Press the ... Input Picture Sound Channel Setup PIP PIP : On √ Source : TV √ Swap Size √ Position √ Channel : Air 11 √ Select Sound : Main √ Move Enter Return NOTE • Swap does...", then press the ENTER button. NOTES • The sub picture doesn't support "ANT 2 IN", "Component1", "Component2", "PC", "DVI" and "HDMI" modes. • For more information about external signals, see "Viewing an External Signal Source" (See page 39). or † button to exit. ...

User Manual (ENGLISH)
Page 44
... Channel Setup Move Enter √ √ √ Return 5 Adjust the position of picture if it is input as "DVI" or "HDMI", the picture quality and position cannot be adjusted. Press the EXIT button to the incoming video signal. Input Picture Sound Channel Setup Setup Language...automatically. 1 Press the SOURCE button to select "PC". 2 Press the MENU button. PC Display Changing the Picture Position After connecting the TV to your PC, adjust the position of the picture by pressing the button. The values of fine, coarse and position are automatically adjusted...
... Channel Setup Move Enter √ √ √ Return 5 Adjust the position of picture if it is input as "DVI" or "HDMI", the picture quality and position cannot be adjusted. Press the EXIT button to the incoming video signal. Input Picture Sound Channel Setup Setup Language...automatically. 1 Press the SOURCE button to select "PC". 2 Press the MENU button. PC Display Changing the Picture Position After connecting the TV to your PC, adjust the position of the picture by pressing the button. The values of fine, coarse and position are automatically adjusted...


