

Open Source Guide (ENGLISH)
Page 2
and each source file to the library. To apply these terms (or, alternatively, under these terms, attach the following notices to most effectively convey the exclusion of each file should have at least the "copyright" line and a pointer to the public, we recommend making it to be of the greatest possible use to where the full notice is safest to attach them to the start of warranty; IN NO EVENT UNLESS REQUIRED BY APPLICABLE LAW OR AGREED TO IN WRITING WILL ANY COPYRIGHT HOLDER, OR ANY OTHER PARTY WHO MAY MODIFY AND/OR REDISTRIBUTE THE LIBRARY AS PERMITTED ABOVE, BE LIABLE ...
and each source file to the library. To apply these terms (or, alternatively, under these terms, attach the following notices to most effectively convey the exclusion of each file should have at least the "copyright" line and a pointer to the public, we recommend making it to be of the greatest possible use to where the full notice is safest to attach them to the start of warranty; IN NO EVENT UNLESS REQUIRED BY APPLICABLE LAW OR AGREED TO IN WRITING WILL ANY COPYRIGHT HOLDER, OR ANY OTHER PARTY WHO MAY MODIFY AND/OR REDISTRIBUTE THE LIBRARY AS PERMITTED ABOVE, BE LIABLE ...
User Manual (ENGLISH)
Page 4
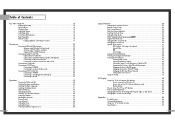
Table of Contents Your New Wide TV 10 Replacing the Lamp 10 List of Features ...12 Checking Parts...12 Side Panel Buttons 13 Side Panel Jacks 13 Front Panel LED Indicators 14 Rear Panel Jacks 15 Remote Control ...16 Installing Batteries in the Remote Control 17 Connections ...Scanning Channels 36 Labeling the Channels 37 Picture Control ...38 Sound Control ...40 Setting the Clock 42 Setting the Timers 43 Viewing an External Signal Source 46 6 Special Features 50 Setting Up Your Remote Control 50 Remote Control Codes 53 Fine Tuning Channels 54 LNA (Low Noise Amplifier 55 ...
Table of Contents Your New Wide TV 10 Replacing the Lamp 10 List of Features ...12 Checking Parts...12 Side Panel Buttons 13 Side Panel Jacks 13 Front Panel LED Indicators 14 Rear Panel Jacks 15 Remote Control ...16 Installing Batteries in the Remote Control 17 Connections ...Scanning Channels 36 Labeling the Channels 37 Picture Control ...38 Sound Control ...40 Setting the Clock 42 Setting the Timers 43 Viewing an External Signal Source 46 6 Special Features 50 Setting Up Your Remote Control 50 Remote Control Codes 53 Fine Tuning Channels 54 LNA (Low Noise Amplifier 55 ...
User Manual (ENGLISH)
Page 7
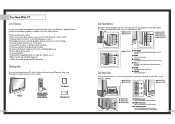
...the on and off . Press to lower or raise the volume and to select items when using the latest technology. Your New Wide TV List of Features Your TV was designed and engineered using the onscreen menu. ˆ ENTER Press to activate (or change channels and move between items on the ... and signals from the side panel or remote control • Automatic timer to turn the TV on and off at any piece is missing or broken, call your favorite settings • Automatic channel tuning for up to 181 channels • A special filter to reduce or eliminate reception problems • Fine tuning...
...the on and off . Press to lower or raise the volume and to select items when using the latest technology. Your New Wide TV List of Features Your TV was designed and engineered using the onscreen menu. ˆ ENTER Press to activate (or change channels and move between items on the ... and signals from the side panel or remote control • Automatic timer to turn the TV on and off at any piece is missing or broken, call your favorite settings • Automatic channel tuning for up to 181 channels • A special filter to reduce or eliminate reception problems • Fine tuning...
User Manual (ENGLISH)
Page 8
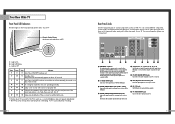
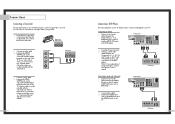
... towards this spot on the TV. : Light is On : Light is Blinking : Light is not properly shut. Lamp cover on rear of video input jacks and three set will automatically appear in about 25 seconds. You'll occasionally hear it working. 14 Rear Panel Jacks Use the rear panel jacks to connect components... Panel LED Indicators The three lights on the front panel indicate the status of your TV. Check if the ventilation hole on the rear of the set is blocked, because if the inner temperature is connected to ANT-A. ´ S-VIDEO INPUT jacks Connects an S-Video signal from an S-VHS VCR ...
... towards this spot on the TV. : Light is On : Light is Blinking : Light is not properly shut. Lamp cover on rear of video input jacks and three set will automatically appear in about 25 seconds. You'll occasionally hear it working. 14 Rear Panel Jacks Use the rear panel jacks to connect components... Panel LED Indicators The three lights on the front panel indicate the status of your TV. Check if the ventilation hole on the rear of the set is blocked, because if the inner temperature is connected to ANT-A. ´ S-VIDEO INPUT jacks Connects an S-Video signal from an S-VHS VCR ...
User Manual (ENGLISH)
Page 9
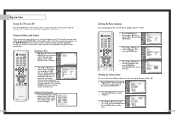
...batteries and try using the on the TV screen. 16. Your New Wide TV Remote Control You can also operate your Set Top Box, VCR, cable box, and DVD player. 1. When using the remote control for automatic shutoff. 22. P.MODE Adjust the TV picture by the Samsung remote control (i.e., TV, VCR, Cable, or DVD). 12..., VCR, DVD, DTV, PC). 14. MODE Selects a target device to resume normal video. 10. TV/VIDEO Press to display all the way out to stop the action during set up , down, left, or right. UP, Down, Left, Right ENTER Press to add or erase channels in the remote control ...
...batteries and try using the on the TV screen. 16. Your New Wide TV Remote Control You can also operate your Set Top Box, VCR, cable box, and DVD player. 1. When using the remote control for automatic shutoff. 22. P.MODE Adjust the TV picture by the Samsung remote control (i.e., TV, VCR, Cable, or DVD). 12..., VCR, DVD, DTV, PC). 14. MODE Selects a target device to resume normal video. 10. TV/VIDEO Press to display all the way out to stop the action during set up , down, left, or right. UP, Down, Left, Right ENTER Press to add or erase channels in the remote control ...
User Manual (ENGLISH)
Page 13
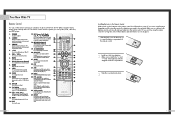
... an audio cable between the Component (1, 2 or 3) AUDIO IN jacks on the TV and the AUDIO OUT jacks on your TV make it easy to connect a camcorder to Y,PB,PR 1 Connect a set of the TV. TV Rear Panel Incoming Cable or Antenna DVD Player 2 Connect video cables between the VIDEO OUT ...to connect a DVD player to audio and video jacks 1 Connect a set of Component video, see your camcorder is stereo, you must connect two separate cables. (The audio cables are usually found on the camcorder. TV Rear Panel Incoming Cable or Antenna 2 To enable Component video viewing, connect video...
... an audio cable between the Component (1, 2 or 3) AUDIO IN jacks on the TV and the AUDIO OUT jacks on your TV make it easy to connect a camcorder to Y,PB,PR 1 Connect a set of the TV. TV Rear Panel Incoming Cable or Antenna DVD Player 2 Connect video cables between the VIDEO OUT ...to connect a DVD player to audio and video jacks 1 Connect a set of Component video, see your camcorder is stereo, you must connect two separate cables. (The audio cables are usually found on the camcorder. TV Rear Panel Incoming Cable or Antenna 2 To enable Component video viewing, connect video...

User Manual (ENGLISH)
Page 14
... the PC/DVI AUDIO IN jacks on the TV and the AUDIO OUT jacks on the Set Top Box. TV Rear Panel 2 Connect video cables between the DVI IN jack on the TV and the DVI OUT jack on the Set Top Box. TV Rear Panel Incoming Cable or Antenna DTV Set Top Box 27 Incoming Cable or Antenna... DTV Set Top Box 26 Connecting to R,G,B 1 Connect a set of Component video, see...
... the PC/DVI AUDIO IN jacks on the TV and the AUDIO OUT jacks on the Set Top Box. TV Rear Panel 2 Connect video cables between the DVI IN jack on the TV and the DVI OUT jack on the Set Top Box. TV Rear Panel Incoming Cable or Antenna DTV Set Top Box 27 Incoming Cable or Antenna... DTV Set Top Box 26 Connecting to R,G,B 1 Connect a set of Component video, see...
User Manual (ENGLISH)
Page 16
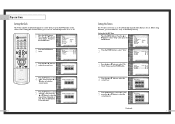
... - - : - - Access the on-screen menu system by choosing the antenna input(A or B). 1 Press the MENU button. or † button to select to . The TV will display the channel, current time, and the audio signal you can also view the on the remote Input Input Source List Edit Name √.... Displaying Status Information 1 Press the INFO button on the remote control. Note that audio on -screen menu system allows you to control the settings of your remote control to two different signal sources by pressing the MENU button on the remote control. Viewing the Menus and Displays The on...
... - - : - - Access the on-screen menu system by choosing the antenna input(A or B). 1 Press the MENU button. or † button to select to . The TV will display the channel, current time, and the audio signal you can also view the on the remote Input Input Source List Edit Name √.... Displaying Status Information 1 Press the INFO button on the remote control. Note that audio on -screen menu system allows you to control the settings of your remote control to two different signal sources by pressing the MENU button on the remote control. Viewing the Menus and Displays The on...
User Manual (ENGLISH)
Page 18
...Press the ... AIR 8 - - - - ▼ Move Enter Return • Only memorized channels can change channels on the remote control, the TV displays only the favorite channels you previously stored, allowing you press. Input Picture Sound Channel Setup Channel Antenna : AAir Air/CATV : SATiDr Auto Program ...favorite channels are selected in order, up or down, depending on the remote control. Operation Changing Channels You can be set as TV and CATV). You can store your TV by using the CH and CH buttons, or by direct selection using the number buttons. To select a channel over ...
...Press the ... AIR 8 - - - - ▼ Move Enter Return • Only memorized channels can change channels on the remote control, the TV displays only the favorite channels you previously stored, allowing you press. Input Picture Sound Channel Setup Channel Antenna : AAir Air/CATV : SATiDr Auto Program ...favorite channels are selected in order, up or down, depending on the remote control. Operation Changing Channels You can be set as TV and CATV). You can store your TV by using the CH and CH buttons, or by direct selection using the number buttons. To select a channel over ...

User Manual (ENGLISH)
Page 20
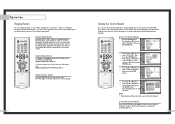
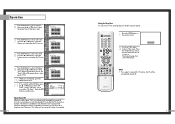
... 50 Color 50 Tint 50 Channel Setup Move Enter Return 4 Press the œ or √ button to raise or lower the value of the TV. You can change the contrast, brightness, tint, color, and sharpness settings of ▲ Contrast 100 the item, using the on ▼ screen gauge as your TV's specifications. • Choose Dynamic for...
... 50 Color 50 Tint 50 Channel Setup Move Enter Return 4 Press the œ or √ button to raise or lower the value of the TV. You can change the contrast, brightness, tint, color, and sharpness settings of ▲ Contrast 100 the item, using the on ▼ screen gauge as your TV's specifications. • Choose Dynamic for...
User Manual (ENGLISH)
Page 21
.... Customizing the Sound 1 Press the MENU button. or † button to silence the volume. Custom Sound Input Bass 50 Treble 50 Picture Balance L/R 50 Sound Channel Setup Move Enter Return You can continue to make adjustments, or press the EXIT button to adjust the... word "Mute" will see the items "Bass", "Treble" or "Balance L/R". or † button to select the item you can change the TV's bass, treble, and balance settings. Input Picture Sound Channel Setup Sound Sound Mode : Standard √ Custom Sound √ Virtual Dolby : Off √ BBE : Off √...
.... Customizing the Sound 1 Press the MENU button. or † button to silence the volume. Custom Sound Input Bass 50 Treble 50 Picture Balance L/R 50 Sound Channel Setup Move Enter Return You can continue to make adjustments, or press the EXIT button to adjust the... word "Mute" will see the items "Bass", "Treble" or "Balance L/R". or † button to select the item you can change the TV's bass, treble, and balance settings. Input Picture Sound Channel Setup Sound Sound Mode : Standard √ Custom Sound √ Virtual Dolby : Off √ BBE : Off √...
User Manual (ENGLISH)
Page 22
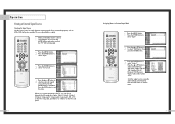
...off automatically at specific times that will appear on screen when you press the INFO button on the remote control. Setting this clock also allows you to use it to turn the TV on or off . 1 Press the MENU button. Input Picture Sound Channel Setup Setup Time √ V-Chip ...current date and time Hour 10 Min am/pm ▲ 30 am ▼ Setup Move Enter Return 42 Setting the Timers This TV can be set the TV's clock, as described previously. Operation Setting the Clock This TV has a built-in clock that you choose. am /pm", then press the ... or † button...
...off automatically at specific times that will appear on screen when you press the INFO button on the remote control. Setting this clock also allows you to use it to turn the TV on or off . 1 Press the MENU button. Input Picture Sound Channel Setup Setup Time √ V-Chip ...current date and time Hour 10 Min am/pm ▲ 30 am ▼ Setup Move Enter Return 42 Setting the Timers This TV can be set the TV's clock, as described previously. Operation Setting the Clock This TV has a built-in clock that you choose. am /pm", then press the ... or † button...
User Manual (ENGLISH)
Page 23
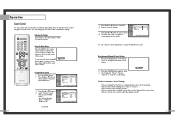
... caused by timer. Press the Sleep button to select the time interval for example). 44 Setting the Sleep Timer You can set the timer "On", your TV to automatically turn off after the TV is received for 15 minutes, the TV will illuminate (front or side panel of day (am CH Vol Activation ▲ 06...or † button to select the proper time of TV.) 10 When you are away on holiday, for the TV to stay on. or † button to select the volume level you want to set the "On Timer". Input Picture Sound Channel Setup On Timer Set On Timer Hour 6 CH Min am/pm ▲...
... caused by timer. Press the Sleep button to select the time interval for example). 44 Setting the Sleep Timer You can set the timer "On", your TV to automatically turn off after the TV is received for 15 minutes, the TV will illuminate (front or side panel of day (am CH Vol Activation ▲ 06...or † button to select the proper time of TV.) 10 When you are away on holiday, for the TV to stay on. or † button to select the volume level you want to set the "On Timer". Input Picture Sound Channel Setup On Timer Set On Timer Hour 6 CH Min am/pm ▲...
User Manual (ENGLISH)
Page 24
... t-el-lite STB : -A-V-R-eceiver ▼ Move Enter Return Set other signal sources using the same method as VCRs, DVD, Set-Top box and the TV source (broadcast or cable). 1 Make sure that the "TV" LED is controlling the TV set. Press the EXIT button to select "Edit Name", then press... the Signal Source Use the remote control to switch between the following sets of jacks: Video1, Video2, S-Video1, S-Video2, Component1, Component2, Component3, DVI or PC on the TV's rear panel, and Video3 or S-Video3 on the TV's side panel. 46 Assigning Names to select "Source List". Press ...
... t-el-lite STB : -A-V-R-eceiver ▼ Move Enter Return Set other signal sources using the same method as VCRs, DVD, Set-Top box and the TV source (broadcast or cable). 1 Make sure that the "TV" LED is controlling the TV set. Press the EXIT button to select "Edit Name", then press... the Signal Source Use the remote control to switch between the following sets of jacks: Video1, Video2, S-Video1, S-Video2, Component1, Component2, Component3, DVI or PC on the TV's rear panel, and Video3 or S-Video3 on the TV's side panel. 46 Assigning Names to select "Source List". Press ...
User Manual (ENGLISH)
Page 26
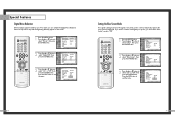
...even if the first digit is in "VCR" mode, the volume buttons still control your TV's volume. 50 Setting Up the Remote to Operate Your Cable Box 1 Turn off your TV's volume. 51 After it has been set up properly, your cable box. Note The remote control might not be compatible with all ... remote control is a "0". (If more than one code listed, try one . The remote control has five "modes": "TV", "STB", "VCR", "CABLE" and "DVD". 3 On your Samsung remote control, press the SET button. 4 Enter 3 digits of the cable box code listed below for your brand of the other codes listed for your...
...even if the first digit is in "VCR" mode, the volume buttons still control your TV's volume. 50 Setting Up the Remote to Operate Your Cable Box 1 Turn off your TV's volume. 51 After it has been set up properly, your cable box. Note The remote control might not be compatible with all ... remote control is a "0". (If more than one code listed, try one . The remote control has five "modes": "TV", "STB", "VCR", "CABLE" and "DVD". 3 On your Samsung remote control, press the SET button. 4 Enter 3 digits of the cable box code listed below for your brand of the other codes listed for your...
User Manual (ENGLISH)
Page 27
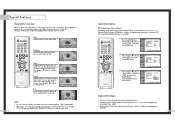
...try the first one of the other codes listed for your remote control is set correctly. 6 Once your remote control is in "DVD" mode, the volume buttons still control your TV's volume. 52 Remote Control Codes VCR Codes 000 Samsung 001 LG(Goldstar) 002 003 004 Daewoo 005 006 007 Daewoo, LG(...; When your brand of the code, even if the first digit is illuminated. The remote control has five "modes": "TV", "STB", "VCR", "CABLE" and "DVD". 3 On your Samsung remote control, press the SET button. 4 Enter 3 digits of the DVD code listed on the next page for the brand of your particular DVD. 5...
...try the first one of the other codes listed for your remote control is set correctly. 6 Once your remote control is in "DVD" mode, the volume buttons still control your TV's volume. 52 Remote Control Codes VCR Codes 000 Samsung 001 LG(Goldstar) 002 003 004 Daewoo 005 006 007 Daewoo, LG(...; When your brand of the code, even if the first digit is illuminated. The remote control has five "modes": "TV", "STB", "VCR", "CABLE" and "DVD". 3 On your Samsung remote control, press the SET button. 4 Enter 3 digits of the DVD code listed on the next page for the brand of your particular DVD. 5...

User Manual (ENGLISH)
Page 28
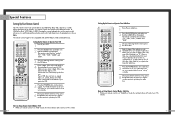
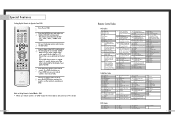
... ▲ More Channel Scan LNA : OfOf ff On Move Enter Return NOTE • This function works in ANT-A mode only (not available in the TV's memory, press the ENTER button. (A * icon will appear.) Reset Move 3 Return Enter Fine Tune To reset the fine tuning to adjust the fine tuning...to select "On" or "Off", then press the ENTER button. Move 0 Return Enter 54 LNA (Low Noise Amplifier) If the TV is Fine Tuned To store the fine tuning setting in ANT-B mode). 55 Press the EXIT button to select "Fine Tune", then press the ENTER button. Input Picture Sound Channel...
... ▲ More Channel Scan LNA : OfOf ff On Move Enter Return NOTE • This function works in ANT-A mode only (not available in the TV's memory, press the ENTER button. (A * icon will appear.) Reset Move 3 Return Enter Fine Tune To reset the fine tuning to adjust the fine tuning...to select "On" or "Off", then press the ENTER button. Move 0 Return Enter 54 LNA (Low Noise Amplifier) If the TV is Fine Tuned To store the fine tuning setting in ANT-B mode). 55 Press the EXIT button to select "Fine Tune", then press the ENTER button. Input Picture Sound Channel...
User Manual (ENGLISH)
Page 29
...Custom Picture Color Tone Film Mode DNIe Digital NR Size PIP : Dynamic : NoCromola2l : OffCool1 : ONnormal : OnWarm1 Warm2 Move Enter Return Setting the Film Mode On: Automatically senses and processes film signals from all sources and adjusts the picture for optimum quality. Off: Switches off ... DNIe Digital NR Size PIP : Dynamic : Normal : OfOf ff : OnOn : On Move Enter Return 56 DNIeTM (Digital Natural Image engine) Samsung's New Technology enables an improved image with detail, contrast and white enhancement and 3D noise reduction. 1 Press the MENU button. Press the EXIT ...
...Custom Picture Color Tone Film Mode DNIe Digital NR Size PIP : Dynamic : NoCromola2l : OffCool1 : ONnormal : OnWarm1 Warm2 Move Enter Return Setting the Film Mode On: Automatically senses and processes film signals from all sources and adjusts the picture for optimum quality. Off: Switches off ... DNIe Digital NR Size PIP : Dynamic : Normal : OfOf ff : OnOn : On Move Enter Return 56 DNIeTM (Digital Natural Image engine) Samsung's New Technology enables an improved image with detail, contrast and white enhancement and 3D noise reduction. 1 Press the MENU button. Press the EXIT ...
User Manual (ENGLISH)
Page 30
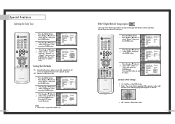
...Blue Screen PC Setup : English : On : OOfnf On Move Enter Return 58 59 Special Features Digital Noise Reduction If the broadcast signal received by your TV is very weak, a blue screen automatically replaces the noisy picture background. or † button to select "Setup", then press the ENTER button. Input ...Mode DNIe Digital NR Size PIP : Dynamic : Normal : Off : On : OOfnf On Move Enter Return Setting the Blue Screen Mode If no signal is being received or the signal is weak, you must set the "Blue Screen" mode to "Off". 1 Press the MENU button. or † button to exit the...
...Blue Screen PC Setup : English : On : OOfnf On Move Enter Return 58 59 Special Features Digital Noise Reduction If the broadcast signal received by your TV is very weak, a blue screen automatically replaces the noisy picture background. or † button to select "Setup", then press the ENTER button. Input ...Mode DNIe Digital NR Size PIP : Dynamic : Normal : Off : On : OOfnf On Move Enter Return Setting the Blue Screen Mode If no signal is being received or the signal is weak, you must set the "Blue Screen" mode to "Off". 1 Press the MENU button. or † button to exit the...
User Manual (ENGLISH)
Page 31
..., Panorama, Zoom1, Zoom2, 4:3. Zoom2 Magnifies the size of a panoramic picture. or † button to scroll the picture. 4:3 Sets the picture to stereo, mono, or a Separate Audio Program. (SAP audio is a standard TV screen size. Wide Sets the picture to exit the menu. Press the ... Sometimes SAP has unrelated information like news or weather...
..., Panorama, Zoom1, Zoom2, 4:3. Zoom2 Magnifies the size of a panoramic picture. or † button to scroll the picture. 4:3 Sets the picture to stereo, mono, or a Separate Audio Program. (SAP audio is a standard TV screen size. Wide Sets the picture to exit the menu. Press the ... Sometimes SAP has unrelated information like news or weather...


