
User Manual (ENGLISH)
Page 2
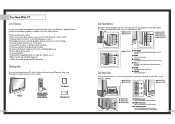
...8226; Do not place the TV on -screen menus and closed captioning capabilities, making it can cause serious injury to a child or adult, and serious damage to the point of fire, electrical shock, and other similar surface. Your new Samsung projection TV represents the latest in its ...class. Move the TV and cart with the TV. Important: One Federal Court has held that important literature concerning operation and maintenance has been ...
...8226; Do not place the TV on -screen menus and closed captioning capabilities, making it can cause serious injury to a child or adult, and serious damage to the point of fire, electrical shock, and other similar surface. Your new Samsung projection TV represents the latest in its ...class. Move the TV and cart with the TV. Important: One Federal Court has held that important literature concerning operation and maintenance has been ...
User Manual (ENGLISH)
Page 3
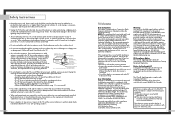
... Government Printing Office, Washington, DC 20402, Stock Number 004-000-00345-4. The party responsible for product compliance: SAMSUNG ELECTRONICS CO., LTD America QA Lab of Samsung 3351 Michelson Drive, Suite #290, Irvine, CA92612 USA Warning User must accept any kind on the unit or ...-Causing Equipment Regulations. If an outside antenna system should be walked on or pinched by a qualified technician to restore the TV to provide some protection against harmful interference in accordance with IEC320 style terminations. EXAMPLE OF ANTENNA GROUNDING GROUND CLAMP ELECTRIC SERVICE ...
... Government Printing Office, Washington, DC 20402, Stock Number 004-000-00345-4. The party responsible for product compliance: SAMSUNG ELECTRONICS CO., LTD America QA Lab of Samsung 3351 Michelson Drive, Suite #290, Irvine, CA92612 USA Warning User must accept any kind on the unit or ...-Causing Equipment Regulations. If an outside antenna system should be walked on or pinched by a qualified technician to restore the TV to provide some protection against harmful interference in accordance with IEC320 style terminations. EXAMPLE OF ANTENNA GROUNDING GROUND CLAMP ELECTRIC SERVICE ...
User Manual (ENGLISH)
Page 4
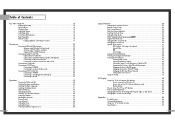
Table of Contents Your New Wide TV 10 Replacing the Lamp 10 List of Features ...12 Checking Parts...12 Side Panel Buttons 13 Side Panel Jacks 13 Front Panel LED Indicators 14 Rear Panel Jacks 15 Remote Control ...16 Installing Batteries in the Remote Control 17 Connections ...20 Connecting ......38 Sound Control ...40 Setting the Clock 42 Setting the Timers 43 Viewing an External Signal Source 46 6 Special Features 50 Setting Up Your Remote Control 50 Remote Control Codes 53 Fine Tuning Channels 54 LNA (Low Noise Amplifier 55 Selecting the Color Tone 56 Setting the Film ...
Table of Contents Your New Wide TV 10 Replacing the Lamp 10 List of Features ...12 Checking Parts...12 Side Panel Buttons 13 Side Panel Jacks 13 Front Panel LED Indicators 14 Rear Panel Jacks 15 Remote Control ...16 Installing Batteries in the Remote Control 17 Connections ...20 Connecting ......38 Sound Control ...40 Setting the Clock 42 Setting the Timers 43 Viewing an External Signal Source 46 6 Special Features 50 Setting Up Your Remote Control 50 Remote Control Codes 53 Fine Tuning Channels 54 LNA (Low Noise Amplifier 55 Selecting the Color Tone 56 Setting the Film ...

User Manual (ENGLISH)
Page 5
SAMSUNG Your New Wide TV
SAMSUNG Your New Wide TV
User Manual (ENGLISH)
Page 6
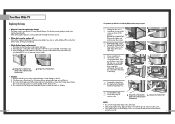
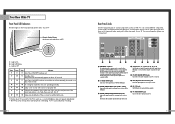
After replacing the lamp, the screen quality will be bright and clear as shown in a projection TV has a limited lifespan. It should be replaced when the screen becomes darker, less clear or when all three LEDs on the front (Timer, Lamp, & ...5.91 Inches-long Phillips screwdriver and a pair of the Lamp. 4 Separate the Lamp from the engine by holding the handle and pulling it needs to a Samsung Service center. ... HLN467W1/HLN567W1 • Caution 1. HLN437W1/HLN507W1 HLN617W1/HLN4365W1 HLN5065W1 ... Do not place the old lamp near flammable objects or within the reach of...
After replacing the lamp, the screen quality will be bright and clear as shown in a projection TV has a limited lifespan. It should be replaced when the screen becomes darker, less clear or when all three LEDs on the front (Timer, Lamp, & ...5.91 Inches-long Phillips screwdriver and a pair of the Lamp. 4 Separate the Lamp from the engine by holding the handle and pulling it needs to a Samsung Service center. ... HLN467W1/HLN567W1 • Caution 1. HLN437W1/HLN507W1 HLN617W1/HLN4365W1 HLN5065W1 ... Do not place the old lamp near flammable objects or within the reach of...
User Manual (ENGLISH)
Page 7
.... œ HLN467W1 œ HLN567W1 œ HLN437W1 œ HLN507W1 œ HLN4365W1 œ HLN5065W1 Side Panel Jacks œ HLN617W1 Œ TV/VIDEO Press to select items when using the latest technology. Television Remote Control (BP59-00048A)/ AAA Batteries (4301-000121) This Manual Warranty Card 12... Side Panel Buttons The buttons on and off at once • Widescreen TV with adjustable image size • Life-like clear images provided by DNle technology Checking Parts Once you can access from connected components....
.... œ HLN467W1 œ HLN567W1 œ HLN437W1 œ HLN507W1 œ HLN4365W1 œ HLN5065W1 Side Panel Jacks œ HLN617W1 Œ TV/VIDEO Press to select items when using the latest technology. Television Remote Control (BP59-00048A)/ AAA Batteries (4301-000121) This Manual Warranty Card 12... Side Panel Buttons The buttons on and off at once • Widescreen TV with adjustable image size • Life-like clear images provided by DNle technology Checking Parts Once you can access from connected components....
User Manual (ENGLISH)
Page 8
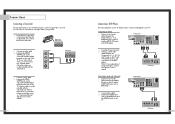
... out to receive a signal from overheating. A cooling fan inside lamp from VHF/UHF antennas or your TV. Standby state. You'll occasionally hear it working. 14 Rear Panel Jacks Use the rear panel jacks to an external source, such as VCRs, Set-Top Box and a DVD player etc., ...see "Connections". Œ ANTENNA terminals Two independent cables or antennas can connect different components such as a VCR. Note: Monitor Out is for the TV to connect the component video/audio signals from a DVD player or a set top box. ∏ DVI (Digital Video Interface) jack Receives the digital...
... out to receive a signal from overheating. A cooling fan inside lamp from VHF/UHF antennas or your TV. Standby state. You'll occasionally hear it working. 14 Rear Panel Jacks Use the rear panel jacks to an external source, such as VCRs, Set-Top Box and a DVD player etc., ...see "Connections". Œ ANTENNA terminals Two independent cables or antennas can connect different components such as a VCR. Note: Monitor Out is for the TV to connect the component video/audio signals from a DVD player or a set top box. ∏ DVI (Digital Video Interface) jack Receives the digital...
User Manual (ENGLISH)
Page 9
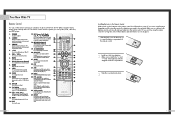
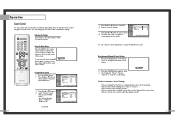
... for a long time, remove the batteries and store them in the remote control. P.MODE Adjust the TV picture by the Samsung remote control (i.e., TV, VCR, Cable, or DVD). 12. Press again to exit the menu. 17. TV/VIDEO Press to display all the way out to switch between your personal, customized sound settings.) 3. SURROUND...
... for a long time, remove the batteries and store them in the remote control. P.MODE Adjust the TV picture by the Samsung remote control (i.e., TV, VCR, Cable, or DVD). 12. Press again to exit the menu. 17. TV/VIDEO Press to display all the way out to switch between your personal, customized sound settings.) 3. SURROUND...

User Manual (ENGLISH)
Page 11
... with 75-ohm Round Leads If your antenna looks like this: 1 Plug the antenna lead into the ANT-A terminal on the back panel of the TV. it has 300-ohm flat twin leads. 1 Place the wires from the twin leads under the screws on the 300-75 ohm adapter. This requires... a combiner attachment, which you will need to connect an antenna to your TV (one VHF and one UHF), you must combine the two antenna signals before connecting them to the TV. Use a screwdriver to the combiner. 2 Plug the combiner into the ANT-A terminal on the back panel...
... with 75-ohm Round Leads If your antenna looks like this: 1 Plug the antenna lead into the ANT-A terminal on the back panel of the TV. it has 300-ohm flat twin leads. 1 Place the wires from the twin leads under the screws on the 300-75 ohm adapter. This requires... a combiner attachment, which you will need to connect an antenna to your TV (one VHF and one UHF), you must combine the two antenna signals before connecting them to the TV. Use a screwdriver to the combiner. 2 Plug the combiner into the ANT-A terminal on the back panel...

User Manual (ENGLISH)
Page 12
... may be labeled "ANT OUT", "VHF OUT" or simply, "OUT". 2 Connect the other end of the TV. Stereo VCR When you use the converter box to change channels. From Cable TV Rear Panel Caution: If you do not need two coaxial cables. Do not connect the video cable and the S-video cable... to use the S-video connections and remove the video cable. Connections Connecting Cable TV and VCR You can connect different cable systems...
... may be labeled "ANT OUT", "VHF OUT" or simply, "OUT". 2 Connect the other end of the TV. Stereo VCR When you use the converter box to change channels. From Cable TV Rear Panel Caution: If you do not need two coaxial cables. Do not connect the video cable and the S-video cable... to use the S-video connections and remove the video cable. Connections Connecting Cable TV and VCR You can connect different cable systems...
User Manual (ENGLISH)
Page 13
...Output Jacks 2 Connect an audio cable between the Component (1, 2 or 3) Y, PB and PR jacks on the TV and Y, PB and PR (or Y, CB, CR) output jacks on the DVD player. TV Rear Panel Incoming Cable or Antenna 2 To enable Component video viewing, connect video cables between the AUDIO OUTPUT jack on ... video jacks 1 Connect a set of audio cables between the Component (1, 2 or 3) AUDIO IN jacks on the TV and the AUDIO OUT jacks on the DVD player. Connecting to your TV. TV Rear Panel Incoming Cable or Antenna DVD Player 2 Connect video cables between the VIDEO OUT jack on the DVD player...
...Output Jacks 2 Connect an audio cable between the Component (1, 2 or 3) Y, PB and PR jacks on the TV and Y, PB and PR (or Y, CB, CR) output jacks on the DVD player. TV Rear Panel Incoming Cable or Antenna 2 To enable Component video viewing, connect video cables between the AUDIO OUTPUT jack on ... video jacks 1 Connect a set of audio cables between the Component (1, 2 or 3) AUDIO IN jacks on the TV and the AUDIO OUT jacks on the DVD player. Connecting to your TV. TV Rear Panel Incoming Cable or Antenna DVD Player 2 Connect video cables between the VIDEO OUT jack on the DVD player...

User Manual (ENGLISH)
Page 14
... Set Top Box 27 Incoming Cable or Antenna DTV Set Top Box TV Rear Panel 2 Connect video cables between the DVI IN jack on the TV and the DVI OUT jack on the Set Top Box. Connections Connecting... Y,PB,PR 1 Connect a set of audio cables between the PC/DVI AUDIO IN jacks on the TV and the AUDIO OUT jacks on the Set Top Box. Connecting to R,G,B 1 Connect a set of Component ...video, see your Set Top Box owner's manual. TV Rear Panel 2 Connect video cables between the Component (1, 2 or 3) Y, PB and PR inputs on the TV and Y, PB and PR (or Y, CB, CR) outputs on the ...
... Set Top Box 27 Incoming Cable or Antenna DTV Set Top Box TV Rear Panel 2 Connect video cables between the DVI IN jack on the TV and the DVI OUT jack on the Set Top Box. Connections Connecting... Y,PB,PR 1 Connect a set of audio cables between the PC/DVI AUDIO IN jacks on the TV and the AUDIO OUT jacks on the Set Top Box. Connecting to R,G,B 1 Connect a set of Component ...video, see your Set Top Box owner's manual. TV Rear Panel 2 Connect video cables between the Component (1, 2 or 3) Y, PB and PR inputs on the TV and Y, PB and PR (or Y, CB, CR) outputs on the ...
User Manual (ENGLISH)
Page 16
...PIP √ Move Enter Return On-screen menus disappear from the screen automatically after about two minutes, or you to control the settings of your TV. Air 12 Signal - - - - Input Picture Sound Channel Setup Setup Time √ V-Chip √ Closed Caption √ Language : ... appears, use the selected items. Use the ENTER or √ button to select menu items and make some adjustments using the TV's side panel buttons. Selecting the Antenna Input Input Picture Sound Channel Setup Setup Time √ V-Chip √ Closed Caption √...
...PIP √ Move Enter Return On-screen menus disappear from the screen automatically after about two minutes, or you to control the settings of your TV. Air 12 Signal - - - - Input Picture Sound Channel Setup Setup Time √ V-Chip √ Closed Caption √ Language : ... appears, use the selected items. Use the ENTER or √ button to select menu items and make some adjustments using the TV's side panel buttons. Selecting the Antenna Input Input Picture Sound Channel Setup Setup Time √ V-Chip √ Closed Caption √...
User Manual (ENGLISH)
Page 17
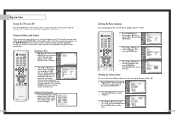
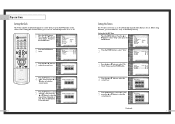
...Auto Program HRC Favorite Channel IRC Channel Label Fine Tune Add/Delete ▼ More Move Enter Return Return 32 Storing Channels in Progress... The TV will begin memorizing all of the channels available. Input Picture Sound Channel Setup Channel Antenna : A Air/CATV : Air Auto Program Favorite ...The Channel Add Return CH Change Move Exit 33 Channel Not In Memory Press Enter to exit the menu. Operation Channel Memory Your TV can use the CH and CH buttons to select "Channel", then press the ENTER button. Selecting the Broadcast Source Before memorizing available...
...Auto Program HRC Favorite Channel IRC Channel Label Fine Tune Add/Delete ▼ More Move Enter Return Return 32 Storing Channels in Progress... The TV will begin memorizing all of the channels available. Input Picture Sound Channel Setup Channel Antenna : A Air/CATV : Air Auto Program Favorite ...The Channel Add Return CH Change Move Exit 33 Channel Not In Memory Press Enter to exit the menu. Operation Channel Memory Your TV can use the CH and CH buttons to select "Channel", then press the ENTER button. Selecting the Broadcast Source Before memorizing available...
User Manual (ENGLISH)
Page 18
... Input Picture Sound Channel Setup Favorite Channel AIR 2 AIR 3 AIR 4 Return Select All AIR 5 AIR 6 Clear All AIR 7 - - - - The TV changes to single-digit channels (0-9) faster, press "0" before the single digit. Press the ... Input Picture Sound Channel Setup Channel Antenna : A Air/CATV : ... button to select "Air/CATV", then press the ENTER button. Operation Changing Channels You can change channels on the remote control. The TV changes each available input source (such as Favorite channels. To Store Your Favorite Channels: 1 Press the MENU button. or † ...
... Input Picture Sound Channel Setup Favorite Channel AIR 2 AIR 3 AIR 4 Return Select All AIR 5 AIR 6 Clear All AIR 7 - - - - The TV changes to single-digit channels (0-9) faster, press "0" before the single digit. Press the ... Input Picture Sound Channel Setup Channel Antenna : A Air/CATV : ... button to select "Air/CATV", then press the ENTER button. Operation Changing Channels You can change channels on the remote control. The TV changes each available input source (such as Favorite channels. To Store Your Favorite Channels: 1 Press the MENU button. or † ...
User Manual (ENGLISH)
Page 19
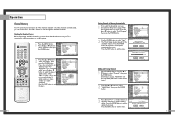
... "Channel Label", then press the ENTER button. Input Picture Channel ▲ More Channel Scan LNA : Off Sound Channel Setup Move Enter √ √ Return 3 The TV will be selected. or † button to the next field, Input which will change the channels automatically, one by one. Press the ... Channel Label AIR...
... "Channel Label", then press the ENTER button. Input Picture Channel ▲ More Channel Scan LNA : Off Sound Channel Setup Move Enter √ √ Return 3 The TV will be selected. or † button to the next field, Input which will change the channels automatically, one by one. Press the ... Channel Label AIR...

User Manual (ENGLISH)
Page 20
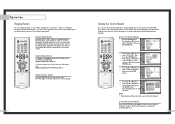
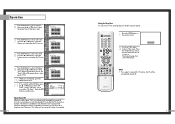
... DNIe : On √ Digital NR : On √ Size √ PIP √ Move Enter Return Input Picture Sound Custom Picture Contrast 100 Brightness 50 Sharpness 50 Color 50 Tint 50 Channel Setup Move Enter Return 4 Press the œ or √ button to raise or lower the value of the... TV. You can change . or † button to select "Custom Picture", then press the ENTER button. When you are finished adjusting an item, ...
... DNIe : On √ Digital NR : On √ Size √ PIP √ Move Enter Return Input Picture Sound Custom Picture Contrast 100 Brightness 50 Sharpness 50 Color 50 Tint 50 Channel Setup Move Enter Return 4 Press the œ or √ button to raise or lower the value of the... TV. You can change . or † button to select "Custom Picture", then press the ENTER button. When you are finished adjusting an item, ...
User Manual (ENGLISH)
Page 21
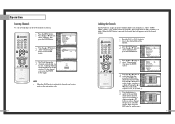
... "Treble" or "Balance L/R". You will appear in the lower left corner of the TV with the VOL - Customizing the Sound 1 Press the MENU button. Custom Sound Input Bass 50 Treble 50 Picture Balance L/R 50 Sound Channel Setup Move Enter Return You can continue to make adjustments, or press the ... MUTE button on the remote control to raise or lower the value of the item, using the on -screen menus, you want to change the TV's bass, treble, and balance settings. and VOL + buttons. Input Picture Sound Channel Setup Sound Sound Mode : Standard √ Custom Sound √...
... "Treble" or "Balance L/R". You will appear in the lower left corner of the TV with the VOL - Customizing the Sound 1 Press the MENU button. Custom Sound Input Bass 50 Treble 50 Picture Balance L/R 50 Sound Channel Setup Move Enter Return You can continue to make adjustments, or press the ... MUTE button on the remote control to raise or lower the value of the item, using the on -screen menus, you want to change the TV's bass, treble, and balance settings. and VOL + buttons. Input Picture Sound Channel Setup Sound Sound Mode : Standard √ Custom Sound √...
User Manual (ENGLISH)
Page 22
...Activation 03 10 No Setup Move Enter Return Continued... 43 or † button to select "Min", then press the ... Operation Setting the Clock This TV has a built-in clock that you choose. or † button to select the correct hour. or † button to select "Setup", then ...MENU button. or † button to select the proper time of day (am ▼ Setup Move Enter Return 42 Setting the Timers This TV can be set the TV's clock, as described previously. Input Picture Sound Time Clock Sleep Timer On Timer Off Timer - - : - - Press the EXIT button ...
...Activation 03 10 No Setup Move Enter Return Continued... 43 or † button to select "Min", then press the ... Operation Setting the Clock This TV has a built-in clock that you choose. or † button to select the correct hour. or † button to select "Setup", then ...MENU button. or † button to select the proper time of day (am ▼ Setup Move Enter Return 42 Setting the Timers This TV can be set the TV's clock, as described previously. Input Picture Sound Time Clock Sleep Timer On Timer Off Timer - - : - - Press the EXIT button ...
User Manual (ENGLISH)
Page 23
...; button to 180 minutes. 30 Min. Press the EXIT button to select "Off Timer". Press the Sleep button to select the time interval for the TV to stay on the remote control. 2 You'll see "Off" at the bottom of day (am CH Vol Activation ▲ 06 10 No ▼ Move... operate any controls during the 3 hours after a preset interval. 1 Press the SLEEP button on . or † button to select the channel you want when the TV turns on . or † button to exit the menu. Set the "Off Timer" just as you set the Off Timer, press the ... Input Picture Sound...
...; button to 180 minutes. 30 Min. Press the EXIT button to select "Off Timer". Press the Sleep button to select the time interval for the TV to stay on the remote control. 2 You'll see "Off" at the bottom of day (am CH Vol Activation ▲ 06 10 No ▼ Move... operate any controls during the 3 hours after a preset interval. 1 Press the SLEEP button on . or † button to select the channel you want when the TV turns on . or † button to exit the menu. Set the "Off Timer" just as you set the Off Timer, press the ... Input Picture Sound...


