User Manual (ENGLISH)
Page 9
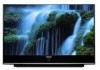
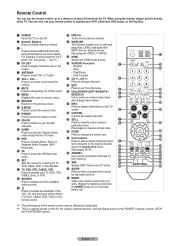
... control to operate your remote control does not work, change the batteries and press the RESET button for 2-3 seconds before use the remote control up to a distance of the VOL, CH and the active source button (TV, DVD, CABLE, STB, VCR) on the remote control. ) PRE-CH Tunes to the previous... menu. (See pages 38~41) l ADD/DEL Use to store and delete channels to directly select a channel. 3 - o RESET When your VCR, Cable box, DVD player, or Set-Top Box. 1 POWER Turns the TV on -screen menu. 9 RETURN Returns to the previous menu. 0 S.MODE Press to stop the action during a particular scene...
... control to operate your remote control does not work, change the batteries and press the RESET button for 2-3 seconds before use the remote control up to a distance of the VOL, CH and the active source button (TV, DVD, CABLE, STB, VCR) on the remote control. ) PRE-CH Tunes to the previous... menu. (See pages 38~41) l ADD/DEL Use to store and delete channels to directly select a channel. 3 - o RESET When your VCR, Cable box, DVD player, or Set-Top Box. 1 POWER Turns the TV on -screen menu. 9 RETURN Returns to the previous menu. 0 S.MODE Press to stop the action during a particular scene...
User Manual (ENGLISH)
Page 18
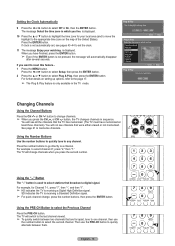
...local area (and to move the highlight to highlight the time zone for Channel 7-1, press "7", then "-", and then "1". ➢ HD indicates the TV is receiving a Standard Definition signal. ➢ For quick channel change channels when you live . If clock is not pressed, the message will automatically ... to set the clock. 11 The message Enjoy your watching. Setting the Clock Automatically 9 Press the ◄ or ► button to reset this feature... 1 Press the MENU button. Press the ENTER button. Using the Number Buttons Use the number buttons to quickly tune to select...
...local area (and to move the highlight to highlight the time zone for Channel 7-1, press "7", then "-", and then "1". ➢ HD indicates the TV is receiving a Standard Definition signal. ➢ For quick channel change channels when you live . If clock is not pressed, the message will automatically ... to set the clock. 11 The message Enjoy your watching. Setting the Clock Automatically 9 Press the ◄ or ► button to reset this feature... 1 Press the MENU button. Press the ENTER button. Using the Number Buttons Use the number buttons to quickly tune to select...
User Manual (ENGLISH)
Page 20
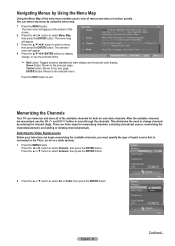
...1030; Tint Color Tone І Detailed Settings І Size І Digital NR І DNIe Active Color І Color Gamut І Position І Reset Mode І SRS TruSurround XT І Preferred Language Multi-Track Sound І Auto Volume І Internal Mute Antenna І Auto Program І Clear ..., then press the ENTER button. an air or a cable system). 1 Press the MENU button. Press the EXIT button to the TV(i.e. There are memorized, use the CH and CH button to display, change channels by entering the channel digits. Enter Channel Return Antenna ACir...
...1030; Tint Color Tone І Detailed Settings І Size І Digital NR І DNIe Active Color І Color Gamut І Position І Reset Mode І SRS TruSurround XT І Preferred Language Multi-Track Sound І Auto Volume І Internal Mute Antenna І Auto Program І Clear ..., then press the ENTER button. an air or a cable system). 1 Press the MENU button. Press the EXIT button to the TV(i.e. There are memorized, use the CH and CH button to display, change channels by entering the channel digits. Enter Channel Return Antenna ACir...
User Manual (ENGLISH)
Page 28
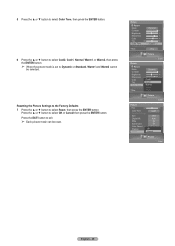
... Enter Picture Tint G50 R50 Color Tone Cool1 Detailed Settings Size 16:9 Digital NR Auto DNIe On Active Color On Color Gamut Normal Position OK Reset CancelOK Picture Enter English - 28 5 Press the ▲ or ▼ button to select Color Tone, then press the ENTER button. 6 Press the ..., or Warm2, then press the ENTER button. ➢ When the picture mode is set to exit. ➢ Each picture mode can be selected. Resetting the Picture Settings to the Factory Defaults 7 Press the ▲ or ▼ button to select OK or Cancel then press the ENTER button. Press...
... Enter Picture Tint G50 R50 Color Tone Cool1 Detailed Settings Size 16:9 Digital NR Auto DNIe On Active Color On Color Gamut Normal Position OK Reset CancelOK Picture Enter English - 28 5 Press the ▲ or ▼ button to select Color Tone, then press the ENTER button. 6 Press the ..., or Warm2, then press the ENTER button. ➢ When the picture mode is set to exit. ➢ Each picture mode can be selected. Resetting the Picture Settings to the Factory Defaults 7 Press the ▲ or ▼ button to select OK or Cancel then press the ENTER button. Press...
User Manual (ENGLISH)
Page 29
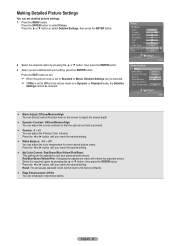
...or Movie, Detailed Settings can emphasize object boundaries. Press the ◄ or ► button until you reach the optimal setting. Reset: The previously adjusted colors will refresh the adjusted screen. Press the ◄ or ► button until you reach the optimal ... optimal contrast is set detailed picture settings. 1 Press the MENU button. Picture Return Mode Standard Contrast 80 Brightness 50 Sharpness 50 Color 50 Tint G50 R50 Color Tone Cool1 Detailed Settings ► Size 16:9 Picture Enter Detailed Settings Return Black Adjust Dynamic...
...or Movie, Detailed Settings can emphasize object boundaries. Press the ◄ or ► button until you reach the optimal setting. Reset: The previously adjusted colors will refresh the adjusted screen. Press the ◄ or ► button until you reach the optimal ... optimal contrast is set detailed picture settings. 1 Press the MENU button. Picture Return Mode Standard Contrast 80 Brightness 50 Sharpness 50 Color 50 Tint G50 R50 Color Tone Cool1 Detailed Settings ► Size 16:9 Picture Enter Detailed Settings Return Black Adjust Dynamic...
User Manual (ENGLISH)
Page 30
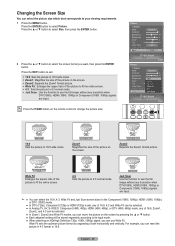
.... Wide Fit : Enlarges the aspect ratio of the picture to fit the entire screen. 4:3 Sets the picture to select Picture. For example, you can reset the picture in the Component (1080i, 1080p), HDMI (1080i, 1080p), or DTV (1080i) mode. ● In DTV (720p), Component (720p) or HDMI (720p... 16:9: Sets the picture to 16:9 wide mode. Zoom1: Magnifies the size of 16:9, Zoom1, Zoom2, and 4:3 can be selected. ● In Analog TV, AV, S-VIDEO, Component (480i, 480p), HDMI (480i, 480p), or DTV (480i, 480p) mode, any of the picture on the screen. Picture Return Mode Dynamic...
.... Wide Fit : Enlarges the aspect ratio of the picture to fit the entire screen. 4:3 Sets the picture to select Picture. For example, you can reset the picture in the Component (1080i, 1080p), HDMI (1080i, 1080p), or DTV (1080i) mode. ● In DTV (720p), Component (720p) or HDMI (720p... 16:9: Sets the picture to 16:9 wide mode. Zoom1: Magnifies the size of 16:9, Zoom1, Zoom2, and 4:3 can be selected. ● In Analog TV, AV, S-VIDEO, Component (480i, 480p), HDMI (480i, 480p), or DTV (480i, 480p) mode, any of the picture on the screen. Picture Return Mode Dynamic...
User Manual (ENGLISH)
Page 31
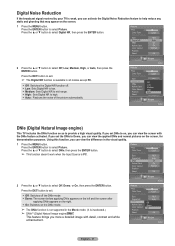
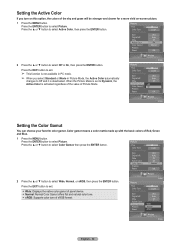
...Color Tone Cool1 Detailed Settings Size 16:9 Digital NR DNIe Active Color Color Gamut Position Reset Off Low LowCooOl1n MediOumKOff High Normal AutoLow OK Picture Enter DNIe (Digital Natural Image engine) This TV includes the DNIe function so as to select Off, Demo, or On, then press... more a detailed image with the DNIe feature activated. Picture Tint G50 Color Tone Detailed Settings Size Digital NR DNIe Active Color Color Gamut Position Reset R50 Cool1 16:9 Auto On On Normal OK 2 Press the ▲ or ▼ button to provide a high visual quality. Using this...
...Color Tone Cool1 Detailed Settings Size 16:9 Digital NR DNIe Active Color Color Gamut Position Reset Off Low LowCooOl1n MediOumKOff High Normal AutoLow OK Picture Enter DNIe (Digital Natural Image engine) This TV includes the DNIe function so as to select Off, Demo, or On, then press... more a detailed image with the DNIe feature activated. Picture Tint G50 Color Tone Detailed Settings Size Digital NR DNIe Active Color Color Gamut Position Reset R50 Cool1 16:9 Auto On On Normal OK 2 Press the ▲ or ▼ button to provide a high visual quality. Using this...
User Manual (ENGLISH)
Page 32
... Tint G50 R50 Color Tone Cool1 Detailed Settings Size 16:9 Digital NR Auto DNIe On Active Color On Color Gamut WideNormal Position Normal Reset sRGB OK Picture Enter English - 32 Picture Enter Picture Tint G50 R50 Color Tone Cool1 Detailed Settings Size 16:9 Digital NR Auto... Color automatically changes to Off and it is deactivated. Picture Tint G50 Color Tone Detailed Settings Size Digital NR DNIe Active Color Color Gamut Position Reset R50 Cool1 16:9 Auto On On Normal 0 OK 2 Press the ▲ or ▼ button to exit. Wide: Displays the...
... Tint G50 R50 Color Tone Cool1 Detailed Settings Size 16:9 Digital NR Auto DNIe On Active Color On Color Gamut WideNormal Position Normal Reset sRGB OK Picture Enter English - 32 Picture Enter Picture Tint G50 R50 Color Tone Cool1 Detailed Settings Size 16:9 Digital NR Auto... Color automatically changes to Off and it is deactivated. Picture Tint G50 Color Tone Detailed Settings Size Digital NR DNIe Active Color Color Gamut Position Reset R50 Cool1 16:9 Auto On On Normal 0 OK 2 Press the ▲ or ▼ button to exit. Wide: Displays the...
User Manual (ENGLISH)
Page 33
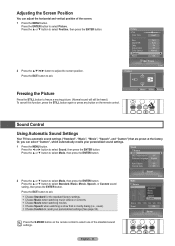
... sound setting, then press the ENTER button. Picture Tint G50 Color Tone Detailed Settings Size Digital NR DNIe Active Color Color Gamut Position Reset R50 Cool1 16:9 Auto On On Normal ► OK Picture Enter Position ▲ ▼ ▼ Freezing the Picture Press the..., press the STILL button again or press any button on the remote control. ▼ Move Enter Return Sound Control Using Automatic Sound Settings Your TV has automatic sound settings ("Standard", "Music", "Movie", "Speech", and "Custom") that is mostly dialog (i.e., news). Choose Custom to...
... sound setting, then press the ENTER button. Picture Tint G50 Color Tone Detailed Settings Size Digital NR DNIe Active Color Color Gamut Position Reset R50 Cool1 16:9 Auto On On Normal ► OK Picture Enter Position ▲ ▼ ▼ Freezing the Picture Press the..., press the STILL button again or press any button on the remote control. ▼ Move Enter Return Sound Control Using Automatic Sound Settings Your TV has automatic sound settings ("Standard", "Music", "Movie", "Speech", and "Custom") that is mostly dialog (i.e., news). Choose Custom to...

User Manual (ENGLISH)
Page 34
... to select Mode, then press the ENTER button. 2 Press the ▲ or ▼ button to select OK or Cancel then press the ENTER button. Resetting the Equalizer Settings to the Factory Defaults 4 Press the ▲ or ▼ button to adjust, then press the ENTER button. Press the ◄ or... ► button to select a particular frequency to select Reset, then press the ENTER button. Press the ▲ or ▼ button to increase or decrease the level of the particular frequency, then press the ENTER...
... to select Mode, then press the ENTER button. 2 Press the ▲ or ▼ button to select OK or Cancel then press the ENTER button. Resetting the Equalizer Settings to the Factory Defaults 4 Press the ▲ or ▼ button to adjust, then press the ENTER button. Press the ◄ or... ► button to select a particular frequency to select Reset, then press the ENTER button. Press the ▲ or ▼ button to increase or decrease the level of the particular frequency, then press the ENTER...

User Manual (ENGLISH)
Page 41
...Air Auto Program Clear Scrambled Channel Channel List ► Fine Tune Signal Strength LNA On Channel 2 Press the ▲ or ▼ button to select Reset, then press the ENTER button. Fine Tuning Analog Channels - Press the ◄ or ► button to adjust the fine tuning. 3 To store the... fine tuning setting in the TV's memory, press the ENTER button. 4 To reset the fine tuning setting, press the ▲ or ▼ button to select Default List Mode, then press the ENTER button. Press...
...Air Auto Program Clear Scrambled Channel Channel List ► Fine Tune Signal Strength LNA On Channel 2 Press the ▲ or ▼ button to select Reset, then press the ENTER button. Fine Tuning Analog Channels - Press the ◄ or ► button to adjust the fine tuning. 3 To store the... fine tuning setting in the TV's memory, press the ENTER button. 4 To reset the fine tuning setting, press the ▲ or ▼ button to select Default List Mode, then press the ENTER button. Press...
User Manual (ENGLISH)
Page 45
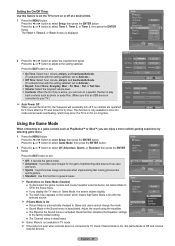
...am /pm, and Inactivate/Activate. (To activate timer with the selected source. ➢ If Game Mode is On ● Picture Mode is On. Reset function initializes the Equalizer settings to select Setup, then press the ENTER button. Press the ◄ or ► button to the factory default setting.... Sound Mode in the Sound menu is activated. Adjust the sound using the equalizer. ● The Reset in the Sound menu is deactivated. Press the ▲ or ▼ button to adjust to TV, check if Game Mode is automatically changed to select Timer 1, Timer 2, or Timer 3, then press ...
...am /pm, and Inactivate/Activate. (To activate timer with the selected source. ➢ If Game Mode is On ● Picture Mode is On. Reset function initializes the Equalizer settings to select Setup, then press the ENTER button. Press the ◄ or ► button to the factory default setting.... Sound Mode in the Sound menu is activated. Adjust the sound using the equalizer. ● The Reset in the Sound menu is deactivated. Press the ▲ or ▼ button to adjust to TV, check if Game Mode is automatically changed to select Timer 1, Timer 2, or Timer 3, then press ...

User Manual (ENGLISH)
Page 47
... PIN. Press the EXIT button to exit. ➢ If you forget the PIN, press the remote-control buttons in the following sequence, which resets the pin to select Setup, then press the ENTER button. The message PIN is displayed. Press the number buttons to enter your PIN and enter... or ▼ button. Press the number buttons to enter your PIN has been memorized. Re-enter the same 4 digits. Choose any 4 digits for a new TV set is "0-0-0-0". Setting Up Your Personal ID Number (PIN) 1 Press the MENU button. Press the ▲ or ▼ button to select Change PIN, then ...
... PIN. Press the EXIT button to exit. ➢ If you forget the PIN, press the remote-control buttons in the following sequence, which resets the pin to select Setup, then press the ENTER button. The message PIN is displayed. Press the number buttons to enter your PIN and enter... or ▼ button. Press the number buttons to enter your PIN has been memorized. Re-enter the same 4 digits. Choose any 4 digits for a new TV set is "0-0-0-0". Setting Up Your Personal ID Number (PIN) 1 Press the MENU button. Press the ▲ or ▼ button to select Change PIN, then ...
User Manual (ENGLISH)
Page 61
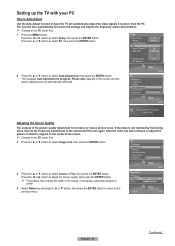
... the ENTER button. Press the ▲ or ▼ button to have the TV set automatically adjust the video signals it is aligned on the screen and the picture...adjust the picture so that it receives from the PC. Image Lock Return Coarse Fine Adjust 50 31 Setup Enter English - 61 Continued... The message Auto Adjustment in progress. Press the...Image Lock Position Auto Adjustment Image Reset Resolution 1152x864 @60Hz Setup Enter Auto Adjustment in progress. PC Return Image Lock ► Position Auto Adjustment Image Reset Resolution 1152x864 @60Hz Setup Enter ...
... the ENTER button. Press the ▲ or ▼ button to have the TV set automatically adjust the video signals it is aligned on the screen and the picture...adjust the picture so that it receives from the PC. Image Lock Return Coarse Fine Adjust 50 31 Setup Enter English - 61 Continued... The message Auto Adjustment in progress. Press the...Image Lock Position Auto Adjustment Image Reset Resolution 1152x864 @60Hz Setup Enter Auto Adjustment in progress. PC Return Image Lock ► Position Auto Adjustment Image Reset Resolution 1152x864 @60Hz Setup Enter ...

User Manual (ENGLISH)
Page 62
... resolution, see page 60. appears on the screen. Press the ◄ or ► button to select Image Reset, then press the ENTER button. 9 The message Image Reset is completed. Changing the Screen Position After connecting the TV to your PC. ➢ Change to the PC mode first. 10 Press the ▲ or ▼...
... resolution, see page 60. appears on the screen. Press the ◄ or ► button to select Image Reset, then press the ENTER button. 9 The message Image Reset is completed. Changing the Screen Position After connecting the TV to your PC. ➢ Change to the PC mode first. 10 Press the ▲ or ▼...


