User Manual (ENGLISH)
Page 3
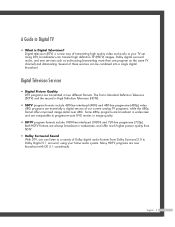
...audio formats from Dolby Surround 2.0 to Dolby Digital 5.1 surround, using your TV set. English - 3 Both HDTV formats are transmitted in widescreen, and offer much higher picture quality than one program on the same TV channel) and datacasting. Some 480p programs are broadcast in image quality. ... more than SDTV. • Dolby Surround Sound With DTV, you can be combined into a single digital broadcast. A Guide to Digital TV • What is High Definition Television (HDTV). • SDTV program formats include 480-line interlaced (480i) and 480-line progressive (480p...
...audio formats from Dolby Surround 2.0 to Dolby Digital 5.1 surround, using your TV set. English - 3 Both HDTV formats are transmitted in widescreen, and offer much higher picture quality than one program on the same TV channel) and datacasting. Some 480p programs are broadcast in image quality. ... more than SDTV. • Dolby Surround Sound With DTV, you can be combined into a single digital broadcast. A Guide to Digital TV • What is High Definition Television (HDTV). • SDTV program formats include 480-line interlaced (480i) and 480-line progressive (480p...
User Manual (ENGLISH)
Page 7
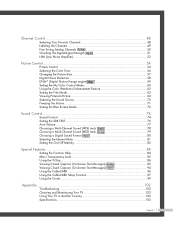
... Your Favorite Channels 48 Labeling the Channels 49 Fine Tuning Analog Channels Analog 50 Checking the Digital-Signal Strength Digital 51 LNA (Low Noise Amplifier 52 Picture Control 54 Picture Control ...54 Selecting the Color Tone 56 Changing the Picture Size 57 Digital Noise Reduction 58 DNIeTM (Digital Natural Image engine) 59 ... Digital 94 Using the CableCARD 96 Using the CableCARD Setup Function 97 Using the Guide 99 Appendix...102 Troubleshooting 102 Cleaning and Maintaining Your TV 103 Using Your TV in Another Country 103 Specifications ...103 English - 7
... Your Favorite Channels 48 Labeling the Channels 49 Fine Tuning Analog Channels Analog 50 Checking the Digital-Signal Strength Digital 51 LNA (Low Noise Amplifier 52 Picture Control 54 Picture Control ...54 Selecting the Color Tone 56 Changing the Picture Size 57 Digital Noise Reduction 58 DNIeTM (Digital Natural Image engine) 59 ... Digital 94 Using the CableCARD 96 Using the CableCARD Setup Function 97 Using the Guide 99 Appendix...102 Troubleshooting 102 Cleaning and Maintaining Your TV 103 Using Your TV in Another Country 103 Specifications ...103 English - 7
User Manual (ENGLISH)
Page 12
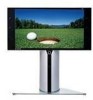
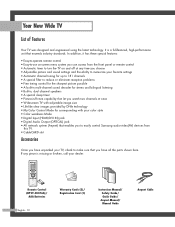
...stereo and bilingual listening • Built-in, dual channel speakers • A special sleep timer • Picture-in-Picture capability that let you watch two channels at once • Widescreen TV with adjustable image size • Life-like clear images provided by DNle technology • My Color Control .../DVI IN) jack • Digital Audio Output (OPTICAL) jack • AV network system (Anynet) that enables you to easily control Samsung audio-video(AV) devices from the front panel or remote control • Automatic timer to make sure that exceeds industry standards. Your New Wide...
...stereo and bilingual listening • Built-in, dual channel speakers • A special sleep timer • Picture-in-Picture capability that let you watch two channels at once • Widescreen TV with adjustable image size • Life-like clear images provided by DNle technology • My Color Control .../DVI IN) jack • Digital Audio Output (OPTICAL) jack • AV network system (Anynet) that enables you to easily control Samsung audio-video(AV) devices from the front panel or remote control • Automatic timer to make sure that exceeds industry standards. Your New Wide...
User Manual (ENGLISH)
Page 16
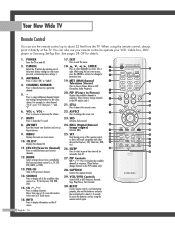
...etc.). 26. ANTENNA Press to select additional channels (digital and analog) being broadcast by the Samsung remote control (i.e., TV, STB, VCR, CABLE, or DVD). 13. Press to select "AIR" or "CABLE". 4. For example, to mute the TV sound. 8. MUTE Press to select channel "54-3", press "54", then press "-" and ... your VCR, Cable box, DVD player or Samsung Set-Top Box. DNIe (Digital Natural Image engine) Activates DNIe. 25. You can use your remote control to the previous channel. 14. PIP (Picture In Picture) Displays the available channels in TV Guide menu. 16. ASPECT Press to select ...
...etc.). 26. ANTENNA Press to select additional channels (digital and analog) being broadcast by the Samsung remote control (i.e., TV, STB, VCR, CABLE, or DVD). 13. Press to select "AIR" or "CABLE". 4. For example, to mute the TV sound. 8. MUTE Press to select channel "54-3", press "54", then press "-" and ... your VCR, Cable box, DVD player or Samsung Set-Top Box. DNIe (Digital Natural Image engine) Activates DNIe. 25. You can use your remote control to the previous channel. 14. PIP (Picture In Picture) Displays the available channels in TV Guide menu. 16. ASPECT Press to select ...
User Manual (ENGLISH)
Page 32
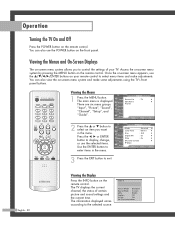
...Move Enter Return 3 Press the EXIT button to select an item you to select menu items and make some adjustments using the TV's front panel buttons. Cable 3 Picture Mode Standard Sound Mode Custom MTS Stereo Caption Off V-Chip Off No Time Information Once the on-screen menu appears, use the...English - 32 Viewing the Display Press the INFO button on your remote control to control the settings of certain picture and sound settings and the current time. Operation Turning the TV On and Off Press the POWER button on the front panel. You can also view the on -screen menu...
...Move Enter Return 3 Press the EXIT button to select an item you to select menu items and make some adjustments using the TV's front panel buttons. Cable 3 Picture Mode Standard Sound Mode Custom MTS Stereo Caption Off V-Chip Off No Time Information Once the on-screen menu appears, use the...English - 32 Viewing the Display Press the INFO button on your remote control to control the settings of certain picture and sound settings and the current time. Operation Turning the TV On and Off Press the POWER button on the front panel. You can also view the on -screen menu...

User Manual (ENGLISH)
Page 33
Press the ... Setup Input Picture Sound Channel Setup Guide Language : EEnngglislihsh Time V-Chip Español Français Caption Menu Transparency : Medium Blue Screen : Off ▼ More Move Enter ... button to select "English", "Español" or "Français", then press the ENTER button. Selecting a Menu Language 1 Press the MENU button. Setup Input Picture Sound Channel Setup Guide Language : English √ Time √ V-Chip √ Caption √ Menu Transparency : Medium √ Blue Screen : Off √ ▼ More Move Enter...
Press the ... Setup Input Picture Sound Channel Setup Guide Language : EEnngglislihsh Time V-Chip Español Français Caption Menu Transparency : Medium Blue Screen : Off ▼ More Move Enter ... button to select "English", "Español" or "Français", then press the ENTER button. Selecting a Menu Language 1 Press the MENU button. Setup Input Picture Sound Channel Setup Guide Language : English √ Time √ V-Chip √ Caption √ Menu Transparency : Medium √ Blue Screen : Off √ ▼ More Move Enter...

User Manual (ENGLISH)
Page 34
... ble Auto Program Cable Add/Delete Favorite Channels Name Fine Tune ▼ More Move Enter Return 3 Press the ... Channel Input Picture Sound Channel Setup Guide Antenna : Cable Auto Program Add/Delete Favorite Channels Name Fine Tune ▼ More Move Enter Return 2 ...MENU button. or † button to select "Air" or "Cable", then press the ENTER button. Operation Memorizing the Channels Your TV can begin memorizing the available channels, you must specify the type of the available channels for memorizing channels: selecting a broadcast source, memorizing...
... ble Auto Program Cable Add/Delete Favorite Channels Name Fine Tune ▼ More Move Enter Return 3 Press the ... Channel Input Picture Sound Channel Setup Guide Antenna : Cable Auto Program Add/Delete Favorite Channels Name Fine Tune ▼ More Move Enter Return 2 ...MENU button. or † button to select "Air" or "Cable", then press the ENTER button. Operation Memorizing the Channels Your TV can begin memorizing the available channels, you must specify the type of the available channels for memorizing channels: selecting a broadcast source, memorizing...

User Manual (ENGLISH)
Page 35
...to "Storing Channels in your particular area. By default, the cable TV system is deleted from the memory, you want to select another type of cable system that channel directly by using the number buttons on the rear panel, "Cable" and "Air+Cable" are not available. Press ...in Memory". 5 Press the √ button to select "Start", then press the ENTER button to memorize. Input Picture Sound Channel Setup Guide Auto Program Select the cable system. The TV begins memorizing all available stations. 4 Press the ... If you can always tune to "STD". Press the ENTER button...
...to "Storing Channels in your particular area. By default, the cable TV system is deleted from the memory, you want to select another type of cable system that channel directly by using the number buttons on the rear panel, "Cable" and "Air+Cable" are not available. Press ...in Memory". 5 Press the √ button to select "Start", then press the ENTER button to memorize. Input Picture Sound Channel Setup Guide Auto Program Select the cable system. The TV begins memorizing all available stations. 4 Press the ... If you can always tune to "STD". Press the ENTER button...

User Manual (ENGLISH)
Page 36
...Press the EXIT button to select "Add/Delete", then press the ENTER button. or † button to delete the channel. Channel Input Picture Sound Channel Setup Guide Antenna : Cable Auto Program Add/Delete Favorite Channels Name Fine Tune ▼ More Move Enter Return 3 Repeatedly .... Move Add Enter Return Add/Delete Cable 26 In Memory Press ENTER to select "Channel", then press the ENTER button. Channel Input Picture Sound Channel Setup Guide Antenna : Cable Auto Program Add/Delete Favorite Channels Name Fine Tune ▼ More Move Enter Return 2 Press...
...Press the EXIT button to select "Add/Delete", then press the ENTER button. or † button to delete the channel. Channel Input Picture Sound Channel Setup Guide Antenna : Cable Auto Program Add/Delete Favorite Channels Name Fine Tune ▼ More Move Enter Return 3 Repeatedly .... Move Add Enter Return Add/Delete Cable 26 In Memory Press ENTER to select "Channel", then press the ENTER button. Channel Input Picture Sound Channel Setup Guide Antenna : Cable Auto Program Add/Delete Favorite Channels Name Fine Tune ▼ More Move Enter Return 2 Press...

User Manual (ENGLISH)
Page 37
...that were either erased or not memorized. You will see all the channels that the TV has memorized. (The TV must have memorized at least three channels.) You will change channels. AIR 7-2 Mono Picture Mode Sound Mode MTS Caption V-Chip 5:21 am Standard Standard English On Off NOTE... • HD indicates the TV is receiving a Analog standard definition signal. English - 37 DTV Air 7-1 English Picture Mode Sound Mode MTS Caption V-Chip 5:21 am Standard Standard Stereo On Off Using the Previous ...
...that were either erased or not memorized. You will see all the channels that the TV has memorized. (The TV must have memorized at least three channels.) You will change channels. AIR 7-2 Mono Picture Mode Sound Mode MTS Caption V-Chip 5:21 am Standard Standard English On Off NOTE... • HD indicates the TV is receiving a Analog standard definition signal. English - 37 DTV Air 7-1 English Picture Mode Sound Mode MTS Caption V-Chip 5:21 am Standard Standard Stereo On Off Using the Previous ...
User Manual (ENGLISH)
Page 40
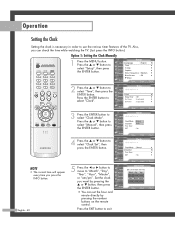
... every time you can set the hour and minute directly by pressing the ... Press the EXIT button to use the various timer features of the TV. Operation Setting the Clock Setting the clock is necessary in order to exit. Press the ... English - 40 5 Press the œ or...; button, then press the ENTER button. • You can check the time while watching the TV. (Just press the INFO button.) Option 1: Setting the Clock Manually 1 Press the MENU button. Time Input Picture Sound Channel Setup Clock Sleep Timer On Timer Off Timer : Off : Inactivated : Inactivated Guide Move...
... every time you can set the hour and minute directly by pressing the ... Press the EXIT button to use the various timer features of the TV. Operation Setting the Clock Setting the clock is necessary in order to exit. Press the ... English - 40 5 Press the œ or...; button, then press the ENTER button. • You can check the time while watching the TV. (Just press the INFO button.) Option 1: Setting the Clock Manually 1 Press the MENU button. Time Input Picture Sound Channel Setup Clock Sleep Timer On Timer Off Timer : Off : Inactivated : Inactivated Guide Move...

User Manual (ENGLISH)
Page 41
... Caption √ Menu Transparency : Medium √ Blue Screen : Off √ ▼ More Move Enter Return 2 Press the ... Time Input Picture Sound Channel Setup Clock Sleep Timer On Timer Off Timer : Off : Inactivated : Inactivated Guide Move Enter Return 3 Press the ENTER button to select... "DST"(Daylight Saving Time), then press the ENTER button. Clock Input Picture Sound Channel Setup Clock Mode Clock Set Time Zone DST : MAauntoual Auto : No Guide Move Enter Return 4 Press the ... Sound...
... Caption √ Menu Transparency : Medium √ Blue Screen : Off √ ▼ More Move Enter Return 2 Press the ... Time Input Picture Sound Channel Setup Clock Sleep Timer On Timer Off Timer : Off : Inactivated : Inactivated Guide Move Enter Return 3 Press the ENTER button to select... "DST"(Daylight Saving Time), then press the ENTER button. Clock Input Picture Sound Channel Setup Clock Mode Clock Set Time Zone DST : MAauntoual Auto : No Guide Move Enter Return 4 Press the ... Sound...
User Manual (ENGLISH)
Page 42
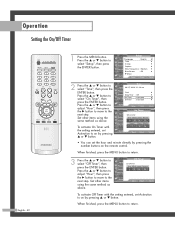
... ... or † button. Press the ... Time Input 08/ 17/ 2004/ 10 : 20 am Picture Sound Channel Setup Clock Sleep Timer On Timer Off Timer : Off : Inactivated : Inactivated Guide Move Enter Return Input Picture Sound Channel Setup Guide On Timer Set on by pressing ... or † button to select "Time...", then press the ENTER button. Input Picture Sound Channel Setup Guide Off Timer Set off timer. Press the ... Press the ... or † button. or † button to select "...
... ... or † button. Press the ... Time Input 08/ 17/ 2004/ 10 : 20 am Picture Sound Channel Setup Clock Sleep Timer On Timer Off Timer : Off : Inactivated : Inactivated Guide Move Enter Return Input Picture Sound Channel Setup Guide On Timer Set on by pressing ... or † button to select "Time...", then press the ENTER button. Input Picture Sound Channel Setup Guide Off Timer Set off timer. Press the ... Press the ... or † button. or † button to select "...

User Manual (ENGLISH)
Page 43
...TV after a preset time (from "30 min" to select "Setup", then press the ENTER button. or † button to 180 minutes). 1 Press the MENU button. or † button to adjust "Minute". or † button to select "Sleep Timer", then press the ENTER button. Input Picture...Inactivated Guide Move Enter Return 3 Press the ... No ▼ Move Adjust Return 4 Setting the Timer sets the Activation to exit. Setup Input Picture Sound Channel Setup Guide Language : English √ Time √ V-Chip √ Caption √ Menu Transparency : Medium √ Blue Screen...
...TV after a preset time (from "30 min" to select "Setup", then press the ENTER button. or † button to 180 minutes). 1 Press the MENU button. or † button to adjust "Minute". or † button to select "Sleep Timer", then press the ENTER button. Input Picture...Inactivated Guide Move Enter Return 3 Press the ... No ▼ Move Adjust Return 4 Setting the Timer sets the Activation to exit. Setup Input Picture Sound Channel Setup Guide Language : English √ Time √ V-Chip √ Caption √ Menu Transparency : Medium √ Blue Screen...

User Manual (ENGLISH)
Page 44
... "Source List". Alternate method Press the SOURCE button on and connected to the TV, Source List Input Picture Sound Channel Setup Guide TV AV1 AV2 S-Video1 S-Video2 Component1 ▼ More Move ----------- Operation Viewing an ...External Signal Source Use the remote control to select "Input". Press the ENTER button to switch between the following sets of jacks: "AV1", "AV2", "S-Video1", "S-Video2", "Component1", "Component2" or "HDMI/DVI" on the TV's rear...
... "Source List". Alternate method Press the SOURCE button on and connected to the TV, Source List Input Picture Sound Channel Setup Guide TV AV1 AV2 S-Video1 S-Video2 Component1 ▼ More Move ----------- Operation Viewing an ...External Signal Source Use the remote control to select "Input". Press the ENTER button to switch between the following sets of jacks: "AV1", "AV2", "S-Video1", "S-Video2", "Component1", "Component2" or "HDMI/DVI" on the TV's rear...

User Manual (ENGLISH)
Page 45
... D-V-DD-VHS Cable STB HD STB Satellite STB PVR STB ▼ Enter Return Recorder, Internet TV Recv., Interactive TV Recv, VOD (Video On Demand) STB, TV. Press the ENTER button. Input Input Source List : TV Picture Edit Name Anynet Sound Channel Setup Guide Move Enter √ √ Return 2 Press the ... Setup Guide AV1 AV2 S-Video1 S-Video2 Component1 Component2 HDMI Move Enter Return 4 Press the ... Input Input Source List : TV Picture Edit Name Anynet Sound Channel Setup Guide Move Enter √ √ Return 3 Press the ... Assigning Names to External ...
... D-V-DD-VHS Cable STB HD STB Satellite STB PVR STB ▼ Enter Return Recorder, Internet TV Recv., Interactive TV Recv, VOD (Video On Demand) STB, TV. Press the ENTER button. Input Input Source List : TV Picture Edit Name Anynet Sound Channel Setup Guide Move Enter √ √ Return 2 Press the ... Setup Guide AV1 AV2 S-Video1 S-Video2 Component1 Component2 HDMI Move Enter Return 4 Press the ... Input Input Source List : TV Picture Edit Name Anynet Sound Channel Setup Guide Move Enter √ √ Return 3 Press the ... Assigning Names to External ...

User Manual (ENGLISH)
Page 48
...on the remote control. English - 48 Channel Control Selecting Your Favorite Channels You can be set as TV and CATV). or † button to select "Favorite Channels", then press the ENTER button. Input Picture Sound Channel Setup Guide Favorite Channels Air 2 Air 3 Air 4 Air 5 Air 6 Air 7 Air...to another. To View Your Favorite Channels: Press the FAV.CH button repeatedly to jump from one favorite channel to exit. Channel Input Picture Sound Channel Setup Guide Antenna : Air Auto Program Add/Delete Favorite Channels Name Fine Tune ▼ More Move Enter Return 2 Press...
...on the remote control. English - 48 Channel Control Selecting Your Favorite Channels You can be set as TV and CATV). or † button to select "Favorite Channels", then press the ENTER button. Input Picture Sound Channel Setup Guide Favorite Channels Air 2 Air 3 Air 4 Air 5 Air 6 Air 7 Air...to another. To View Your Favorite Channels: Press the FAV.CH button repeatedly to jump from one favorite channel to exit. Channel Input Picture Sound Channel Setup Guide Antenna : Air Auto Program Add/Delete Favorite Channels Name Fine Tune ▼ More Move Enter Return 2 Press...

User Manual (ENGLISH)
Page 49
...digit pressing ... To erase the assigned new name, select "Clear" by pressing the button, then press the ENTER button. Press the ... Channel Input Picture Sound Channel Setup Guide Antenna : Air Auto Program Add/Delete Favorite Channels Name Fine Tune ▼ More Move Enter Return 3 Press the button to ...(Results in this feature to assign an easy-to-remember label to a new name, then press the ENTER button. When you add or delete a TV channel, the labeled channels will also be added or deleted. 1 Press the CH or CH will appear below to select "Channel", then press the ...
...digit pressing ... To erase the assigned new name, select "Clear" by pressing the button, then press the ENTER button. Press the ... Channel Input Picture Sound Channel Setup Guide Antenna : Air Auto Program Add/Delete Favorite Channels Name Fine Tune ▼ More Move Enter Return 3 Press the button to ...(Results in this feature to assign an easy-to-remember label to a new name, then press the ENTER button. When you add or delete a TV channel, the labeled channels will also be added or deleted. 1 Press the CH or CH will appear below to select "Channel", then press the ...

User Manual (ENGLISH)
Page 50
... Antenna : Cable Auto Program Add/Delete Favorite Channels Name Fine Tune ▼ More Move Enter Return 2 Press the ... Channel Input Picture Sound Channel Setup Guide Antenna : Cable Auto Program Add/Delete Favorite Channels Name Fine Tune ▼ More Move Enter Return 3 Press ... setting in the TV's memory, press the ENTER button. or † button to select "Channel", then press the ENTER button. Press the ... Cable 26 Fine Tune Fine Tuned 3 Adjust Reset Save Return Cable 26 Fine Tune Not Fine Tuned 0 Move Reset Enter Return English - 50
... Antenna : Cable Auto Program Add/Delete Favorite Channels Name Fine Tune ▼ More Move Enter Return 2 Press the ... Channel Input Picture Sound Channel Setup Guide Antenna : Cable Auto Program Add/Delete Favorite Channels Name Fine Tune ▼ More Move Enter Return 3 Press ... setting in the TV's memory, press the ENTER button. or † button to select "Channel", then press the ENTER button. Press the ... Cable 26 Fine Tune Fine Tuned 3 Adjust Reset Save Return Cable 26 Fine Tune Not Fine Tuned 0 Move Reset Enter Return English - 50

User Manual (ENGLISH)
Page 51
...fine tune a digital channel. Signal Strength OK Enter Return English - 51 or † button to increase the signal strength. Channel Input Picture Sound ▲ More Signal Strength LNA : Off Channel Setup Guide Move Enter √ √ Return If the signal strength meter ... weak, physically adjust your antenna to improve the reception of available digital channels. 1 Press the MENU button. Channel Input Picture Sound Channel Setup Guide Antenna : Cable Auto Program Add/Delete Favorite Channels Name Fine Tune ▼ More Move Enter Return 2 Press...
...fine tune a digital channel. Signal Strength OK Enter Return English - 51 or † button to increase the signal strength. Channel Input Picture Sound ▲ More Signal Strength LNA : Off Channel Setup Guide Move Enter √ √ Return If the signal strength meter ... weak, physically adjust your antenna to improve the reception of available digital channels. 1 Press the MENU button. Channel Input Picture Sound Channel Setup Guide Antenna : Cable Auto Program Add/Delete Favorite Channels Name Fine Tune ▼ More Move Enter Return 2 Press...


