Hlr4266w Hdmi - Samsung HL R4266W
Hlr4266w Hdmi

Related Manual Pages


Similar Questions

Why My Samsung Rv410/rv510/s3510/e3510 Dont Have Hdmi.
(Posted by Anonymous-33856 12 years ago)

My Samsung Tv (hl-r6768w) No Longer Recognizes Hdmi Source.
My husband removed HDMI cable from our AV receiver so that he could hook it up to our new laptop whi...
My husband removed HDMI cable from our AV receiver so that he could hook it up to our new laptop whi...
(Posted by tseeger01 13 years ago)

Which Cable Should I Buy To Connect Hdmi Notebook To Tv?
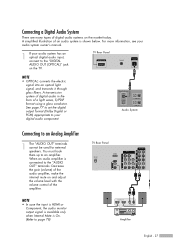
The TV I have is a Samsun DLP TV, model HL-R4266W. It has something called a HDMI/DVI In jack.
The TV I have is a Samsun DLP TV, model HL-R4266W. It has something called a HDMI/DVI In jack.
(Posted by johnm92008 14 years ago)