

Open Source Guide (ENGLISH)
Page 1
... user how to view a copy of this License. (Exception: if the Program itself accompanies the executable. rather, the intent is to exercise the right to control the distribution of derivative or collective works based on what is believed to share and change free software--to this License. 7. However, as expressly provided under this License. This product use of the Program...
... user how to view a copy of this License. (Exception: if the Program itself accompanies the executable. rather, the intent is to exercise the right to control the distribution of derivative or collective works based on what is believed to share and change free software--to this License. 7. However, as expressly provided under this License. This product use of the Program...

Open Source Guide (ENGLISH)
Page 2
...be of the greatest possible use to most effectively convey the exclusion of warranty; and each source file to the public, we recommend making it free software that everyone can do so by permitting redistribution under the terms of each file should have at least the "copyright" line and a pointer to ... CONSEQUENTIAL DAMAGES ARISING OUT OF THE USE OR INABILITY TO USE THE LIBRARY (INCLUDING BUT NOT LIMITED TO LOSS OF DATA OR DATA BEING RENDERED INACCURATE OR LOSSES SUSTAINED BY YOU OR THIRD PARTIES OR A FAILURE OF THE LIBRARY TO OPERATE WITH ANY OTHER SOFTWARE), EVEN IF SUCH HOLDER OR OTHER...
...be of the greatest possible use to most effectively convey the exclusion of warranty; and each source file to the public, we recommend making it free software that everyone can do so by permitting redistribution under the terms of each file should have at least the "copyright" line and a pointer to ... CONSEQUENTIAL DAMAGES ARISING OUT OF THE USE OR INABILITY TO USE THE LIBRARY (INCLUDING BUT NOT LIMITED TO LOSS OF DATA OR DATA BEING RENDERED INACCURATE OR LOSSES SUSTAINED BY YOU OR THIRD PARTIES OR A FAILURE OF THE LIBRARY TO OPERATE WITH ANY OTHER SOFTWARE), EVEN IF SUCH HOLDER OR OTHER...
Quick Guide (ENGLISH)
Page 1
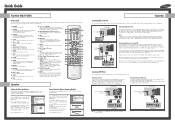
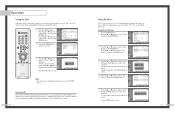
... factory settings (or select your remote control to VCR Audio OUT using the remote control again. Press the ENTER button at the TV. Press the EXIT button to start the auto program. Input Picture Sound Channel Setup Channel Antenna : Ant.1 Air/CATV : Air Auto Program Add/Delete Favorite Channels Name Fine Tune M More Move Enter Return Auto Program Start Enter Return Auto Program Stop Enter Air 11 Return Connections Connecting Cable TV and VCR You can also use the S-Video connections and remove the video cable. From Cable TV Rear Panel Connecting a Cable...
... factory settings (or select your remote control to VCR Audio OUT using the remote control again. Press the ENTER button at the TV. Press the EXIT button to start the auto program. Input Picture Sound Channel Setup Channel Antenna : Ant.1 Air/CATV : Air Auto Program Add/Delete Favorite Channels Name Fine Tune M More Move Enter Return Auto Program Start Enter Return Auto Program Stop Enter Air 11 Return Connections Connecting Cable TV and VCR You can also use the S-Video connections and remove the video cable. From Cable TV Rear Panel Connecting a Cable...
Quick Guide (ENGLISH)
Page 2
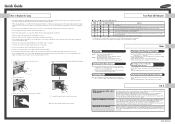
... TV. Front Panel LED Indicators : Light is On, : Light is Blinking, : Light is not properly shut. Lamp may be damaged if you wish to buy a new lamp, please phone your Service Center or a nearby TV dealer, and tell them the model of your monitor is different from overheating. Change channels of the Lamp is very hot. Change channels with DLP remote control. Lamp cover on rear of the screen. You'll occasionally hear it out. 2 Remove the Lamp cover. 3 Remove...
... TV. Front Panel LED Indicators : Light is On, : Light is Blinking, : Light is not properly shut. Lamp may be damaged if you wish to buy a new lamp, please phone your Service Center or a nearby TV dealer, and tell them the model of your monitor is different from overheating. Change channels of the Lamp is very hot. Change channels with DLP remote control. Lamp cover on rear of the screen. You'll occasionally hear it out. 2 Remove the Lamp cover. 3 Remove...
User Manual (ENGLISH)
Page 3
... 63 Auto Volume ...64 Enjoying the Sound of External Speakers 65 Using the V-Chip (USA 66 Viewing Closed Caption Information 72 Setting the Blue Screen Mode 74 Setting The On/Off Melody 75 Using the Color Weakness Enhancement Feature 76 PC Display...78 Using Your TV as a Computer (PC) Display 78 How to Connect Your PC to the TV 78 Setting up Your PC Software (Based on Windows 98 79 Display Modes 80 Adjusting the Picture Quality 81 Changing the Picture...
... 63 Auto Volume ...64 Enjoying the Sound of External Speakers 65 Using the V-Chip (USA 66 Viewing Closed Caption Information 72 Setting the Blue Screen Mode 74 Setting The On/Off Melody 75 Using the Color Weakness Enhancement Feature 76 PC Display...78 Using Your TV as a Computer (PC) Display 78 How to Connect Your PC to the TV 78 Setting up Your PC Software (Based on Windows 98 79 Display Modes 80 Adjusting the Picture Quality 81 Changing the Picture...
User Manual (ENGLISH)
Page 10
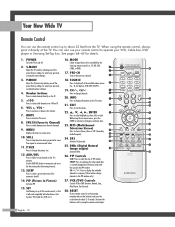
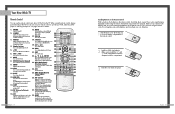
... your remote control is currently displayed on -screen menus, press the ENTER to activate (or change channels in sequence. (These buttons change ) a particular item. 23. Press to exchange the video signal that it directly at the TV. Number buttons Press to select channels directly on the TV. 5. +100 Press to select cable channels over 100 on -screen menu. 10. MTS (Multichannel Television Stereo) Press to mute the TV sound. 8. DNIe (Digital Natural Image engine) Activates...
... your remote control is currently displayed on -screen menus, press the ENTER to activate (or change channels in sequence. (These buttons change ) a particular item. 23. Press to exchange the video signal that it directly at the TV. Number buttons Press to select channels directly on the TV. 5. +100 Press to select cable channels over 100 on -screen menu. 10. MTS (Multichannel Television Stereo) Press to mute the TV sound. 8. DNIe (Digital Natural Image engine) Activates...
User Manual (ENGLISH)
Page 19
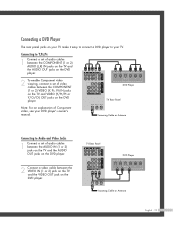
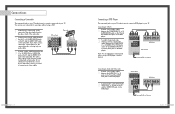
TV Rear Panel DVD Player Incoming Cable or Antenna English - 19 DVD Player TV Rear Panel Note: For an explanation of audio cables between the AUDIO IN (1 or 2) jacks on the TV and the AUDIO OUT jacks on the DVD player. 2 Connect a video cable between the VIDEO IN (1 or 2) jack on the TV and the VIDEO OUT jack on your TV make it easy to connect a DVD player to your DVD player's owner's manual. Incoming Cable or Antenna Connecting to Y,PB,PR 1 Connect a set of audio cables between the COMPONENT (1 or...
TV Rear Panel DVD Player Incoming Cable or Antenna English - 19 DVD Player TV Rear Panel Note: For an explanation of audio cables between the AUDIO IN (1 or 2) jacks on the TV and the AUDIO OUT jacks on the DVD player. 2 Connect a video cable between the VIDEO IN (1 or 2) jack on the TV and the VIDEO OUT jack on your TV make it easy to connect a DVD player to your DVD player's owner's manual. Incoming Cable or Antenna Connecting to Y,PB,PR 1 Connect a set of audio cables between the COMPONENT (1 or...
User Manual (ENGLISH)
Page 37
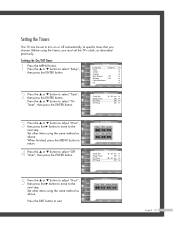
... ... Input Picture Sound Channel Setup On Timer Hour L 12 M Ch 03 Min am/pm 00 am No Move Adjust Return English - 37 Press the EXIT button to select "On Timer", then press the ENTER button. Setting the On/Off Timer 1 Press the MENU button. Input Picture Sound Channel Setup Off Timer Hour L 12 M Min am/pm Activation 00 am Vol. Input Picture Sound Channel Setup Setup Language : English √ Time √ V-Chip √ Caption √ Blue Screen : Off √ Melody : On √ Color Weakness...
... ... Input Picture Sound Channel Setup On Timer Hour L 12 M Ch 03 Min am/pm 00 am No Move Adjust Return English - 37 Press the EXIT button to select "On Timer", then press the ENTER button. Setting the On/Off Timer 1 Press the MENU button. Input Picture Sound Channel Setup Off Timer Hour L 12 M Min am/pm Activation 00 am Vol. Input Picture Sound Channel Setup Setup Language : English √ Time √ V-Chip √ Caption √ Blue Screen : Off √ Melody : On √ Color Weakness...
User Manual (ENGLISH)
Page 52
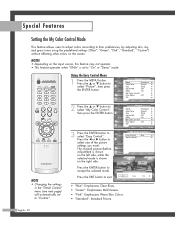
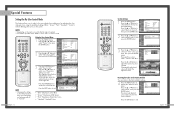
... Features Setting the My Color Control Mode This feature allows users to adjust colors according to their preferences, by adjusting skin, sky, and grass tones using the predefined settings ("Blue", "Green", "Pink", "Standard", "Custom") without affecting other colors on the input source, this feature may not operate. • This feature operates when "DNIe" is shown on the right side. Using the Easy Control Menu 1 Press the MENU button. The original picture (before adjustment...
... Features Setting the My Color Control Mode This feature allows users to adjust colors according to their preferences, by adjusting skin, sky, and grass tones using the predefined settings ("Blue", "Green", "Pink", "Standard", "Custom") without affecting other colors on the input source, this feature may not operate. • This feature operates when "DNIe" is shown on the right side. Using the Easy Control Menu 1 Press the MENU button. The original picture (before adjustment...
User Manual (ENGLISH)
Page 66
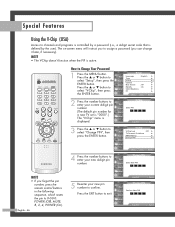
... number to channels and programs is controlled by a password (i.e., a 4-digit secret code that is defined by the user). Picture Enter PIN (The default pin number for Sound * a new TV set is "0000".) The "V-Chip" menu is active. Press the ... Setup 0 9 Enter PIN Return 3 Press the ... Special Features Using the V-Chip (USA) Access to confirm. Input Picture Sound Channel Setup Change PIN Enter New PIN * 0 9 Enter PIN Return 5 Re-enter your current 4-digit pin Input V-Chip number. The on-screen menu will instruct...
... number to channels and programs is controlled by a password (i.e., a 4-digit secret code that is defined by the user). Picture Enter PIN (The default pin number for Sound * a new TV set is "0000".) The "V-Chip" menu is active. Press the ... Setup 0 9 Enter PIN Return 3 Press the ... Special Features Using the V-Chip (USA) Access to confirm. Input Picture Sound Channel Setup Change PIN Enter New PIN * 0 9 Enter PIN Return 5 Re-enter your current 4-digit pin Input V-Chip number. The on-screen menu will instruct...
User Manual (ENGLISH)
Page 88
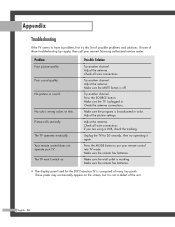
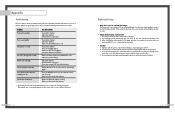
... sound quality. Your remote control does not operate your remote control into TV mode. Adjust the antenna. Try another channel. Check all wire connections. Make sure the remote has batteries. Make sure the remote has batteries. • The display panel used for 30 seconds, then try this list of the unit. Problem Poor picture quality. Check the antenna connections. English - 88 Possible Solution Try another channel. Appendix Troubleshooting If the TV seems to put your TV. No color, wrong colors...
... sound quality. Your remote control does not operate your remote control into TV mode. Adjust the antenna. Try another channel. Check all wire connections. Make sure the remote has batteries. Make sure the remote has batteries. • The display panel used for 30 seconds, then try this list of the unit. Problem Poor picture quality. Check the antenna connections. English - 88 Possible Solution Try another channel. Appendix Troubleshooting If the TV seems to put your TV. No color, wrong colors...
User Manual (ENGLISH)
Page 2
...-Channel Sound (MTS) track 63 Auto Volume ...64 Enjoying the Sound of External Speakers 65 Using the V-Chip 66 Viewing Closed Caption Information 76 Setting the Blue Screen Mode 78 Setting The On/Off Melody 79 Using the Color Weakness Enhancement Feature 80 PC Display...82 Using Your TV as a Computer (PC) Display 82 How to Connect Your PC to the TV 82 Setting up Your PC Software (Based on Windows 98 83 Display Modes 84 Adjusting the Picture Quality 85 Changing...
...-Channel Sound (MTS) track 63 Auto Volume ...64 Enjoying the Sound of External Speakers 65 Using the V-Chip 66 Viewing Closed Caption Information 76 Setting the Blue Screen Mode 78 Setting The On/Off Melody 79 Using the Color Weakness Enhancement Feature 80 PC Display...82 Using Your TV as a Computer (PC) Display 82 How to Connect Your PC to the TV 82 Setting up Your PC Software (Based on Windows 98 83 Display Modes 84 Adjusting the Picture Quality 85 Changing...
User Manual (ENGLISH)
Page 6
... replaced. You can use the remote control up of the batteries with other devices (SetTop box, VCR, Cable box, DVD, etc.). 16. POWER Turns the TV on -screen menu. 10. Number buttons Press to select channels directly on the TV. 5. +100 Press to choose Stereo, Mono or SAP (Secondary Audio Program). 24. MTS (Multichannel Television Stereo) Press to select cable channels over 100 on the main screen with the signal in the PIP window. PIP Controls SIZE; VCR/DVD Controls Controls...
... replaced. You can use the remote control up of the batteries with other devices (SetTop box, VCR, Cable box, DVD, etc.). 16. POWER Turns the TV on -screen menu. 10. Number buttons Press to select channels directly on the TV. 5. +100 Press to choose Stereo, Mono or SAP (Secondary Audio Program). 24. MTS (Multichannel Television Stereo) Press to select cable channels over 100 on the main screen with the signal in the PIP window. PIP Controls SIZE; VCR/DVD Controls Controls...
User Manual (ENGLISH)
Page 10
... DVD player. Incoming Cable or Antenna Connecting to the camcorder audio out using a VCR. 1 Locate the A/V output jacks on the camcorder. If you need to your DVD player's owner's manual. You can use your camcorder is stereo, you have a mono camcorder, connect L(mono) to Audio and Video Jacks 1 Connect a set of audio cables between the AUDIO IN (1 or 2) jacks on the TV and the AUDIO OUT jacks on the DVD player. 2 Connect a video cable between the AV (1 or 2) VIDEO IN (or S-VIDEO...
... DVD player. Incoming Cable or Antenna Connecting to the camcorder audio out using a VCR. 1 Locate the A/V output jacks on the camcorder. If you need to your DVD player's owner's manual. You can use your camcorder is stereo, you have a mono camcorder, connect L(mono) to Audio and Video Jacks 1 Connect a set of audio cables between the AUDIO IN (1 or 2) jacks on the TV and the AUDIO OUT jacks on the DVD player. 2 Connect a video cable between the AV (1 or 2) VIDEO IN (or S-VIDEO...

User Manual (ENGLISH)
Page 17
... button again to display the "Mode" menu. Standard • Choose "Dynamic" for viewing the TV during the day or when there is a bright light in PC, DVI, HDMI or 480p-Component or higher modes. or † button to exit. Press the EXIT button to select "Picture", then press the ENTER button. You can return to the factory default picture settings. 4 Press the MENU button to select "Mode". Input Picture Sound Channel Setup Mode Mode Contrast Brightness Sharpness Color Tint G 50 Reset...
... button again to display the "Mode" menu. Standard • Choose "Dynamic" for viewing the TV during the day or when there is a bright light in PC, DVI, HDMI or 480p-Component or higher modes. or † button to exit. Press the EXIT button to select "Picture", then press the ENTER button. You can return to the factory default picture settings. 4 Press the MENU button to select "Mode". Input Picture Sound Channel Setup Mode Mode Contrast Brightness Sharpness Color Tint G 50 Reset...
User Manual (ENGLISH)
Page 19
... the MENU button. Input Picture Sound Channel Setup Setup Language : English √ Time √ V-Chip √ Caption √ Blue Screen : Off √ Melody : On √ Color Weakness √ PC √ Move Enter Return 2 Press the ... Input Picture Sound Channel Setup Off Timer Hour ▲ 12 ▼ Min am/pm Activation 00 am Vol. Input Picture Sound Time Clock Set Sleep Timer On Timer Off Timer - - : - - or † button to exit. or † button to adjust "Hour", then press the √ button to move to use...
... the MENU button. Input Picture Sound Channel Setup Setup Language : English √ Time √ V-Chip √ Caption √ Blue Screen : Off √ Melody : On √ Color Weakness √ PC √ Move Enter Return 2 Press the ... Input Picture Sound Channel Setup Off Timer Hour ▲ 12 ▼ Min am/pm Activation 00 am Vol. Input Picture Sound Time Clock Set Sleep Timer On Timer Off Timer - - : - - or † button to exit. or † button to adjust "Hour", then press the √ button to move to use...
User Manual (ENGLISH)
Page 27
... automatically set to exit. The previously adjusted colors will be reset to select "Detail Control", then press the ENTER button. Using the Easy Control Menu 1 Press the MENU button. Blue Move Easy Control Green Enter Pink √ Return • "Blue": Emphasizes Clear Blues. • "Green": Emphasizes Mild Greens. • "Pink": Emphasizes Warm Skin Colors. • "Standard": Standard Picture. Press the ... or † button to the factory defaults. Detail Control Input Pink 50 Green 50 Picture Blue 50 Reset Sound Channel Setup...
... automatically set to exit. The previously adjusted colors will be reset to select "Detail Control", then press the ENTER button. Using the Easy Control Menu 1 Press the MENU button. Blue Move Easy Control Green Enter Pink √ Return • "Blue": Emphasizes Clear Blues. • "Green": Emphasizes Mild Greens. • "Pink": Emphasizes Warm Skin Colors. • "Standard": Standard Picture. Press the ... or † button to the factory defaults. Detail Control Input Pink 50 Green 50 Picture Blue 50 Reset Sound Channel Setup...

User Manual (ENGLISH)
Page 43
... depending on the type of PC monitor and its resolution. Check your PC instruction book for information about connecting your particular version of Windows). If the noise is not removed by fine tuning alone, then do the frequency adjustments to the DVI jack. Input Picture Sound Channel Setup Setup Language : English √ Time √ V-Chip √ Caption √ Blue Screen : Off √ Melody : On √ Color Weakness √ PC √ Move...
... depending on the type of PC monitor and its resolution. Check your PC instruction book for information about connecting your particular version of Windows). If the noise is not removed by fine tuning alone, then do the frequency adjustments to the DVI jack. Input Picture Sound Channel Setup Setup Language : English √ Time √ V-Chip √ Caption √ Blue Screen : Off √ Melody : On √ Color Weakness √ PC √ Move...
User Manual (ENGLISH)
Page 47
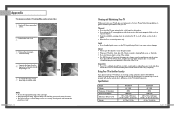
... a problem, first try operating it needs to replace the lamp? If none of possible problems and solutions. Problem Poor picture quality. Picture rolls vertically. The TV won't switch on the lamp case. 3. Try another channel. Adjust the antenna. Press the MODE button to the TV. 2. Make sure the remote has batteries. • The display panel used in color. The lamp type is indicated on the screen, but it is broadcasted in a projection TV has a limited lifespan. No picture or sound...
... a problem, first try operating it needs to replace the lamp? If none of possible problems and solutions. Problem Poor picture quality. Picture rolls vertically. The TV won't switch on the lamp case. 3. Try another channel. Adjust the antenna. Press the MODE button to the TV. 2. Make sure the remote has batteries. • The display panel used in color. The lamp type is indicated on the screen, but it is broadcasted in a projection TV has a limited lifespan. No picture or sound...
User Manual (ENGLISH)
Page 48
... / 125 lbs HL-P5685W AC 120V 60Hz 200 watts 1491 x 556 x 1482 mm / 58.70 x 21.89 x 58.34 inches 61 Kg / 134.48 lbs English - 95 Specifications Model Voltage Frequency of gloves. 1 Unplug TV, then remove the 7 screws. 2 Remove the rear cover. 3 Remove the 2 press-pin screws the Lamp. 4 Separate the Lamp from the engine by applying an optical system. Appendix • For replacement, you...
... / 125 lbs HL-P5685W AC 120V 60Hz 200 watts 1491 x 556 x 1482 mm / 58.70 x 21.89 x 58.34 inches 61 Kg / 134.48 lbs English - 95 Specifications Model Voltage Frequency of gloves. 1 Unplug TV, then remove the 7 screws. 2 Remove the rear cover. 3 Remove the 2 press-pin screws the Lamp. 4 Separate the Lamp from the engine by applying an optical system. Appendix • For replacement, you...


