
Quick Guide (ENGLISH)
Page 1
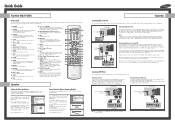
... Auto Program Start Enter Return Auto Program Stop Enter Air 11 Return Connections Connecting Cable TV and VCR You can connect different cable systems to your TV there may be controlled by the Samsung remote control (i.e., TV, STB, VCR, CABLE, or DVD). 12. When viewing premium channels, select "ANT... 2 IN" and tune the TV to channel 3 or 4 (whichever channel is vacant in the "Antenna" ...
... Auto Program Start Enter Return Auto Program Stop Enter Air 11 Return Connections Connecting Cable TV and VCR You can connect different cable systems to your TV there may be controlled by the Samsung remote control (i.e., TV, STB, VCR, CABLE, or DVD). 12. When viewing premium channels, select "ANT... 2 IN" and tune the TV to channel 3 or 4 (whichever channel is vacant in the "Antenna" ...
Quick Guide (ENGLISH)
Page 2
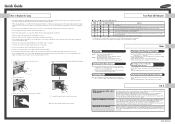
... by the manufacturer. • Please don't remove the lamp except when replacing with cable converter. But, DLP does not use a lamp that the TV will shut off TV power before changing a lamp and then unplug after it out. 2 Remove the Lamp cover. 3 Remove the screws securing the Lamp by using a... if the lamp cover is not securely attached. Please tighten the holding the handle and pulling it has been attached to the TV. 1 Unplug TV, then use a screwdriver to the TV through Set-Top Box DLP : Press the SOURCE button on the Lamp. • A dirty cover or lamp can catch fire, ...
... by the manufacturer. • Please don't remove the lamp except when replacing with cable converter. But, DLP does not use a lamp that the TV will shut off TV power before changing a lamp and then unplug after it out. 2 Remove the Lamp cover. 3 Remove the screws securing the Lamp by using a... if the lamp cover is not securely attached. Please tighten the holding the handle and pulling it has been attached to the TV. 1 Unplug TV, then use a screwdriver to the TV through Set-Top Box DLP : Press the SOURCE button on the Lamp. • A dirty cover or lamp can catch fire, ...
User Manual (ENGLISH)
Page 2
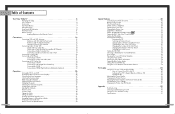
... Antennas 16 Antennas with 300-ohm Flat Twin Leads 16 Antennas with 75-ohm Round Leads 16 Separate VHF and UHF Antennas 17 Connecting Cable TV and VCR 18 Cable without a Cable Box 18 Cable with a Cable Box that Descrambles All Channels 18 Connecting a Cable Converter Box 19 ...22 Connecting to DVI (Digital Visual Interface 22 Connecting to R,G,B 23 Connecting to HDMI (High Definition Multimedia Interface 23 Operation ...26 Turning the TV On and Off 26 Viewing the Menus and On-Screen Displays 26 Selecting the Menu Language 27 Selecting the Antenna Input 27 Memorizing the Channels...
... Antennas 16 Antennas with 300-ohm Flat Twin Leads 16 Antennas with 75-ohm Round Leads 16 Separate VHF and UHF Antennas 17 Connecting Cable TV and VCR 18 Cable without a Cable Box 18 Cable with a Cable Box that Descrambles All Channels 18 Connecting a Cable Converter Box 19 ...22 Connecting to DVI (Digital Visual Interface 22 Connecting to R,G,B 23 Connecting to HDMI (High Definition Multimedia Interface 23 Operation ...26 Turning the TV On and Off 26 Viewing the Menus and On-Screen Displays 26 Selecting the Menu Language 27 Selecting the Antenna Input 27 Memorizing the Channels...

User Manual (ENGLISH)
Page 3
SAMSUNG Your New Wide TV
SAMSUNG Your New Wide TV
User Manual (ENGLISH)
Page 4
...of children. 6 • For replacement, you purchased the TV or to a Samsung Service center. • Caution 1. The lamp used in reverse order. The lamp must be replaced periodically. Replace with the groove and secure the screw. • The TV will not turn on the right side of gloves. 1 ...Unplug TV, then use a screwdriver to the TV. 2. It should be hot....
...of children. 6 • For replacement, you purchased the TV or to a Samsung Service center. • Caution 1. The lamp used in reverse order. The lamp must be replaced periodically. Replace with the groove and secure the screw. • The TV will not turn on the right side of gloves. 1 ...Unplug TV, then use a screwdriver to the TV. 2. It should be hot....
User Manual (ENGLISH)
Page 5
... items on the on-screen menu. Connect the video signal from connected components. Press to activate (or change channels and move between viewing TV programs and signals from a camcorder or video game. Connect the audio signal from a camcorder or video game. (S-Video 3 jack and ...are used only occasionally (a camcorder or video game, for corresponding with your color style • Color weakness Mode Accessories Once you have unpacked your TV, check to change ) a particular item. Connect an S-video signal from a camcorder or video game. Press to make sure that you choose ...
... items on the on-screen menu. Connect the video signal from connected components. Press to activate (or change channels and move between viewing TV programs and signals from a camcorder or video game. Connect the audio signal from a camcorder or video game. (S-Video 3 jack and ...are used only occasionally (a camcorder or video game, for corresponding with your color style • Color weakness Mode Accessories Once you have unpacked your TV, check to change ) a particular item. Connect an S-video signal from a camcorder or video game. Press to make sure that you choose ...
User Manual (ENGLISH)
Page 6
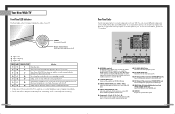
...set is Off TIMER LAMP STAND BY/TEMP Indication Standby state. The PIP channel can be connected to the video output jack on your TV. The picture will automatically be defective. For more information, please see "Connections". Œ ANTENNA terminals Two independent cables or antennas can... output. Ô SERVICE This jack is available only in about 15 seconds. Please contact a certified technician. • It takes about 30 seconds for the TV to warm up, so normal brightness may be turned on in RF, Video and S-Video modes. ˆ Component1, 2 jacks (Y, PB, PR, L, ...
...set is Off TIMER LAMP STAND BY/TEMP Indication Standby state. The PIP channel can be connected to the video output jack on your TV. The picture will automatically be defective. For more information, please see "Connections". Œ ANTENNA terminals Two independent cables or antennas can... output. Ô SERVICE This jack is available only in about 15 seconds. Please contact a certified technician. • It takes about 30 seconds for the TV to warm up, so normal brightness may be turned on in RF, Video and S-Video modes. ˆ Component1, 2 jacks (Y, PB, PR, L, ...
User Manual (ENGLISH)
Page 7
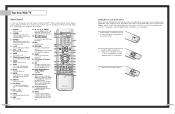
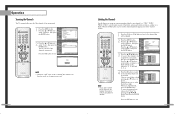
...sure to match the "+" and "-" ends of PIP window. Your New Wide TV Remote Control You can also use your remote control to operate your favorite channels. 8. S.MODE Adjust the TV sound by the Samsung remote control (i.e., TV, STB, VCR, CABLE, or DVD). 12. Press to activate (or change... channels. 15. SWAP; RESET If your remote control is currently displayed on TV. 5. You can use , the batteries in the TV's memory. Press to the previous...
...sure to match the "+" and "-" ends of PIP window. Your New Wide TV Remote Control You can also use your remote control to operate your favorite channels. 8. S.MODE Adjust the TV sound by the Samsung remote control (i.e., TV, STB, VCR, CABLE, or DVD). 12. Press to activate (or change... channels. 15. SWAP; RESET If your remote control is currently displayed on TV. 5. You can use , the batteries in the TV's memory. Press to the previous...

User Manual (ENGLISH)
Page 9
... leads. 16 Separate VHF and UHF Antennas If you have a cable system, you must combine the two antenna signals before connecting the antennas to the TV. This procedure requires an optional combiner-adaptor (available at most electronics shops). 1 Connect both antenna leads to tighten the screws. 2 Plug the adapter into the... the "ANT 1 IN" terminal on the rear panel. 17 Connections Connecting VHF and UHF Antennas If you do not have two separate antennas for your TV (one VHF and one UHF), you will need to connect an antenna to your...
... leads. 16 Separate VHF and UHF Antennas If you have a cable system, you must combine the two antenna signals before connecting the antennas to the TV. This procedure requires an optional combiner-adaptor (available at most electronics shops). 1 Connect both antenna leads to tighten the screws. 2 Plug the adapter into the... the "ANT 1 IN" terminal on the rear panel. 17 Connections Connecting VHF and UHF Antennas If you do not have two separate antennas for your TV (one VHF and one UHF), you will need to connect an antenna to your...

User Manual (ENGLISH)
Page 10
...cable converter box. Connecting a Cable Converter Box and a VCR This connection allows you do not need two coaxial cables. You should keep your TV selected to "ANT 1 IN" so that is connected to watch and record basic and premium cable channels, as well as watch cable and premium... and blocking channels. 19 You will need to use a converter box with a cable box that you can connect different cable systems to your TV, including cable without a Cable Box If you want to change channels. This terminal might be features that descrambles some or all channels. Connections ...
...cable converter box. Connecting a Cable Converter Box and a VCR This connection allows you do not need two coaxial cables. You should keep your TV selected to "ANT 1 IN" so that is connected to watch and record basic and premium cable channels, as well as watch cable and premium... and blocking channels. 19 You will need to use a converter box with a cable box that you can connect different cable systems to your TV, including cable without a Cable Box If you want to change channels. This terminal might be features that descrambles some or all channels. Connections ...

User Manual (ENGLISH)
Page 11
...2 Connect a set of audio cables between the COMPONENT (1 or 2) VIDEO (Y, PB, PR) IN jacks on the TV and VIDEO (Y/PB/PR or Y/CB/CR) OUT jacks on the DVD player. Connecting to Y,PB,PR 1 Connect ...a set of audio cables between the AUDIO IN jacks on the TV and the AUDIO OUT jacks on the camcorder. DVD Player Connecting to audio and video jacks 1 Connect a ...using only one audio cable. 3 Connect a video cable between the VIDEO IN (1 or 2) jack on the TV and the VIDEO OUT jack on the DVD player. If you need to connect a set of audio cables ...
...2 Connect a set of audio cables between the COMPONENT (1 or 2) VIDEO (Y, PB, PR) IN jacks on the TV and VIDEO (Y/PB/PR or Y/CB/CR) OUT jacks on the DVD player. Connecting to Y,PB,PR 1 Connect ...a set of audio cables between the AUDIO IN jacks on the TV and the AUDIO OUT jacks on the camcorder. DVD Player Connecting to audio and video jacks 1 Connect a ...using only one audio cable. 3 Connect a video cable between the VIDEO IN (1 or 2) jack on the TV and the VIDEO OUT jack on the DVD player. If you need to connect a set of audio cables ...

User Manual (ENGLISH)
Page 12
...Set-Top Box. 2 Connect a set of HDMI source (DTV Set-Top Box, DVD, etc.) to TV. TV Rear Panel NOTE • Please check if the power of HDMI source is on, in case that you... connected the cable of video cables between the HDMI IN jack on the TV and the HDMI OUT jack on the Set-Top Box. Incoming Cable or Antenna DTV Set Top Box 23...Connect a set of Component video, see your Set Top Box owner's manual. Incoming Cable or Antenna 22 TV Rear Panel DTV Set Top Box TV Rear Panel DTV Set Top Box Connecting to select HDMI from the "Source List" even after you fail ...
...Set-Top Box. 2 Connect a set of HDMI source (DTV Set-Top Box, DVD, etc.) to TV. TV Rear Panel NOTE • Please check if the power of HDMI source is on, in case that you... connected the cable of video cables between the HDMI IN jack on the TV and the HDMI OUT jack on the Set-Top Box. Incoming Cable or Antenna DTV Set Top Box 23...Connect a set of Component video, see your Set Top Box owner's manual. Incoming Cable or Antenna 22 TV Rear Panel DTV Set Top Box TV Rear Panel DTV Set Top Box Connecting to select HDMI from the "Source List" even after you fail ...

User Manual (ENGLISH)
Page 14
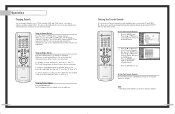
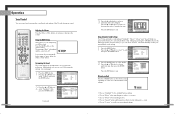
... † button to select to an item you to select menu items and make some adjustments using the TV's side panel buttons. The TV displays the current channel, the status of your remote control to control the settings of certain picture and sound settings and the ...Return 3 Press the EXIT button to select "Antenna". or † button to select "Ant.1" or "Ant.2", then press ENTER button. Input Input Source List : TV Edit Name √ √ There are five menu groups: Picture "Input", "Picture", "Sound", Sound "Channel" and "Setup". am Mono Dynamic Standard Stereo Stereo...
... † button to select to an item you to select menu items and make some adjustments using the TV's side panel buttons. The TV displays the current channel, the status of your remote control to control the settings of certain picture and sound settings and the ...Return 3 Press the EXIT button to select "Antenna". or † button to select "Ant.1" or "Ant.2", then press ENTER button. Input Input Source List : TV Edit Name √ √ There are five menu groups: Picture "Input", "Picture", "Sound", Sound "Channel" and "Setup". am Mono Dynamic Standard Stereo Stereo...

User Manual (ENGLISH)
Page 15
... (manual). or † button to interrupt the memorization process. NOTES • "STD", "HRC" and "IRC" identify various types of cable TV systems. Contact your local cable company to select the type of cable system that exists in Memory (Automatic Method) First, select the correct signal source... ("Air", "STD", "HRC" or "IRC") as described on the remote control to start the auto program. Press the ... The TV begins memorizing all of signal source that were not memorized or delete unwanted channels from memory. 1 Press the MENU button. Press the ENTER button ...
... (manual). or † button to interrupt the memorization process. NOTES • "STD", "HRC" and "IRC" identify various types of cable TV systems. Contact your local cable company to select the type of cable system that exists in Memory (Automatic Method) First, select the correct signal source... ("Air", "STD", "HRC" or "IRC") as described on the remote control to start the auto program. Press the ... The TV begins memorizing all of signal source that were not memorized or delete unwanted channels from memory. 1 Press the MENU button. Press the ENTER button ...
User Manual (ENGLISH)
Page 16
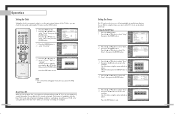
.... To Store Your Favorite Channels: 1 Press the MENU button. Press the ... NOTE • Only memorized channels can be set as TV and CATV). The TV changes to jump from one that has been erased or has not been memorized). This allows you press the CH or CH button, the...source (such as Favorite channels. 31 When you to deselect the selected channel. To change to select a channel, then press the ENTER button. The TV will not see channels that were either erased or not memorized. or † button to single-digit channels (0-9) faster, press the "0" before the ...
.... To Store Your Favorite Channels: 1 Press the MENU button. Press the ... NOTE • Only memorized channels can be set as TV and CATV). The TV changes to jump from one that has been erased or has not been memorized). This allows you press the CH or CH button, the...source (such as Favorite channels. 31 When you to deselect the selected channel. To change to select a channel, then press the ENTER button. The TV will not see channels that were either erased or not memorized. or † button to single-digit channels (0-9) faster, press the "0" before the ...
User Manual (ENGLISH)
Page 17
or † button to select "Name", then press the ENTER button. Picture Scan √ The TV scans all of the channels it has memorized. 1 Press the MENU button. Setup Move Enter Return Scan Air 3 Air 4 Return Enter Return NOTE • When ... Picture Air 2 Air 3 Name ▲ A ▼ ---- Press the ... Press the ... Clear Clear Select a second letter or digit Sound Air 4 - - - - When you add or delete the TV channel, the labeled channels list will also be added or deleted. 1 Press the CH or CH button to tune to the channel that will be...
or † button to select "Name", then press the ENTER button. Picture Scan √ The TV scans all of the channels it has memorized. 1 Press the MENU button. Setup Move Enter Return Scan Air 3 Air 4 Return Enter Return NOTE • When ... Picture Air 2 Air 3 Name ▲ A ▼ ---- Press the ... Press the ... Clear Clear Select a second letter or digit Sound Air 4 - - - - When you add or delete the TV channel, the labeled channels list will also be added or deleted. 1 Press the CH or CH button to tune to the channel that will be...

User Manual (ENGLISH)
Page 18
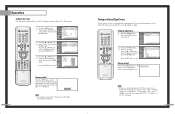
...Mode Mode : Standard √ Contrast 90 Brightness 50 Sharpness 50 Color 50 Tint 50 50 Reset Move Enter Return 34 Using Automatic Picture Settings Your TV has automatic picture settings ("Dynamic", "Standard" and "Cinema") that are preset at the factory. or † button to select "Mode". Press... picture settings. 1 Press the MENU button. NOTE • "Tint" doesn't operate in the room. • Choose "Standard" for viewing the TV during the day or when there is a bright light in PC, DVI, HDMI or 480p-Component or higher modes. Input Picture Sound Channel Setup Mode...
...Mode Mode : Standard √ Contrast 90 Brightness 50 Sharpness 50 Color 50 Tint 50 50 Reset Move Enter Return 34 Using Automatic Picture Settings Your TV has automatic picture settings ("Dynamic", "Standard" and "Cinema") that are preset at the factory. or † button to select "Mode". Press... picture settings. 1 Press the MENU button. NOTE • "Tint" doesn't operate in the room. • Choose "Standard" for viewing the TV during the day or when there is a bright light in PC, DVI, HDMI or 480p-Component or higher modes. Input Picture Sound Channel Setup Mode...
User Manual (ENGLISH)
Page 19
...Customizing the Sound The sound settings can be changed. Balance 100Hz 300Hz 1KHz 3KHz 10KHz Move Adjust Return Using Automatic Sound Settings Your TV has automatic sound settings ("Standard", "Music", "Movie" and "Speech") that is displayed and the sound cuts off press the MUTE...: Off √ : Off √ Move Enter Return 36 3 Press the œ or √ button to select a particular item to select one of the TV with the remote control. Input Picture Sound Channel Setup Equalizer R + + 0 0 L - - Mute To turn mute off . You can activate these sound settings by...
...Customizing the Sound The sound settings can be changed. Balance 100Hz 300Hz 1KHz 3KHz 10KHz Move Adjust Return Using Automatic Sound Settings Your TV has automatic sound settings ("Standard", "Music", "Movie" and "Speech") that is displayed and the sound cuts off press the MUTE...: Off √ : Off √ Move Enter Return 36 3 Press the œ or √ button to select a particular item to select one of the TV with the remote control. Input Picture Sound Channel Setup Equalizer R + + 0 0 L - - Mute To turn mute off . You can activate these sound settings by...
User Manual (ENGLISH)
Page 20
...8730; button to move to the next step. Set the clock you must set the TV's clock, as described previously. Before using the timers, you want by your television will eventually be set the timer "On...", your TV left on for a long time due to select "On Timer", then press the ENTER button. or ... you are away on or off , if you do not operate any controls during the 3 hours after the TV is necessary in only the timer "On" mode and will appear every time you can be turned off automatically at...
...8730; button to move to the next step. Set the clock you must set the TV's clock, as described previously. Before using the timers, you want by your television will eventually be set the timer "On...", your TV left on for a long time due to select "On Timer", then press the ENTER button. or ... you are away on or off , if you do not operate any controls during the 3 hours after the TV is necessary in only the timer "On" mode and will appear every time you can be turned off automatically at...
User Manual (ENGLISH)
Page 21
...Setup Move Enter Return 3 Press the ... Setting the Signal Source 1 Press the MENU button. Input Picture Sound Channel Setup Input Source List : TV Edit Name Move Enter √ √ Return 2 Press the ENTER button to select the preset time you can choose between viewing signals from ... the appropriate time interval appears (any of jacks: "AV1", "AV2", "S-Video1", "S-Video2", "Component1", "Component2", "PC", "DVI" or "HDMI" on the TV's rear panel, and "AV3" or "S-Video3" on the AV1 remote control repeatedly to 180 minutes). 1 Press the MENU button. or † button to exit....
...Setup Move Enter Return 3 Press the ... Setting the Signal Source 1 Press the MENU button. Input Picture Sound Channel Setup Input Source List : TV Edit Name Move Enter √ √ Return 2 Press the ENTER button to select the preset time you can choose between viewing signals from ... the appropriate time interval appears (any of jacks: "AV1", "AV2", "S-Video1", "S-Video2", "Component1", "Component2", "PC", "DVI" or "HDMI" on the TV's rear panel, and "AV3" or "S-Video3" on the AV1 remote control repeatedly to 180 minutes). 1 Press the MENU button. or † button to exit....


