
Quick Guide (ENGLISH)
Page 1
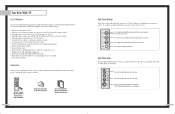
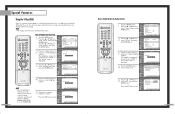
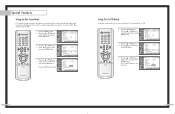
...properly, take out the batteries and press the reset button for automatic shutoff. 22. Press the MENU button. If you must be controlled by the Samsung remote control (i.e., TV, STB, VCR, CABLE, or DVD). 12. When you use the S-Video connections and remove the video cable. Connecting to ... of the preset factory settings (or select your TV selected to select cable channels over 100 on the DVD player. Press to display information on -screen menu. 9. Press the EXIT button to select "Auto Program", then press the ENTER button. PIP (Picture In Picture) Activates PIP. 23. or...
...properly, take out the batteries and press the reset button for automatic shutoff. 22. Press the MENU button. If you must be controlled by the Samsung remote control (i.e., TV, STB, VCR, CABLE, or DVD). 12. When you use the S-Video connections and remove the video cable. Connecting to ... of the preset factory settings (or select your TV selected to select cable channels over 100 on the DVD player. Press to display information on -screen menu. 9. Press the EXIT button to select "Auto Program", then press the ENTER button. PIP (Picture In Picture) Activates PIP. 23. or...
Quick Guide (ENGLISH)
Page 2
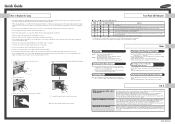
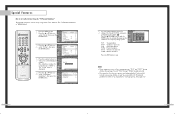
...Home Theater, select "AUX1". * Press the FUNCTION button on the center of Home Theater, select "AUX2". * Press the FUNCTION button on a screen Watching TV for example,6-1,7-1,9-1,10-1,11-1. Change channels of cable converter. Example 2 : Viewing TV with DLP remote control. Turn on the DLP remote ...code for HD broadcasting, you watch from the engine by holding the handle and pulling it working. Listening to warm up with 2 screens (exterior/interior screen). Therefore, white spot appears on the Home Theater, select "AUX1". This does not have to display on the center of the ...
...Home Theater, select "AUX1". * Press the FUNCTION button on the center of Home Theater, select "AUX2". * Press the FUNCTION button on a screen Watching TV for example,6-1,7-1,9-1,10-1,11-1. Change channels of cable converter. Example 2 : Viewing TV with DLP remote control. Turn on the DLP remote ...code for HD broadcasting, you watch from the engine by holding the handle and pulling it working. Listening to warm up with 2 screens (exterior/interior screen). Therefore, white spot appears on the Home Theater, select "AUX1". This does not have to display on the center of the ...
User Manual (ENGLISH)
Page 2
... 23 Connecting to HDMI (High Definition Multimedia Interface 23 Operation ...26 Turning the TV On and Off 26 Viewing the Menus and On-Screen Displays 26 Selecting the Menu Language 27 Selecting the Antenna Input 27 Memorizing the Channels 28 Adding and Erasing Channels 29 Changing Channels 30 ...65 Auto Volume ...66 Enjoying the Sound of External Speakers 67 Using the V-Chip (USA 68 Viewing Closed Caption Information 74 Setting the Blue Screen Mode 76 Setting The On/Off Melody 77 Using the Color Weakness Enhancement Feature 78 PC Display...80 Using Your TV as a Computer (PC...
... 23 Connecting to HDMI (High Definition Multimedia Interface 23 Operation ...26 Turning the TV On and Off 26 Viewing the Menus and On-Screen Displays 26 Selecting the Menu Language 27 Selecting the Antenna Input 27 Memorizing the Channels 28 Adding and Erasing Channels 29 Changing Channels 30 ...65 Auto Volume ...66 Enjoying the Sound of External Speakers 67 Using the V-Chip (USA 68 Viewing Closed Caption Information 74 Setting the Blue Screen Mode 76 Setting The On/Off Melody 77 Using the Color Weakness Enhancement Feature 78 PC Display...80 Using Your TV as a Computer (PC...
User Manual (ENGLISH)
Page 4
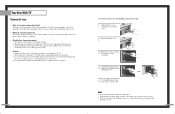
... the front (Timer, Lamp, & Temp.) are flashing. • Check before replacing the lamp as this will activate the protective circuit). 7 After replacing the lamp, the screen quality will need a 5.91 Inches-long Phillips screwdriver and a pair of the TV. Do not place the old lamp near flammable objects or within the... these steps in a projection TV has a limited lifespan. Do not touch the glass part of children. 6 • For replacement, you purchased the TV or to a Samsung Service center. • Caution 1. The lamp used in reverse order.
... the front (Timer, Lamp, & Temp.) are flashing. • Check before replacing the lamp as this will activate the protective circuit). 7 After replacing the lamp, the screen quality will need a 5.91 Inches-long Phillips screwdriver and a pair of the TV. Do not place the old lamp near flammable objects or within the... these steps in a projection TV has a limited lifespan. Do not touch the glass part of children. 6 • For replacement, you purchased the TV or to a Samsung Service center. • Caution 1. The lamp used in reverse order.
User Manual (ENGLISH)
Page 5
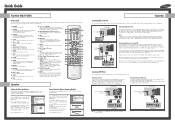
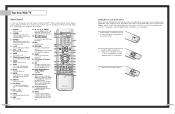
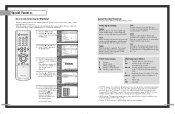
... to connect a component that you have all the parts shown here. It is missing or broken, call your TV's basic features, including the on -screen menu. Press to lower or raise the volume and to reduce or eliminate reception problems • Fine tuning control for the sharpest picture possible •.... Press to make sure that is used in -Picture capability that exceeds industry standards. To use the more advanced features, you must use on-screen menu system you can access from a camcorder or video game. Press to -use the remote control. Your New Wide TV List of Features Your...
... to connect a component that you have all the parts shown here. It is missing or broken, call your TV's basic features, including the on -screen menu. Press to lower or raise the volume and to reduce or eliminate reception problems • Fine tuning control for the sharpest picture possible •.... Press to make sure that is used in -Picture capability that exceeds industry standards. To use the more advanced features, you must use on-screen menu system you can access from a camcorder or video game. Press to -use the remote control. Your New Wide TV List of Features Your...
User Manual (ENGLISH)
Page 7
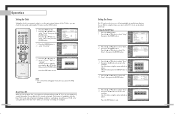
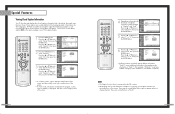
... DVD player. VCR/DVD Controls Controls VCR or DVD functions: Rewind, Stop, Play/Pause, Fast Forward. 27. Make sure you won't be controlled by the Samsung remote control (i.e., TV, STB, VCR, CABLE, or DVD). 12. MUTE Press to memorize and erase the fine tuning after fine tuning channels. 21. CH ,... to be using the remote control, always point it will work compatibly with the signal in the TV's memory. While using the on the TV screen. 16. ADD/DEL Press to activate (or change the picture size. 11. DNIe (Digital Natural Image engine) Activates DNIe. 25. CH / ; RESET If ...
... DVD player. VCR/DVD Controls Controls VCR or DVD functions: Rewind, Stop, Play/Pause, Fast Forward. 27. Make sure you won't be controlled by the Samsung remote control (i.e., TV, STB, VCR, CABLE, or DVD). 12. MUTE Press to memorize and erase the fine tuning after fine tuning channels. 21. CH ,... to be using the remote control, always point it will work compatibly with the signal in the TV's memory. While using the on the TV screen. 16. ADD/DEL Press to activate (or change the picture size. 11. DNIe (Digital Natural Image engine) Activates DNIe. 25. CH / ; RESET If ...

User Manual (ENGLISH)
Page 14
... Viewing the Menus 1 Press the MENU button. Channel Setup Move Enter Exit 2 Press the ... Viewing the Display Press the INFO button on -screen menus: English, Spanish or French. 1 Press the MENU button. Input Picture Sound Channel Setup Setup Language : English √ Time √ ...: Picture "Input", "Picture", "Sound", Sound "Channel" and "Setup". Input Picture Sound Channel Setup Setup Language Time V-Chip Caption Blue Screen Melody Color Weakness PC : EEnngglilsihsh Español √Français : Off : On Move Enter Return Selecting the Antenna Input You...
... Viewing the Menus 1 Press the MENU button. Channel Setup Move Enter Exit 2 Press the ... Viewing the Display Press the INFO button on -screen menus: English, Spanish or French. 1 Press the MENU button. Input Picture Sound Channel Setup Setup Language : English √ Time √ ...: Picture "Input", "Picture", "Sound", Sound "Channel" and "Setup". Input Picture Sound Channel Setup Setup Language Time V-Chip Caption Blue Screen Melody Color Weakness PC : EEnngglilsihsh Español √Français : Off : On Move Enter Return Selecting the Antenna Input You...

User Manual (ENGLISH)
Page 18
... : SDtaynnadmaircd Contrast Standard 90 Brightness Cinema 50 Sharpness 50 Color 50 Tint 50 50 Reset Move Enter Return Alternate method Press the P.MODE button on -screen menus to change the "Contrast", "Brightness", "Sharpness", "Color" and "Tint" according to the Factory Defaults You can activate either "Dynamic", "Standard" or "Cinema" by pressing...
... : SDtaynnadmaircd Contrast Standard 90 Brightness Cinema 50 Sharpness 50 Color 50 Tint 50 50 Reset Move Enter Return Alternate method Press the P.MODE button on -screen menus to change the "Contrast", "Brightness", "Sharpness", "Color" and "Tint" according to the Factory Defaults You can activate either "Dynamic", "Standard" or "Cinema" by pressing...
User Manual (ENGLISH)
Page 20
... to select "Clock Set". Input Picture Sound Channel Setup Setup Language : English √ Time √ V-Chip √ Caption √ Blue Screen : Off √ Melody : On √ Color Weakness √ PC √ Move Enter Return 2 Press the ENTER button to select "...timer features of the TV. Input Picture Sound Channel Setup Setup Language : English √ Time √ V-Chip √ Caption √ Blue Screen : Off √ Melody : On √ Color Weakness √ PC √ Move Enter Return 2 Press the ... Press the ... ...
... to select "Clock Set". Input Picture Sound Channel Setup Setup Language : English √ Time √ V-Chip √ Caption √ Blue Screen : Off √ Melody : On √ Color Weakness √ PC √ Move Enter Return 2 Press the ENTER button to select "...timer features of the TV. Input Picture Sound Channel Setup Setup Language : English √ Time √ V-Chip √ Caption √ Blue Screen : Off √ Melody : On √ Color Weakness √ PC √ Move Enter Return 2 Press the ... Press the ... ...
User Manual (ENGLISH)
Page 21
... (from 30 to 180 minutes). 1 Press the MENU button. Input Picture Sound Channel Setup Setup Language : English √ Time √ V-Chip √ Caption √ Blue Screen : Off √ Melody : On √ Color Weakness √ PC √ Move Enter Return 2 Press the ... Input Picture Sound Channel Setup Time Clock Set Sleep Timer...
... (from 30 to 180 minutes). 1 Press the MENU button. Input Picture Sound Channel Setup Setup Language : English √ Time √ V-Chip √ Caption √ Blue Screen : Off √ Melody : On √ Color Weakness √ PC √ Move Enter Return 2 Press the ... Input Picture Sound Channel Setup Time Clock Set Sleep Timer...

User Manual (ENGLISH)
Page 26
...more than "Zoom1". Input Picture Sound Channel Setup Size Wide Panorama Zoom1 Zoom2 4:3 Move Enter Return Alternate method Press the P.SIZE button on screen. or † button to 4:3 normal mode. This is active in the TV or AV mode. 51 Input Picture Sound Channel Setup .... Press the EXIT button to select "Picture", then press the ENTER button. Press the ... NOTES • You can also move the picture on screen using the scroll function. Press the ... Press the ... or † button to exit. or † button to exit. Press the EXIT button...
...more than "Zoom1". Input Picture Sound Channel Setup Size Wide Panorama Zoom1 Zoom2 4:3 Move Enter Return Alternate method Press the P.SIZE button on screen. or † button to 4:3 normal mode. This is active in the TV or AV mode. 51 Input Picture Sound Channel Setup .... Press the EXIT button to select "Picture", then press the ENTER button. Press the ... NOTES • You can also move the picture on screen using the scroll function. Press the ... Press the ... or † button to exit. or † button to exit. Press the EXIT button...

User Manual (ENGLISH)
Page 27
.... • On: Switches on the DNIe mode. • Off: Switches off the DNIe mode. • Demo: The screen before applying DNIe appears on the right and the screen after applying DNIe appears on the screen. 1 Press the MENU button. Special Features Digital Noise Reduction If the broadcast signal received by your eyes. 1 Press...
.... • On: Switches on the DNIe mode. • Off: Switches off the DNIe mode. • Demo: The screen before applying DNIe appears on the right and the screen after applying DNIe appears on the screen. 1 Press the MENU button. Special Features Digital Noise Reduction If the broadcast signal received by your eyes. 1 Press...

User Manual (ENGLISH)
Page 28
... the "Detail Control" menu. Press the ... The original picture (before adjustment) is shown on the left side, while the selected mode is shown on the screen. Press the ... Input Picture MCC Easy Control : Turkish Blue √ Detail Control √ Sound Channel Setup Move Enter Return 3 Press the ... or † button to... or † button to select one of the MCC color you want , then press the ENTER button. Changing the adjustment value will refresh the adjusted screen.
... the "Detail Control" menu. Press the ... The original picture (before adjustment) is shown on the left side, while the selected mode is shown on the screen. Press the ... Input Picture MCC Easy Control : Turkish Blue √ Detail Control √ Sound Channel Setup Move Enter Return 3 Press the ... or † button to... or † button to select one of the MCC color you want , then press the ENTER button. Changing the adjustment value will refresh the adjusted screen.

User Manual (ENGLISH)
Page 29
... your TV is active. • This feature doesn't operate in 480i only. 56 Viewing Picture-In-Picture One of the most best features of the screen.
... your TV is active. • This feature doesn't operate in 480i only. 56 Viewing Picture-In-Picture One of the most best features of the screen.
User Manual (ENGLISH)
Page 35
...4-digit pin number. Input Picture Sound Channel Setup Setup Language : English √ Time √ V-Chip √ Caption √ Blue Screen : Off √ Melody : On √ Color Weakness √ PC √ Move Enter Return 3 Press the number buttons to select... "V-Chip Lock". Input Picture Sound Channel Setup Setup Language : English √ Time √ V-Chip √ Caption √ Blue Screen : Off √ Melody : On √ Color Weakness √ PC √ Move Enter Return 2 Press the ... Press the EXIT button...
...4-digit pin number. Input Picture Sound Channel Setup Setup Language : English √ Time √ V-Chip √ Caption √ Blue Screen : Off √ Melody : On √ Color Weakness √ PC √ Move Enter Return 3 Press the number buttons to select... "V-Chip Lock". Input Picture Sound Channel Setup Setup Language : English √ Time √ V-Chip √ Caption √ Blue Screen : Off √ Melody : On √ Color Weakness √ PC √ Move Enter Return 2 Press the ... Press the EXIT button...
User Manual (ENGLISH)
Page 36
... lock the TV ratings. Input Picture Sound Channel Setup Setup Language : English √ Time √ V-Chip √ Caption √ Blue Screen : Off √ Melody : On √ Color Weakness √ PC √ Move Enter Return 2 Press the ... Press the buttons and...group. (See page 73.) 71 Input Picture Sound Channel Setup Setup Language : English √ Time √ V-Chip √ Caption √ Blue Screen : Off √ Melody : On √ Color Weakness √ PC √ Move Enter Return 3 Press the number buttons to activate the ...
... lock the TV ratings. Input Picture Sound Channel Setup Setup Language : English √ Time √ V-Chip √ Caption √ Blue Screen : Off √ Melody : On √ Color Weakness √ PC √ Move Enter Return 2 Press the ... Press the buttons and...group. (See page 73.) 71 Input Picture Sound Channel Setup Setup Language : English √ Time √ V-Chip √ Caption √ Blue Screen : Off √ Melody : On √ Color Weakness √ PC √ Move Enter Return 3 Press the number buttons to activate the ...
User Manual (ENGLISH)
Page 37
...should be 17 or older. Input Picture Sound Channel Setup Setup Language : English √ Time √ V-Chip √ Caption √ Blue Screen : Off √ Melody : On √ Color Weakness √ PC √ Move Enter Return 2 Press the ... Picture Enter PIN (...MA Mature audiences only. Input Picture Sound Channel Setup Setup Language : English √ Time √ V-Chip √ Caption √ Blue Screen : Off √ Melody : On √ Color Weakness √ PC √ Move Enter Return 3 Press the number buttons to older ...
...should be 17 or older. Input Picture Sound Channel Setup Setup Language : English √ Time √ V-Chip √ Caption √ Blue Screen : Off √ Melody : On √ Color Weakness √ PC √ Move Enter Return 2 Press the ... Picture Enter PIN (...MA Mature audiences only. Input Picture Sound Channel Setup Setup Language : English √ Time √ V-Chip √ Caption √ Blue Screen : Off √ Melody : On √ Color Weakness √ PC √ Move Enter Return 3 Press the number buttons to older ...
User Manual (ENGLISH)
Page 38
... 1 Text : 1 Channel Setup Move Enter Return • In "Caption" mode, caption appears at the bottom of the screen, and they usually cover only a small portion of the screen. 74 4 Depending on the tape's package or your TV program-schedule. 1 Press the MENU button. or † button...", then press the ENTER button. Input Picture Sound Channel Setup Setup Language : English √ Time √ V-Chip √ Caption √ Blue Screen : Off √ Melody : On √ Color Weakness √ PC √ Move Enter Return 2 Press the ENTER button to select "Mode...
... 1 Text : 1 Channel Setup Move Enter Return • In "Caption" mode, caption appears at the bottom of the screen, and they usually cover only a small portion of the screen. 74 4 Depending on the tape's package or your TV program-schedule. 1 Press the MENU button. or † button...", then press the ENTER button. Input Picture Sound Channel Setup Setup Language : English √ Time √ V-Chip √ Caption √ Blue Screen : Off √ Melody : On √ Color Weakness √ PC √ Move Enter Return 2 Press the ENTER button to select "Mode...
User Manual (ENGLISH)
Page 39
... "Setup", then press the ENTER button. Input Picture Sound Channel Setup Setup Language : English √ Time √ V-Chip √ Caption √ Blue Screen : Off √ Melody : On √ Color Weakness √ PC √ Move Enter Return 3 Press the ... Press the ... or † button... to select "On" or "Off", then press the ENTER button. Input Picture Sound Channel Setup Setup Language Time V-Chip Caption Blue Screen Melody Color Weakness PC : English : Off : OOnff On Move Enter Return 76 77 Press the EXIT button to select "Setup", then...
... "Setup", then press the ENTER button. Input Picture Sound Channel Setup Setup Language : English √ Time √ V-Chip √ Caption √ Blue Screen : Off √ Melody : On √ Color Weakness √ PC √ Move Enter Return 3 Press the ... Press the ... or † button... to select "On" or "Off", then press the ENTER button. Input Picture Sound Channel Setup Setup Language Time V-Chip Caption Blue Screen Melody Color Weakness PC : English : Off : OOnff On Move Enter Return 76 77 Press the EXIT button to select "Setup", then...
User Manual (ENGLISH)
Page 40
...select "Color Weakness". Input Picture Sound Channel Setup Setup Language : English √ Time √ V-Chip √ Caption √ Blue Screen : Off √ Melody : On √ Color Weakness √ PC √ Move Enter Return 3 Press the ENTER button to exit...Return 4 Press the ... Input Picture Sound Channel Setup Setup Language : English √ Time √ V-Chip √ Caption √ Blue Screen : Off √ Melody : On √ Color Weakness √ PC √ Move Enter Return 2 Press the ... Special Features Using ...
...select "Color Weakness". Input Picture Sound Channel Setup Setup Language : English √ Time √ V-Chip √ Caption √ Blue Screen : Off √ Melody : On √ Color Weakness √ PC √ Move Enter Return 3 Press the ENTER button to exit...Return 4 Press the ... Input Picture Sound Channel Setup Setup Language : English √ Time √ V-Chip √ Caption √ Blue Screen : Off √ Melody : On √ Color Weakness √ PC √ Move Enter Return 2 Press the ... Special Features Using ...


