Owner Instructions
Page 4
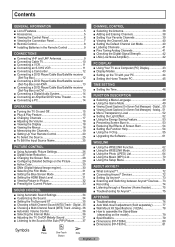
...36 ■ Adjusting the TV On/Off Melody Sound 37 ■ Listening to the Sound of the Sub (PIP) Picture .......... 37 Symbols Press One-Touch ➢ Note APPENDIX ■ Troubleshooting 76 ■ Auto Wall-mount adjustment (Sold separately 77 ■ Wall Mount Kit Specifications ...( VESA 78 ■ How to assemble the Stand-Base (depending on the Picture 29 ■ Using the WISELINK Function 62 ■ Using the WISELINK Mode 63 ■ Using the Photo...
...36 ■ Adjusting the TV On/Off Melody Sound 37 ■ Listening to the Sound of the Sub (PIP) Picture .......... 37 Symbols Press One-Touch ➢ Note APPENDIX ■ Troubleshooting 76 ■ Auto Wall-mount adjustment (Sold separately 77 ■ Wall Mount Kit Specifications ...( VESA 78 ■ How to assemble the Stand-Base (depending on the Picture 29 ■ Using the WISELINK Function 62 ■ Using the WISELINK Mode 63 ■ Using the Photo...

Owner Instructions
Page 7
...an optional HDMI/DVI adapter, the DVI analog audio inputs on your TV allow you wish to watch a television program without disturbing other people in... video game. Side Panel Jacks Use the right side panel jacks to connect a component that will be wall mounted. Viewing the Connection Panel Rear Panel Jacks Use the rear panel jacks to connect A/V components that is ...Uses a 75Ω Coaxial connector for an Air/Cable Network. 9 EX-LINK Connect this to the jack on the optional wall mount bracket. When using your PC. 6 DVI IN (HDMI 1) (AUDIO-R/L) Connect to the DVI audio output jack of an ...
...an optional HDMI/DVI adapter, the DVI analog audio inputs on your TV allow you wish to watch a television program without disturbing other people in... video game. Side Panel Jacks Use the right side panel jacks to connect a component that will be wall mounted. Viewing the Connection Panel Rear Panel Jacks Use the rear panel jacks to connect A/V components that is ...Uses a 75Ω Coaxial connector for an Air/Cable Network. 9 EX-LINK Connect this to the jack on the optional wall mount bracket. When using your PC. 6 DVI IN (HDMI 1) (AUDIO-R/L) Connect to the DVI audio output jack of an ...
Owner Instructions
Page 31
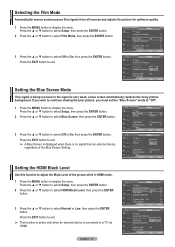
... Upgrade ► Move Enter Return T V Setup ▲ More Screen Burn Protection HDMI Black Level : Normal Film Mode : OOff f Wall-Mount Adjustment On PIP Function Help : On SW Upgrade Move Enter Return Setting the Blue Screen Mode If no signal from all sources and adjusts ... Setup ▲ More Blue Screen : Off ► Melody : Medium ► PC ► Home Theater PC : Off ► Light Effect : In Watching TV ► Energy Saving : Off ► ▼ More Move Enter Return T V Setup ▲ More Blue Screen Melody PC : OOfff : MOendium Home Theater ...
... Upgrade ► Move Enter Return T V Setup ▲ More Screen Burn Protection HDMI Black Level : Normal Film Mode : OOff f Wall-Mount Adjustment On PIP Function Help : On SW Upgrade Move Enter Return Setting the Blue Screen Mode If no signal from all sources and adjusts ... Setup ▲ More Blue Screen : Off ► Melody : Medium ► PC ► Home Theater PC : Off ► Light Effect : In Watching TV ► Energy Saving : Off ► ▼ More Move Enter Return T V Setup ▲ More Blue Screen Melody PC : OOfff : MOendium Home Theater ...

Owner Instructions
Page 32
...ENTER button. 2 Press the ENTER button again. T V Setup ▲ More Screen Burn Protection ► HDMI Black Level : Normal ► Film Mode : Off ► Wall-Mount Adjustment ► PIP ► Function Help : On ► SW Upgrade ► Move Enter Return T V PIP Size Position Channel PIP : OOfff : On : : ...can be used. (Refer to select Size, then press the ENTER button. Main picture Component 1,2 HDMI 1,2,3 PC Sub picture Analog TV broadcasts only Move Enter Return Changing the Size of the PIP window, then press the ENTER button. ➢ If the main picture...
...ENTER button. 2 Press the ENTER button again. T V Setup ▲ More Screen Burn Protection ► HDMI Black Level : Normal ► Film Mode : Off ► Wall-Mount Adjustment ► PIP ► Function Help : On ► SW Upgrade ► Move Enter Return T V PIP Size Position Channel PIP : OOfff : On : : ...can be used. (Refer to select Size, then press the ENTER button. Main picture Component 1,2 HDMI 1,2,3 PC Sub picture Analog TV broadcasts only Move Enter Return Changing the Size of the PIP window, then press the ENTER button. ➢ If the main picture...

Owner Instructions
Page 53
...TV/AV1/AV2/S-Video/ Component/HDMI Horizontal Dot 1 2 Vertical Line 1 2 Time(min) 2 2 Press the EXIT button to select Off, Low, Medium, or High, then press the ENTER button. T V Setup ▲ More Screen Burn Protection ► HDMI Black Level : Normal ► Film Mode : Off ► Wall-Mount...9650; More Blue Screen Melody : Off ► : Medium ► PC ► Home Theater PC : Off ► Light Effect : In Watching TV ► Energy Saving : Off ► ▼ More Move Enter Return T V Setup ▲ More Blue Screen : Off Melody : Medium PC ...
...TV/AV1/AV2/S-Video/ Component/HDMI Horizontal Dot 1 2 Vertical Line 1 2 Time(min) 2 2 Press the EXIT button to select Off, Low, Medium, or High, then press the ENTER button. T V Setup ▲ More Screen Burn Protection ► HDMI Black Level : Normal ► Film Mode : Off ► Wall-Mount...9650; More Blue Screen Melody : Off ► : Medium ► PC ► Home Theater PC : Off ► Light Effect : In Watching TV ► Energy Saving : Off ► ▼ More Move Enter Return T V Setup ▲ More Blue Screen : Off Melody : Medium PC ...

Owner Instructions
Page 54
... Light. • Dark: When you set the screen ratio to 4:3, it darkens the left and right sides. • Light: When you watch TV with the screen ratio of 4:3, the screen is more effective. ➢ The after-image removal function has to be executed for a long time (... Press the MENU button to exit. English - 54 T V Setup ▲ More Screen Burn Protection HDMI Black Level : Normal Film Mode : Off Wall-Mount Adjustment PIP Function Help : On SW Upgrade Move Enter Return T V Setup ▲ More Screen Burn Protection HDMI Black Level : Normal Film Mode : Off...
... Light. • Dark: When you set the screen ratio to 4:3, it darkens the left and right sides. • Light: When you watch TV with the screen ratio of 4:3, the screen is more effective. ➢ The after-image removal function has to be executed for a long time (... Press the MENU button to exit. English - 54 T V Setup ▲ More Screen Burn Protection HDMI Black Level : Normal Film Mode : Off Wall-Mount Adjustment PIP Function Help : On SW Upgrade Move Enter Return T V Setup ▲ More Screen Burn Protection HDMI Black Level : Normal Film Mode : Off...

Owner Instructions
Page 61
...of your TV. 1 Insert a USB drive containing the firmware upgrade into the USB Upgrade Port on automatically after upgrade. Press the ◄ or ► button to version XXXX ? T V Setup ▲ More Screen Burn Protection ► HDMI Black Level : Normal ► Film Mode : Off ► Wall-Mount Adjustment &#.... It may take up to version xxxx? The system would be careful not to 30 seconds. Please contact the Samsung call center at 1-800-SAMSUNG to select USB, then press the ENTER button. It may take up to disconnect the power or remove the USB...
...of your TV. 1 Insert a USB drive containing the firmware upgrade into the USB Upgrade Port on automatically after upgrade. Press the ◄ or ► button to version XXXX ? T V Setup ▲ More Screen Burn Protection ► HDMI Black Level : Normal ► Film Mode : Off ► Wall-Mount Adjustment &#.... It may take up to version xxxx? The system would be careful not to 30 seconds. Please contact the Samsung call center at 1-800-SAMSUNG to select USB, then press the ENTER button. It may take up to disconnect the power or remove the USB...
Owner Instructions
Page 77
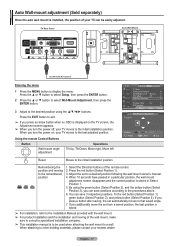
... product installation and the installation and moving to the remembered position 1. English - 77 Auto Wall-mount adjustment (Sold separately) Once the auto wall mount is installed, the position of your TV can be used when attaching the wall mount to a wall. TV Rear Panel Auto Wall-Mount EX-LINK Cable (Not supplied) Entering the menu 1 Press the MENU button to the...
... product installation and the installation and moving to the remembered position 1. English - 77 Auto Wall-mount adjustment (Sold separately) Once the auto wall mount is installed, the position of your TV can be used when attaching the wall mount to a wall. TV Rear Panel Auto Wall-Mount EX-LINK Cable (Not supplied) Entering the menu 1 Press the MENU button to the...

Owner Instructions
Page 78
... screws longer than the standard dimension, as shown in severe personal injury. English - 78 Product Family LCD-TV PDP-TV inch 23 ~ 26 32 ~ 40 46 ~ 52 57 57 ~ 70 80 ~ 42 ~ 50 55 ~ 70 63 80 ~ VESA Spec. (A * B) 200 * 100 200 * 200 600 * 400 700 * 400 (No VESA) 800 * 400 1400 *...to fall, leading to the inside of the TV set. ➢ For wall mounts that do not comply with the VESA standard screw specifications, the length of accidents. ➢ Samsung is not liable for product damage or personal injury when a non-VESA or non-specified wall mount is used or the consumer fails to other ...
... screws longer than the standard dimension, as shown in severe personal injury. English - 78 Product Family LCD-TV PDP-TV inch 23 ~ 26 32 ~ 40 46 ~ 52 57 57 ~ 70 80 ~ 42 ~ 50 55 ~ 70 63 80 ~ VESA Spec. (A * B) 200 * 100 200 * 200 600 * 400 700 * 400 (No VESA) 800 * 400 1400 *...to fall, leading to the inside of the TV set. ➢ For wall mounts that do not comply with the VESA standard screw specifications, the length of accidents. ➢ Samsung is not liable for product damage or personal injury when a non-VESA or non-specified wall mount is used or the consumer fails to other ...
Owner Instructions
Page 79
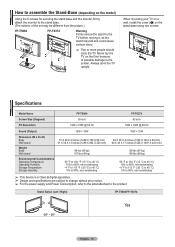
... exterior of possible damage to the screen. Specifications Model Name Screen Size (Diagonal) PC Resolution FP-T5084 50 inch 1920 x 1080 @ 60 Hz FP-T6374 63 inch 1920 x 1080 @ 60 Hz Sound (Output) 15W + 15W Dimension (W x H x D) Body With stand Weight Body With stand 51 X 29 X 4 inches (1289 X 739 X 95 ... moving it, as the stand may fall and could cause serious injury. ➢ Two or more people should carry the TV. When mounting your TV on a wall, install the cover (1) on the floor because of the set may be different from the picture.) FP-T5084 FP-T6374 Warning Firmly secure ...
... exterior of possible damage to the screen. Specifications Model Name Screen Size (Diagonal) PC Resolution FP-T5084 50 inch 1920 x 1080 @ 60 Hz FP-T6374 63 inch 1920 x 1080 @ 60 Hz Sound (Output) 15W + 15W Dimension (W x H x D) Body With stand Weight Body With stand 51 X 29 X 4 inches (1289 X 739 X 95 ... moving it, as the stand may fall and could cause serious injury. ➢ Two or more people should carry the TV. When mounting your TV on a wall, install the cover (1) on the floor because of the set may be different from the picture.) FP-T5084 FP-T6374 Warning Firmly secure ...


