User Manual (ENGLISH)
Page 4
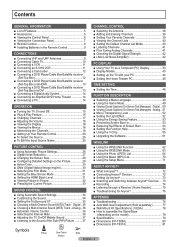
...30 ■ Selecting the Film Mode 31 ■ Setting the Blue Screen Mode 31 ■ Setting the HDMI Black Level 31 ■ Viewing Picture-in the Remote Control 9 CONNECTIONS ■ Connecting VHF and UHF Antennas 9 ■ Connecting Cable TV 10 ■ Connecting a VCR 11 ■ ... Game Mode 49 ■ Viewing Closed Captions (On-Screen Text Messages) - Digital....50 ■ Viewing Closed Captions (On-Screen Text Messages) - Analog.. 51 ■ Menu Transparency Level 52 ■ Setting the Light Effect 52 ■ Using the Energy Saving Feature 53 ■ Preventing...
...30 ■ Selecting the Film Mode 31 ■ Setting the Blue Screen Mode 31 ■ Setting the HDMI Black Level 31 ■ Viewing Picture-in the Remote Control 9 CONNECTIONS ■ Connecting VHF and UHF Antennas 9 ■ Connecting Cable TV 10 ■ Connecting a VCR 11 ■ ... Game Mode 49 ■ Viewing Closed Captions (On-Screen Text Messages) - Digital....50 ■ Viewing Closed Captions (On-Screen Text Messages) - Analog.. 51 ■ Menu Transparency Level 52 ■ Setting the Light Effect 52 ■ Using the Energy Saving Feature 53 ■ Preventing...
User Manual (ENGLISH)
Page 5
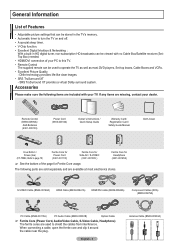
If any items are available at most DVD players, Set-top boxes, Cable Boxes and VCRs. • Excellent Picture Quality - RETURN FAV.CH Remote Control (BN59-00599A) / AAA Batteries (4301-000103) Power Cord (3903-000144) Owner's Instructions / Quick Setup Guide Warranty... the ferrite core and clip it around the cable near the plug. General Information List of Features • Adjustable picture settings that can be stored in the TV's memory. • Automatic timer to turn the TV on and off. • A special sleep timer. • V-Chip function. • Excellent Digital Interface & ...
If any items are available at most DVD players, Set-top boxes, Cable Boxes and VCRs. • Excellent Picture Quality - RETURN FAV.CH Remote Control (BN59-00599A) / AAA Batteries (4301-000103) Power Cord (3903-000144) Owner's Instructions / Quick Setup Guide Warranty... the ferrite core and clip it around the cable near the plug. General Information List of Features • Adjustable picture settings that can be stored in the TV's memory. • Automatic timer to turn the TV on and off. • A special sleep timer. • V-Chip function. • Excellent Digital Interface & ...
User Manual (ENGLISH)
Page 8
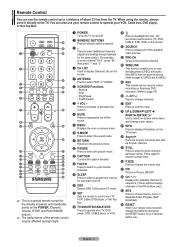
... and change menu values. b WISELINK This function enables you to view and play photo (JPEG) and audio files (MP3) from the TV. h Anynet+ Runs the Anynet+ functions and sets up to a distance of about 23 feet from an external device. (Refer to pages 63 (JPEG) and 69 (MP3)) c REC...by the same station. k PIP Picture-in the PIP window only.) m MTS Press to choose stereo, mono or Separate Audio Program (SAP broadcast). Rewind - Fast/Forward 7 + VOL - a PRE-CH Tunes to stop the action during a particular scene. g INFO Press to display information on Samsung DVD recorders. (Refer to page ...
... and change menu values. b WISELINK This function enables you to view and play photo (JPEG) and audio files (MP3) from the TV. h Anynet+ Runs the Anynet+ functions and sets up to a distance of about 23 feet from an external device. (Refer to pages 63 (JPEG) and 69 (MP3)) c REC...by the same station. k PIP Picture-in the PIP window only.) m MTS Press to choose stereo, mono or Separate Audio Program (SAP broadcast). Rewind - Fast/Forward 7 + VOL - a PRE-CH Tunes to stop the action during a particular scene. g INFO Press to display information on Samsung DVD recorders. (Refer to page ...
User Manual (ENGLISH)
Page 13
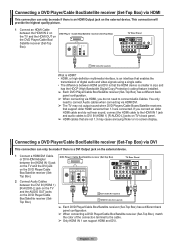
... will provide the highest quality picture. 1 Connect an HDMI Cable between HDMI and DVI is that the HDMI device is smaller in size and has the HDCP (High Bandwidth Digital Copy Protection) coding feature installed. ➢ Each DVD Player/Cable Box/Satellite receiver (Set-Top Box) has a different...the DVD Player/Cable Box/Satellite receiver (SetTop Box). DVD Player / Cable Box/Satellite receiver (Set-Top Box) TV Rear Panel 2 Connect Audio Cables between the DVI IN (HDMI 1) [R-AUDIO-L] jack on the TV and the AUDIO OUT jacks on the DVD Player/Cable Box/Satellite receiver (SetTop Box). 2...
... will provide the highest quality picture. 1 Connect an HDMI Cable between HDMI and DVI is that the HDMI device is smaller in size and has the HDCP (High Bandwidth Digital Copy Protection) coding feature installed. ➢ Each DVD Player/Cable Box/Satellite receiver (Set-Top Box) has a different...the DVD Player/Cable Box/Satellite receiver (SetTop Box). DVD Player / Cable Box/Satellite receiver (Set-Top Box) TV Rear Panel 2 Connect Audio Cables between the DVI IN (HDMI 1) [R-AUDIO-L] jack on the TV and the AUDIO OUT jacks on the DVD Player/Cable Box/Satellite receiver (SetTop Box). 2...
User Manual (ENGLISH)
Page 15
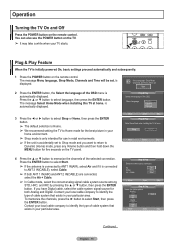
...Start Move Enter Skip Plug & Play Select the cable system. The message Select Home Mode when installing this TV at home. If you want to return to Home mode for the best picture in retail environments. ➢ If the unit is automatically displayed. Plug & Play Select the antennas to ...or ► button to select Shop or Home, then press the ENTER button. ➢ The default selection is Home. ➢ We recommend setting the TV to Dynamic (Home) mode, press any Volume button and then hold down the MENU button for five seconds on the remote control. Shop Home ...
...Start Move Enter Skip Plug & Play Select the cable system. The message Select Home Mode when installing this TV at home. If you want to return to Home mode for the best picture in retail environments. ➢ If the unit is automatically displayed. Plug & Play Select the antennas to ...or ► button to select Shop or Home, then press the ENTER button. ➢ The default selection is Home. ➢ We recommend setting the TV to Dynamic (Home) mode, press any Volume button and then hold down the MENU button for five seconds on the remote control. Shop Home ...
User Manual (ENGLISH)
Page 18
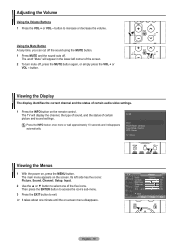
...To turn mute off . Viewing the Display The display identifies the current channel and the status of certain picture and sound settings. The TV will appear in the lower-left side has five icons: Picture, Sound, Channel, Setup, Input. 2 Use the ▲ or ▼ button to increase or ...sound, and the status of certain audio-video settings. 1 Press the INFO button on -screen menu disappears. button. Its left corner of the five icons. T V Picture Mode Contrast Brightness Sharpness Color Tint G 50 : Dynamic ► 100 45 75 55 R 50 ▼ More Move Enter Exit English - ...
...To turn mute off . Viewing the Display The display identifies the current channel and the status of certain picture and sound settings. The TV will appear in the lower-left side has five icons: Picture, Sound, Channel, Setup, Input. 2 Use the ▲ or ▼ button to increase or ...sound, and the status of certain audio-video settings. 1 Press the INFO button on -screen menu disappears. button. Its left corner of the five icons. T V Picture Mode Contrast Brightness Sharpness Color Tint G 50 : Dynamic ► 100 45 75 55 R 50 ▼ More Move Enter Exit English - ...
User Manual (ENGLISH)
Page 26
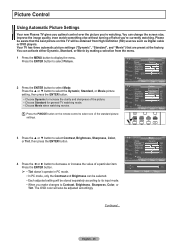
...re watching. T V Picture Mode Contrast Brightness Sharpness Color Tint G 50 : Dynamic ► 100 45 75 55 R 50 ▼ More Move Enter Return T V Picture Mode : DDyynnaammicic Contrast Brightness Standard 100 Movie 45 Sharpness 75 Color 55 Tint G 50 R 50 ▼ More Move ...Picture. 2 Press the ENTER button to select one of the picture. • Choose Standard for general TV watching mode. • Choose Movie when watching movies. The OSD color will also be aware that are preset at the factory. Picture Control Using Automatic Picture Settings Your new Plasma TV...
...re watching. T V Picture Mode Contrast Brightness Sharpness Color Tint G 50 : Dynamic ► 100 45 75 55 R 50 ▼ More Move Enter Return T V Picture Mode : DDyynnaammicic Contrast Brightness Standard 100 Movie 45 Sharpness 75 Color 55 Tint G 50 R 50 ▼ More Move ...Picture. 2 Press the ENTER button to select one of the picture. • Choose Standard for general TV watching mode. • Choose Movie when watching movies. The OSD color will also be aware that are preset at the factory. Picture Control Using Automatic Picture Settings Your new Plasma TV...

User Manual (ENGLISH)
Page 27
..., Normal, Warm1, or Warm2, then press the ENTER button. ➢ When the picture mode is set to exit. ➢ The Digital NR function is weak, you can be selected. Resetting the Picture Settings to the Factory Defaults 7 Press the ▲ or ▼ button to select OK...DNIe : On Reset : OK Move Enter Return T V Picture ▲ More Color Tone : Cool1 Detailed Settings Size : 16:9 Digital NR : Auto Active Color : On DNIe : OOnK Reset : Cancel Move Enter Return Digital Noise Reduction If the broadcast signal received by your TV is available in all modes except PC.
..., Normal, Warm1, or Warm2, then press the ENTER button. ➢ When the picture mode is set to exit. ➢ The Digital NR function is weak, you can be selected. Resetting the Picture Settings to the Factory Defaults 7 Press the ▲ or ▼ button to select OK...DNIe : On Reset : OK Move Enter Return T V Picture ▲ More Color Tone : Cool1 Detailed Settings Size : 16:9 Digital NR : Auto Active Color : On DNIe : OOnK Reset : Cancel Move Enter Return Digital Noise Reduction If the broadcast signal received by your TV is available in all modes except PC.

User Manual (ENGLISH)
Page 28
...8226; When Double ( , ) mode has been set in PIP, the Picture Size cannot be set of the picture to fit the entire screen. 4:3 Sets the picture to 4:3 normal mode. Changing the Screen Size Occasionally, you may differ from the ones above. • In TV, VIDEO, S-VIDEO, and COMPONENT(480i, 480p) ...Wide screen is vertically enlarged. Your TV comes with specific types of the image on the screen. • Zoom2 : Expands the Zoom1 format picture. • Wide Fit : Enlarges the aspect ratio of the picture to fit the entire screen. • 4:3 : Sets the picture to 4:3 normal mode. •...
...8226; When Double ( , ) mode has been set in PIP, the Picture Size cannot be set of the picture to fit the entire screen. 4:3 Sets the picture to 4:3 normal mode. Changing the Screen Size Occasionally, you may differ from the ones above. • In TV, VIDEO, S-VIDEO, and COMPONENT(480i, 480p) ...Wide screen is vertically enlarged. Your TV comes with specific types of the image on the screen. • Zoom2 : Expands the Zoom1 format picture. • Wide Fit : Enlarges the aspect ratio of the picture to fit the entire screen. • 4:3 : Sets the picture to 4:3 normal mode. •...
User Manual (ENGLISH)
Page 29
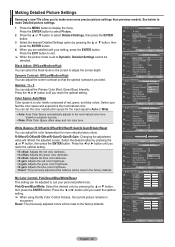
.... Pink/Green/Blue/White: Select the desired color by pressing the ▲ or ▼ button, then press the ENTER button. Making Detailed Picture Settings Samsung's new TVs allow you to Dynamic, Detailed Settings cannot be selected. Gamma: -3 ~ 3 You can adjust the screen contrast so that the optimal contrast is a color matrix composed of red, green...
.... Pink/Green/Blue/White: Select the desired color by pressing the ▲ or ▼ button, then press the ENTER button. Making Detailed Picture Settings Samsung's new TVs allow you to Dynamic, Detailed Settings cannot be selected. Gamma: -3 ~ 3 You can adjust the screen contrast so that the optimal contrast is a color matrix composed of red, green...
User Manual (ENGLISH)
Page 30
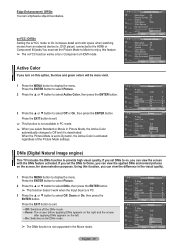
...Reset : OK Move Enter Return T V Picture ▲ More Color Tone : Cool1 Detailed Settings Size : 16:9 Digital NR : Auto Active Color : OOnff DNIe : OOnn Reset : OK Move Enter Return DNIe (Digital Natural Image engine) This TV includes the DNIe function to On increases ... Color If you can view the applied DNIe and normal pictures on the screen, for demonstration purposes. When the Picture Mode is activated regardless of the Picture Mode settings. T V Picture ▲ More Color Tone : Cool1 Detailed Settings Size : 16:9 Digital NR : Auto Active Color :...
...Reset : OK Move Enter Return T V Picture ▲ More Color Tone : Cool1 Detailed Settings Size : 16:9 Digital NR : Auto Active Color : OOnff DNIe : OOnn Reset : OK Move Enter Return DNIe (Digital Natural Image engine) This TV includes the DNIe function to On increases ... Color If you can view the applied DNIe and normal pictures on the screen, for demonstration purposes. When the Picture Mode is activated regardless of the Picture Mode settings. T V Picture ▲ More Color Tone : Cool1 Detailed Settings Size : 16:9 Digital NR : Auto Active Color :...
User Manual (ENGLISH)
Page 31
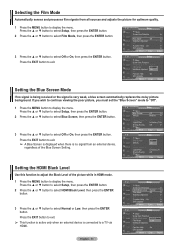
...T V Setup ▲ More Blue Screen : Off ► Melody : Medium ► PC ► Home Theater PC : Off ► Light Effect : In Watching TV ► Energy Saving : Off ► ▼ More Move Enter Return T V Setup ▲ More Blue Screen Melody PC : OOfff : MOendium Home Theater PC : ... Film Mode : OOff f Wall-Mount Adjustment On PIP Function Help : On SW Upgrade Move Enter Return Setting the Blue Screen Mode If no signal from all sources and adjusts the picture for optimum quality. 1 Press the MENU button to display the menu. English - 31 T V Setup ...
...T V Setup ▲ More Blue Screen : Off ► Melody : Medium ► PC ► Home Theater PC : Off ► Light Effect : In Watching TV ► Energy Saving : Off ► ▼ More Move Enter Return T V Setup ▲ More Blue Screen Melody PC : OOfff : MOendium Home Theater PC : ... Film Mode : OOff f Wall-Mount Adjustment On PIP Function Help : On SW Upgrade Move Enter Return Setting the Blue Screen Mode If no signal from all sources and adjusts the picture for optimum quality. 1 Press the MENU button to display the menu. English - 31 T V Setup ...
User Manual (ENGLISH)
Page 32
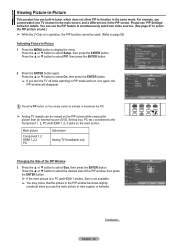
... Size, then press the ENTER button. Press the ▲ or ▼ button to select Setup, then press the ENTER button. Main picture Component 1,2 HDMI 1,2,3 PC Sub picture Analog TV broadcasts only Move Enter Return Changing the Size of the PIP window, then press the ENTER button. ➢ If the main...operation, the PIP function cannot be viewed on the PIP screen while viewing the picture from an external source (DVD, Set-top box, PC etc.) connected to select On, then press the ENTER button. ➢ If you turn the TV off while watching in the same mode. T V Setup ▲ More ...
... Size, then press the ENTER button. Press the ▲ or ▼ button to select Setup, then press the ENTER button. Main picture Component 1,2 HDMI 1,2,3 PC Sub picture Analog TV broadcasts only Move Enter Return Changing the Size of the PIP window, then press the ENTER button. ➢ If the main...operation, the PIP function cannot be viewed on the PIP screen while viewing the picture from an external source (DVD, Set-top box, PC etc.) connected to select On, then press the ENTER button. ➢ If you turn the TV off while watching in the same mode. T V Setup ▲ More ...

User Manual (ENGLISH)
Page 33
...to select the desired channel in the PIP window, then press the ENTER button. ➢ MAIN: PC / HDMI 1,2,3 / Component 1,2 PIP: TV(Analog) Press the EXIT button to exit. Changing the PIP Channel 5 Press the ▲ or ▼ button to select the desired PIP window ...On : : : DTDVTAVirA3▲ ▲ir- 30 - 0 Move Enter Return Freezing the Current Picture 1 Press the STILL button to freeze a moving picture. ➢ Normal sound will automatically cancel after 5 minutes. ➢ While V-Chip is set to Double Window ( ) or Double Wide ( ) mode, the screen size or alignment may ...
...to select the desired channel in the PIP window, then press the ENTER button. ➢ MAIN: PC / HDMI 1,2,3 / Component 1,2 PIP: TV(Analog) Press the EXIT button to exit. Changing the PIP Channel 5 Press the ▲ or ▼ button to select the desired PIP window ...On : : : DTDVTAVirA3▲ ▲ir- 30 - 0 Move Enter Return Freezing the Current Picture 1 Press the STILL button to freeze a moving picture. ➢ Normal sound will automatically cancel after 5 minutes. ➢ While V-Chip is set to Double Window ( ) or Double Wide ( ) mode, the screen size or alignment may ...
User Manual (ENGLISH)
Page 37
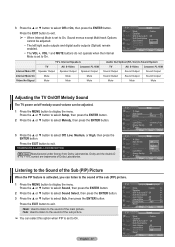
...the MENU button to exit. Dolby and the double-D symbol are trademarks of the Sub (PIP) Picture When the PIP feature is activated, you can select this option when PIP is set to the Sound of Dolby Laboratories. T V Setup ▲ More Blue Screen Melody PC Home ...V Setup ▲ More Blue Screen Melody PC Home Theater PC Light Effect Energy Saving ▼ More Move : OOffff : MLeodwium Medium : OHffigh : In Watching TV : Off Enter Return Listening to On. T V Sound Mode : Custom Equalizer SRS TruSurround XT : Off Multi-Track Options Auto Volume : OOff f Internal Mute ...
...the MENU button to exit. Dolby and the double-D symbol are trademarks of the Sub (PIP) Picture When the PIP feature is activated, you can select this option when PIP is set to the Sound of Dolby Laboratories. T V Setup ▲ More Blue Screen Melody PC Home ...V Setup ▲ More Blue Screen Melody PC Home Theater PC Light Effect Energy Saving ▼ More Move : OOffff : MLeodwium Medium : OHffigh : In Watching TV : Off Enter Return Listening to On. T V Sound Mode : Custom Equalizer SRS TruSurround XT : Off Multi-Track Options Auto Volume : OOff f Internal Mute ...

User Manual (ENGLISH)
Page 42
...setting must be made separately for each channel. You can , however, adjust your antenna to increase the signal strength. T V Channel Antenna : Air Auto Program Clear Scrambled Channel Channel List Name Fine Tune Signal Strength LNA : On Move Enter Return T V Signal Strength OK Enter Return LNA (Low Noise Amplifier) If the TV... unlike analog channels, you will not receive them at all. Press the EXIT button to exit. ➢ If the picture is weak, physically adjust your antenna to improve the reception of available digital channels. 1 Press the MENU button to display...
...setting must be made separately for each channel. You can , however, adjust your antenna to increase the signal strength. T V Channel Antenna : Air Auto Program Clear Scrambled Channel Channel List Name Fine Tune Signal Strength LNA : On Move Enter Return T V Signal Strength OK Enter Return LNA (Low Noise Amplifier) If the TV... unlike analog channels, you will not receive them at all. Press the EXIT button to exit. ➢ If the picture is weak, physically adjust your antenna to improve the reception of available digital channels. 1 Press the MENU button to display...
User Manual (ENGLISH)
Page 44
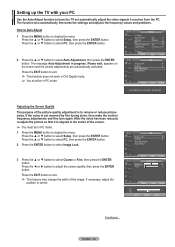
...9658; Melody : Medium ► PC ► Home Theater PC : Off ► Light Effect : In Watching TV ► Energy Saving : Off ► ▼ More Move Enter Return T V PC Image Lock ► ...display the menu. Move Enter Return T V Image Lock Coarse 50 Fine 0 Move Enter Return Coarse Move Adjust 50 Return Continued... How to Auto Adjust 1 Press the MENU button... or reduce picture noise. After the noise has been reduced, re-adjust the picture so that it receives from the PC. The function also automatically fine-tunes the settings and adjusts ...
...9658; Melody : Medium ► PC ► Home Theater PC : Off ► Light Effect : In Watching TV ► Energy Saving : Off ► ▼ More Move Enter Return T V PC Image Lock ► ...display the menu. Move Enter Return T V Image Lock Coarse 50 Fine 0 Move Enter Return Coarse Move Adjust 50 Return Continued... How to Auto Adjust 1 Press the MENU button... or reduce picture noise. After the noise has been reduced, re-adjust the picture so that it receives from the PC. The function also automatically fine-tunes the settings and adjusts ...

User Manual (ENGLISH)
Page 45
.... Press the EXIT button to exit. ➢ The previously adjusted settings will be reset to select Setup, then press the ENTER button. Press the ▲ or ▼ button to view higher quality pictures while in PC Mode. Setting the Home Theater PC This function enables you can adjust the position ...of the screen after connecting the TV to your PC. ➢ Change to the PC mode first. 1 Press the MENU...
.... Press the EXIT button to exit. ➢ The previously adjusted settings will be reset to select Setup, then press the ENTER button. Press the ▲ or ▼ button to view higher quality pictures while in PC Mode. Setting the Home Theater PC This function enables you can adjust the position ...of the screen after connecting the TV to your PC. ➢ Change to the PC mode first. 1 Press the MENU...
User Manual (ENGLISH)
Page 49
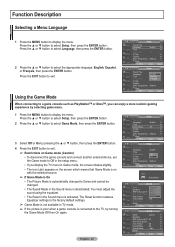
.... You must adjust the sound using the equalizer. • The Reset in the Sound menu is deactivated. The Reset function restores Equalizer settings to the TV, try turning the Game Mode Off then On again. Press the ▲ or ▼ button to select the appropriate language: English,... is automatically changed to Game and cannot be changed. • The Sound Mode in TV mode. ➢ If the picture is poor when a game console is connected to the factory default settings. ➢ Game Mode is not available in the Sound menu is activated. English - 49 T V Setup Plug & Play ►...
.... You must adjust the sound using the equalizer. • The Reset in the Sound menu is deactivated. The Reset function restores Equalizer settings to the TV, try turning the Game Mode Off then On again. Press the ▲ or ▼ button to select the appropriate language: English,... is automatically changed to Game and cannot be changed. • The Sound Mode in TV mode. ➢ If the picture is poor when a game console is connected to the factory default settings. ➢ Game Mode is not available in the Sound menu is activated. English - 49 T V Setup Plug & Play ►...
User Manual (ENGLISH)
Page 53
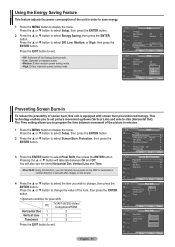
...T V Setup ▲ More Blue Screen Melody : Off ► : Medium ► PC ► Home Theater PC : Off ► Light Effect : In Watching TV ► Energy Saving : Off ► ▼ More Move Enter Return T V Setup ▲ More Blue Screen : Off Melody : Medium PC Off Home Theater PC... possibility of screen burn, this function, you wish to change the value of the picture in minutes. 1 Press the MENU button to side (Horizontal Dot). The Time setting allows you to set picture movement up/down (Vertical Line) and side to display the menu. Press the &#...
...T V Setup ▲ More Blue Screen Melody : Off ► : Medium ► PC ► Home Theater PC : Off ► Light Effect : In Watching TV ► Energy Saving : Off ► ▼ More Move Enter Return T V Setup ▲ More Blue Screen : Off Melody : Medium PC Off Home Theater PC... possibility of screen burn, this function, you wish to change the value of the picture in minutes. 1 Press the MENU button to side (Horizontal Dot). The Time setting allows you to set picture movement up/down (Vertical Line) and side to display the menu. Press the &#...


