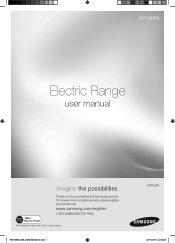
Range FE710DRS/XAA - Samsung
Range FE710DRS/XAA

View Results Below
Free Samsung FE710DRS/XAA manuals!
Problems with Samsung FE710DRS/XAA?
Ask a Question
Free Samsung FE710DRS/XAA manuals!
Problems with Samsung FE710DRS/XAA?
Ask a Question
Related Manual Pages


Related Videos

Samsung Range with Flex Dual Oven FE710DRS
Duration: 2:06
Total Views: 10,458
Duration: 2:06
Total Views: 10,458
Samsung FE710DRS Freestanding Range
Duration: :58
Total Views: 332
Duration: :58
Total Views: 332
SAMSUNG FE710DRS CONV FAN ISSUE SMALL
Duration: :34
Total Views: 145
Duration: :34
Total Views: 145
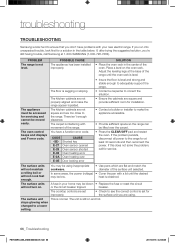
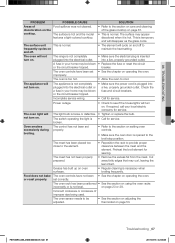
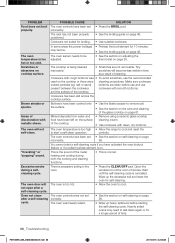
Similar Questions

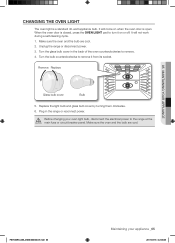
The Light On The Inside Of The Range Will Not Light Up.i Think The Bulb Burnt Ou
the light on the inside of the electric range has blown out but the glass lens will not turn counter...
the light on the inside of the electric range has blown out but the glass lens will not turn counter...
(Posted by daleclements41 4 years ago)

The Broil Element Arced Stove Shut Off. New Element Installed But Now None Of Th
I have a Samsung FE710DRS Range about 3 years old. The Broil element arced and stove shut off. A new...
I have a Samsung FE710DRS Range about 3 years old. The Broil element arced and stove shut off. A new...
(Posted by billlynnwright 7 years ago)

Hi, Samsung Electric Range Model# Fen300wx
Hi, i have aSsamsung electric range with cook-top that does not work. the rest of the oven works fin...
Hi, i have aSsamsung electric range with cook-top that does not work. the rest of the oven works fin...
(Posted by pjhawk 10 years ago)


What Is Clearance For
Floor Mounted Power Socket
For Samsung Fe710drs Range
To install FE710DRS Samsung range, what is the clearance for a floor mounted power socket?
To install FE710DRS Samsung range, what is the clearance for a floor mounted power socket?
(Posted by mdbirnbaum 11 years ago)
Related Terms
The following terms were also used when searching for Range FE710DRS/XAA - Samsung:- samsung fe710drs flex oven range
- fe710drs/xaa flex dual oven
- fe710drs/xaa installation
- fe710drs/xaa manual
- fe710drs/xaa parts
- fe710drs/xaa warranty
- fe710drs/xac
- fe710drs/xac manual
- flex duo fe710drs/xaa
- model fe710drs
- range fe710drs xaa
- range fe710drs/xaa
- samsung fe710drs
- samsung fe710drs best buy
- fe710drs/xaa
- samsung fe710drs lowes
- samsung fe710drs manual
- samsung fe710drs range
- samsung fe710drs xaa
- samsung fe710drs/xaa
- samsung fe710drs/xaa flex dual oven
- samsung fe710drs/xaa manual
- samsung fe710drs/xaa parts
- samsung flex duo fe710drs/xaa
- samsung range fe710drs xaa
- samsung range fe710drs/xaa
- samsung samsung range fe710drs/xaa
- fe710drs manual
- fe710drs
- fe710drs 30
- fe710drs best buy
- fe710drs ceramic
- fe710drs circuit breaker
- fe710drs convection conversion
- fe710drs cost
- fe710drs error code e 4
- fe710drs error codes
- fe710drs induction
- fe710drs installation manual
- fe710drs lowes
- best buy fe710drs
- fe710drs parts
- fe710drs price
- fe710drs prices
- fe710drs problems
- fe710drs recall
- fe710drs samsung
- fe710drs samsung range
- fe710drs sears
- fe710drs turn off open door
- fe710drs warranty
- fe710drs xaa
- fe710drs xac