Samsung FE710DRS/XAA Research

View Results Below
Free Samsung FE710DRS/XAA manuals!
Problems with Samsung FE710DRS/XAA?
Ask a Question
Free Samsung FE710DRS/XAA manuals!
Problems with Samsung FE710DRS/XAA?
Ask a Question
Related Manual Pages


Related Videos

Samsung Range with Flex Dual Oven FE710DRS
Duration: 2:06
Total Views: 10,458
Duration: 2:06
Total Views: 10,458
Samsung FE710DRS Freestanding Range
Duration: :58
Total Views: 332
Duration: :58
Total Views: 332
SAMSUNG FE710DRS CONV FAN ISSUE SMALL
Duration: :34
Total Views: 145
Duration: :34
Total Views: 145
Similar Questions

Samsung Fe710drs Control Unit Made A Popping Sound And Won't Power Up
I was cooking some food on one burner. I put a pan on another burner and turned the knob and there w...
I was cooking some food on one burner. I put a pan on another burner and turned the knob and there w...
(Posted by troymwoolridge 9 years ago)

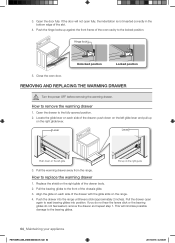
How Do You Replace Warming Drawer Samsung Fe710drs
Trying to replace a warming drawer in Samsung Fe710DRS. the manual says remove the shield on the rig...
Trying to replace a warming drawer in Samsung Fe710DRS. the manual says remove the shield on the rig...
(Posted by hlsmith 11 years ago)

Need Front Of Warming Drawer For Samsung Fe710drs/xaa
Need to replace front part of the warming drawer,we have the handle, but need the front stainless pa...
Need to replace front part of the warming drawer,we have the handle, but need the front stainless pa...
(Posted by dewitwiththedew 12 years ago)

Samsung Oven Model Ftq353iwub
Our Samsung oven is not heating at all on the bottom. The top inside element works fine. We had issu...
Our Samsung oven is not heating at all on the bottom. The top inside element works fine. We had issu...
(Posted by Bscheloski 12 years ago)