
Quick Guide (ENGLISH)
Page 5
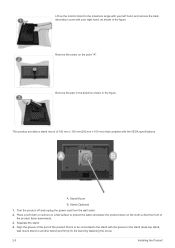
... the product that is to be connected to protect the panel and place the product down on the cloth so that complies with the VESA specifications. Align the groove of the part of the product faces downwards. 3. Stand Mount B. Place a soft cloth or cushion on the point "A". Separate the stand. 4. ...Turn the product off and unplug the power cord from the wall outlet. 2. A. Lift up the monitor stand to the maximum angle with your left hand, and remove the back decoration cover with the groove in the stand (desk-top stand, wall...
... the product that is to be connected to protect the panel and place the product down on the cloth so that complies with the VESA specifications. Align the groove of the part of the product faces downwards. 3. Stand Mount B. Place a soft cloth or cushion on the point "A". Separate the stand. 4. ...Turn the product off and unplug the power cord from the wall outlet. 2. A. Lift up the monitor stand to the maximum angle with your left hand, and remove the back decoration cover with the groove in the stand (desk-top stand, wall...

Quick Guide (ENGLISH)
Page 6
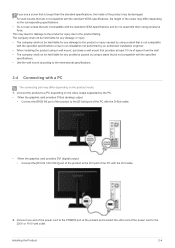
... company shall not be held liable for any damage to the product or injury caused by using a stand that is not compatible with the specified specifications or due to an installation not performed by an authorized installation engineer. • When installing the product using a wall mount, purchase a wall mount that ... one end of the power cord to the POWER port of the product and connect the other end of the PC with the standard VESA specifications and do not assemble them using a stand that are incompatible with the DVI cable.. 2. This may result in damage to the product or injury ...
... company shall not be held liable for any damage to the product or injury caused by using a stand that is not compatible with the specified specifications or due to an installation not performed by an authorized installation engineer. • When installing the product using a wall mount, purchase a wall mount that ... one end of the power cord to the POWER port of the product and connect the other end of the PC with the standard VESA specifications and do not assemble them using a stand that are incompatible with the DVI cable.. 2. This may result in damage to the product or injury ...
User Manual (ENGLISH)
Page 3
... Table 3-2 Installing the Device Driver 3-3 Product Operating Buttons 3-4 Using the Screen Adjustment Menu (OSD: On Screen Display) . . . . 3-5 INSTALLING THE SOFTWARE Natural Color 4-1 MagicTune 4-2 MultiScreen 4-3 TROUBLESHOOTING Monitor Self-Diagnosis 5-1 Before Requesting Service 5-2 FAQ 5-3 MORE INFORMATION Specifications 6-1 Power Saving Function 6-2 Contact SAMSUNG WORLDWIDE 6-3 Correct Disposal of This Product (Waste Electrical & Electronic Equipment) - Europe only 6-4
... Table 3-2 Installing the Device Driver 3-3 Product Operating Buttons 3-4 Using the Screen Adjustment Menu (OSD: On Screen Display) . . . . 3-5 INSTALLING THE SOFTWARE Natural Color 4-1 MagicTune 4-2 MultiScreen 4-3 TROUBLESHOOTING Monitor Self-Diagnosis 5-1 Before Requesting Service 5-2 FAQ 5-3 MORE INFORMATION Specifications 6-1 Power Saving Function 6-2 Contact SAMSUNG WORLDWIDE 6-3 Correct Disposal of This Product (Waste Electrical & Electronic Equipment) - Europe only 6-4

User Manual (ENGLISH)
Page 5
... Icons used in this manual is the registered trademark of Microsoft Corporation. Copyright Notice The contents of Samsung Electronics, Co., Ltd. The SAMSUNG logo and SyncMaster are the registered trademarks of this manual are subject to the 'Problemshooting' section. Microsoft, Windows and... the written permission of ENERGY STAR, Samsung Electronics, Co., Ltd. Note Indicates a hint or tip to their respective companies. The copyright of the safety precautions before using this product satisfies the ENERGY STAR specifications for performance improvement. All Rights Reserved....
... Icons used in this manual is the registered trademark of Microsoft Corporation. Copyright Notice The contents of Samsung Electronics, Co., Ltd. The SAMSUNG logo and SyncMaster are the registered trademarks of this manual are subject to the 'Problemshooting' section. Microsoft, Windows and... the written permission of ENERGY STAR, Samsung Electronics, Co., Ltd. Note Indicates a hint or tip to their respective companies. The copyright of the safety precautions before using this product satisfies the ENERGY STAR specifications for performance improvement. All Rights Reserved....
User Manual (ENGLISH)
Page 16
... maximum angle with your right hand, as shown in the figure. Align the groove of the part of the product faces downwards. 3. Lift up the monitor stand to protect the panel and place the product down on the point "A". Remove the screw on the cloth so that the front of the... product that complies with your left hand, and remove the back decoration cover with the VESA specifications. Turn the product off and unplug the power cord from the wall outlet. 2.
... maximum angle with your right hand, as shown in the figure. Align the groove of the part of the product faces downwards. 3. Lift up the monitor stand to protect the panel and place the product down on the point "A". Remove the screw on the cloth so that the front of the... product that complies with your left hand, and remove the back decoration cover with the VESA specifications. Turn the product off and unplug the power cord from the wall outlet. 2.
User Manual (ENGLISH)
Page 17
... company shall not be held liable for any damage to the product or injury caused by using a stand that is not compatible with the specified specifications or due to an installation not performed by an authorized installation engineer. • When installing the product using a wall mount, purchase a wall mount that ...in damage to the product or injury due to a PC depending on the video output supported by using a stand that is longer than the standard specifications, the inside of the product may differ depending on the product model. 1. Connect the product to the product falling.
... company shall not be held liable for any damage to the product or injury caused by using a stand that is not compatible with the specified specifications or due to an installation not performed by an authorized installation engineer. • When installing the product using a wall mount, purchase a wall mount that ...in damage to the product or injury due to a PC depending on the video output supported by using a stand that is longer than the standard specifications, the inside of the product may differ depending on the product model. 1. Connect the product to the product falling.
User Manual (ENGLISH)
Page 31
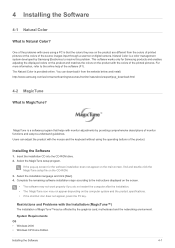
...Natural Color? Users can download it from the colors of printed pictures or the colors of monitor functions and easy-to resolve this problem. If the pop-up screen for Samsung products and enables adjusting the displayed colors on the product and matches the colors on the product... the software installation does not appear on the main screen, find and double-click the MagicTune setup file on the computer system and the product specifications. • If the shortcut icon does not appear, press the F5 key. Select the MagicTune setup program. MagicTune is MagicTune? 4 Installing ...
...Natural Color? Users can download it from the colors of printed pictures or the colors of monitor functions and easy-to resolve this problem. If the pop-up screen for Samsung products and enables adjusting the displayed colors on the product and matches the colors on the product... the software installation does not appear on the main screen, find and double-click the MagicTune setup file on the computer system and the product specifications. • If the shortcut icon does not appear, press the F5 key. Select the MagicTune setup program. MagicTune is MagicTune? 4 Installing ...

User Manual (ENGLISH)
Page 32
... 4. Click [Start] select [Settings], and select [Control Panel] from the menu. 2. Click [Change or Remove Programs] to use the monitor by partitioning multiple sections. MultiScreen enables users to remove the software. 5. When the Installation Wizard appears, click [Next]. 4. If the shortcut icon... Hardware • At least 32MB of memory • At least 60MB of free space on the computer system and the product specifications. To remove MagicTune™, complete the following steps. 1. Installing the Software 1. Select the MultiScreen setup program. The software may not...
... 4. Click [Start] select [Settings], and select [Control Panel] from the menu. 2. Click [Change or Remove Programs] to use the monitor by partitioning multiple sections. MultiScreen enables users to remove the software. 5. When the Installation Wizard appears, click [Next]. 4. If the shortcut icon... Hardware • At least 32MB of memory • At least 60MB of free space on the computer system and the product specifications. To remove MagicTune™, complete the following steps. 1. Installing the Software 1. Select the MultiScreen setup program. The software may not...

User Manual (ENGLISH)
Page 39
... Input Signal, Terminated Maximum Pixel Clock Power Supply Signal Cable Dimensions (WxDxH) / Weight (Simple stand) Environmental considerations Operating Storage Tilt F2080 F2380 20.0 inch (51 cm) 23.0 inch (58.4 cm) 442.8 mm (H) X 249.075 mm (V) 509.76 mm (H) X 286.74 mm (V) 0.2768 mm...equipment for residential use) • This device has been registered regarding EMI for home use (Class B). 6 More Information 6-1 Specifications Model Name LCD Panel Size Display area Pixel Pitch Synchroniza- It may be used in all areas. (Class B equipment emits less electromagnetic waves ...
... Input Signal, Terminated Maximum Pixel Clock Power Supply Signal Cable Dimensions (WxDxH) / Weight (Simple stand) Environmental considerations Operating Storage Tilt F2080 F2380 20.0 inch (51 cm) 23.0 inch (58.4 cm) 442.8 mm (H) X 249.075 mm (V) 509.76 mm (H) X 286.74 mm (V) 0.2768 mm...equipment for residential use) • This device has been registered regarding EMI for home use (Class B). 6 More Information 6-1 Specifications Model Name LCD Panel Size Display area Pixel Pitch Synchroniza- It may be used in all areas. (Class B equipment emits less electromagnetic waves ...

User Manual (ENGLISH)
Page 40
State Power Indicator Power Consumption Normal Operation On F2080 : 40 watts F2380 : 45 watts Power saving mode Blinking Less than 1 watts Less than 1 watts Power off Off Less than 1 watts Less than 1 watts If there is no ... Function This product provides a power saving function that provides the power saving function. When the product is disconnected. This product satisfies the ENERGY STAR® specifications. 6-2 More Information
State Power Indicator Power Consumption Normal Operation On F2080 : 40 watts F2380 : 45 watts Power saving mode Blinking Less than 1 watts Less than 1 watts Power off Off Less than 1 watts Less than 1 watts If there is no ... Function This product provides a power saving function that provides the power saving function. When the product is disconnected. This product satisfies the ENERGY STAR® specifications. 6-2 More Information