User Manual
Page 2
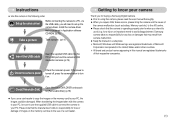
... manufacturer holds no responsibility for buying a Samsung Digital Camera. ● Prior to using this camera, please read the user manual thoroughly. ● When you require After Sales service, please bring the camera and the cause of the camera malfunction (such as battery, Memory card...14) Insert the USB cable Insert the supplied USB cable into the PC's USB port and the camera's USB connection terminal. (p.76) Getting to know your camera Thank you use the supplied USB cable to connect the camera to set up the camera driver. Check the camera's power Check the camera's power. Please ...
... manufacturer holds no responsibility for buying a Samsung Digital Camera. ● Prior to using this camera, please read the user manual thoroughly. ● When you require After Sales service, please bring the camera and the cause of the camera malfunction (such as battery, Memory card...14) Insert the USB cable Insert the supplied USB cable into the PC's USB port and the camera's USB connection terminal. (p.76) Getting to know your camera Thank you use the supplied USB cable to connect the camera to set up the camera driver. Check the camera's power Check the camera's power. Please ...
User Manual
Page 5
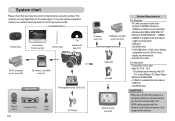
...Samsung service centre. < Included items > Camera case User manual, Product warranty Camera strap Software CD (see p.72) DPOF compatible printer (see p.53) SD memory card/ MMC (see p.11) Optional KIT Rechargeable battery (SLB-1237) Remote control 《4》 Cradle(SCC-S7) HDMI cable AC Charger Computer (see p.76) PictBridge compatible printer (see p.55) USB cable AV cable... External monitor (see p.63) System Requirements For Windows •PC with the camera, or ...
...Samsung service centre. < Included items > Camera case User manual, Product warranty Camera strap Software CD (see p.72) DPOF compatible printer (see p.53) SD memory card/ MMC (see p.11) Optional KIT Rechargeable battery (SLB-1237) Remote control 《4》 Cradle(SCC-S7) HDMI cable AC Charger Computer (see p.76) PictBridge compatible printer (see p.55) USB cable AV cable... External monitor (see p.63) System Requirements For Windows •PC with the camera, or ...

User Manual
Page 9
...CLOSE UP SUNSET DAWN BACKLIGHT FIREWORKS BEACH & SNOW Icon ■ Camera Status Lamp Status Description Power on The lamp turns on and off when the camera is ready to take a picture While voice memo recording The lamp blinks When the USB cable The lamp lights up is inserted to a PC (LCD monitor... turns off after about the camera mode setting. Be sure to pages 14-18 for more information about 10 seconds and 2 seconds later a second picture ...
...CLOSE UP SUNSET DAWN BACKLIGHT FIREWORKS BEACH & SNOW Icon ■ Camera Status Lamp Status Description Power on The lamp turns on and off when the camera is ready to take a picture While voice memo recording The lamp blinks When the USB cable The lamp lights up is inserted to a PC (LCD monitor... turns off after about the camera mode setting. Be sure to pages 14-18 for more information about 10 seconds and 2 seconds later a second picture ...
User Manual
Page 49
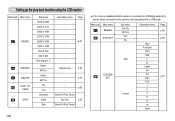
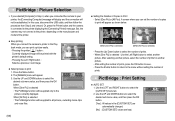
.../ Cancel No/ Yes p.53 Select/ All Pics/ Cancel 《48》 ■ This menu is available while the camera is connected to a PictBridge supporting printer (direct connection to the camera, sold separately) with a USB cable. Menu tab Main menu IMAGES AUTO SET Sub menu One Pic All Pics Yes No Size CUSTOM SET Layout...
.../ Cancel No/ Yes p.53 Select/ All Pics/ Cancel 《48》 ■ This menu is available while the camera is connected to a PictBridge supporting printer (direct connection to the camera, sold separately) with a USB cable. Menu tab Main menu IMAGES AUTO SET Sub menu One Pic All Pics Yes No Size CUSTOM SET Layout...

User Manual
Page 56
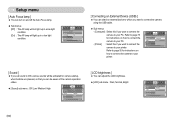
... only for the printer to process. Connect the cradle to a printer's USB port with the supplied USB cable. ● Using the USB cable with Camera : Connect the camera to a printer's USB port with the supplied USB cable. [Using the USB cable with Cradle] [Using the USB cable with Cradle (Optional) : Connect the camera and the cradle. Press the play mode button and press the menu...
... only for the printer to process. Connect the cradle to a printer's USB port with the supplied USB cable. ● Using the USB cable with Camera : Connect the camera to a printer's USB port with the supplied USB cable. [Using the USB cable with Cradle] [Using the USB cable with Cradle (Optional) : Connect the camera and the cradle. Press the play mode button and press the menu...
User Manual
Page 57
...camera to Print - When [All Pics] is selected] - Press the Shutter button to return to the menu without setting the number of Copies to printer in the [CUSTOM SET] are automatically changed. [No] : [CUSTOM SET] values are kept. AUTO SET Yes No Move: In this case, disconnect the USB cable...Exit:Shutter Set:OK [When [All Pics] is selected : The PictBridge function will be applied to select another picture. - But, the camera may not connect to the printer, depending on the manufacturer and model of prints, press the OK button to print 1. After selecting another ...
...camera to Print - When [All Pics] is selected] - Press the Shutter button to return to the menu without setting the number of Copies to printer in the [CUSTOM SET] are automatically changed. [No] : [CUSTOM SET] values are kept. AUTO SET Yes No Move: In this case, disconnect the USB cable...Exit:Shutter Set:OK [When [All Pics] is selected : The PictBridge function will be applied to select another picture. - But, the camera may not connect to the printer, depending on the manufacturer and model of prints, press the OK button to print 1. After selecting another ...
User Manual
Page 63
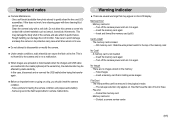
... your printer. SETUP World Time Imprint Off AF Lamp On Sound USB Back: Set:OK [ Connecting an External Device (USB) ] ■ You can select an external device to which you want to connect the camera using the USB cable. ● Sub menus - [Computer] : Select this if you can adjust the LCD ...brightness. ● [LCD] sub menu : Dark, Normal, Bright Sound USB LCD Video Out HDMI Out Back: SETUP Dark Normal Bright Set...
... your printer. SETUP World Time Imprint Off AF Lamp On Sound USB Back: Set:OK [ Connecting an External Device (USB) ] ■ You can select an external device to which you want to connect the camera using the USB cable. ● Sub menus - [Computer] : Select this if you can adjust the LCD ...brightness. ● [LCD] sub menu : Dark, Normal, Bright Sound USB LCD Video Out HDMI Out Back: SETUP Dark Normal Bright Set...

User Manual
Page 64
... support only BDGHI. ■ Connecting to an external monitor ● Using the USB cable with Cradle (Optional) : Connect the camera and the cradle. PAL mode can be a digital noise on the LCD monitor. [Using the AV cable with Cradle] [Using the AV cable with Camera] Yellow - PAL : Australia, Austria, Belgium, China, Denmark, Finland, Germany, U.K., Holland, Italy, Kuwait...
... support only BDGHI. ■ Connecting to an external monitor ● Using the USB cable with Cradle (Optional) : Connect the camera and the cradle. PAL mode can be a digital noise on the LCD monitor. [Using the AV cable with Cradle] [Using the AV cable with Camera] Yellow - PAL : Australia, Austria, Belgium, China, Denmark, Finland, Germany, U.K., Holland, Italy, Kuwait...
User Manual
Page 68
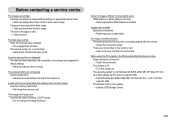
Do not allow this case, disconnect and re-connect the USB cable before trying the transfer again. ■ Before an important event or going on a trip, you should check the camera condition. - This is not harmful to the camera and is holding some images File Error! ㆍThe ...flash unit to three. ㆍFile error → Format the memory card ㆍMemory card error → Contact a camera service centre 《67》 Samsung cannot be removed in its performance. Clean the camera body with solvent materials such as benzol, insecticide, thinners etc. Take a picture for...
Do not allow this case, disconnect and re-connect the USB cable before trying the transfer again. ■ Before an important event or going on a trip, you should check the camera condition. - This is not harmful to the camera and is holding some images File Error! ㆍThe ...flash unit to three. ㆍFile error → Format the memory card ㆍMemory card error → Contact a camera service centre 《67》 Samsung cannot be removed in its performance. Clean the camera body with solvent materials such as benzol, insecticide, thinners etc. Take a picture for...
User Manual
Page 70
... the PC does not support USB → Install Windows 98, 98SE, 2000, ME, XP/ Mac OS 10.0 - 10.3 to PC that has correct files When using the PC's explorer, the [Removable Disk] file does not show ㆍCable connection is incorrect → Check the connection ㆍThe camera is off mode ㆍThe...
... the PC does not support USB → Install Windows 98, 98SE, 2000, ME, XP/ Mac OS 10.0 - 10.3 to PC that has correct files When using the PC's explorer, the [Removable Disk] file does not show ㆍCable connection is incorrect → Check the connection ㆍThe camera is off mode ㆍThe...
User Manual
Page 76
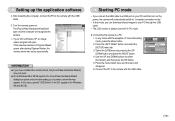
..." in PC mode. ■ Connecting the camera to the camera with the exception of Digmax Master opens after starting Digimax Master, the camera driver was set up the application software 4. If the download window of Voice Recording mode, press the Menu button. 2. In any mode with the USB cable. After restarting the computer, connect the PC...
..." in PC mode. ■ Connecting the camera to the camera with the exception of Digmax Master opens after starting Digimax Master, the camera driver was set up the application software 4. If the download window of Voice Recording mode, press the Menu button. 2. In any mode with the USB cable. After restarting the computer, connect the PC...
User Manual
Page 77
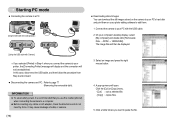
...: cuts a selected file. - [Copy] : copies files. 5. Starting PC mode ■ Connecting the camera to a PC [Using the USB cable with Camera] ※ If you selected [Printer] in Step 4, when you connect the camera to your printer, the [Connecting Printer] message will display and the connection will not be displayed. [Using... (optional) ] ■ Downloading stored images You can download the still images stored on the camera to your PC's hard disk and print them . 1. On your PC with the USB cable. 2. Select an image and press the right mouse button. 4. The image files will open....
...: cuts a selected file. - [Copy] : copies files. 5. Starting PC mode ■ Connecting the camera to a PC [Using the USB cable with Camera] ※ If you selected [Printer] in Step 4, when you connect the camera to your printer, the [Connecting Printer] message will display and the connection will not be displayed. [Using... (optional) ] ■ Downloading stored images You can download the still images stored on the camera to your PC's hard disk and print them . 1. On your PC with the USB cable. 2. Select an image and press the right mouse button. 4. The image files will open....
User Manual
Page 78
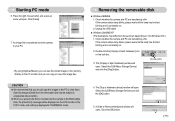
... lamp blinks, please wait until the lamp has finished blinking and is transferred from the camera to view them. Select the [USB Mass Storage Device] and click the [OK] button. 5. Unplug the USB cable. ■ Windows 2000/ME/XP (The illustrations may differ from the removable disk may...by this camera to Remove Hardware] window will open . Press the right mouse button and a pop-up menu will open . Opening images directly from those shown depending on . 2. Click [Paste]. 7. A [Safe to the Removable Disk, the [File Error!] message will open . By using [Digimax Master], you...
... lamp blinks, please wait until the lamp has finished blinking and is transferred from the camera to view them. Select the [USB Mass Storage Device] and click the [OK] button. 5. Unplug the USB cable. ■ Windows 2000/ME/XP (The illustrations may differ from the removable disk may...by this camera to Remove Hardware] window will open . Press the right mouse button and a pop-up menu will open . Opening images directly from those shown depending on . 2. Click [Paste]. 7. A [Safe to the Removable Disk, the [File Error!] message will open . By using [Digimax Master], you...
User Manual
Page 79
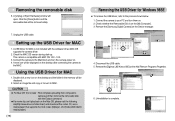
... removable disk with the Extract command. ●If a movie clip can't play back on the Add/ Remove Programs Properties. 6. Remove the [Samsung Digital Camera] on . 4. Removing the removable disk 6. Click the [Close] button and the removable disk will be removed safely. 7. A new icon will open. Connect the camera to MAC. Unplug the USB cable. Disconnect the USB cable. 5.
... removable disk with the Extract command. ●If a movie clip can't play back on the Add/ Remove Programs Properties. 6. Remove the [Samsung Digital Camera] on . 4. Removing the removable disk 6. Click the [Close] button and the removable disk will be removed safely. 7. A new icon will open. Connect the camera to MAC. Unplug the USB cable. Disconnect the USB cable. 5.
User Manual
Page 82
... file types. ② Frame display window : You can insert multi media in this camera 1. File location : Selecting a location where the edited movie is not compatible with the included USB cable. 5. To save the edited multi media as STP8XXXX.avi (You can input any numbers... between 0001 - 9999 instead of XXX letters) 6. Select Camera option, Output location, File name and press the [Make] button. - Save the movie as a new file name. Copy the edited movie to the computer with the Digimax...
... file types. ② Frame display window : You can insert multi media in this camera 1. File location : Selecting a location where the edited movie is not compatible with the included USB cable. 5. To save the edited multi media as STP8XXXX.avi (You can input any numbers... between 0001 - 9999 instead of XXX letters) 6. Select Camera option, Output location, File name and press the [Make] button. - Save the movie as a new file name. Copy the edited movie to the computer with the Digimax...
User Manual
Page 83
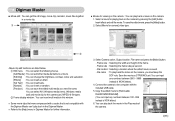
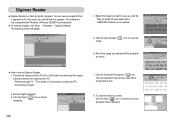
... a text file. * Only an image that was taken with a SAMSUNG camera can save the section as a text file with a USB cable and download the images that is only compatible with Windows. (Windows 2000/XP recommended) ■ To start the program, click [Start → Programs → Digimax Reader]. Click the Character Recognition ( ) icon. Select the image...
... a text file. * Only an image that was taken with a SAMSUNG camera can save the section as a text file with a USB cable and download the images that is only compatible with Windows. (Windows 2000/XP recommended) ■ To start the program, click [Start → Programs → Digimax Reader]. Click the Character Recognition ( ) icon. Select the image...
User Manual
Page 84
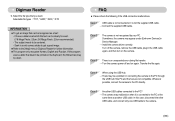
Case 2 The camera is not the supplied USB cable. → Connect the supplied USB cable. Case 1 USB cable is not connected or it is an unexpected error during file transfer. → Turn the camera power off the camera, remove the USB cable, plug in Digimax Reader for further information. ●This program only recognise Korean, English and Russian. Transfer the file again. In...
Case 2 The camera is not the supplied USB cable. → Connect the supplied USB cable. Case 1 USB cable is not connected or it is an unexpected error during file transfer. → Turn the camera power off the camera, remove the USB cable, plug in Digimax Reader for further information. ●This program only recognise Korean, English and Russian. Transfer the file again. In...


