User Manual
Page 4
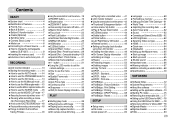
...5-function button 7 ■Cradle (Optional) 7 ■Self-timer lamp 8 ■Camera Status Lamp 8 ■Mode icon 8 ●Connecting to a Power Source 8 ■...camera movie trimming 40 ■Playing back a recorded voice 41 ●LCD monitor Indicator 41 ●Using the camera buttons to set the camera...9632;Selecting Video out type 63 ■HDMI 64 ■Quick view 64 ■... Pictures 18 ●Using the camera buttons to set the camera 19 ■POWER button 19 ...9679;Using the LCD monitor to set the camera settings 34 ■How to use the ...
...5-function button 7 ■Cradle (Optional) 7 ■Self-timer lamp 8 ■Camera Status Lamp 8 ■Mode icon 8 ●Connecting to a Power Source 8 ■...camera movie trimming 40 ■Playing back a recorded voice 41 ●LCD monitor Indicator 41 ●Using the camera buttons to set the camera...9632;Selecting Video out type 63 ■HDMI 64 ■Quick view 64 ■... Pictures 18 ●Using the camera buttons to set the camera 19 ■POWER button 19 ...9679;Using the LCD monitor to set the camera settings 34 ■How to use the ...
User Manual
Page 5
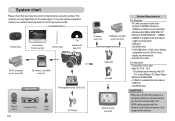
...your nearest Samsung dealer or Samsung service centre. < Included items > Camera case User manual, Product warranty Camera strap Software CD (see p.72) DPOF compatible printer (see p.53) SD memory card/ MMC (see p.11) Optional KIT Rechargeable battery (SLB-1237) Remote control 《4》 Cradle(SCC-S7) HDMI cable AC... of available hard-disk space •USB port •CD-ROM drive CAUTION When you connect the camera to use the USB / AV / HDMI cable supplied with the camera, or the external devices can vary depending on the sales region. System chart Please check that you ...
...your nearest Samsung dealer or Samsung service centre. < Included items > Camera case User manual, Product warranty Camera strap Software CD (see p.72) DPOF compatible printer (see p.53) SD memory card/ MMC (see p.11) Optional KIT Rechargeable battery (SLB-1237) Remote control 《4》 Cradle(SCC-S7) HDMI cable AC... of available hard-disk space •USB port •CD-ROM drive CAUTION When you connect the camera to use the USB / AV / HDMI cable supplied with the camera, or the external devices can vary depending on the sales region. System chart Please check that you ...

User Manual
Page 8
...; You can recharge your rechargeable battery, transfer a captured image to print, and download images with the cradle. (Refer to page 9, 55, 75-76) ● Top Camera connection terminal Battery holder Voice memo/ Voice Recording/ Up button Menu/ OK button Flash/ Left button Self-timer/ Remote/ Right button Macro/ Down button Play...
...; You can recharge your rechargeable battery, transfer a captured image to print, and download images with the cradle. (Refer to page 9, 55, 75-76) ● Top Camera connection terminal Battery holder Voice memo/ Voice Recording/ Up button Menu/ OK button Flash/ Left button Self-timer/ Remote/ Right button Macro/ Down button Play...

User Manual
Page 60
...; Select a desired sub menu by pressing the UP/ DOWN button and press the RIGHT button. File names are subject to the DCF (Design rule for Camera File systems) format. Press the menu button twice and the menu will be set from 100 to select the file naming format. ● Assigning File... Names 1. Setup menu Menu tab Main menu World Time Imprint AF Lamp Sound USB LCD Video Out HDMI Out Quick View Reset Sub menu Samoa, Midway Honolulu, Hawaii Alaska LA, San Francisco Off Date Date&Time Off On Off Low Medium High Computer...
...; Select a desired sub menu by pressing the UP/ DOWN button and press the RIGHT button. File names are subject to the DCF (Design rule for Camera File systems) format. Press the menu button twice and the menu will be set from 100 to select the file naming format. ● Assigning File... Names 1. Setup menu Menu tab Main menu World Time Imprint AF Lamp Sound USB LCD Video Out HDMI Out Quick View Reset Sub menu Samoa, Midway Honolulu, Hawaii Alaska LA, San Francisco Off Date Date&Time Off On Off Low Medium High Computer...
User Manual
Page 63
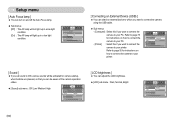
... you set sound to ON, various sounds will light up in a low light condition. Refer to page 76 for instructions on how to connect the camera to your PC. SETUP World Time Imprint Off AF Lamp On Sound USB Back: Set:OK [ Connecting an External Device (USB) ] ■ You can adjust... LCD brightness. ● [LCD] sub menu : Dark, Normal, Bright Sound USB LCD Video Out HDMI Out Back: SETUP Dark Normal Bright Set:OK 《62》 Refer to page 55 for instructions on how to connect the camera to your printer. Setup menu [ Auto Focus lamp ] ■ You can turn on and...
... you set sound to ON, various sounds will light up in a low light condition. Refer to page 76 for instructions on how to connect the camera to your PC. SETUP World Time Imprint Off AF Lamp On Sound USB Back: Set:OK [ Connecting an External Device (USB) ] ■ You can adjust... LCD brightness. ● [LCD] sub menu : Dark, Normal, Bright Sound USB LCD Video Out HDMI Out Back: SETUP Dark Normal Bright Set:OK 《62》 Refer to page 55 for instructions on how to connect the camera to your printer. Setup menu [ Auto Focus lamp ] ■ You can turn on and...

User Manual
Page 64
... be governed by the type of device (monitor or TV, etc.) to which the camera is connected to an external monitor, the menu will be a digital noise on the LCD monitor. [Using the AV cable with Cradle] [Using the AV cable with Camera] Yellow - NTSC : U.S.A, Canada, Japan, South Korea, Taiwan, Mexico. - When the..., use the TV controls to centre it is not in the centre of the TV. - If the image is not a malfunction. - USB LCD Video Out HDMI Out Quick View Back: SETUP NTSC PAL Set:OK - There will be visible on the external monitor and the menu functions are the same as...
... be governed by the type of device (monitor or TV, etc.) to which the camera is connected to an external monitor, the menu will be a digital noise on the LCD monitor. [Using the AV cable with Cradle] [Using the AV cable with Camera] Yellow - NTSC : U.S.A, Canada, Japan, South Korea, Taiwan, Mexico. - When the..., use the TV controls to centre it is not in the centre of the TV. - If the image is not a malfunction. - USB LCD Video Out HDMI Out Quick View Back: SETUP NTSC PAL Set:OK - There will be visible on the external monitor and the menu functions are the same as...

User Manual
Page 65
Quick view is possible only with the HD TV. However, values for the duration set in the [Quick View] setup. Setup menu [ HDMI ] ■ When the camera is connected with the HD TV, you can select image size that is compatible with still images. ● Sub menus [Off] : The quick view ...function can view the image you can 't be activated. [0.5, 1, 3 sec] : The captured image is uncompressed, all-digital audio/ video interface to display to captured images on the HD TV by using the HDMI cable. ●If the image sizes set on the LCD monitor for DATE/ TIME, LANGUAGE, and VIDEO OUT...
Quick view is possible only with the HD TV. However, values for the duration set in the [Quick View] setup. Setup menu [ HDMI ] ■ When the camera is connected with the HD TV, you can select image size that is compatible with still images. ● Sub menus [Off] : The quick view ...function can view the image you can 't be activated. [0.5, 1, 3 sec] : The captured image is uncompressed, all-digital audio/ video interface to display to captured images on the HD TV by using the HDMI cable. ●If the image sizes set on the LCD monitor for DATE/ TIME, LANGUAGE, and VIDEO OUT...

User Manual
Page 72
... Normal 22 29 44 51 82 ※ These figures are measured under Samsung's standard conditions and may vary depending on shooting conditions and camera settings. ■ Image Play - Video output : NTSC, PAL (user selectable) - Charger: DC 4.2V, 750mA - Application : Digimax Master 1.0, Digimax Reader ※ Specifications are the property of their respective owners. 《71...
... Normal 22 29 44 51 82 ※ These figures are measured under Samsung's standard conditions and may vary depending on shooting conditions and camera settings. ■ Image Play - Video output : NTSC, PAL (user selectable) - Charger: DC 4.2V, 750mA - Application : Digimax Master 1.0, Digimax Reader ※ Specifications are the property of their respective owners. 《71...
