User Manual (ENGLISH)
Page 4
... sure to remove the disc and turn them all off the player after use. • Disconnect the AC power cord from the AC outlet. • Do not use of the disc. • The Mains plug is licensed under direct sunlight. • Keep in a cool ventilated area. • Store vertically. • Keep in the disc tray. • Exterior interference such as a disconnect device and...
... sure to remove the disc and turn them all off the player after use. • Disconnect the AC power cord from the AC outlet. • Do not use of the disc. • The Mains plug is licensed under direct sunlight. • Keep in a cool ventilated area. • Store vertically. • Keep in the disc tray. • Exterior interference such as a disconnect device and...
User Manual (ENGLISH)
Page 6
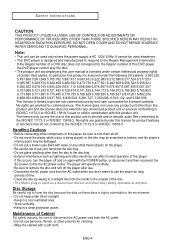
... an Audio System (2 Channel Amplifier, Analog 19 Connecting to an Audio System (Dolby digital, MPEG2 or DTS Amplifier 20 Connecting the Power Cord ...21 Chapter 3: Initial Setup Selecting a Menu Language ...22 Setting the Clock ...23 Setting the Clock Manually ...23 Setting the Front Panel Display ...24 Setting the Auto Power Off ...25 Chapter 4: DVD Operations Playing a Disc ...26 Using the Search and Skip Functions ...28 Using the Display Function ...29 Using the Disc and Title Menu (DVD) ...31 Using the Function Menu (DVD) ...32 Repeat Play ...33 Slow Play ...34 Adjusting the Aspect Ratio...
... an Audio System (2 Channel Amplifier, Analog 19 Connecting to an Audio System (Dolby digital, MPEG2 or DTS Amplifier 20 Connecting the Power Cord ...21 Chapter 3: Initial Setup Selecting a Menu Language ...22 Setting the Clock ...23 Setting the Clock Manually ...23 Setting the Front Panel Display ...24 Setting the Auto Power Off ...25 Chapter 4: DVD Operations Playing a Disc ...26 Using the Search and Skip Functions ...28 Using the Display Function ...29 Using the Disc and Title Menu (DVD) ...31 Using the Function Menu (DVD) ...32 Repeat Play ...33 Slow Play ...34 Adjusting the Aspect Ratio...
User Manual (ENGLISH)
Page 7
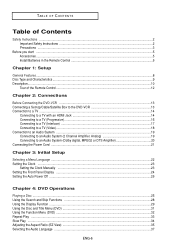
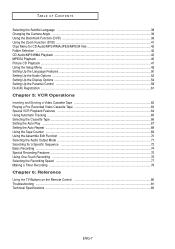
... Setup Menu ...49 Setting Up the Language Features ...50 Setting Up the Audio Options ...52 Setting Up the Display Options ...54 Setting Up the Parental Control ...58 DivX(R) Registration ...61 Chapter 5: VCR Operations Inserting and Ejecting a Video Cassette Tape 62 Playing a Pre-Recorded Video Cassette Tape 63 Special VCR Playback Features ...64 Using Automatic Tracking ...65 Selecting the Cassette Type ...66 Setting the Auto Play ...67 Setting the Auto Repeat ...68 Using the Tape Counter ...69 Using the Assemble Edit Function ...70 Selecting the Audio Output Mode...
... Setup Menu ...49 Setting Up the Language Features ...50 Setting Up the Audio Options ...52 Setting Up the Display Options ...54 Setting Up the Parental Control ...58 DivX(R) Registration ...61 Chapter 5: VCR Operations Inserting and Ejecting a Video Cassette Tape 62 Playing a Pre-Recorded Video Cassette Tape 63 Special VCR Playback Features ...64 Using Automatic Tracking ...65 Selecting the Cassette Type ...66 Setting the Auto Play ...67 Setting the Auto Repeat ...68 Using the Tape Counter ...69 Using the Assemble Edit Function ...70 Selecting the Audio Output Mode...
User Manual (ENGLISH)
Page 8
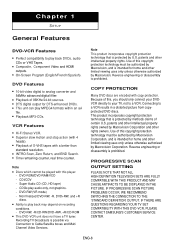
...; Playback MP3-CDs. PROGRESSIVE SCAN OUTPUT SETTING PLEASE NOTE THAT NOT ALL HIGH DEFINITION TELEVISION SETS ARE FULLY COMPATIBLE WITH THIS PRODUCT AND MAY CAUSE ARTIFACTS TO BE DISPLAYED IN THE PICTURE. Super Audio CD (CD, HD layer) - CDGs play back DVDs, audio CDs or VHS Tapes. ■ Composite, Component Video and HDMI outputs. ■ On-Screen Program (English/French/Spanish). Non finalized DVD-RW, -R, DVD+RW, and +R discs. ■ Ability to Cable/Satellite boxes and Multi Channel Video Services...
...; Playback MP3-CDs. PROGRESSIVE SCAN OUTPUT SETTING PLEASE NOTE THAT NOT ALL HIGH DEFINITION TELEVISION SETS ARE FULLY COMPATIBLE WITH THIS PRODUCT AND MAY CAUSE ARTIFACTS TO BE DISPLAYED IN THE PICTURE. Super Audio CD (CD, HD layer) - CDGs play back DVDs, audio CDs or VHS Tapes. ■ Composite, Component Video and HDMI outputs. ■ On-Screen Program (English/French/Spanish). Non finalized DVD-RW, -R, DVD+RW, and +R discs. ■ Ability to Cable/Satellite boxes and Multi Channel Video Services...
User Manual (ENGLISH)
Page 9
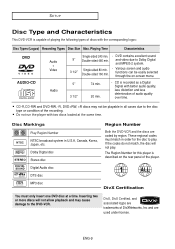
... and DVD-RW, -R, DVD+RW, +R discs may cause damage to the DVD-VCR. CD is recorded as a Digital Signal with the corresponding logos: Disc Types (Logos) Recording Types Disc Size Max. These regional codes must only insert one DVD disc at the same time. The Region Number for the disc to Dolby Digital and MPEG-2 system. - DVD contains excellent sound and video due to play . Dolby Digital disc STEREO Stereo disc DIGITAL SOUND Digital Audio disc DTS disc Region Number Both the DVD-VCR and the discs are used under license. MP3 disc DivX Certification...
... and DVD-RW, -R, DVD+RW, +R discs may cause damage to the DVD-VCR. CD is recorded as a Digital Signal with the corresponding logos: Disc Types (Logos) Recording Types Disc Size Max. These regional codes must only insert one DVD disc at the same time. The Region Number for the disc to Dolby Digital and MPEG-2 system. - DVD contains excellent sound and video due to play . Dolby Digital disc STEREO Stereo disc DIGITAL SOUND Digital Audio disc DTS disc Region Number Both the DVD-VCR and the discs are used under license. MP3 disc DivX Certification...
User Manual (ENGLISH)
Page 10
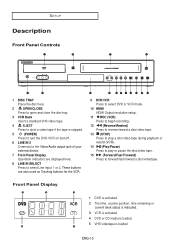
... stopped. 5 (POWER) Press to turn the DVD-VCR on and off. 6 LINE IN 2 Connects to the Video/Audio output jack of your external device. 7 Front Panel Display Operation indicators are also used as Tracking buttons for the VCR. 7 8 9 10 11 12 13 14 15 9 DVD/VCR Press to select DVD or VCR mode. 10 HDMI HDMI Output resolution setup. 11 REC (VCR) Press to begin recording. 12 (Reverse/Rewind) Press to reverse/rewind a disc/video tape. 13 (STOP) Press to stop a disc/video tape during playback...
... stopped. 5 (POWER) Press to turn the DVD-VCR on and off. 6 LINE IN 2 Connects to the Video/Audio output jack of your external device. 7 Front Panel Display Operation indicators are also used as Tracking buttons for the VCR. 7 8 9 10 11 12 13 14 15 9 DVD/VCR Press to select DVD or VCR mode. 10 HDMI HDMI Output resolution setup. 11 REC (VCR) Press to begin recording. 12 (Reverse/Rewind) Press to reverse/rewind a disc/video tape. 13 (STOP) Press to stop a disc/video tape during playback...
User Manual (ENGLISH)
Page 11
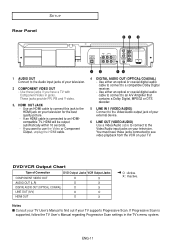
... digital audio cable to connect to use the Video or Component Output, unplug the HDMI cable. 4 DIGITAL AUDIO OUT (OPTICAL/COAXIAL) - DVD/VCR Output Chart Type of your television for the best quality picture. - You must have a TV with Component Video in the TV's menu system. X : Inactive. These jacks provide PR, PB and Y video. 3. Use these jacks if you want to a compatible Dolby Digital receiver. - If Progressive Scan is connected to the Audio input jacks of Connection DVD Output Jacks VCR Output Jacks COMPONENT VIDEO OUT O X AUDIO OUT (L,R) O X DIGITAL AUDIO...
... digital audio cable to connect to use the Video or Component Output, unplug the HDMI cable. 4 DIGITAL AUDIO OUT (OPTICAL/COAXIAL) - DVD/VCR Output Chart Type of your television for the best quality picture. - You must have a TV with Component Video in the TV's menu system. X : Inactive. These jacks provide PR, PB and Y video. 3. Use these jacks if you want to a compatible Dolby Digital receiver. - If Progressive Scan is connected to the Audio input jacks of Connection DVD Output Jacks VCR Output Jacks COMPONENT VIDEO OUT O X AUDIO OUT (L,R) O X DIGITAL AUDIO...

User Manual (ENGLISH)
Page 12
.... (DVD) Displays the VCR Function menu. (VCR) 32 ANGLE/TIMER button Use to access various camera angles on screen. 16 MODE button Use to select the program or random play or pause the - Use to skip a title,chapter or track on a disc. ◊ 23 SPEED button Use to select the tape ± recording speed. ≠ 24 Search button Press to search a disc - REPEAT button Allows you to skip a disc forward. Press to ¯ select a external signal ˘ source. ¿ 20 OPEN/CLOSE button Use to open...
.... (DVD) Displays the VCR Function menu. (VCR) 32 ANGLE/TIMER button Use to access various camera angles on screen. 16 MODE button Use to select the program or random play or pause the - Use to skip a title,chapter or track on a disc. ◊ 23 SPEED button Use to select the tape ± recording speed. ≠ 24 Search button Press to search a disc - REPEAT button Allows you to skip a disc forward. Press to ¯ select a external signal ˘ source. ¿ 20 OPEN/CLOSE button Use to open...
User Manual (ENGLISH)
Page 13
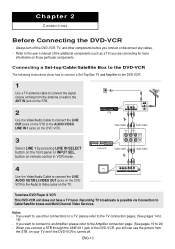
... AUDIO/VIDEO LINE IN 1 jacks on the front panel or INPUT SEL. ENG-13 Refer to the user's manual of the DVD-VCR, you are connecting for more information on your TV set if the DVD-VCR is possible via Connection to the Audio & Video jacks on remote control in VCR mode . Chapter 2 CONNECTIONS Before Connecting the DVD-VCR - DVD-V9700 Video Cable Audio Cable 4 Use the Video/Audio Cable to connect the LINE AUDIO OUT(R/L)/VIDEO OUT jacks on the DVDVCR to Cable/Satellite boxes and Multi Channel Video Services. Always turn...
... AUDIO/VIDEO LINE IN 1 jacks on the front panel or INPUT SEL. ENG-13 Refer to the user's manual of the DVD-VCR, you are connecting for more information on your TV set if the DVD-VCR is possible via Connection to the Audio & Video jacks on remote control in VCR mode . Chapter 2 CONNECTIONS Before Connecting the DVD-VCR - DVD-V9700 Video Cable Audio Cable 4 Use the Video/Audio Cable to connect the LINE AUDIO OUT(R/L)/VIDEO OUT jacks on the DVDVCR to Cable/Satellite boxes and Multi Channel Video Services. Always turn...

User Manual (ENGLISH)
Page 14
.... - HDMI Cable Not included HDMI VIDEO Specifications When you press the HDMI button on your TV, certain HDMI output resolutions may not work. - Please refer to the user's manual of connections commonly used to 720p or 1080p (see page 56-57) - ENG-14 The first press of your TV. 2 Press the input selector on your TV remote control. When using your TV remote control until the HDMI signal from the DVD player appears on the front panel...
.... - HDMI Cable Not included HDMI VIDEO Specifications When you press the HDMI button on your TV, certain HDMI output resolutions may not work. - Please refer to the user's manual of connections commonly used to 720p or 1080p (see page 56-57) - ENG-14 The first press of your TV. 2 Press the input selector on your TV remote control. When using your TV remote control until the HDMI signal from the DVD player appears on the front panel...
User Manual (ENGLISH)
Page 15
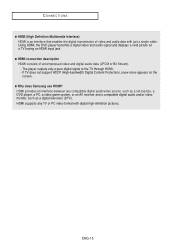
... video format with just a single cable. The player outputs only a pure digital signal to the TV through HDMI. - If TV does not support HDCP (High-bandwidth Digital Content Protection), snow noise appears on a TV having an HDMI input jack. ● HDMI connection description HDMI consists of video and audio data with digital high-definition pictures. HDMI supports any compatible digital audio/video source, such as a set-top box, a DVD player, a PC, a video game system, or an AV receiver and a compatible digital audio and/or video...
... video format with just a single cable. The player outputs only a pure digital signal to the TV through HDMI. - If TV does not support HDCP (High-bandwidth Digital Content Protection), snow noise appears on a TV having an HDMI input jack. ● HDMI connection description HDMI consists of video and audio data with digital high-definition pictures. HDMI supports any compatible digital audio/video source, such as a set-top box, a DVD player, a PC, a video game system, or an AV receiver and a compatible digital audio and/or video...
User Manual (ENGLISH)
Page 16
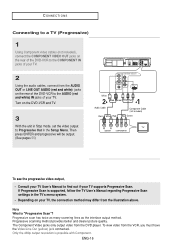
... What is supported, follow the TV User's Manual regarding Progressive Scan settings in the Setup Menu. If Progressive Scan is "Progressive Scan"? CONNECTIONS Connecting to a TV (Progressive) 1 Using Component video cables (not included), connect the COMPONENT VIDEO OUT jacks on the rear of the DVD-VCR to the COMPONENT IN jacks of your TV. Then press ENTER and progressive will be output. (See pages 55) White Red Green Blue Red Audio Cable Red White Red Component Cable (not included) Blue Green To see the progressive video output, - Progressive scanning method provides...
... What is supported, follow the TV User's Manual regarding Progressive Scan settings in the Setup Menu. If Progressive Scan is "Progressive Scan"? CONNECTIONS Connecting to a TV (Progressive) 1 Using Component video cables (not included), connect the COMPONENT VIDEO OUT jacks on the rear of the DVD-VCR to the COMPONENT IN jacks of your TV. Then press ENTER and progressive will be output. (See pages 55) White Red Green Blue Red Audio Cable Red White Red Component Cable (not included) Blue Green To see the progressive video output, - Progressive scanning method provides...

User Manual (ENGLISH)
Page 17
... your TV using Component video cables. - Component video separates the picture element into black and white(Y), blue(PB), red(PR) signals to Progressive Out in the Setup Menu. The component jack of your TV. The number and position of your TV may vary depending on the TV set the video output to present clear and clean images. (Audio signals are delivered through Line Out Audio jacks (Red,White). To view video from the AUDIO OUT or...
... your TV using Component video cables. - Component video separates the picture element into black and white(Y), blue(PB), red(PR) signals to Progressive Out in the Setup Menu. The component jack of your TV. The number and position of your TV may vary depending on the TV set the video output to present clear and clean images. (Audio signals are delivered through Line Out Audio jacks (Red,White). To view video from the AUDIO OUT or...
User Manual (ENGLISH)
Page 19
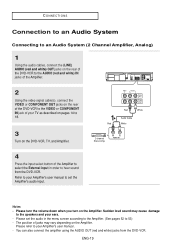
Red White Audio Cable Red White 2-channel Stereo Amp. 4 Press the input select button of the Amplifier to select the External input in the menu screen according to the Amplifier. (See pages 52 to the speakers and your ears. - Notes - Please refer to hear sound from the DVD-VCR. Please set the Amplifier's audio input. Please turn the volume down when you turn on the Amplifier. Sudden loud sound may vary depending on...
Red White Audio Cable Red White 2-channel Stereo Amp. 4 Press the input select button of the Amplifier to select the External input in the menu screen according to the Amplifier. (See pages 52 to the speakers and your ears. - Notes - Please refer to hear sound from the DVD-VCR. Please set the Amplifier's audio input. Please turn the volume down when you turn on the Amplifier. Sudden loud sound may vary depending on...
User Manual (ENGLISH)
Page 57
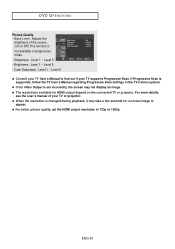
Black Level : Adjusts the brightness of your TV supports Progressive Scan. If Progressive Scan is changed during playback, it may take a few seconds for a normal image to appear. ● For better picture quality, set incorrectly, the screen may not display an image. ● The resolutions available for HDMI output depend on the connected TV or projector. For more details, see the user's manual of the screen. (On or Off) This function is...
Black Level : Adjusts the brightness of your TV supports Progressive Scan. If Progressive Scan is changed during playback, it may take a few seconds for a normal image to appear. ● For better picture quality, set incorrectly, the screen may not display an image. ● The resolutions available for HDMI output depend on the connected TV or projector. For more details, see the user's manual of the screen. (On or Off) This function is...
User Manual (ENGLISH)
Page 74
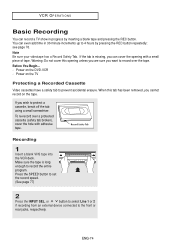
... even add time in progress by pressing the REC button repeatedly; If the tab is long enough to the front or rear jacks, respectively. or button to select Line 1 or 2 if recording from an external device connected to record the entire program. You can cover the opening with adhesive tape. Note Be sure your videotape has a Record Safety Tab. Press the SPEED button to protect...
... even add time in progress by pressing the REC button repeatedly; If the tab is long enough to the front or rear jacks, respectively. or button to select Line 1 or 2 if recording from an external device connected to record the entire program. You can cover the opening with adhesive tape. Note Be sure your videotape has a Record Safety Tab. Press the SPEED button to protect...

User Manual (ENGLISH)
Page 76
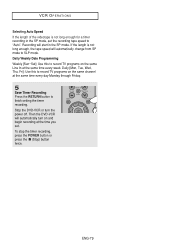
... button on the On-screen display and the DVD-VCR will record for exactly 30 minutes. Record length 0:30 appears on the remote control or front panel. 4 While in 30-minute increments up to 4 hours at the touch of a button. 1 Insert a blank VHS tape into the VCR deck. 2 Use the CH or buttons to select the desired TV channel, or press the INPUT SEL. VCR OPERATIONS Using One-Touch Recording One-Touch Recording...
... button on the On-screen display and the DVD-VCR will record for exactly 30 minutes. Record length 0:30 appears on the remote control or front panel. 4 While in 30-minute increments up to 4 hours at the touch of a button. 1 Insert a blank VHS tape into the VCR deck. 2 Use the CH or buttons to select the desired TV channel, or press the INPUT SEL. VCR OPERATIONS Using One-Touch Recording One-Touch Recording...
User Manual (ENGLISH)
Page 79
... RETURN button to record TV programs on and begin recording at the same time every week. To stop the timer recording, press the POWER button or press the (Stop) button twice. VCR OPERATIONS Selecting Auto Speed If the length of the videotape is not long enough, the tape speed will automatically change from SP mode to "Auto". Daily [Mon, Tue, Wed, Thu, Fri]: Use this to finish setting the timer recording. Stop the DVD-VCR or turn...
... RETURN button to record TV programs on and begin recording at the same time every week. To stop the timer recording, press the POWER button or press the (Stop) button twice. VCR OPERATIONS Selecting Auto Speed If the length of the videotape is not long enough, the tape speed will automatically change from SP mode to "Auto". Daily [Mon, Tue, Wed, Thu, Fri]: Use this to finish setting the timer recording. Stop the DVD-VCR or turn...
User Manual (ENGLISH)
Page 81
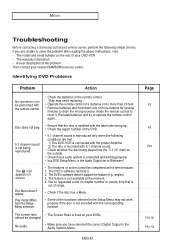
... your audio system is connected and working properly. • In a DVD Setup Menu, is not encoded with the remote control. • Check the batteries in the Audio Options Menu. The model and serial number on the outside. • Check if your DVD-VCR - The warranty information - They may not work properly if the disc is the Audio Output set to reset it . 2. The icon appears on your nearest SAMSUNG service center. The feature is fixed on screen...
... your audio system is connected and working properly. • In a DVD Setup Menu, is not encoded with the remote control. • Check the batteries in the Audio Options Menu. The model and serial number on the outside. • Check if your DVD-VCR - The warranty information - They may not work properly if the disc is the Audio Output set to reset it . 2. The icon appears on your nearest SAMSUNG service center. The feature is fixed on screen...

User Manual (ENGLISH)
Page 82
... playback When the button is pressed during timer recording, the recording will have "noise bars", depending on tuner. When cleaning the video heads, read all instructions provided with the window a video cassette side up and the safety tab facing you. All settings including the password will revert to the factory settings. • From a cold start /stop time settings. • If there was not recorded • Check the DVD-VCR antenna/cable connections...
... playback When the button is pressed during timer recording, the recording will have "noise bars", depending on tuner. When cleaning the video heads, read all instructions provided with the window a video cassette side up and the safety tab facing you. All settings including the password will revert to the factory settings. • From a cold start /stop time settings. • If there was not recorded • Check the DVD-VCR antenna/cable connections...


