

User Manual (user Manual) (ver.1.0) (English)
Page 4
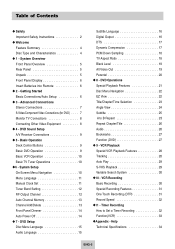
... • Welcome Feature Summary 4 Disc Type and Characteristics 4 • 1 - DVD Sound Setup A/V Receiver Connections 9 • 5 - VCR Playback Special VCR Playback Features 27 Tracking 28 Auto Play 28 S-VHS Playback 29 Variable Search System 29... 10 - System Setup On-Screen Menu Navigation 10 Menu Language 11 Manual Clock Set 11 Tuner Band Setting 12 Auto Channel Memory 12 Channel Add/Delete 13 Front Panel Dimmer 13 Auto Power Off 14 • 7 - DVD...
... • Welcome Feature Summary 4 Disc Type and Characteristics 4 • 1 - DVD Sound Setup A/V Receiver Connections 9 • 5 - VCR Playback Special VCR Playback Features 27 Tracking 28 Auto Play 28 S-VHS Playback 29 Variable Search System 29... 10 - System Setup On-Screen Menu Navigation 10 Menu Language 11 Manual Clock Set 11 Tuner Band Setting 12 Auto Channel Memory 12 Channel Add/Delete 13 Front Panel Dimmer 13 Auto Power Off 14 • 7 - DVD...
User Manual (user Manual) (ver.1.0) (English)
Page 7
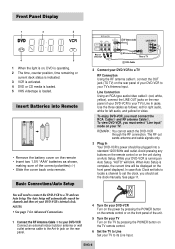
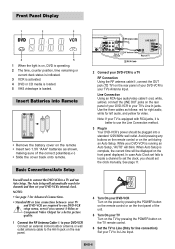
... cable➁, connect the OUT jack (TO TV) on the TV remote control. 6 Set the TV to Line Set your TV to your DVD-VCR to set the clock manually. Use the three cables as shown, making sure of your TV's Line In jacks. The RF out sends antenna and cable signals only.... 3 Plug In Your DVD-VCR's power should set the clock, you should be displayed on the remote • Insert two 1.5V "AAA" batteries as follows: ...
... cable➁, connect the OUT jack (TO TV) on the TV remote control. 6 Set the TV to Line Set your TV to your DVD-VCR to set the clock manually. Use the three cables as shown, making sure of your TV's Line In jacks. The RF out sends antenna and cable signals only.... 3 Plug In Your DVD-VCR's power should set the clock, you should be displayed on the remote • Insert two 1.5V "AAA" batteries as follows: ...
User Manual (user Manual) (ver.1.0) (English)
Page 9
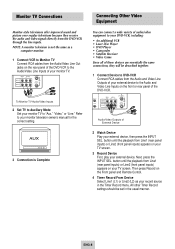
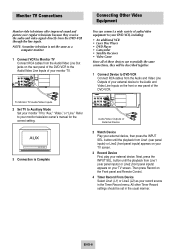
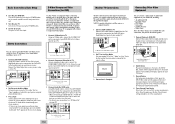
...Connect RCA cables from the DVD-VCR through the line inputs. Then press Record on the Front panel and Remote Control. 4 Timer Record From Device Select Line1 (L1) or Line2 (L2) as a computer monitor. 1 Connect VCR to your monitor television owner's manual for the correct setting. ...3 Connection is not the same as your DVD-VCR, including: • An additional VCR • Laser Disc Player • DVD Player • Camcorder • Satellite Receiver • Video ...
...Connect RCA cables from the DVD-VCR through the line inputs. Then press Record on the Front panel and Remote Control. 4 Timer Record From Device Select Line1 (L1) or Line2 (L2) as a computer monitor. 1 Connect VCR to your monitor television owner's manual for the correct setting. ...3 Connection is not the same as your DVD-VCR, including: • An additional VCR • Laser Disc Player • DVD Player • Camcorder • Satellite Receiver • Video ...
User Manual (user Manual) (ver.1.0) (English)
Page 12
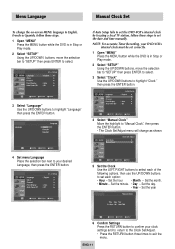
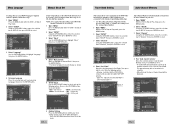
...; Press the RETURN button three times to highlight "Language" then press the ENTER button. ENG-11 Menu Language Manual Clock Set To change as shown. 4 Set menu Language Place the selection bar next to your DVD-VCR's internal clock must be set correctly. 1 Open "MENU" Press the MENU button while the..." then press ENTER to select. Set the hour • Month - Set the day. • Year - If Auto Setup fails to set the DVD-VCR's internal clock by locating a local TV station, follow these steps to set each of the following options, then use the UP/DOWN buttons to highlight...
...; Press the RETURN button three times to highlight "Language" then press the ENTER button. ENG-11 Menu Language Manual Clock Set To change as shown. 4 Set menu Language Place the selection bar next to your DVD-VCR's internal clock must be set correctly. 1 Open "MENU" Press the MENU button while the..." then press ENTER to select. Set the hour • Month - Set the day. • Year - If Auto Setup fails to set the DVD-VCR's internal clock by locating a local TV station, follow these steps to set each of the following options, then use the UP/DOWN buttons to highlight...

User Manual (user Manual) (ver.1.0) (English)
Page 13
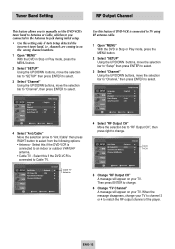
..../Cable : Cable TV Auto Channel Memory Channel Add/Delete ENG-12 Tuner Band Setting Auto Channel Memory This feature allows you to manually set the DVD-VCR's tuner band to Antenna or Cable, whichever you connected to select from the following options: • Antenna - Indicates that the...Power Off : Auto : Off 4 Run "Auto channel memory" Move the selection arrow to "Auto Channel Memory," then press ENTER to select. • The DVD-VCR will be displayed. Language : English Front Display Auto Power Off : Auto : Off 4 Select "Ant./Cable" Move the selection arrow to "Ant./Cable" then...
..../Cable : Cable TV Auto Channel Memory Channel Add/Delete ENG-12 Tuner Band Setting Auto Channel Memory This feature allows you to manually set the DVD-VCR's tuner band to Antenna or Cable, whichever you connected to select from the following options: • Antenna - Indicates that the...Power Off : Auto : Off 4 Run "Auto channel memory" Move the selection arrow to "Auto Channel Memory," then press ENTER to select. • The DVD-VCR will be displayed. Language : English Front Display Auto Power Off : Auto : Off 4 Select "Ant./Cable" Move the selection arrow to "Ant./Cable" then...
User Manual (user Manual) (ver.1.0) (English)
Page 20
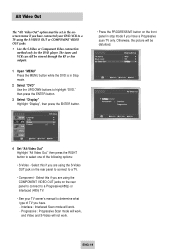
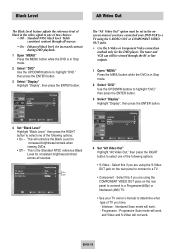
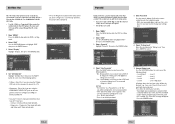
.... The tuner and VCR can still be viewed through the RF or line outputs. 1 Open "MENU" Press the MENU button while the DVD is in Stop mode. 2 Select "DVD" Use the UP/DOWN buttons to highlight "DVD," then press the...jacks on the rear panel to connect to a Progressive(480p) or Interlaced (480i) TV. • See your DVD-VCR to a TV using the S-Video OUT jack on the rear panel to connect to a TV. • ...COMPONENT VIDEO OUT jacks. • Use the S-Video or Component Video connection method only for the DVD player. Select this if you have. - Alt Video Out The "Alt Video Out" option must...
.... The tuner and VCR can still be viewed through the RF or line outputs. 1 Open "MENU" Press the MENU button while the DVD is in Stop mode. 2 Select "DVD" Use the UP/DOWN buttons to highlight "DVD," then press the...jacks on the rear panel to connect to a Progressive(480p) or Interlaced (480i) TV. • See your DVD-VCR to a TV using the S-Video OUT jack on the rear panel to connect to a TV. • ...COMPONENT VIDEO OUT jacks. • Use the S-Video or Component Video connection method only for the DVD player. Select this if you have. - Alt Video Out The "Alt Video Out" option must...
User Manual (user Manual) (ver.1.0) (English)
Page 4
System Setup On-Screen Menu Navigation 10 Menu Language 11 Manual Clock Set 11 Tuner Band Setting 12 RF Output Channel 12 Auto Channel Memory 13 Channel Add/Delete 13 Front...and Characteristics 4 1 - Basic Operation Deck Control Buttons 9 Basic DVD Operation 9 Basic VCR Operation 10 Basic TV Tuner Operations 10 6 - Advanced Connections Stereo Connections 7 S-Video/Component Video Connections (for DVD) . . . . 7 Monitor TV Connections 8 Connecting Other Video Equipment 8 4 - VCR Playback Special VCR Playback Features 28 Tracking 28 Auto Play 29 S-VHS Playback 29...
System Setup On-Screen Menu Navigation 10 Menu Language 11 Manual Clock Set 11 Tuner Band Setting 12 RF Output Channel 12 Auto Channel Memory 13 Channel Add/Delete 13 Front...and Characteristics 4 1 - Basic Operation Deck Control Buttons 9 Basic DVD Operation 9 Basic VCR Operation 10 Basic TV Tuner Operations 10 6 - Advanced Connections Stereo Connections 7 S-Video/Component Video Connections (for DVD) . . . . 7 Monitor TV Connections 8 Connecting Other Video Equipment 8 4 - VCR Playback Special VCR Playback Features 28 Tracking 28 Auto Play 29 S-VHS Playback 29...
User Manual (user Manual) (ver.1.0) (English)
Page 7
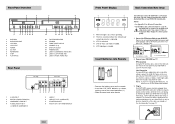
... LINE OUT jacks on the unit during an Auto Setup. While your TV is equipped with RCA jacks, it is better to a TV and run DVD-VCR setup menu, even if you should be plugged into Remote • Remove the battery cover on the remote • Insert two 1.5V "AAA" ...batteries as follows: red for right audio, white for left audio, and yellow for channels and then set the clock manually. Note: If your DVD-VCR is running an Auto Setup, "AUTO" will automatically search for video. Front Panel Display 1 2 3 LINE INPUT 4 5 1 When the light is on the...
... LINE OUT jacks on the unit during an Auto Setup. While your TV is equipped with RCA jacks, it is better to a TV and run DVD-VCR setup menu, even if you should be plugged into Remote • Remove the battery cover on the remote • Insert two 1.5V "AAA" ...batteries as follows: red for right audio, white for left audio, and yellow for channels and then set the clock manually. Note: If your DVD-VCR is running an Auto Setup, "AUTO" will automatically search for video. Front Panel Display 1 2 3 LINE INPUT 4 5 1 When the light is on the...
User Manual (user Manual) (ver.1.0) (English)
Page 9
... essentially the same connections, they will be set in the Timer Record menu. NOTE: A monitor television is Complete Audio/Video Outputs of the DVD-VCR. Connecting Other Video Equipment You can connect a wide variety of your record source in the usual manner. button until the playback from Line1 (...Device 2 Watch Device Play your monitor TV to the Audio and Video Line Inputs on your external device. Refer to your monitor television owner's manual for the correct setting. 3 Connection is not the same as your monitor TV. Next, press the INPUT SEL. All other Timer Record settings...
... essentially the same connections, they will be set in the Timer Record menu. NOTE: A monitor television is Complete Audio/Video Outputs of the DVD-VCR. Connecting Other Video Equipment You can connect a wide variety of your record source in the usual manner. button until the playback from Line1 (...Device 2 Watch Device Play your monitor TV to the Audio and Video Line Inputs on your external device. Refer to your monitor television owner's manual for the correct setting. 3 Connection is not the same as your monitor TV. Next, press the INPUT SEL. All other Timer Record settings...

User Manual (user Manual) (ver.1.0) (English)
Page 12
Menu Language Manual Clock Set To change as shown. 4 Set menu Language Place the selection bar next to your DVD-VCR's internal clock must be set correctly. 1 Open "MENU" Press the MENU button while the DVD is in Stop or Play mode. 2 Select "SETUP" Using the UP/DOWN buttons, move the selection bar to ...Front Display Auto Power Off : Auto : Off 5 Set the Clock Use the LEFT/RIGHT buttons to set the date and time manually. If Auto Setup fails to set the DVD-VCR's internal clock by locating a local TV station, follow these steps to set each of the following options, then use the UP/...
Menu Language Manual Clock Set To change as shown. 4 Set menu Language Place the selection bar next to your DVD-VCR's internal clock must be set correctly. 1 Open "MENU" Press the MENU button while the DVD is in Stop or Play mode. 2 Select "SETUP" Using the UP/DOWN buttons, move the selection bar to ...Front Display Auto Power Off : Auto : Off 5 Set the Clock Use the LEFT/RIGHT buttons to set the date and time manually. If Auto Setup fails to set the DVD-VCR's internal clock by locating a local TV station, follow these steps to set each of the following options, then use the UP/...
User Manual (user Manual) (ver.1.0) (English)
Page 13
... "TV Channel" A message will appear on your TV. When the message disappears, change . Tuner Band Setting RF Output Channel This feature allows you to manually set the DVD-VCR's tuner band to Antenna or Cable, whichever you connected to the Antenna In jack during initial setup. • Use this feature if... DVD-VCR is connected to TV using RF antenna cable. 1 Open "MENU" With the DVD in Stop or Play mode, press the MENU button. 2 Select "SETUP" Using the UP/DOWN buttons, move...
... "TV Channel" A message will appear on your TV. When the message disappears, change . Tuner Band Setting RF Output Channel This feature allows you to manually set the DVD-VCR's tuner band to Antenna or Cable, whichever you connected to the Antenna In jack during initial setup. • Use this feature if... DVD-VCR is connected to TV using RF antenna cable. 1 Open "MENU" With the DVD in Stop or Play mode, press the MENU button. 2 Select "SETUP" Using the UP/DOWN buttons, move...
User Manual (user Manual) (ver.1.0) (English)
Page 20
... viewed through all sources. Select this if you have connected your DVD-VCR to a TV using the S-Video OUT jack on the rear panel to connect to a Progressive(480p) or Interlaced (480i) TV. • See your TV owner's manual to determine what type of TV you are using the S-VIDEO ...OUT or COMPONENT VIDEO OUT jacks. • Use the S-Video or Component Video connection method only for increased contrast during DVD playback. 1 Open "MENU" Press the MENU button while the...
... viewed through all sources. Select this if you have connected your DVD-VCR to a TV using the S-Video OUT jack on the rear panel to connect to a Progressive(480p) or Interlaced (480i) TV. • See your TV owner's manual to determine what type of TV you are using the S-VIDEO ...OUT or COMPONENT VIDEO OUT jacks. • Use the S-Video or Component Video connection method only for increased contrast during DVD playback. 1 Open "MENU" Press the MENU button while the...

User Manual (user Manual) (ver.1.0) (English)
Page 29
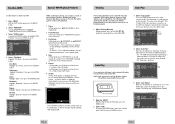
... speed. 4 Skip In Play mode, press F.ADV/SKIP to advance the tape forward or backward at two speeds: • Picture Search - Picture Search - Shuttle Special VCR Playback Features Tracking While a videotape is playing, you can enjoy a variety of tape (SLP mode). 6 Shuttle In Play mode, Shuttle >> gradually increases the cue speed...
... speed. 4 Skip In Play mode, press F.ADV/SKIP to advance the tape forward or backward at two speeds: • Picture Search - Picture Search - Shuttle Special VCR Playback Features Tracking While a videotape is playing, you can enjoy a variety of tape (SLP mode). 6 Shuttle In Play mode, Shuttle >> gradually increases the cue speed...
User Manual (user Manual) (ver.1.0) (Spanish)
Page 3
... Instructions 2 Welcome Feature Summary 4 Disc Type and Characteristics 4 1 - Basic Operation Deck Control Buttons 10 Basic DVD Operation 10 Basic VCR Operation 11 Basic TV Tuner Operations 11 6 - System Setup On-Screen Menu Navigation 11 Menu Language 12 Manual Clock Set 12 Tuner Band Setting 13 Auto Channel Memory 13 Channel Add/Delete 14...
... Instructions 2 Welcome Feature Summary 4 Disc Type and Characteristics 4 1 - Basic Operation Deck Control Buttons 10 Basic DVD Operation 10 Basic VCR Operation 11 Basic TV Tuner Operations 11 6 - System Setup On-Screen Menu Navigation 11 Menu Language 12 Manual Clock Set 12 Tuner Band Setting 13 Auto Channel Memory 13 Channel Add/Delete 14...
User Manual (user Manual) (ver.1.0) (Spanish)
Page 5
.... 2 The time, counter position, time remaining or current deck status is indicated. 3 VCR is activated. 4 DVD or VCD, CD media is loaded. 5 VHS videotape is loaded. In case Auto Clock set the clock manually. When Auto Setup is complete, the current time will blink. See page 12. 3 ENG...-7 Insert Batteries into a standard 120V/60Hz wall outlet. NOTES: • See Appendix A for a better picture quality. 1 Connect the RF Antenna Cable to your DVD-VCR Connect an external ...
.... 2 The time, counter position, time remaining or current deck status is indicated. 3 VCR is activated. 4 DVD or VCD, CD media is loaded. 5 VHS videotape is loaded. In case Auto Clock set the clock manually. When Auto Setup is complete, the current time will blink. See page 12. 3 ENG...-7 Insert Batteries into a standard 120V/60Hz wall outlet. NOTES: • See Appendix A for a better picture quality. 1 Connect the RF Antenna Cable to your DVD-VCR Connect an external ...
User Manual (user Manual) (ver.1.0) (Spanish)
Page 6
... stereo videotape into your monitor television owner's manual for the DVD player. All other Timer Record settings should be viewed through the line inputs. The tuner and VCR can connect a wide variety of audio/video equipment to your DVD-VCR, including: • An additional VCR • Laser Disc Player • DVD Player • Camcorder • Satellite Receiver...
... stereo videotape into your monitor television owner's manual for the DVD player. All other Timer Record settings should be viewed through the line inputs. The tuner and VCR can connect a wide variety of audio/video equipment to your DVD-VCR, including: • An additional VCR • Laser Disc Player • DVD Player • Camcorder • Satellite Receiver...
User Manual (user Manual) (ver.1.0) (Spanish)
Page 8
...channel memory" Move the selection arrow to "Auto Channel Memory," then press ENTER to select. • The DVD-VCR will be set the date and time manually. If Auto Setup fails to set the DVD-VCR's internal clock by locating a local TV station, follow these steps to set correctly. 1 Open "MENU" ... 3 Select "Channel" Using the UP/DOWN buttons, move the selection bar to "SETUP" then press ENTER to select. Indicates that the DVD-VCR is connected to Cable TV. Set the year Manual Clock 2004 THU 6 Confirm Settings Press the RETURN button to confirm your area. 1 Open "MENU" With the...
...channel memory" Move the selection arrow to "Auto Channel Memory," then press ENTER to select. • The DVD-VCR will be set the date and time manually. If Auto Setup fails to set the DVD-VCR's internal clock by locating a local TV station, follow these steps to set correctly. 1 Open "MENU" ... 3 Select "Channel" Using the UP/DOWN buttons, move the selection bar to "SETUP" then press ENTER to select. Indicates that the DVD-VCR is connected to Cable TV. Set the year Manual Clock 2004 THU 6 Confirm Settings Press the RETURN button to confirm your area. 1 Open "MENU" With the...
User Manual (user Manual) (ver.1.0) (Spanish)
Page 12
The tuner and VCR can still be viewed through the RF or line outputs. 1 Open "MENU" Press the MENU button while the DVD is in the unit. Select this if you ... you have connected your DVD-VCR to a TV using the COMPONENT VIDEO OUT jacks on the rear panel to connect to a Progressive(480p) or Interlaced (480i) TV. • See your TV owner's manual to determine what type...will change as shown. The system uses an eight level rating system. • If you try to play a DVD that allows you will also be disturbed. Press the REW and F.F buttons simultaneously on the remote control to enter the...
The tuner and VCR can still be viewed through the RF or line outputs. 1 Open "MENU" Press the MENU button while the DVD is in the unit. Select this if you ... you have connected your DVD-VCR to a TV using the COMPONENT VIDEO OUT jacks on the rear panel to connect to a Progressive(480p) or Interlaced (480i) TV. • See your TV owner's manual to determine what type...will change as shown. The system uses an eight level rating system. • If you try to play a DVD that allows you will also be disturbed. Press the REW and F.F buttons simultaneously on the remote control to enter the...
User Manual (user Manual) (ver.1.0) (Spanish)
Page 16
.... Press and release to select. 4 Select "Title Menu" Highlight "Title Menu", then press the ENTER button. - Shuttle Function (DVD) Special VCR Playback Features Use this feature to check your DVD. 1 Open "MENU" With the DVD in Play mode, press the MENU button. 2 Select "FUNCTION" Use the UP/DOWN buttons to highlight "FUNCTION" then press...
.... Press and release to select. 4 Select "Title Menu" Highlight "Title Menu", then press the ENTER button. - Shuttle Function (DVD) Special VCR Playback Features Use this feature to check your DVD. 1 Open "MENU" With the DVD in Play mode, press the MENU button. 2 Select "FUNCTION" Use the UP/DOWN buttons to highlight "FUNCTION" then press...

User Manual (user Manual) (ver.1.0) (Spanish)
Page 19
...hours FF/REW TIME T-120 tape: FM azimuth luminance;chrominance: converted sub system phase shift AUDIO TRACK Normal: 1 track; Technical Specifications Inputs Outputs VCR DVD SYSTEM AUDIO 2 Stereo audio inputs, RCA Connector, -8dbm, 47KΩ, front and rear VIDEO 2 Composite video inputs, RCA Connector, 75Ω,... Antenna or CATV Input, F-Connector, 75Ω AUDIO 1 Stereo audio outputs, RCA Connector, -8dbm, 1.5KΩ AUDIO (DVD only) 1 Digital audio output (1 coaxial) 1 pair Stereo audio outputs VIDEO 1 Composite video output, RCA Connector, 75Ω, 1Vp-p VIDEO...
...hours FF/REW TIME T-120 tape: FM azimuth luminance;chrominance: converted sub system phase shift AUDIO TRACK Normal: 1 track; Technical Specifications Inputs Outputs VCR DVD SYSTEM AUDIO 2 Stereo audio inputs, RCA Connector, -8dbm, 47KΩ, front and rear VIDEO 2 Composite video inputs, RCA Connector, 75Ω,... Antenna or CATV Input, F-Connector, 75Ω AUDIO 1 Stereo audio outputs, RCA Connector, -8dbm, 1.5KΩ AUDIO (DVD only) 1 Digital audio output (1 coaxial) 1 pair Stereo audio outputs VIDEO 1 Composite video output, RCA Connector, 75Ω, 1Vp-p VIDEO...


