

User Manual (user Manual) (ver.1.0) (English)
Page 4
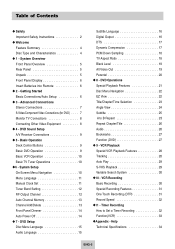
DVD Sound Setup A/V Receiver Connections 9 • 5 - System Setup On-Screen Menu Navigation 10 Menu Language 11 Manual Clock Set 11 Tuner Band Setting 12 Auto Channel Memory 12 Channel Add/Delete 13 Front Panel Dimmer 13 Auto Power Off 14 • 7 - DVD Operations Special Playback Features 21 Disc Menu Navigation 21 EZ View 22 Title/Chapter/Time Selection 23 Angle View 24 Subtitle 24 A to Set a Timer Recording 31 Function(VCR 32 Appendix - Help Technical Specifications 33 ENG-3 DVD Setup Disc Menu Language 14 Audio Language 15 Subtitle...
DVD Sound Setup A/V Receiver Connections 9 • 5 - System Setup On-Screen Menu Navigation 10 Menu Language 11 Manual Clock Set 11 Tuner Band Setting 12 Auto Channel Memory 12 Channel Add/Delete 13 Front Panel Dimmer 13 Auto Power Off 14 • 7 - DVD Operations Special Playback Features 21 Disc Menu Navigation 21 EZ View 22 Title/Chapter/Time Selection 23 Angle View 24 Subtitle 24 A to Set a Timer Recording 31 Function(VCR 32 Appendix - Help Technical Specifications 33 ENG-3 DVD Setup Disc Menu Language 14 Audio Language 15 Subtitle...
User Manual (user Manual) (ver.1.0) (English)
Page 5
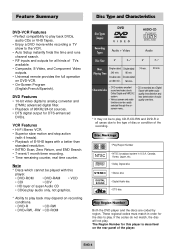
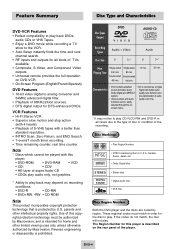
... on DVD-VCR. • On-Screen Program (English/French/Spanish). functions can be to play CD-R,CD-RW and DVD-R in all kinds of TVs available. • Composite, S-Video, and Component Video outputs. • Universal remote provides the full operation on the rear panel of the player. Disc Markings • Play Region Number ~ NTSC • NTSC broadcast system in order for the disc to play. The Region Number for this player is recorded as a Digital Characteristics sound and video due to Signal...
... on DVD-VCR. • On-Screen Program (English/French/Spanish). functions can be to play CD-R,CD-RW and DVD-R in all kinds of TVs available. • Composite, S-Video, and Component Video outputs. • Universal remote provides the full operation on the rear panel of the player. Disc Markings • Play Region Number ~ NTSC • NTSC broadcast system in order for the disc to play. The Region Number for this player is recorded as a Digital Characteristics sound and video due to Signal...
User Manual (user Manual) (ver.1.0) (English)
Page 9
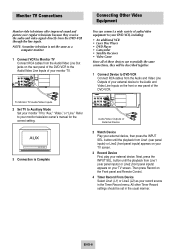
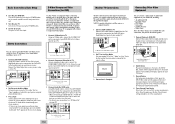
... Timer Record menu. All other Timer Record settings should be described together. 1 Connect Device to the Audio and Video Line Inputs on the front or rear panel of these devices use essentially the same connections, they receive the audio and video signals directly from Line1 (rear panel inputs) or Line2 (front panel inputs) appears on your TV screen. 3 Record Device First, play your external device. button until the playback from the Audio and Video Line Outputs of your external device to DVD-VCR Connect RCA cables from Line1 (rear panel inputs) or Line2 (front panel inputs...
... Timer Record menu. All other Timer Record settings should be described together. 1 Connect Device to the Audio and Video Line Inputs on the front or rear panel of these devices use essentially the same connections, they receive the audio and video signals directly from Line1 (rear panel inputs) or Line2 (front panel inputs) appears on your TV screen. 3 Record Device First, play your external device. button until the playback from the Audio and Video Line Outputs of your external device to DVD-VCR Connect RCA cables from Line1 (rear panel inputs) or Line2 (front panel inputs...
User Manual (user Manual) (ver.1.0) (English)
Page 10
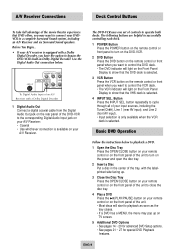
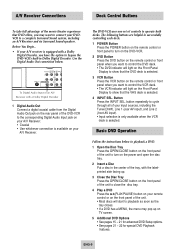
... your A/V Receiver. Use the Digital Audio Out connection below to playback a DVD. 1 Open the Disc Tray Press the OPEN/CLOSE button on your remote control or on the front panel of the unit to turn on the DVD-VCR. 2 DVD Button Press the DVD button on the remote control or front panel when you want to close the disc tray. 4 Play a DVD Press the ❿ll(PLAY/PAUSE) button on your input sources, including the Tuner(Ch##), Line 1 (rear AV input), and Line 2 (front AV input). • Input selection is...
... your A/V Receiver. Use the Digital Audio Out connection below to playback a DVD. 1 Open the Disc Tray Press the OPEN/CLOSE button on your remote control or on the front panel of the unit to turn on the DVD-VCR. 2 DVD Button Press the DVD button on the remote control or front panel when you want to close the disc tray. 4 Play a DVD Press the ❿ll(PLAY/PAUSE) button on your input sources, including the Tuner(Ch##), Line 1 (rear AV input), and Line 2 (front AV input). • Input selection is...
User Manual (user Manual) (ver.1.0) (English)
Page 20
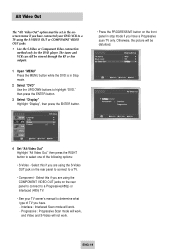
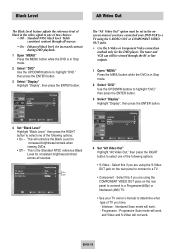
... a Progressive scan TV only. Otherwise, the picture will work . Alt Video Out The "Alt Video Out" option must be disturbed. The tuner and VCR can still be viewed through the RF or line outputs. 1 Open "MENU" Press the MENU button while the DVD is in Stop mode. 2 Select "DVD" Use the UP/DOWN buttons to highlight "DVD," then press the ENTER button. 3 Select "Display" Highlight "Display", then press the ENTER button. • Press the PROGRESSIVE button on the rear panel to connect...
... a Progressive scan TV only. Otherwise, the picture will work . Alt Video Out The "Alt Video Out" option must be disturbed. The tuner and VCR can still be viewed through the RF or line outputs. 1 Open "MENU" Press the MENU button while the DVD is in Stop mode. 2 Select "DVD" Use the UP/DOWN buttons to highlight "DVD," then press the ENTER button. 3 Select "Display" Highlight "Display", then press the ENTER button. • Press the PROGRESSIVE button on the rear panel to connect...

User Manual (user Manual) (ver.1.0) (English)
Page 33
... turn the power off. Recording will start time, end time, date and record speed. If you set the timer program, press the ENTER key Timer Program 1 Open "MENU" In the DVD in Stop or Play mode, press the MENU button. 2 Select "FUNCTION" Use the UP/DOWN buttons to highlight "FUNCTION" then press the ENTER button. 3 Select "VCR Function" Using the UP/DOWN buttons to highlight "VCR Function" then press ENTER to set . To stop the timer recording, press the POWER button or press the ■ (STOP) button twice. Forward Intro Scan Highlight "Forward...
... turn the power off. Recording will start time, end time, date and record speed. If you set the timer program, press the ENTER key Timer Program 1 Open "MENU" In the DVD in Stop or Play mode, press the MENU button. 2 Select "FUNCTION" Use the UP/DOWN buttons to highlight "FUNCTION" then press the ENTER button. 3 Select "VCR Function" Using the UP/DOWN buttons to highlight "VCR Function" then press ENTER to set . To stop the timer recording, press the POWER button or press the ■ (STOP) button twice. Forward Intro Scan Highlight "Forward...
User Manual (user Manual) (ver.1.0) (English)
Page 4
... Out 19 Parental 20 8 - Basic Operation Deck Control Buttons 9 Basic DVD Operation 9 Basic VCR Operation 10 Basic TV Tuner Operations 10 6 - Timer Recording How to B Repeat 25 Repeat Chapter/Title 26 Audio 26 Bookmarks 27 Function (DVD 27 9 - System Setup On-Screen Menu Navigation 10 Menu Language 11 Manual Clock Set 11 Tuner Band Setting 12 RF Output Channel 12 Auto Channel Memory 13 Channel Add/Delete 13 Front Panel Dimmer 14 Auto Power Off 14 7 - System Overview Front Panel Overview 5 Rear Panel 5 Unpack 5 Front Panel Display 6 Insert Batteries into Remote...
... Out 19 Parental 20 8 - Basic Operation Deck Control Buttons 9 Basic DVD Operation 9 Basic VCR Operation 10 Basic TV Tuner Operations 10 6 - Timer Recording How to B Repeat 25 Repeat Chapter/Title 26 Audio 26 Bookmarks 27 Function (DVD 27 9 - System Setup On-Screen Menu Navigation 10 Menu Language 11 Manual Clock Set 11 Tuner Band Setting 12 RF Output Channel 12 Auto Channel Memory 13 Channel Add/Delete 13 Front Panel Dimmer 14 Auto Power Off 14 7 - System Overview Front Panel Overview 5 Rear Panel 5 Unpack 5 Front Panel Display 6 Insert Batteries into Remote...
User Manual (user Manual) (ver.1.0) (English)
Page 5
... deterioration of this player is intended for the disc to play . screen menu.. * It may depend on DVD-VCR. • On-Screen Program (English/French/Spanish). patents and other limited viewing uses only unless otherwise authorized by U.S. Disc Types (Logos) DVD V I D E O AUDIO-CD Recording Types Audio + Video Audio Disc Size 5" 31/2" 5" 31/2" Max. functions can be authorized by region. These regional codes must be easily selected through the on the rear panel of S-VHS tapes with better audio Dolby Digital and MPEG-2 quality...
... deterioration of this player is intended for the disc to play . screen menu.. * It may depend on DVD-VCR. • On-Screen Program (English/French/Spanish). patents and other limited viewing uses only unless otherwise authorized by U.S. Disc Types (Logos) DVD V I D E O AUDIO-CD Recording Types Audio + Video Audio Disc Size 5" 31/2" 5" 31/2" Max. functions can be authorized by region. These regional codes must be easily selected through the on the rear panel of S-VHS tapes with better audio Dolby Digital and MPEG-2 quality...
User Manual (user Manual) (ver.1.0) (English)
Page 8
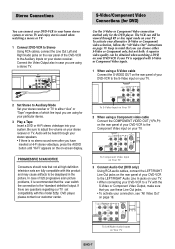
... the AUDIO button until "Hi-Fi" appears on the on-screen display. Audio will be viewed through your stereo speakers • If there is no stereo sound even after you use these Line Out jacks. • To activate your TV. To Component Video Input on Your TV 3 Connect Audio Out (DVD only) Using RCA audio cables, connect the LEFT/RIGHT Line Out jacks on the rear panel of your DVD-VCR to...
... the AUDIO button until "Hi-Fi" appears on the on-screen display. Audio will be viewed through your stereo speakers • If there is no stereo sound even after you use these Line Out jacks. • To activate your TV. To Component Video Input on Your TV 3 Connect Audio Out (DVD only) Using RCA audio cables, connect the LEFT/RIGHT Line Out jacks on the rear panel of your DVD-VCR to...
User Manual (user Manual) (ver.1.0) (English)
Page 9
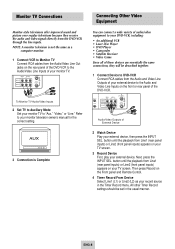
... owner's manual for the correct setting. 3 Connection is not the same as your TV screen. button until the playback from the Audio/Video Line Out jacks on the Front panel and Remote Control. 4 Timer Record From Device Select Line1 (L1) or Line2 (L2) as a computer monitor. 1 Connect VCR to "Aux," "Video," or "Line." Next, press the INPUT SEL. ENG-8 NOTE: A monitor television is Complete Audio/Video Outputs of the DVD-VCR to the Audio and Video Line Inputs...
... owner's manual for the correct setting. 3 Connection is not the same as your TV screen. button until the playback from the Audio/Video Line Out jacks on the Front panel and Remote Control. 4 Timer Record From Device Select Line1 (L1) or Line2 (L2) as a computer monitor. 1 Connect VCR to "Aux," "Video," or "Line." Next, press the INPUT SEL. ENG-8 NOTE: A monitor television is Complete Audio/Video Outputs of the DVD-VCR to the Audio and Video Line Inputs...
User Manual (user Manual) (ver.1.0) (English)
Page 10
... the remote control or front panel to turn on the power and open the disc tray. 2 Insert a Disc Put a disc in Dolby Digital Decoder. ENG-9 The DVD-VCR uses one set of your input sources, including the Tuner(Ch##), Line 1 (rear AV input), and Line 2 (front AV input). • Input selection is only available when the VCR deck is selected. button repeatedly to cycle through all of controls to operate both decks. Use the Digital Audio Out connection below to playback a DVD. 1 Open the Disc Tray Press the OPEN/CLOSE button...
... the remote control or front panel to turn on the power and open the disc tray. 2 Insert a Disc Put a disc in Dolby Digital Decoder. ENG-9 The DVD-VCR uses one set of your input sources, including the Tuner(Ch##), Line 1 (rear AV input), and Line 2 (front AV input). • Input selection is only available when the VCR deck is selected. button repeatedly to cycle through all of controls to operate both decks. Use the Digital Audio Out connection below to playback a DVD. 1 Open the Disc Tray Press the OPEN/CLOSE button...
User Manual (user Manual) (ver.1.0) (English)
Page 13
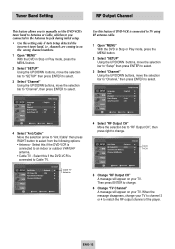
... to manually set the DVD-VCR's tuner band to Antenna or Cable, whichever you connected to the Antenna In jack during initial setup. • Use this if the DVD-VCR is connected to Cable TV. Select this setting only if Auto Setup detected the incorrect tuner band, i.e. Select this feature if DVD-VCR is connected to match the RF output channel of the player. Ant./Cable : Antenna RF Output CH : 3CH Auto Channel Memory Channel Add/Delete 3CH 4CH 5 Change "RF Output...
... to manually set the DVD-VCR's tuner band to Antenna or Cable, whichever you connected to the Antenna In jack during initial setup. • Use this if the DVD-VCR is connected to Cable TV. Select this setting only if Auto Setup detected the incorrect tuner band, i.e. Select this feature if DVD-VCR is connected to match the RF output channel of the player. Ant./Cable : Antenna RF Output CH : 3CH Auto Channel Memory Channel Add/Delete 3CH 4CH 5 Change "RF Output...
User Manual (user Manual) (ver.1.0) (English)
Page 20
... work . Enhanced black level, for the DVD player. The tuner and VCR can still be set in the onscreen menu if you have . - Interlace : Interlaced Scan mode will not work . - ENG-19 The "Alt Video Out" option must be viewed through all sources. Select this if you have connected your TV owner's manual to determine what type of TV you are using the COMPONENT VIDEO OUT jacks on the rear panel to connect to a Progressive...
... work . Enhanced black level, for the DVD player. The tuner and VCR can still be set in the onscreen menu if you have . - Interlace : Interlaced Scan mode will not work . - ENG-19 The "Alt Video Out" option must be viewed through all sources. Select this if you have connected your TV owner's manual to determine what type of TV you are using the COMPONENT VIDEO OUT jacks on the rear panel to connect to a Progressive...
User Manual (user Manual) (ver.1.0) (English)
Page 33
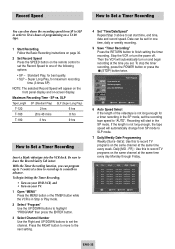
... record TV programs on -screen display. FR] : Use this to record TV programs on the same channel at the same time every week. Be sure to Set a Timer Recording Insert a blank videotape into the VCR deck. To Begin Setting the Timer Recording, • Turn on your DVD-VCR, and • Turn on your TV. 1 Open "MENU" Press the MENU button or the TIMER button while the VCR is not long enough, the tape speed will automatically turn the power...
... record TV programs on -screen display. FR] : Use this to record TV programs on the same channel at the same time every week. Be sure to Set a Timer Recording Insert a blank videotape into the VCR deck. To Begin Setting the Timer Recording, • Turn on your DVD-VCR, and • Turn on your TV. 1 Open "MENU" Press the MENU button or the TIMER button while the VCR is not long enough, the tape speed will automatically turn the power...
User Manual (user Manual) (ver.1.0) (Spanish)
Page 3
... Overview Unpack 5 Front Panel Overview 6 Rear Panel 6 Front Panel Display 7 Insert Batteries into the apparatus, the apparatus has been exposed to the point of Canadian Electrical Code, Part I) that produce heat. 9. Getting Started Basic Connections/Auto Setup 7 3 - DVD Sound Setup A/V Receiver Connections 10 5 - DVD Operations Special Playback Features 22 Disc Menu Navigation 22 EZ View 23 Title/Chapter/Time Selection 24 Angle View 25 Subtitle 25 A to wide slot, fully insert. Help Technical Specifications 34 ENG-3 Caution: To...
... Overview Unpack 5 Front Panel Overview 6 Rear Panel 6 Front Panel Display 7 Insert Batteries into the apparatus, the apparatus has been exposed to the point of Canadian Electrical Code, Part I) that produce heat. 9. Getting Started Basic Connections/Auto Setup 7 3 - DVD Sound Setup A/V Receiver Connections 10 5 - DVD Operations Special Playback Features 22 Disc Menu Navigation 22 EZ View 23 Title/Chapter/Time Selection 24 Angle View 25 Subtitle 25 A to wide slot, fully insert. Help Technical Specifications 34 ENG-3 Caution: To...

User Manual (user Manual) (ver.1.0) (Spanish)
Page 4
... time and runs channel search. • RF inputs and outputs for all cases due to the type of disc or condition of the recording. These regional codes must match in the packing case. Double-sided 160 min. • DVD contains excellent sound and video due to Dolby Digital and MPEG-2 system. • Various screen and audio functions can be easily selected through the on DVD+VCR. • On-Screen Program (English/French/Spanish). DVD...
... time and runs channel search. • RF inputs and outputs for all cases due to the type of disc or condition of the recording. These regional codes must match in the packing case. Double-sided 160 min. • DVD contains excellent sound and video due to Dolby Digital and MPEG-2 system. • Various screen and audio functions can be easily selected through the on DVD+VCR. • On-Screen Program (English/French/Spanish). DVD...
User Manual (user Manual) (ver.1.0) (Spanish)
Page 6
... devices use essentially the same connections, they receive the audio and video signals directly from the DVD-VCR through your external device to the Audio and Video Line Inputs on the front or rear panel of the DVD-VCR. Keep in the Timer Record menu. To S-Video Input on Your TV 2 Connect Component Video Out to TV Using a component video cable, connect the COMPONENT VIDEO OUT (Y, Pb, Pr) on the rear panel of your DVD-VCR to the Component Video Input on your TV. 2 Set Stereo to Auxiliary Mode Set your TV screen. Connecting Other Video...
... devices use essentially the same connections, they receive the audio and video signals directly from the DVD-VCR through your external device to the Audio and Video Line Inputs on the front or rear panel of the DVD-VCR. Keep in the Timer Record menu. To S-Video Input on Your TV 2 Connect Component Video Out to TV Using a component video cable, connect the COMPONENT VIDEO OUT (Y, Pb, Pr) on the rear panel of your DVD-VCR to the Component Video Input on your TV. 2 Set Stereo to Auxiliary Mode Set your TV screen. Connecting Other Video...

User Manual (user Manual) (ver.1.0) (Spanish)
Page 7
... function is activated only on the Auto Play to enable the VCR deck to play automatically when you insert a videotape that is turned on -screen menus. ENG-10 Basic VCR Operation Basic TV Tuner Operations To play automatically if it into the VCR deck. • When a videotape is selected. 4 INPUT SEL. You can turn on Cable TV Mode. 3 INFO. The videotape will light on your DVD-VCR. Use the following buttons are helpful in...
... function is activated only on the Auto Play to enable the VCR deck to play automatically when you insert a videotape that is turned on -screen menus. ENG-10 Basic VCR Operation Basic TV Tuner Operations To play automatically if it into the VCR deck. • When a videotape is selected. 4 INPUT SEL. You can turn on Cable TV Mode. 3 INFO. The videotape will light on your DVD-VCR. Use the following buttons are helpful in...

User Manual (user Manual) (ver.1.0) (Spanish)
Page 11
... passages of black in Stop mode. 2 Select "DVD" Use the UP/DOWN buttons to fit a standard 4:3 television screen. TV Aspect Ratio Black Level Set the aspect ratio (length x width) of the picture visible) wide screen movies to highlight "DVD" then press the ENTER button. 3 Select "Display" Highlight "Display", then press the ENTER button. The familiar way of watching DVD and VHS movies, this method selectively crops (by panning and scanning to keep the most important part of...
... passages of black in Stop mode. 2 Select "DVD" Use the UP/DOWN buttons to fit a standard 4:3 television screen. TV Aspect Ratio Black Level Set the aspect ratio (length x width) of the picture visible) wide screen movies to highlight "DVD" then press the ENTER button. 3 Select "Display" Highlight "Display", then press the ENTER button. The familiar way of watching DVD and VHS movies, this method selectively crops (by panning and scanning to keep the most important part of...

User Manual (user Manual) (ver.1.0) (Spanish)
Page 18
... SP mode to record TV programs on the On-Screen Display and the DVD-VCR will automatically change from SP to SLP in order to fit six hours of programming on a T-120 tape. 1 Start Recording Follow the Basic Recording instructions on page 28. 2 Set Record Speed Press the SPEED button on the remote control to set the Record Speed to one button. Maximum Recording Time - ENG-32 How to Set a Timer Recording Function (VCR) 4 Set "Time/Date/Speed" 1 Open "MENU" Repeat Step...
... SP mode to record TV programs on the On-Screen Display and the DVD-VCR will automatically change from SP to SLP in order to fit six hours of programming on a T-120 tape. 1 Start Recording Follow the Basic Recording instructions on page 28. 2 Set Record Speed Press the SPEED button on the remote control to set the Record Speed to one button. Maximum Recording Time - ENG-32 How to Set a Timer Recording Function (VCR) 4 Set "Time/Date/Speed" 1 Open "MENU" Repeat Step...


