
Quick Guide (easy Manual) (ver.1.0) (English)
Page 6
...Specifications 4 General Features 8 Before Reading the Instruction Manual 9 How to use the DVD Recorder 9 Description 11 Front Panel 11 Front Panel Display 11 Rear Panel 12 Unpacking 12 Accessories 12 Tour of the Remote Control 13 Connecting & Setting UP Quick Overview 14 Step 1 : Connecting the ...Antenna cable 15 Antenna + DVD Recorder + TV : No Cable box . . . . . .15 Antenna + Cable box + DVD Recorder + TV : Cable box with many scrambled ...
...Specifications 4 General Features 8 Before Reading the Instruction Manual 9 How to use the DVD Recorder 9 Description 11 Front Panel 11 Front Panel Display 11 Rear Panel 12 Unpacking 12 Accessories 12 Tour of the Remote Control 13 Connecting & Setting UP Quick Overview 14 Step 1 : Connecting the ...Antenna cable 15 Antenna + DVD Recorder + TV : No Cable box . . . . . .15 Antenna + Cable box + DVD Recorder + TV : Cable box with many scrambled ...
Quick Guide (easy Manual) (ver.1.0) (English)
Page 12
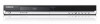
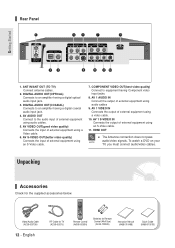
... the output of external equipment using audio cables 9. To watch a DVD on your TV, you must connect audio/video cables. ANT IN/ANT OUT (TO TV) Connect antenna cables. 2. Unpacking Accessories Check for Remote Control (AAA Size) (AC43-12002H) Instruction Manual (AK68-01049B) ...output of external equipment using an S-Video cable. 11. Rear Panel Getting Started 1. English RF Cable for TV (AC39-42001J) Remote Control (AK59-00055A) Batteries for the supplied accessories below. DIGITAL AUDIO OUT(COAXIAL) Connects to the audio input of external equipment using ...
... the output of external equipment using audio cables 9. To watch a DVD on your TV, you must connect audio/video cables. ANT IN/ANT OUT (TO TV) Connect antenna cables. 2. Unpacking Accessories Check for Remote Control (AAA Size) (AC43-12002H) Instruction Manual (AK68-01049B) ...output of external equipment using an S-Video cable. 11. Rear Panel Getting Started 1. English RF Cable for TV (AC39-42001J) Remote Control (AK59-00055A) Batteries for the supplied accessories below. DIGITAL AUDIO OUT(COAXIAL) Connects to the audio input of external equipment using ...
Quick Guide (easy Manual) (ver.1.0) (English)
Page 13
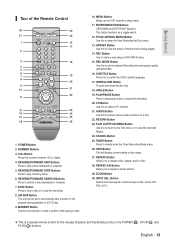
... you to make a recording on a disc. 22. English - 13 REVERSE/FORWARD SEARCH Buttons Press to automatically skip a portion of the program during playback of the Remote Control 28 29 27 30 1 16 17 2 3 18 4 5 6 7 19 8 20 9 10 21 22 11 12 23 13 24 14 25 15 26 1.... Selects line input signal in external input mode. (Tuner, AV1, AV2 or DV) ❋ This is being played. 14. Getting Started Tour of a DVD disc. 9. CANCEL Button 25. ZOOM Button 30. POWER Button 2. REVERSE/FORWARD SKIP Buttons Press to directly enter the Timer Recording Mode menu. 26. REVERSE/...
... you to make a recording on a disc. 22. English - 13 REVERSE/FORWARD SEARCH Buttons Press to automatically skip a portion of the program during playback of the Remote Control 28 29 27 30 1 16 17 2 3 18 4 5 6 7 19 8 20 9 10 21 22 11 12 23 13 24 14 25 15 26 1.... Selects line input signal in external input mode. (Tuner, AV1, AV2 or DV) ❋ This is being played. 14. Getting Started Tour of a DVD disc. 9. CANCEL Button 25. ZOOM Button 30. POWER Button 2. REVERSE/FORWARD SKIP Buttons Press to directly enter the Timer Recording Mode menu. 26. REVERSE/...

Quick Guide (easy Manual) (ver.1.0) (English)
Page 14
.... Connecting & Setting Up Connecting & Setting Up This section involves various methods of cable entry as close to the point of connecting the DVD Recorder to other external components and setting required initial modes. Step 1 : Connecting the Antenna Cable † Step 2 : Connecting the... HDMI/ DVI to a TV † Step 5 : Connecting External Devices † Step 6 : Connecting the Power Cord † Step 7 : Preparing the Remote Control Quick Overview 14 Step 1 : Connecting the Antenna Cable 15 Step 2 : Connecting the Video Cable 18 Step 3 : Connecting the Audio Cable 21 Step 4...
.... Connecting & Setting Up Connecting & Setting Up This section involves various methods of cable entry as close to the point of connecting the DVD Recorder to other external components and setting required initial modes. Step 1 : Connecting the Antenna Cable † Step 2 : Connecting the... HDMI/ DVI to a TV † Step 5 : Connecting External Devices † Step 6 : Connecting the Power Cord † Step 7 : Preparing the Remote Control Quick Overview 14 Step 1 : Connecting the Antenna Cable 15 Step 2 : Connecting the Video Cable 18 Step 3 : Connecting the Audio Cable 21 Step 4...

Quick Guide (easy Manual) (ver.1.0) (English)
Page 24
You will enjoy the best quality images and sounds. Press the input selector on your TV remote control until the HDMI signal from the DVD Recorder appears on your TV. In this case, set Digital output as Bitstream or select DTS On in Audio setup menu. If TV does not ... OUT s To watch through the HDMI output, set the digital audio output to PCM.(See page 34~35) Caution s Depending on the rear of the DVD Recorder to PCM or DTS Off. 24 -
You will enjoy the best quality images and sounds. Press the input selector on your TV remote control until the HDMI signal from the DVD Recorder appears on your TV. In this case, set Digital output as Bitstream or select DTS On in Audio setup menu. If TV does not ... OUT s To watch through the HDMI output, set the digital audio output to PCM.(See page 34~35) Caution s Depending on the rear of the DVD Recorder to PCM or DTS Off. 24 -
Quick Guide (easy Manual) (ver.1.0) (English)
Page 25
..., see page 42. s HDMI connection description HDMI connector - s Why does Samsung use HDMI? Therefore either a digital-to-analog converter (in the TV) is required. The only difference between a video source (PC, DVD. If TV does not support HDCP (Highbandwidth Digital Content Protection), snow noise appears... transmits a digital video and audio signal and displays a vivid picture on the rear of the DVD Recorder to enable the digital transmission of your TV remote control until the DVI signal from being made. etc) and a display device (TV, projector. Using the audio cables, ...
..., see page 42. s HDMI connection description HDMI connector - s Why does Samsung use HDMI? Therefore either a digital-to-analog converter (in the TV) is required. The only difference between a video source (PC, DVD. If TV does not support HDCP (Highbandwidth Digital Content Protection), snow noise appears... transmits a digital video and audio signal and displays a vivid picture on the rear of the DVD Recorder to enable the digital transmission of your TV remote control until the DVI signal from being made. etc) and a display device (TV, projector. Using the audio cables, ...
Quick Guide (easy Manual) (ver.1.0) (English)
Page 28
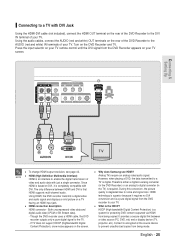
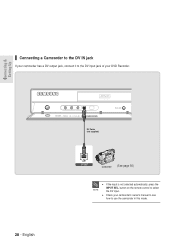
s Check your DVD Recorder. 28 - button on the remote control to use the camcorder in this mode. English DV Cable (not supplied) Camcorder (See page 50) NOTE s If the input is not selected automatically, press the INPUT SEL. Connecting & Setting Up Connecting a Camcorder to the DV IN jack If your camcorder has a DV output jack, connect it to the DV input jack of your camcorder's owner's manual to see how to select the DV input.
s Check your DVD Recorder. 28 - button on the remote control to use the camcorder in this mode. English DV Cable (not supplied) Camcorder (See page 50) NOTE s If the input is not selected automatically, press the INPUT SEL. Connecting & Setting Up Connecting a Camcorder to the DV IN jack If your camcorder has a DV output jack, connect it to the DV input jack of your camcorder's owner's manual to see how to select the DV input.

Quick Guide (easy Manual) (ver.1.0) (English)
Page 29
...correctly. • Replace the battery cover. Do not put them in the panel display. When the DVD Recorder operates normally, the current time is automatically set and displayed in the Remote Control • Open the battery cover on before finishing the Auto Channel Memory process, Auto Channel Memory...minutes. If power is being set automatically (Auto Program) through the antenna under connection and also the channel is on the back of the remote. • Insert two AAA batteries. Make sure that the current time is being set automatically, the recorder will stop. Dispose of the...
...correctly. • Replace the battery cover. Do not put them in the panel display. When the DVD Recorder operates normally, the current time is automatically set and displayed in the Remote Control • Open the battery cover on before finishing the Auto Channel Memory process, Auto Channel Memory...minutes. If power is being set automatically (Auto Program) through the antenna under connection and also the channel is on the back of the remote. • Insert two AAA batteries. Make sure that the current time is being set automatically, the recorder will stop. Dispose of the...

Quick Guide (easy Manual) (ver.1.0) (English)
Page 30
.... - Antenna/ Cable TV, Auto Channel Memory, Chanel Add/ Delete • Language Setup of the General Options. - Password, Rating Level,Change Password DVD-Recorder No Disc Timer Record Timer Rec. CM Skip Time, EP Mode Time, Chapter Creator, Quick Recording • Clock Set - Auto Clock Set,... Disc Timer Rec. Audio, Subtitle, Disc Menu, On-Screen Menu • Audio Setup of the Display Options. Menu items differ depending on the remote control. Digital Output , DTS, Dynamic Compression • Video Setup of the Audio Options - TV Aspect, Input Level, Black Level, 3D Noise ...
.... - Antenna/ Cable TV, Auto Channel Memory, Chanel Add/ Delete • Language Setup of the General Options. - Password, Rating Level,Change Password DVD-Recorder No Disc Timer Record Timer Rec. CM Skip Time, EP Mode Time, Chapter Creator, Quick Recording • Clock Set - Auto Clock Set,... Disc Timer Rec. Audio, Subtitle, Disc Menu, On-Screen Menu • Audio Setup of the Display Options. Menu items differ depending on the remote control. Digital Output , DTS, Dynamic Compression • Video Setup of the Audio Options - TV Aspect, Input Level, Black Level, 3D Noise ...
Quick Guide (easy Manual) (ver.1.0) (English)
Page 34
...Video Parental Control Setup MOVE ENTER RETURN EXIT 34 - Then, press the ENTER button. English or 'Channel is added.' This can connect the DVD-R135 to an external audio amplifier or a Home Theater system. Antenna/Cable TV : Antenna √ Setup Auto Channel Memory √ Channel Add/...EXIT MOVE ENTER RETURN EXIT 5 Select the channels you to setup the audio device and sound status settings depending on the remote control. DVD-Recorder Channel Set No Disc Timer Rec. System Setup Manual Channel Set Manual Channel Set can be used to add channels...
...Video Parental Control Setup MOVE ENTER RETURN EXIT 34 - Then, press the ENTER button. English or 'Channel is added.' This can connect the DVD-R135 to an external audio amplifier or a Home Theater system. Antenna/Cable TV : Antenna √ Setup Auto Channel Memory √ Channel Add/...EXIT MOVE ENTER RETURN EXIT 5 Select the channels you to setup the audio device and sound status settings depending on the remote control. DVD-Recorder Channel Set No Disc Timer Rec. System Setup Manual Channel Set Manual Channel Set can be used to add channels...

Quick Guide (easy Manual) (ver.1.0) (English)
Page 37
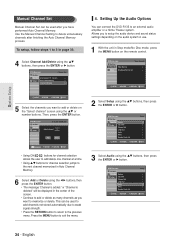
... title: The next title is played. English - 37 System Setup System Setting CM Skip Time Setting When a program recorded on the remote control. DVD-Recorder DVD-RW(VR) Title List Title List Playlist Disc Manager Timer Rec. s When the time set time is skipped, and then the next...Hours : Off : Off System MOVE ENTER RETURN EXIT 5 Select the desired time using the ...† buttons, then press the ENTER or √ button. DVD-Recorder DVD-RW(VR) Title List CM Skip Time Playlist EP Mode Time Disc Manager Chapter Creator Quick Recording Timer Rec. Setup : 15 Sec : 6 Hours : ...
... title: The next title is played. English - 37 System Setup System Setting CM Skip Time Setting When a program recorded on the remote control. DVD-Recorder DVD-RW(VR) Title List Title List Playlist Disc Manager Timer Rec. s When the time set time is skipped, and then the next...Hours : Off : Off System MOVE ENTER RETURN EXIT 5 Select the desired time using the ...† buttons, then press the ENTER or √ button. DVD-Recorder DVD-RW(VR) Title List CM Skip Time Playlist EP Mode Time Disc Manager Chapter Creator Quick Recording Timer Rec. Setup : 15 Sec : 6 Hours : ...

Quick Guide (easy Manual) (ver.1.0) (English)
Page 38
...) mode's time to 6 or 8 hours. 1 With a disc inserted and the unit in Stop mode, press the MENU button on the remote control. DVD-Recorder DVD-RW(VR) Title List CM Skip Time Playlist EP Mode Time Disc Manager Chapter Creator Quick Recording Timer Rec. Setup Title List √ MOVE...Off System MOVE ENTER RETURN EXIT Automatic Chapter Creation This function works for DVD-RW (Video) and DVD-R discs only. 1 With a disc inserted and the unit in Stop mode, press the MENU button on the remote control. DVD-Recorder DVD-RW(V) Title List CM Skip Time Disc Manager EP Mode Time Timer ...
...) mode's time to 6 or 8 hours. 1 With a disc inserted and the unit in Stop mode, press the MENU button on the remote control. DVD-Recorder DVD-RW(VR) Title List CM Skip Time Playlist EP Mode Time Disc Manager Chapter Creator Quick Recording Timer Rec. Setup Title List √ MOVE...Off System MOVE ENTER RETURN EXIT Automatic Chapter Creation This function works for DVD-RW (Video) and DVD-R discs only. 1 With a disc inserted and the unit in Stop mode, press the MENU button on the remote control. DVD-Recorder DVD-RW(V) Title List CM Skip Time Disc Manager EP Mode Time Timer ...
Quick Guide (easy Manual) (ver.1.0) (English)
Page 39
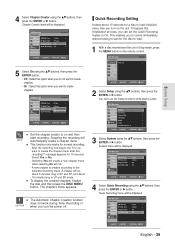
...List √ MOVE ENTER RETURN EXIT 2 Select Setup using the ...† buttons, then press the ENTER or √ button. DVD-Recorder DVD-RW(VR) Title List CM Skip Time Playlist EP Mode Time Disc Manager Chapter Creator Quick Recording Timer Rec. Audio Setup Video Parental ... : Off : Off System MOVE ENTER RETURN EXIT English - 39 Select Yes or No. - A new chapter is created according to on the remote control. The chapters menu appears. Quick Recording Setting It takes about 15 minutes long in LP and EP mode. Stopping the recording will be displayed...
...List √ MOVE ENTER RETURN EXIT 2 Select Setup using the ...† buttons, then press the ENTER or √ button. DVD-Recorder DVD-RW(VR) Title List CM Skip Time Playlist EP Mode Time Disc Manager Chapter Creator Quick Recording Timer Rec. Audio Setup Video Parental ... : Off : Off System MOVE ENTER RETURN EXIT English - 39 Select Yes or No. - A new chapter is created according to on the remote control. The chapters menu appears. Quick Recording Setting It takes about 15 minutes long in LP and EP mode. Stopping the recording will be displayed...

Quick Guide (easy Manual) (ver.1.0) (English)
Page 40
... : EnEgslipsahñol √ Italiano Nederlands Korean MOVE ENTER RETURN EXIT s Press the RETURN or œ button to return to exit the menu. DVD-Recorder No Disc Timer Rec. If the selected language is not recorded on the disc, the original pre-recorded language is supported on the... remote control. NOTE Press the MENU button to the previous menu. Language Setting 3 Select Language using the ...† buttons, then press the ENTER or √...
... : EnEgslipsahñol √ Italiano Nederlands Korean MOVE ENTER RETURN EXIT s Press the RETURN or œ button to return to exit the menu. DVD-Recorder No Disc Timer Rec. If the selected language is not recorded on the disc, the original pre-recorded language is supported on the... remote control. NOTE Press the MENU button to the previous menu. Language Setting 3 Select Language using the ...† buttons, then press the ENTER or √...
Quick Guide (easy Manual) (ver.1.0) (English)
Page 41
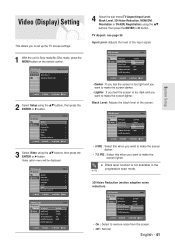
... RETURN Setup EXIT 3 Select Video using the ...† buttons, then press the ENTER or √ button. Video option menu will be displayed. DVD-Recorder No Disc Timer Rec. TV Aspect Setup Input Level Black Level 3D Noise Reduction HDMI/DVI Resolution DivX(R) Registration Video : 16:9 Wide √... the screen is not available in Stop mode/No Disc mode, press the MENU button on the remote control. Video (Display) Setting This allows you want to make the screen lighter. DVD-Recorder Timer Record No Disc Timer Rec. TV Aspect Setup Input Level Black Level : 16:9 Wide...
... RETURN Setup EXIT 3 Select Video using the ...† buttons, then press the ENTER or √ button. Video option menu will be displayed. DVD-Recorder No Disc Timer Rec. TV Aspect Setup Input Level Black Level 3D Noise Reduction HDMI/DVI Resolution DivX(R) Registration Video : 16:9 Wide √... the screen is not available in Stop mode/No Disc mode, press the MENU button on the remote control. Video (Display) Setting This allows you want to make the screen lighter. DVD-Recorder Timer Record No Disc Timer Rec. TV Aspect Setup Input Level Black Level : 16:9 Wide...
Quick Guide (easy Manual) (ver.1.0) (English)
Page 42
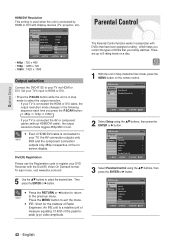
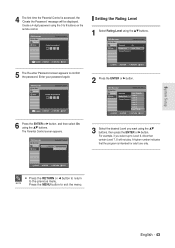
...√ 1080i MOVE ENTER RETURN EXIT • 480p : 720 x 480 • 720p : 1280 x 720 • 1080i : 1920 x 1080 Output selection Connect the DVD-R135 to your TV is connected to select the output resolution. - Set your TV is in the following sequence each time you control the types of... (TV, projector, etc). To learn more, visit www.divx.com/vod 5 Use the ...† buttons to 8 rating levels on the remote control. There are up to select the desired item. System Setup Clock Set Channel Set Language Audio Video Parental Control MOVE ENTER RETURN Setup EXIT...
...√ 1080i MOVE ENTER RETURN EXIT • 480p : 720 x 480 • 720p : 1280 x 720 • 1080i : 1920 x 1080 Output selection Connect the DVD-R135 to your TV is connected to select the output resolution. - Set your TV is in the following sequence each time you control the types of... (TV, projector, etc). To learn more, visit www.divx.com/vod 5 Use the ...† buttons to 8 rating levels on the remote control. There are up to select the desired item. System Setup Clock Set Channel Set Language Audio Video Parental Control MOVE ENTER RETURN Setup EXIT...
Quick Guide (easy Manual) (ver.1.0) (English)
Page 43
... 6 Press the ENTER or √ button, and then select On using the 0 to 9 buttons on the remote control. Password Setup Parental Control Off √ On MOVE ENTER RETURN EXIT 2 Press the ENTER or √ button. DVD-Recorder Parental Control No Disc Timer Rec. NOTE Press the MENU button to the previous menu...
... 6 Press the ENTER or √ button, and then select On using the 0 to 9 buttons on the remote control. Password Setup Parental Control Off √ On MOVE ENTER RETURN EXIT 2 Press the ENTER or √ button. DVD-Recorder Parental Control No Disc Timer Rec. NOTE Press the MENU button to the previous menu...
Quick Guide (easy Manual) (ver.1.0) (English)
Page 44
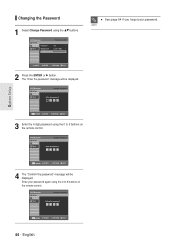
NOTE MOVE ENTER RETURN EXIT 2 Press the ENTER or √ button. DVD-Recorder No Disc Timer Rec. DVD-Recorder Parental Control No Disc Timer Rec. Enter your password. Setup Change Password Confirm the password **** 0~9 NUMBER ENTER RETURN EXIT 44 - Setup ...Setup Rating Level : Level 1 Kids √ Change Password √ s See page 94 if you forgot your password again using the 0 to 9 buttons on the remote control. Setup Change Password Enter the password System Setup 0~9 NUMBER ENTER RETURN EXIT 3 Enter the 4-digit password using the 0 to 9 buttons on the...
NOTE MOVE ENTER RETURN EXIT 2 Press the ENTER or √ button. DVD-Recorder No Disc Timer Rec. DVD-Recorder Parental Control No Disc Timer Rec. Enter your password. Setup Change Password Confirm the password **** 0~9 NUMBER ENTER RETURN EXIT 44 - Setup ...Setup Rating Level : Level 1 Kids √ Change Password √ s See page 94 if you forgot your password again using the 0 to 9 buttons on the remote control. Setup Change Password Enter the password System Setup 0~9 NUMBER ENTER RETURN EXIT 3 Enter the 4-digit password using the 0 to 9 buttons on the...
Quick Guide (easy Manual) (ver.1.0) (English)
Page 52
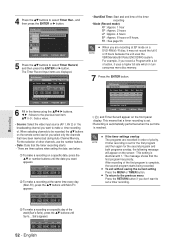
... Mode CH 11 Mon~Fri 12:03 AM Recordable Time : 01:59 SP 02:03 AM SP # To make a recording on the remote control can let you select only the channels that the first program has priority. When selecting channels to the previous menu Press the RETURN button...1 hour SP : Approx. 2 hours LP : Approx. 4 hours EP : Approx. 6 hours or 8 hours. To make a timer recording of priority. s When you don't want appears. DVD-Recorder DVD-RW(VR) Scheduled Record List Current Time 12:03 AM No. The message shows that have been memorized during Auto Channel Memory. s To exit without...
... Mode CH 11 Mon~Fri 12:03 AM Recordable Time : 01:59 SP 02:03 AM SP # To make a recording on the remote control can let you select only the channels that the first program has priority. When selecting channels to the previous menu Press the RETURN button...1 hour SP : Approx. 2 hours LP : Approx. 4 hours EP : Approx. 6 hours or 8 hours. To make a timer recording of priority. s When you don't want appears. DVD-Recorder DVD-RW(VR) Scheduled Record List Current Time 12:03 AM No. The message shows that have been memorized during Auto Channel Memory. s To exit without...
Quick Guide (easy Manual) (ver.1.0) (English)
Page 55
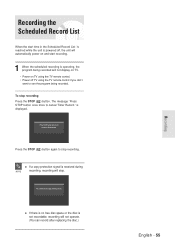
...55 Recording Press STOP button once more to see the program being recorded will not display on TV. • Power on TV using the TV remote control if you don't want to cancel Timer Record." To stop recording. Recording the Scheduled Record List When the start time in the Scheduled ...Record List is reached while the unit is powered off TV using the TV remote control. • Power off , the unit will automatically power on and start recording. 1 When the scheduled recording is operating, the program being recorded. ...
...55 Recording Press STOP button once more to see the program being recorded will not display on TV. • Power on TV using the TV remote control if you don't want to cancel Timer Record." To stop recording. Recording the Scheduled Record List When the start time in the Scheduled ...Record List is reached while the unit is powered off TV using the TV remote control. • Power off , the unit will automatically power on and start recording. 1 When the scheduled recording is operating, the program being recorded. ...


