User Manual (ENGLISH)
Page 1
DVD-P191 DVD Player user manual imagine the possibilities Thank you for purchasing this Samsung product. To receive more complete service, please register your product at www.samsung.com/global/register AK68-01765A(03)
DVD-P191 DVD Player user manual imagine the possibilities Thank you for purchasing this Samsung product. To receive more complete service, please register your product at www.samsung.com/global/register AK68-01765A(03)
User Manual (ENGLISH)
Page 4
...Store vertically. • Keep in a clean protection jacket. The player will operate normally. • Be sure to the Region Management Information. Note: • This unit can affect normal operation of this user manual is AC 120V, 60Hz. In particular, this license for product ...DVD player cannot play the disc. • The product unit accompanying this product unit to encode and/or decode audio files conforming to private non-commercial use by wiping in combination with a soft cloth. 4_ getting started If the Region number of a DVD disc does not correspond to the Region...
...Store vertically. • Keep in a clean protection jacket. The player will operate normally. • Be sure to the Region Management Information. Note: • This unit can affect normal operation of this user manual is AC 120V, 60Hz. In particular, this license for product ...DVD player cannot play the disc. • The product unit accompanying this product unit to encode and/or decode audio files conforming to private non-commercial use by wiping in combination with a soft cloth. 4_ getting started If the Region number of a DVD disc does not correspond to the Region...

User Manual (ENGLISH)
Page 5
● GETTING STARTED Before you start Accessories Remote Control (AK59-00103C) User's Manual (AK68-01765A) Video/Audio Cable (AC39-22017Z & AC39-42001U) Install Batteries in the Remote control 1 Open the battery cover on the back of the batteries. - ...
● GETTING STARTED Before you start Accessories Remote Control (AK59-00103C) User's Manual (AK68-01765A) Video/Audio Cable (AC39-22017Z & AC39-42001U) Install Batteries in the Remote control 1 Open the battery cover on the back of the batteries. - ...
User Manual (ENGLISH)
Page 10
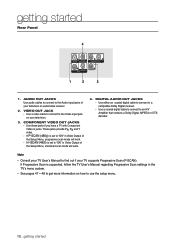
Use a video cable to connect to "ON" in Video Output of your TV User's Manual to a compatible Dolby Digital receiver. - COMPONENT VIDEO OUT JACKS - Use these jacks if you have a TV with Component Video in the TV's menu system. - ... Y video. - getting started Rear Panel 4 1 2 3 1. VIDEO OUT JACK - Consult your television or audio/video receiver 2. If I-SCAN (480i) is supported, follow the TV User's Manual regarding Progressive Scan settings in jacks. Use a coaxial digital cable to connect to "ON" in Video Output of the Setup Menu, progressive scan mode will...
Use a video cable to connect to "ON" in Video Output of your TV User's Manual to a compatible Dolby Digital receiver. - COMPONENT VIDEO OUT JACKS - Use these jacks if you have a TV with Component Video in the TV's menu system. - ... Y video. - getting started Rear Panel 4 1 2 3 1. VIDEO OUT JACK - Consult your television or audio/video receiver 2. If I-SCAN (480i) is supported, follow the TV User's Manual regarding Progressive Scan settings in jacks. Use a coaxial digital cable to connect to "ON" in Video Output of the Setup Menu, progressive scan mode will...
User Manual (ENGLISH)
Page 12
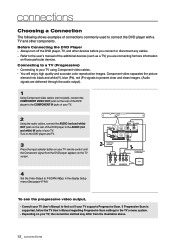
... You will enjoy high quality and accurate color reproduction images. Turn on the DVD player and TV. 3 Press the input selector button on the TV screen. If Progressive Scan is supported, follow the TV User's Manual regarding Progressive Scan settings in the display Setup menu (See pages 47-48) ...To see the progressive video output, - Always turn off the DVD player, TV, and other components. Consult your TV User's Manual to find out if your TV remote control until the Component signal from the illustration above. 12_ connections Before ...
... You will enjoy high quality and accurate color reproduction images. Turn on the DVD player and TV. 3 Press the input selector button on the TV screen. If Progressive Scan is supported, follow the TV User's Manual regarding Progressive Scan settings in the display Setup menu (See pages 47-48) ...To see the progressive video output, - Always turn off the DVD player, TV, and other components. Consult your TV User's Manual to find out if your TV remote control until the Component signal from the illustration above. 12_ connections Before ...
User Manual (ENGLISH)
Page 13
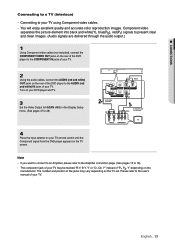
...included) 4 Press the input selector on your TV remote control until the Component signal from the DVD player appears on the rear of your TV. Please refer to a TV (Interlace) - ● CONECTIONS Connecting to the user's manual of your TV. Connecting to the AUDIO (red and white) IN jacks of the... DVD player to your TV. 2 Using the audio cables, connect the AUDIO (red and white) OUT jacks on the TV...
...included) 4 Press the input selector on your TV remote control until the Component signal from the DVD player appears on the rear of your TV. Please refer to a TV (Interlace) - ● CONECTIONS Connecting to the user's manual of your TV. Connecting to the AUDIO (red and white) IN jacks of the... DVD player to your TV. 2 Using the audio cables, connect the AUDIO (red and white) OUT jacks on the TV...
User Manual (ENGLISH)
Page 14
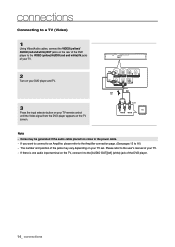
.... 2 Turn on your DVD player and TV. 3 Press the input selector button on your TV remote control until the Video signal from the DVD player appears on the TV screen.... Noise may vary depending on your TV. - Please refer to 16) - connections Connecting to a TV (Video) 1 Using Video/Audio cables, connect the VIDEO (yellow)/ AUDIO (red and white) OUT jacks on the rear of the DVD player... to the [AUDIO OUT][left] (white) jack of the DVD player. 14_ connections If you want to connect to an Amplifier...
.... 2 Turn on your DVD player and TV. 3 Press the input selector button on your TV remote control until the Video signal from the DVD player appears on the TV screen.... Noise may vary depending on your TV. - Please refer to 16) - connections Connecting to a TV (Video) 1 Using Video/Audio cables, connect the VIDEO (yellow)/ AUDIO (red and white) OUT jacks on the rear of the DVD player... to the [AUDIO OUT][left] (white) jack of the DVD player. 14_ connections If you want to connect to an Amplifier...
User Manual (ENGLISH)
Page 15
... COMPONENT jacks of your TV as described on pages 12 to 16. 3 Turn on your DVD player, TV, and Amplifier. 4 Press the input select button of the Amplifier to select the audio input your Amplifier's user manual to set the audio in order to the speakers and your ears. - Please turn the... the Amplifier. The position of the Amplifier. Please set the Amplifier's audio input. Refer to your DVD player is connected to in the menu screen according to the Amplifier.(See pages 45 to the user's manual of jacks may cause damage to hear sound. WHITE RED Audio Cable (Included) RED WHITE 2-Channel...
... COMPONENT jacks of your TV as described on pages 12 to 16. 3 Turn on your DVD player, TV, and Amplifier. 4 Press the input select button of the Amplifier to select the audio input your Amplifier's user manual to set the audio in order to the speakers and your ears. - Please turn the... the Amplifier. The position of the Amplifier. Please set the Amplifier's audio input. Refer to your DVD player is connected to in the menu screen according to the Amplifier.(See pages 45 to the user's manual of jacks may cause damage to hear sound. WHITE RED Audio Cable (Included) RED WHITE 2-Channel...
User Manual (ENGLISH)
Page 16
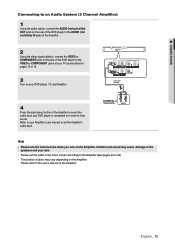
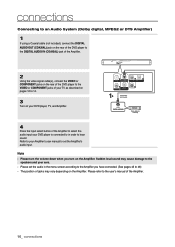
... your TV as described on pages 12 to 14. 3 Turn on your Amplifier's user manual to set the audio in order to hear sound. Please turn on the Amplifier. Refer to your DVD player, TV, and Amplifier. The position of the Amplifier to select the audio input your ears. - Sudden loud ...DIGITAL AUDIO IN (COAXIAL) jack of the Amplifier. 2 Using the video signal cable(s), connect the VIDEO or COMPONENT jacks on the rear of the DVD player to the VIDEO or COMPONENT jacks of the Amplifier. 16_ connections Coaxial Cable (not included) Dolby digital or DTS amp 4 Press the input select button...
... your TV as described on pages 12 to 14. 3 Turn on your Amplifier's user manual to set the audio in order to hear sound. Please turn on the Amplifier. Refer to your DVD player, TV, and Amplifier. The position of the Amplifier to select the audio input your ears. - Sudden loud ...DIGITAL AUDIO IN (COAXIAL) jack of the Amplifier. 2 Using the video signal cable(s), connect the VIDEO or COMPONENT jacks on the rear of the DVD player to the VIDEO or COMPONENT jacks of the Amplifier. 16_ connections Coaxial Cable (not included) Dolby digital or DTS amp 4 Press the input select button...
User Manual (ENGLISH)
Page 48
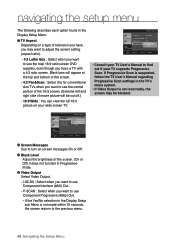
... is not made within 10 seconds, the screen returns to turn on your TV supports Progressive Scan. I -SCAN P-SCAN • Consult your TV User's Manual to find out if your wide screen TV. P-SCAN : Select when you want to use Component Progressive (480p) Out. • If the Yes/No ... the top and bottom of the screen. - 4:3 Pan&Scan : Select this for conventional size TVs when you want to see the total 16:9 ratio screen DVD supplies, even though you have a TV with a 4:3 ratio screen. DISPLAY SETUP TV Aspect : 16:9 Wide Screen Messages : On Black Level : Off Video Output √ ...
... is not made within 10 seconds, the screen returns to turn on your TV supports Progressive Scan. I -SCAN P-SCAN • Consult your TV User's Manual to find out if your wide screen TV. P-SCAN : Select when you want to use Component Progressive (480p) Out. • If the Yes/No ... the top and bottom of the screen. - 4:3 Pan&Scan : Select this for conventional size TVs when you want to see the total 16:9 ratio screen DVD supplies, even though you have a TV with a 4:3 ratio screen. DISPLAY SETUP TV Aspect : 16:9 Wide Screen Messages : On Black Level : Off Video Output √ ...


