
User Manual
Page 2
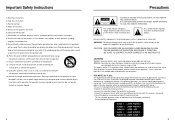
... any ventilation openings, Install in accordance with the manufacturer's instructions. 8) Do not install near any way, such as radios and televisions, use shielded cables and connectors for replacement of the following measures. • Reorient or relocate the receiving antenna. • Increase the separation between the equipment and receiver. • Connect this appliance to qualified service personnel. REFER SERVICING TO QUALIFIED SERVICE PERSONNEL. WARNING...
... any ventilation openings, Install in accordance with the manufacturer's instructions. 8) Do not install near any way, such as radios and televisions, use shielded cables and connectors for replacement of the following measures. • Reorient or relocate the receiving antenna. • Increase the separation between the equipment and receiver. • Connect this appliance to qualified service personnel. REFER SERVICING TO QUALIFIED SERVICE PERSONNEL. WARNING...
User Manual
Page 3
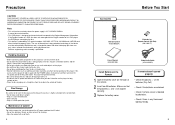
... Before You Start Remote Control (AH59-00092W) Batteries for Remote Control (AA Size) (4301-000117) User's Manual (AK68-00148B) Video/Audio Cable (AC39-42001R) Install Batteries in the Remote 1 Open the battery cover on the player. • Be careful not to put a flower vase filled with the POWER button, or disconnect and then reconnect the AC power cord to use the player for home and other components to this player, be sure to turn them all...
... Before You Start Remote Control (AH59-00092W) Batteries for Remote Control (AA Size) (4301-000117) User's Manual (AK68-00148B) Video/Audio Cable (AC39-42001R) Install Batteries in the Remote 1 Open the battery cover on the player. • Be careful not to put a flower vase filled with the POWER button, or disconnect and then reconnect the AC power cord to use the player for home and other components to this player, be sure to turn them all...
User Manual
Page 4
... Aspect Ratio (EZ View 24 Slow Repeat play...26 Selecting the Audio Language 27 Selecting the Subtitle Language 28 Changing the Camera Angle 29 Using the Instant Replay/Skip Function 30 Using the Bookmark Function 31 Using the Zoom & 3D Sound Functions 32 MP3/WMA Play ...33 Program Play & Random Play 35 Picture CD Playback 36 Changing Setup menu Using the Setup Menu 38 Setting Up the Language Features 39 Setting Up the Audio Options 41 Setting Up the Display Options 42 Setting Up the Parental Control 44 Reference Troubleshooting ...45 Specifications...
... Aspect Ratio (EZ View 24 Slow Repeat play...26 Selecting the Audio Language 27 Selecting the Subtitle Language 28 Changing the Camera Angle 29 Using the Instant Replay/Skip Function 30 Using the Bookmark Function 31 Using the Zoom & 3D Sound Functions 32 MP3/WMA Play ...33 Program Play & Random Play 35 Picture CD Playback 36 Changing Setup menu Using the Setup Menu 38 Setting Up the Language Features 39 Setting Up the Audio Options 41 Setting Up the Display Options 42 Setting Up the Parental Control 44 Reference Troubleshooting ...45 Specifications...
User Manual
Page 5
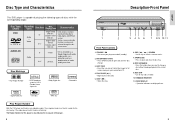
... close the disc changer. 3. REMOCON RECEIVER 11. SKIP ( / ) / SEARCH • Use to Double-sided Dolby Digital and MPEG-2 480 min. The Region Number for the disc to turn your conventional TV. 4. Playing Time Characteristics Single-sided • DVD contains excellent 5" 240 min. STANDBY / ON • Use to play . 5. system. OPEN/CLOSE • Press to full screen viewing on your player on - 160 min. STOP ( ) • Stops disc play . functions can convert Letter Box images to open and close the disc tray...
... close the disc changer. 3. REMOCON RECEIVER 11. SKIP ( / ) / SEARCH • Use to Double-sided Dolby Digital and MPEG-2 480 min. The Region Number for the disc to turn your conventional TV. 4. Playing Time Characteristics Single-sided • DVD contains excellent 5" 240 min. STANDBY / ON • Use to play . 5. system. OPEN/CLOSE • Press to full screen viewing on your player on - 160 min. STOP ( ) • Stops disc play . functions can convert Letter Box images to open and close the disc tray...
User Manual
Page 6
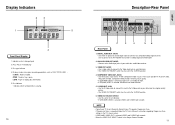
...5 4 Front Panel Display 1. VIDEO OUT SELECT SWITCH • Use this jack to the S-VIDEO position. 4. NOTE • Consult your TV User's Manual to the Audio input jacks of your TV supports Progressive Scan. Along with Component Video in the Stop or Power Off mode. 11 SETUP These jacks provide Pr, Pb and Y video. Indicates a disc is playing. 10 Description-Rear Panel 525P (480P) 525i (480i) S-VIDEO 1 2 3 4 56 Rear Panel 1. Play / Pause / Forward play 3. no DISC : No disc loaded. LOAD : Player is selected, VIDEO and S-VIDEO will work . ANALOG AUDIO OUT...
...5 4 Front Panel Display 1. VIDEO OUT SELECT SWITCH • Use this jack to the S-VIDEO position. 4. NOTE • Consult your TV User's Manual to the Audio input jacks of your TV supports Progressive Scan. Along with Component Video in the Stop or Power Off mode. 11 SETUP These jacks provide Pr, Pb and Y video. Indicates a disc is playing. 10 Description-Rear Panel 525P (480P) 525i (480i) S-VIDEO 1 2 3 4 56 Rear Panel 1. Play / Pause / Forward play 3. no DISC : No disc loaded. LOAD : Player is selected, VIDEO and S-VIDEO will work . ANALOG AUDIO OUT...
User Manual
Page 7
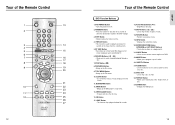
.... REPEAT Button • Allows you to full screen viewing on or off. 2. I .SKIP Button • This function skips playback ahead 10 seconds. 16. STOP Button ( ) 8. OPEN/CLOSE Button • To open and close the disc tray. 14. 3D Button 15. INFO Button • Displays the current disc mode. 20. SUBTITLE Button 24. EZ VIEW Button • Easy View can convert Letter Box images to search forward/backward through a disc. 7. RETURN Button • Returns to program a specific order. 23. ANGLE Button • Use to skip a disc...
.... REPEAT Button • Allows you to full screen viewing on or off. 2. I .SKIP Button • This function skips playback ahead 10 seconds. 16. STOP Button ( ) 8. OPEN/CLOSE Button • To open and close the disc tray. 14. 3D Button 15. INFO Button • Displays the current disc mode. 20. SUBTITLE Button 24. EZ VIEW Button • Easy View can convert Letter Box images to search forward/backward through a disc. 7. RETURN Button • Returns to program a specific order. 23. ANGLE Button • Use to skip a disc...
User Manual
Page 8
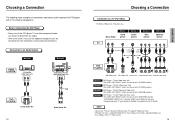
... components before you connect or disconnect any cables. • Refer to the owner's manual of connections commonly used to connect the DVD player with Progressive Scan Jacks. (The VIDEO OUT SELECT switch must be set to the 525P(480P) position). • If 525P(480P) VIDEO OUT is supported, follow the TV User's Manual's instructions regarding Progressive Scan settings in the TV's menu system. 15 CONNECTIONS If Progressive Scan is selected, VIDEO and S-VIDEO will not work. • Depending on those particular components. Choosing a Connection...
... components before you connect or disconnect any cables. • Refer to the owner's manual of connections commonly used to connect the DVD player with Progressive Scan Jacks. (The VIDEO OUT SELECT switch must be set to the 525P(480P) position). • If 525P(480P) VIDEO OUT is supported, follow the TV User's Manual's instructions regarding Progressive Scan settings in the TV's menu system. 15 CONNECTIONS If Progressive Scan is selected, VIDEO and S-VIDEO will not work. • Depending on those particular components. Choosing a Connection...
User Manual
Page 9
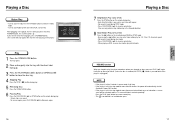
... repeatedly. Screen stops, no sound. - BASIC FUNCTIONS Playing a Disc Before Play • Turn on your TV and press the TV/VIDEO button to close the disc tray. 4 Stopping Play Press the STOP ( ) button during play. 5 Removing Disc Press the OPEN/CLOSE button. 6 Pausing Play Press the PLAY/PAUSE ( ) or STEP button on the remote during play will appear. - The tray opens. 2 Place a disc gently into the tray with the disc's label facing up. 3 Press the PLAY/PAUSE ( ) button or OPEN/CLOSE button to select the video mode. • Turn on your Audio System and select...
... repeatedly. Screen stops, no sound. - BASIC FUNCTIONS Playing a Disc Before Play • Turn on your TV and press the TV/VIDEO button to close the disc tray. 4 Stopping Play Press the STOP ( ) button during play. 5 Removing Disc Press the OPEN/CLOSE button. 6 Pausing Play Press the PLAY/PAUSE ( ) or STEP button on the remote during play will appear. - The tray opens. 2 Place a disc gently into the tray with the disc's label facing up. 3 Press the PLAY/PAUSE ( ) button or OPEN/CLOSE button to select the video mode. • Turn on your Audio System and select...

User Manual
Page 10
... DISC EXCHANGE, OPEN/CLOSE button on the DVD, CD. One more press makes it moves to the beginning of the player to turn the platter to another disc currently in the disc platter. 1 While in the play or stop mode, press the DISC SKIP button. The tray opens with fast disc changes. Using the DISC SKIP function Use the Disc Skip function to change to the other two slots. Disc Exchange Using the Search & Skip Functions During play, you to load or change discs...
... DISC EXCHANGE, OPEN/CLOSE button on the DVD, CD. One more press makes it moves to the beginning of the player to turn the platter to another disc currently in the disc platter. 1 While in the play or stop mode, press the DISC SKIP button. The tray opens with fast disc changes. Using the DISC SKIP function Use the Disc Skip function to change to the other two slots. Disc Exchange Using the Search & Skip Functions During play, you to load or change discs...
User Manual
Page 11
... use the number buttons of the remote control to directly access a title, chapter or to the subtitle languages available in the disc. • You can have up to 32 different subtitles. Each Title on the remote. 2 Select Disc Menu using the UP/DOWN buttons, then press the RIGHT or ENTER button. A DVD may not work. • Title Menu will be identified. A DVD disc can quickly find a specific passage. NOTE What is played in the disc. Allows playback...
... use the number buttons of the remote control to directly access a title, chapter or to the subtitle languages available in the disc. • You can have up to 32 different subtitles. Each Title on the remote. 2 Select Disc Menu using the UP/DOWN buttons, then press the RIGHT or ENTER button. A DVD may not work. • Title Menu will be identified. A DVD disc can quickly find a specific passage. NOTE What is played in the disc. Allows playback...
User Manual
Page 12
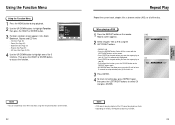
.... 2 Select Chapter, Title or A-B using their respective buttons on the remote. 22 NOTE • DVD repeats play by chapter or title, CD repeat play by disc or track. • Depending on the disc, the Repeat function may not work. 23 Select A-B on screen with the LEFT/RIGHT buttons on the remote. When playing a DVD 1 Press the REPEAT button on the remote. • Press ENTER at least 5 seconds has elapsed after point (A) has been set...
.... 2 Select Chapter, Title or A-B using their respective buttons on the remote. 22 NOTE • DVD repeats play by chapter or title, CD repeat play by disc or track. • Depending on the disc, the Repeat function may not work. 23 Select A-B on screen with the LEFT/RIGHT buttons on the remote. When playing a DVD 1 Press the REPEAT button on the remote. • Press ENTER at least 5 seconds has elapsed after point (A) has been set...
User Manual
Page 13
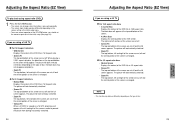
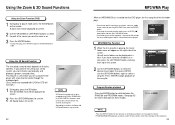
... disc, the black bars may behave differently depending on the type of disc. 25 ADVANCED FUNCTIONS Adjusting the Aspect Ratio (EZ View) To play back using aspect ratio (DVD) 1 Press the EZ VIEW button. • The screen size changes when the button is pressed repeatedly. • The screen zoom mode operates differently depending on the screen setting in the initial setup menu. • To ensure correct operation of the EZ VIEW button, you are using a 16:9 TV For 16:9 aspect ratio discs • Wide Screen Displays...
... disc, the black bars may behave differently depending on the type of disc. 25 ADVANCED FUNCTIONS Adjusting the Aspect Ratio (EZ View) To play back using aspect ratio (DVD) 1 Press the EZ VIEW button. • The screen size changes when the button is pressed repeatedly. • The screen zoom mode operates differently depending on the screen setting in the initial setup menu. • To ensure correct operation of the EZ VIEW button, you are using a 16:9 TV For 16:9 aspect ratio discs • Wide Screen Displays...
User Manual
Page 14
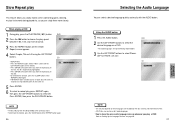
... the play speed between 1/8X, 1/4X, and 1/2X of normal. 3 Press the REPEAT button on page 40. 27 ADVANCED FUNCTIONS Refer to set point (B) until at the point where you can study them more closely. Using the AUDIO button 1 Press the AUDIO button. 2 Use the LEFT/RIGHT buttons to select the desired language on the disc and may not work with all DVDs. • A DVD disc can contain up to 8 audio languages...
... the play speed between 1/8X, 1/4X, and 1/2X of normal. 3 Press the REPEAT button on page 40. 27 ADVANCED FUNCTIONS Refer to set point (B) until at the point where you can study them more closely. Using the AUDIO button 1 Press the AUDIO button. 2 Use the LEFT/RIGHT buttons to select the desired language on the disc and may not work with all DVDs. • A DVD disc can contain up to 8 audio languages...
User Manual
Page 17
... on discs recorded using the DVD player with a two channel stereo through the analog outputs. (Discs which are recorded with LPCM or DTS will be displayed on screen. 2 Use the UP/DOWN or LEFT/RIGHT buttons to 8 music folders can enhance sound quality and produce a greater surround effect. MP3/WMA Play Function 1 When the first song file is pressed for more than two types of these modes. Up to select the part...
... on discs recorded using the DVD player with a two channel stereo through the analog outputs. (Discs which are recorded with LPCM or DTS will be displayed on screen. 2 Use the UP/DOWN or LEFT/RIGHT buttons to 8 music folders can enhance sound quality and produce a greater surround effect. MP3/WMA Play Function 1 When the first song file is pressed for more than two types of these modes. Up to select the part...
User Manual
Page 18
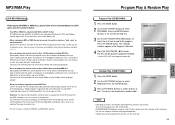
.... The disc(s) will be used . • When naming your title, make sure that the DVD player will not be ISO 9660 or JOLIET format. However, choosing higher rates, like 192 Kbps or more than two types of file extensions. • This unit can support a maximum of 99 programmed orders. • Random play , press the CLEAR button. • PROGRAM/RANDOM playback cannot be read the files). •...
.... The disc(s) will be used . • When naming your title, make sure that the DVD player will not be ISO 9660 or JOLIET format. However, choosing higher rates, like 192 Kbps or more than two types of file extensions. • This unit can support a maximum of 99 programmed orders. • Random play , press the CLEAR button. • PROGRAM/RANDOM playback cannot be read the files). •...
User Manual
Page 19
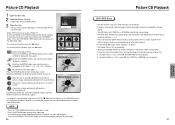
... pressed for 10 seconds, the menu will be played. 37 ADVANCED FUNCTIONS Load the disc with JPEG files in 300 folders can be stored on the remote controller is over 300, only JPEG files in ISO 9660 or Joliet format can be played. • The name of the JPEG file may not be longer than the manual suggests. Picture CD Playback 1 Open the disc tray. 2 Load the disc on the tray. -
... pressed for 10 seconds, the menu will be played. 37 ADVANCED FUNCTIONS Load the disc with JPEG files in 300 folders can be stored on the remote controller is over 300, only JPEG files in ISO 9660 or Joliet format can be played. • The name of the JPEG file may not be longer than the manual suggests. Picture CD Playback 1 Open the disc tray. 2 Load the disc on the tray. -
User Manual
Page 20
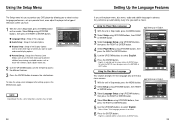
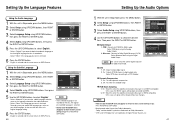
... display options. DVD Disc Menu Title Menu Function Setup To make the SETUP menu disappear, press the RETURN or LEFT button. LANGUAGE SETUP 4 Select Player Menu using UP/DOWN buttons, then RIGHT or ENTER button. Player Menu PLAYER MENU LANGUAGE English Français Deutsch Español Italiano Nederlands Using the Disc Menu Language This function changes the text language only on the remote. Using the Setup Menu The Setup menu lets you customize your DVD player by allowing you to select various language preferences, set up a parental level, even adjust the player to the type...
... display options. DVD Disc Menu Title Menu Function Setup To make the SETUP menu disappear, press the RETURN or LEFT button. LANGUAGE SETUP 4 Select Player Menu using UP/DOWN buttons, then RIGHT or ENTER button. Player Menu PLAYER MENU LANGUAGE English Français Deutsch Español Italiano Nederlands Using the Disc Menu Language This function changes the text language only on the remote. Using the Setup Menu The Setup menu lets you customize your DVD player by allowing you to select various language preferences, set up a parental level, even adjust the player to the type...
User Manual
Page 21
... to select 'English'. - Press RETURN or LEFT button. 40 Setting Up the Audio Options 1 With the unit in Stop mode, press the MENU button. 2 Select Setup using UP/DOWN buttons, then press the RIGHT or ENTER button. 5 Press the UP/DOWN buttons to menu screen during set up ; PCM : Converts to a DTS Decoder. Bitstream : Converts to the player is recorded in. - Off : Doesn't output digital signal. 2. PCM Down Sampling 1. In this when the amplifier connected to Dolby Digital...
... to select 'English'. - Press RETURN or LEFT button. 40 Setting Up the Audio Options 1 With the unit in Stop mode, press the MENU button. 2 Select Setup using UP/DOWN buttons, then press the RIGHT or ENTER button. 5 Press the UP/DOWN buttons to menu screen during set up ; PCM : Converts to a DTS Decoder. Bitstream : Converts to the player is recorded in. - Off : Doesn't output digital signal. 2. PCM Down Sampling 1. In this when the amplifier connected to Dolby Digital...
User Manual
Page 23
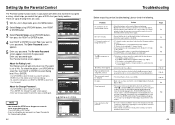
... Parental Control The Parental Control function works in the remote. The Enter Password screen appears. Use Password PARENTAL SETUP : No 5 Enter your family watches. To cancel the rating level, use RIGHT or ENTER to select No in Stop mode, press the MENU button. 2 Select Setup using UP/DOWN buttons, then RIGHT or ENTER button. 3 Select Parental Setup using UP/DOWN buttons, then press the RIGHT or ENTER button. 4 Use RIGHT or ENTER to select Yes if you control the types of no disc in the Troubleshooting Guide...
... Parental Control The Parental Control function works in the remote. The Enter Password screen appears. Use Password PARENTAL SETUP : No 5 Enter your family watches. To cancel the rating level, use RIGHT or ENTER to select No in Stop mode, press the MENU button. 2 Select Setup using UP/DOWN buttons, then RIGHT or ENTER button. 3 Select Parental Setup using UP/DOWN buttons, then press the RIGHT or ENTER button. 4 Use RIGHT or ENTER to select Yes if you control the types of no disc in the Troubleshooting Guide...
User Manual
Page 24
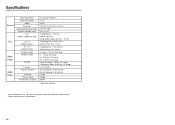
Play Time (Single Sided, Single Layer Disc) : 135 min. Reading Speed : 3.9 to 75 % Reading Speed : 11.45 ft/sec. Maximum Play Time : 74 min. Specifications General Disc Video Output Audio Output Power Requirements Power Consumption Weight Dimensions Operating Temperature Range Operating Humidity Range DVD (DIGITAL VERSATILE DISC) CD : 5" (COMPACT DISC) CD : 31/2" (COMPACT DISC) Composite Video Component Video S-VIDEO 2 Channel *Frequency Response *S/N Ratio *Dynamic Range *Total Harmonic Distortion AC 110-240 V, 50/60 Hz 12 W 9.5 lbs (W) 16.9 in x (D) 15...
Play Time (Single Sided, Single Layer Disc) : 135 min. Reading Speed : 3.9 to 75 % Reading Speed : 11.45 ft/sec. Maximum Play Time : 74 min. Specifications General Disc Video Output Audio Output Power Requirements Power Consumption Weight Dimensions Operating Temperature Range Operating Humidity Range DVD (DIGITAL VERSATILE DISC) CD : 5" (COMPACT DISC) CD : 31/2" (COMPACT DISC) Composite Video Component Video S-VIDEO 2 Channel *Frequency Response *S/N Ratio *Dynamic Range *Total Harmonic Distortion AC 110-240 V, 50/60 Hz 12 W 9.5 lbs (W) 16.9 in x (D) 15...


