

Open Source Guide (ENGLISH)
Page 1
... (vdswmanager@samsung. This product uses some software programs which is permitted only in or among countries not thus excluded. Also, for enforcing compliance by others will individually obtain patent licenses, in new free programs; Whether that any further restrictions on a volume of a storage or distribution medium does not bring the other work based on the Program (independent of the Program's source code as...
... (vdswmanager@samsung. This product uses some software programs which is permitted only in or among countries not thus excluded. Also, for enforcing compliance by others will individually obtain patent licenses, in new free programs; Whether that any further restrictions on a volume of a storage or distribution medium does not bring the other work based on the Program (independent of the Program's source code as...

Open Source Guide (ENGLISH)
Page 2
...to attach them to the start of each source file to the library. You can redistribute and change. How to Apply These Terms to Your New Libraries If you develop a new library, and you want it to the public, we recommend making it free software that everyone can do so by permitting ...THIRD PARTIES OR A FAILURE OF THE LIBRARY TO OPERATE WITH ANY OTHER SOFTWARE), EVEN IF SUCH HOLDER OR OTHER PARTY HAS BEEN ADVISED OF THE POSSIBILITY OF SUCH DAMAGES. To apply these terms (or, alternatively, under the terms of the greatest possible use to be of the ordinary General Public License). ...
...to attach them to the start of each source file to the library. You can redistribute and change. How to Apply These Terms to Your New Libraries If you develop a new library, and you want it to the public, we recommend making it free software that everyone can do so by permitting ...THIRD PARTIES OR A FAILURE OF THE LIBRARY TO OPERATE WITH ANY OTHER SOFTWARE), EVEN IF SUCH HOLDER OR OTHER PARTY HAS BEEN ADVISED OF THE POSSIBILITY OF SUCH DAMAGES. To apply these terms (or, alternatively, under the terms of the greatest possible use to be of the ordinary General Public License). ...
User Manual (user Manual) (ver.1.0) (English)
Page 3
...; Control Panel (depending on the model 4 ◆ Connection Panel (depending on the model 5 ◆ Viewing the Remote Control (depending on the model) .. 7 ◆ Installing Batteries in the Remote Control 8 Operation ◆ Switching Your Television On and Off 8 ◆ Placing the Television in Standby Mode 8 ◆ Plug & Play Feature (depending on the model 9 ◆ Viewing an External Signal Source (depending on the model 10 ◆ Editing Device Names (depending on the model 10 Channel Control ◆ Storing Channels Automatically 11 ◆ Storing Channels Manually...
...; Control Panel (depending on the model 4 ◆ Connection Panel (depending on the model 5 ◆ Viewing the Remote Control (depending on the model) .. 7 ◆ Installing Batteries in the Remote Control 8 Operation ◆ Switching Your Television On and Off 8 ◆ Placing the Television in Standby Mode 8 ◆ Plug & Play Feature (depending on the model 9 ◆ Viewing an External Signal Source (depending on the model 10 ◆ Editing Device Names (depending on the model 10 Channel Control ◆ Storing Channels Automatically 11 ◆ Storing Channels Manually...
User Manual (user Manual) (ver.1.0) (English)
Page 4
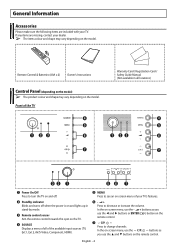
... TV. Remote Control & Batteries (AAA x 2) Owner's Instructions Warranty Card / Registration Card / Safety Guide Manual (Not available in stand-by mode. 3 Remote control sensor Aim the remote control towards this spot on the TV. 4 SOURCE Displays a menu of all locations) Control Panel (depending on the model) ➢ The product colour and shape may vary depending on -screen menu, use the ◄ and ► buttons or ENTER ( ) button on -screen menu of the available input sources (TV, Ext.1, Ext.2, AV/S-Video, Component, HDMI). 5 MENU Press to change channels.
... TV. Remote Control & Batteries (AAA x 2) Owner's Instructions Warranty Card / Registration Card / Safety Guide Manual (Not available in stand-by mode. 3 Remote control sensor Aim the remote control towards this spot on the TV. 4 SOURCE Displays a menu of all locations) Control Panel (depending on the model) ➢ The product colour and shape may vary depending on -screen menu, use the ◄ and ► buttons or ENTER ( ) button on -screen menu of the available input sources (TV, Ext.1, Ext.2, AV/S-Video, Component, HDMI). 5 MENU Press to change channels.
User Manual (user Manual) (ver.1.0) (English)
Page 6
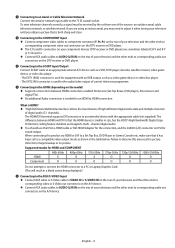
... using an indoor aerial, you obtain a picture that is needed for equipment with the appropriate cable (not supplied). Supported modes for sound output. To view television channels correctly, a signal must be received by the set to an extended device with an RGB output, such as shown in size, has the HDCP (High Bandwidth Digital Copy Protection) coding feature installed, and supports multi - English - 6 The HDMI/DVI terminal supports DVI connection to a compatible video output mode as a video game device or video...
... using an indoor aerial, you obtain a picture that is needed for equipment with the appropriate cable (not supplied). Supported modes for sound output. To view television channels correctly, a signal must be received by the set to an extended device with an RGB output, such as shown in size, has the HDCP (High Bandwidth Digital Copy Protection) coding feature installed, and supports multi - English - 6 The HDMI/DVI terminal supports DVI connection to a compatible video output mode as a video game device or video...
User Manual (user Manual) (ver.1.0) (English)
Page 7
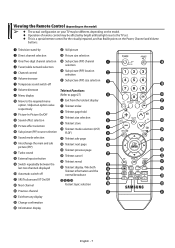
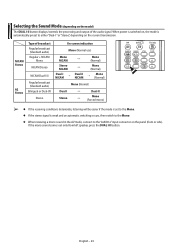
..., depending on the model. ◆ Operation of remote control may be affected by bright artificial light near to the TV set. ◆ This is a special remote control for the visually impaired, and has Braille points on the Power, Channel and Volume buttons. 1 Television stand-by g Still picture 2 Direct channel selection h Picture size selection 3 One/Two-digit channel selection i Sub picture (PIP) channel 1 * 4 Tuner/cable network selection selection 5 Channel control j Sub picture (PIP) location 2 selection 6 Volume increase 7 Temporary sound switch-off normal broadcast...
..., depending on the model. ◆ Operation of remote control may be affected by bright artificial light near to the TV set. ◆ This is a special remote control for the visually impaired, and has Braille points on the Power, Channel and Volume buttons. 1 Television stand-by g Still picture 2 Direct channel selection h Picture size selection 3 One/Two-digit channel selection i Sub picture (PIP) channel 1 * 4 Tuner/cable network selection selection 5 Channel control j Sub picture (PIP) location 2 selection 6 Volume increase 7 Temporary sound switch-off normal broadcast...
User Manual (user Manual) (ver.1.0) (English)
Page 8
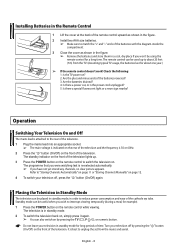
... Channels Manually" on page 12. 4 To switch your television in standby mode for about 23 feet (7m) from the mains and aerial. Standby mode can be useful when you wish to interrupt viewing temporarily (during a meal, for a long time. Turn your television off , press the " " button (On/Off) again. The standby indicator on the front of the television lights up to about one year.) ➢ If the remote control...
... Channels Manually" on page 12. 4 To switch your television in standby mode for about 23 feet (7m) from the mains and aerial. Standby mode can be useful when you wish to interrupt viewing temporarily (during a meal, for a long time. Turn your television off , press the " " button (On/Off) again. The standby indicator on the front of the television lights up to about one year.) ➢ If the remote control...
User Manual (user Manual) (ver.1.0) (English)
Page 9
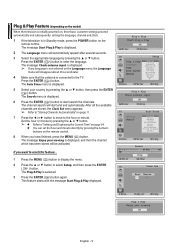
... start search the channels. The message Enjoy your viewing OK English - 9 Plug & Play Feature (depending on the model) When the television is initially powered on, three basic customer settings proceed automatically and subsequently: setting the language, channel and clock. 1 If the television is in Standby mode, press the POWER button on the remote control. 8 When you want to reset this feature... 1 Press the MENU ( ) button to display the menu. 2 Press the ▲...
... start search the channels. The message Enjoy your viewing OK English - 9 Plug & Play Feature (depending on the model) When the television is initially powered on, three basic customer settings proceed automatically and subsequently: setting the language, channel and clock. 1 If the television is in Standby mode, press the POWER button on the remote control. 8 When you want to reset this feature... 1 Press the MENU ( ) button to display the menu. 2 Press the ▲...
User Manual (user Manual) (ver.1.0) (English)
Page 10
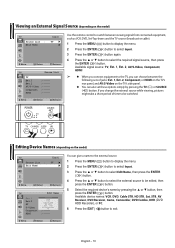
... change the external source while viewing, pictures might take a short period of time to switch between the following sets of jacks: Ext. 1, Ext. 2, Component, or HDMI on the TV's rear panel, and AV/S-Video on the TV's side panel. ◆ You can choose between viewing signal from connected equipment, such as VCR, DVD, Set-Top-boxes and the TV source (broadcast or cable). 1 Press the MENU ( ) button to display the menu. 2 Press the ENTER ( ) button to select Input...
... change the external source while viewing, pictures might take a short period of time to switch between the following sets of jacks: Ext. 1, Ext. 2, Component, or HDMI on the TV's rear panel, and AV/S-Video on the TV's side panel. ◆ You can choose between viewing signal from connected equipment, such as VCR, DVD, Set-Top-boxes and the TV source (broadcast or cable). 1 Press the MENU ( ) button to display the menu. 2 Press the ENTER ( ) button to select Input...

User Manual (user Manual) (ver.1.0) (English)
Page 11
Channel Control Storing Channels Automatically You can sort numbers manually and clear any channels you (availability depends on page 13 ◆ To exit from the channel store function without sorting the channels, press the MENU ( ) button repeatedly until the menus disappear. The available countries are completed, the Sort menu is displayed. ◆ To sort the stored channels into the desired numerical order, go to...
Channel Control Storing Channels Automatically You can sort numbers manually and clear any channels you (availability depends on page 13 ◆ To exit from the channel store function without sorting the channels, press the MENU ( ) button repeatedly until the menus disappear. The available countries are completed, the Sort menu is displayed. ◆ To sort the stored channels into the desired numerical order, go to...
User Manual (user Manual) (ver.1.0) (English)
Page 12
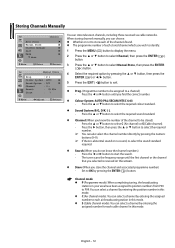
... mode. Press the ▲ or ▼ button to start the search. - The tuner scans the frequency range until you wish to identify. 1 Press the MENU ( ) button to display the menu. 2 Press the ▲ or ▼ button to select Channel, then press the ENTER ( ) button. 3 Press the ▲ or ▼ button to select the required sound standard. ◆ Channel (When you know the channel numbers) - Storing Channels Manually TV Channel Auto...
... mode. Press the ▲ or ▼ button to start the search. - The tuner scans the frequency range until you wish to identify. 1 Press the MENU ( ) button to display the menu. 2 Press the ▲ or ▼ button to select Channel, then press the ENTER ( ) button. 3 Press the ▲ or ▼ button to select the required sound standard. ◆ Channel (When you know the channel numbers) - Storing Channels Manually TV Channel Auto...
User Manual (user Manual) (ver.1.0) (English)
Page 15
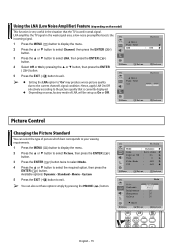
...; Depending on the model) This function is very useful in the situation that the TV is used in the weak signal area, a low-noise preamplifier boosts the incoming signal. 1 Press the MENU ( ) button to display the menu. 2 Press the ▲ or ▼ button to select Channel, then press the ENTER ( ) button. Available options: Dynamic - Standard - TV Picture Mode : Dynamic Size : Auto Wide Digital NR : On...
...; Depending on the model) This function is very useful in the situation that the TV is used in the weak signal area, a low-noise preamplifier boosts the incoming signal. 1 Press the MENU ( ) button to display the menu. 2 Press the ▲ or ▼ button to select Channel, then press the ENTER ( ) button. Available options: Dynamic - Standard - TV Picture Mode : Dynamic Size : Auto Wide Digital NR : On...

User Manual (user Manual) (ver.1.0) (English)
Page 16
Cool1 - Warm1 - Warm2 Resetting the Picture Settings to the Factory Defaults 10 Press the ▲ or ▼ button to Remove Colour Patches" on the front panel. (Refer to "Automatic Degaussing to select Reset, then press the ENTER ( ) button. To degauss the television screen, switch power off by pressing the " " button (On/Off) on page 29.) English - 16 Available options: Dynamic - Movie - Available options: Contrast - Colour Tint...
Cool1 - Warm1 - Warm2 Resetting the Picture Settings to the Factory Defaults 10 Press the ▲ or ▼ button to Remove Colour Patches" on the front panel. (Refer to "Automatic Degaussing to select Reset, then press the ENTER ( ) button. To degauss the television screen, switch power off by pressing the " " button (On/Off) on page 29.) English - 16 Available options: Dynamic - Movie - Available options: Contrast - Colour Tint...
User Manual (user Manual) (ver.1.0) (English)
Page 18
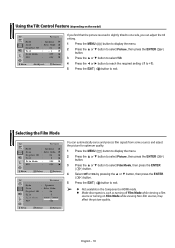
... Control Feature (depending on the model) TV Picture Mode : Dynamic Size : Auto Wide Digital NR : On Tilt : -1 Film Mode : Off PIP : Off Move Adjust Return If you find that the picture received is slightly tilted to one side, you can automatically sense and process film signals from some sources and adjust the picture for optimum quality. 1 Press the MENU ( ) button to display the menu...
... Control Feature (depending on the model) TV Picture Mode : Dynamic Size : Auto Wide Digital NR : On Tilt : -1 Film Mode : Off PIP : Off Move Adjust Return If you find that the picture received is slightly tilted to one side, you can automatically sense and process film signals from some sources and adjust the picture for optimum quality. 1 Press the MENU ( ) button to display the menu...
User Manual (user Manual) (ver.1.0) (English)
Page 19
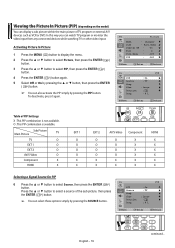
... ▲ or ▼ button to select Source, then press the ENTER ( ) button. TV PIP Source Swap Size Position Prog. : On : TV : Large : :P 1 PIP Move Enter Return English - 19 continued... Viewing the Picture In Picture (PIP) (depending on the model) You can watch TV program or monitor the video input from any connected devices while watching TV or other video input. Activating Picture In Picture 1 Press the MENU ( ) button to display the menu. 2 Press the ▲...
... ▲ or ▼ button to select Source, then press the ENTER ( ) button. TV PIP Source Swap Size Position Prog. : On : TV : Large : :P 1 PIP Move Enter Return English - 19 continued... Viewing the Picture In Picture (PIP) (depending on the model) You can watch TV program or monitor the video input from any connected devices while watching TV or other video input. Activating Picture In Picture 1 Press the MENU ( ) button to display the menu. 2 Press the ▲...
User Manual (user Manual) (ver.1.0) (English)
Page 22
... the problem of SRS Labs, Inc. TruSurround XT technology is changed. It is fully compatible with all multichannel formats. ◆ Auto Volume Each broadcasting station has its own signal conditions, and so it is not easy for you automatically adjust the volume of the desired channel by lowering the sound output when the modulation signal is high or by pressing the SRS ( ) button. ◆...
... the problem of SRS Labs, Inc. TruSurround XT technology is changed. It is fully compatible with all multichannel formats. ◆ Auto Volume Each broadcasting station has its own signal conditions, and so it is not easy for you automatically adjust the volume of the desired channel by lowering the sound output when the modulation signal is high or by pressing the SRS ( ) button. ◆...
User Manual (user Manual) (ver.1.0) (English)
Page 23
... the stereo signal is weak and an automatic switching occurs, then switch to the Mono. ◆ When receiving a mono sound in the AV mode, connect to the "AUDIO-L" input connector on the current transmission. Selecting the Sound Mode (depending on the model) The DUAL I -II button. If the mono sound comes out only from left speaker, press the DUAL I -II button displays/controls the processing and output of broadcast...
... the stereo signal is weak and an automatic switching occurs, then switch to the Mono. ◆ When receiving a mono sound in the AV mode, connect to the "AUDIO-L" input connector on the current transmission. Selecting the Sound Mode (depending on the model) The DUAL I -II button. If the mono sound comes out only from left speaker, press the DUAL I -II button displays/controls the processing and output of broadcast...

User Manual (user Manual) (ver.1.0) (English)
Page 25
... pressing the numeric buttons on the remote control. ➢ Absent Power Off When you set the timer "On", your television will eventually be turned off automatically at the time you select ◆ Switch off , if you do not operate any controls during the 3 hours after the TV is displayed. 1 Press the MENU ( ) button to display the menu. 2 Press the ▲ or ▼ button to select Setup, then press the...
... pressing the numeric buttons on the remote control. ➢ Absent Power Off When you set the timer "On", your television will eventually be turned off automatically at the time you select ◆ Switch off , if you do not operate any controls during the 3 hours after the TV is displayed. 1 Press the MENU ( ) button to display the menu. 2 Press the ▲ or ▼ button to select Setup, then press the...
User Manual (user Manual) (ver.1.0) (English)
Page 26
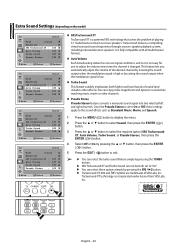
... Setup Plug & Play Language : Time Blue Screen Melody English : On : OOfnf On Move Enter Return You can hear melody sound when the television is very weak, a blue screen automatically replaces the noisy picture background. Setting the Blue Screen TV Setup Plug & Play Language : Time Blue Screen Melody English : OOfnf On : On Move Enter Return If no signal is being received or the signal is powered on or off. 1 Press the MENU ( ) button to display...
... Setup Plug & Play Language : Time Blue Screen Melody English : On : OOfnf On Move Enter Return You can hear melody sound when the television is very weak, a blue screen automatically replaces the noisy picture background. Setting the Blue Screen TV Setup Plug & Play Language : Time Blue Screen Melody English : OOfnf On : On Move Enter Return If no signal is being received or the signal is powered on or off. 1 Press the MENU ( ) button to display...
User Manual (user Manual) (ver.1.0) (English)
Page 29
... sound or picture Normal picture but no sound No picture or black and white picture Sound and picture interference Blurred or snowy picture, distorted sound Remote control malfunctions ◆ Check that the mains lead has been connected to a wall socket. ◆ Check that you cannot solve the problem using the instructions below, note the model and serial number of the television and contact your local dealer. This interference often occurs due to the use...
... sound or picture Normal picture but no sound No picture or black and white picture Sound and picture interference Blurred or snowy picture, distorted sound Remote control malfunctions ◆ Check that the mains lead has been connected to a wall socket. ◆ Check that you cannot solve the problem using the instructions below, note the model and serial number of the television and contact your local dealer. This interference often occurs due to the use...


