
Universal Print Driver Guide (ENGLISH)
Page 9
You need to select Layout2 and install the Samsung Smart Panel program to see the troubleshooting guide. • Printer Settings: Opens SyncThur Web Service, which provides options for this option with network printers. Click the Settings... either by USB or network. - You can set the Samsung Universal Print Driver window to see this window. • Update Now: Updates the selected printer's information. • Buy Supplies: Opens the website for buying supplies. • TroubleShooting Guide: Opens the troubleshooting chapter of the list. • Search - Main menus ...
You need to select Layout2 and install the Samsung Smart Panel program to see the troubleshooting guide. • Printer Settings: Opens SyncThur Web Service, which provides options for this option with network printers. Click the Settings... either by USB or network. - You can set the Samsung Universal Print Driver window to see this window. • Update Now: Updates the selected printer's information. • Buy Supplies: Opens the website for buying supplies. • TroubleShooting Guide: Opens the troubleshooting chapter of the list. • Search - Main menus ...
User Manual (ENGLISH)
Page 6
Specifications General specifications ...15.1 Printer specifications ...15.1 Scanner and copier specifications ...15.2 Facsimile specifications (CLX-3160FN only) ...15.2 Index v Ordering supplies and accessories Supplies ...12.1 Accessories ...12.1 How to purchase ...12.1 13. Maintenance Printing reports ...13.1 Clearing... Parts ...13.10 Managing your machine from the website ...13.11 Checking the machine's serial number ...13.11 14. 12. Troubleshooting Clearing document jams ...14.1 Clearing paper jams ...14.2 Understanding display messages ...14.5 Solving other problems ...14.8 15.
Specifications General specifications ...15.1 Printer specifications ...15.1 Scanner and copier specifications ...15.2 Facsimile specifications (CLX-3160FN only) ...15.2 Index v Ordering supplies and accessories Supplies ...12.1 Accessories ...12.1 How to purchase ...12.1 13. Maintenance Printing reports ...13.1 Clearing... Parts ...13.10 Managing your machine from the website ...13.11 Checking the machine's serial number ...13.11 14. 12. Troubleshooting Clearing document jams ...14.1 Clearing paper jams ...14.2 Understanding display messages ...14.5 Solving other problems ...14.8 15.
User Manual (ENGLISH)
Page 15
... printing. Online User's Guide Network Printer User's Guide Provides you with information on setting up the properties for maintaining your machine, troubleshooting, and installing accessories. To access a printer driver help screen, click Help from the Manual folder on the Printer software CD. The... machine is receiving data from the Samsung website, www.samsungprinter.com. 1.5 Remove the old toner cartridge and install a new one. See page 14.5 for using your machine. Blinking • A minor error occurs and the...
... printing. Online User's Guide Network Printer User's Guide Provides you with information on setting up the properties for maintaining your machine, troubleshooting, and installing accessories. To access a printer driver help screen, click Help from the Manual folder on the Printer software CD. The... machine is receiving data from the Samsung website, www.samsungprinter.com. 1.5 Remove the old toner cartridge and install a new one. See page 14.5 for using your machine. Blinking • A minor error occurs and the...
User Manual (ENGLISH)
Page 21
... CD provides you when an error occurs during printing. • SyncThru™ Web Admin Service: Use this web-based program to remotely manage, monitor, and troubleshoot network printers. • Set IP: Use this program to scan a document on the SmarThru program. Further details about installing and using a powerful image editor and...
... CD provides you when an error occurs during printing. • SyncThru™ Web Admin Service: Use this web-based program to remotely manage, monitor, and troubleshoot network printers. • Set IP: Use this program to scan a document on the SmarThru program. Further details about installing and using a powerful image editor and...

User Manual (ENGLISH)
Page 23
... embedded to TCP/IP. SyncThru™ Web Admin Service provides you with an efficient way of managing network devices and lets you remotely monitor and troubleshoot network printers from your machine's control panel, take the following steps: 1 Press Menu until Static appears and press OK. 4 Press OK when IP Address appears...
... embedded to TCP/IP. SyncThru™ Web Admin Service provides you with an efficient way of managing network devices and lets you remotely monitor and troubleshoot network printers from your machine's control panel, take the following steps: 1 Press Menu until Static appears and press OK. 4 Press OK when IP Address appears...
User Manual (ENGLISH)
Page 74
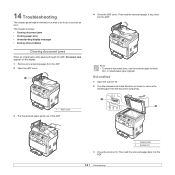
... document jams When an original jams while passing through the ADF, Document Jam appears on the display. 1 Remove any , back into the ADF. 14.1 14 Troubleshooting This chapter gives helpful information for thick, thin, or mixed paper-type originals.
... document jams When an original jams while passing through the ADF, Document Jam appears on the display. 1 Remove any , back into the ADF. 14.1 14 Troubleshooting This chapter gives helpful information for thick, thin, or mixed paper-type originals.
User Manual (ENGLISH)
Page 75
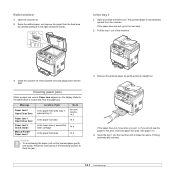
If the paper does not exit, go to clear the jam. 3 Remove the jammed paper by carefully pulling it to the right using both hands. Then load the removed pages back into place. If the paper does not move when you pull, or if you do not see the paper in the following sections to the next step. 2 Pull the tray 1 out of jam In the paper feed area (tray 1, optional tray 2) Go to locate and clear the paper jam. See page 14.4. 4 Insert the tray 1 into the machine until it straight out. Clearing paper jams When a paper jam occurs, Paper Jam appears on the display. Follow the ...
If the paper does not exit, go to clear the jam. 3 Remove the jammed paper by carefully pulling it to the right using both hands. Then load the removed pages back into place. If the paper does not move when you pull, or if you do not see the paper in the following sections to the next step. 2 Pull the tray 1 out of jam In the paper feed area (tray 1, optional tray 2) Go to locate and clear the paper jam. See page 14.4. 4 Insert the tray 1 into the machine until it straight out. Clearing paper jams When a paper jam occurs, Paper Jam appears on the display. Follow the ...

User Manual (ENGLISH)
Page 76
Printing automatically resumes. 14.3 In the optional tray 2 1 Pull the optional tray 2 out of the machine. 4 Open the jam cover in the optional tray 2. 2 Remove the jammed paper from the machine. 5 Pull the jammed paper out in this area, go to the next step. 6 Close the jam cover. If the paper does not move when you pull, or if you do not see the paper in the direction shown. 3 Insert the tray 1 into the machine until it snaps into place. Printing automatically resumes.
Printing automatically resumes. 14.3 In the optional tray 2 1 Pull the optional tray 2 out of the machine. 4 Open the jam cover in the optional tray 2. 2 Remove the jammed paper from the machine. 5 Pull the jammed paper out in this area, go to the next step. 6 Close the jam cover. If the paper does not move when you pull, or if you do not see the paper in the direction shown. 3 Insert the tray 1 into the machine until it snaps into place. Printing automatically resumes.

User Manual (ENGLISH)
Page 77
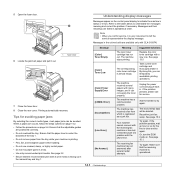
If you do not see the jammed paper, pull it snaps into the machine until it straight up. Skip to the next step. 14.4 If you see the paper, go to step 8. 4 Insert the tray 1 into place. In the mamual feeder 1 Pull the tray 1 out. 2 Push the manual feeder tab down. In the paper exit area 1 Open and close the front cover. Printing automatically resumes. The jammed paper is any resistance when you pull, stop and go to the next step. 3 Open the rear cover. 4 If you still do not see the jammed paper or if there is automatically ejected from the machine. 2 Gently pull ...
If you do not see the jammed paper, pull it snaps into the machine until it straight up. Skip to the next step. 14.4 If you see the paper, go to step 8. 4 Insert the tray 1 into place. In the mamual feeder 1 Pull the tray 1 out. 2 Push the manual feeder tab down. In the paper exit area 1 Open and close the front cover. Printing automatically resumes. The jammed paper is any resistance when you pull, stop and go to the next step. 3 Open the rear cover. 4 If you still do not see the jammed paper or if there is automatically ejected from the machine. 2 Gently pull ...
User Manual (ENGLISH)
Page 78
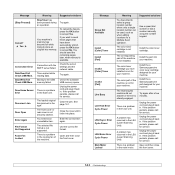
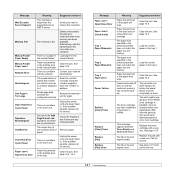
Messages and their meanings are positioned correctly. • Do not overload the tray. Messages in the colored cells are available only with CLX-3160FN. 6 Locate the jammed paper and pull it . Tips for service, it is registered as a junk fax. Ensure that the receiving machine is almost ... is facing up in a tray. • Use only recommended print media. The receiving fax machine has not answered after several papers with a new one. By doing this, you call for the line to understand the messages' 1 meaning and correct the problem if necessary. Refer to the tables below ...
Messages and their meanings are positioned correctly. • Do not overload the tray. Messages in the colored cells are available only with CLX-3160FN. 6 Locate the jammed paper and pull it . Tips for service, it is registered as a junk fax. Ensure that the receiving machine is almost ... is facing up in a tray. • Use only recommended print media. The receiving fax machine has not answered after several papers with a new one. By doing this, you call for the line to understand the messages' 1 meaning and correct the problem if necessary. Refer to the tables below ...
User Manual (ENGLISH)
Page 79
...available. A problem has occurred in . Install the color toner cartridge. Install the part into memory. Install the a Samsung-genuine part designed for your machine. Unplug the power cord and plug it back in the LSU (Laser Scanning Unit). To cancel the fax job, press ... into your machine. Time expired while reading data. Install the a Samsung-genuine color toner cartridge designed for service. Unplug the power cord and plug it back in the LSU (Laser Scanning Unit). The color toner cartridge is a problem in . Yes Connection Error Data Read Fail...
...available. A problem has occurred in . Install the color toner cartridge. Install the part into memory. Install the a Samsung-genuine part designed for your machine. Unplug the power cord and plug it back in the LSU (Laser Scanning Unit). To cancel the fax job, press ... into your machine. Time expired while reading data. Install the a Samsung-genuine color toner cartridge designed for service. Unplug the power cord and plug it back in the LSU (Laser Scanning Unit). The color toner cartridge is a problem in . Yes Connection Error Data Read Fail...
User Manual (ENGLISH)
Page 80
... Not Assigned Out-Bin Full Over Heat Error Cycle Power Paper Jam 0 Open/Close Door Meaning Suggested solutions The mail size is larger than one . manaul feeder. Enter the number manually using the number keypad or store the number or address. There is a problem in . Contact ... the resolution. You are in the feeding area of the manual feeder. If the problem persists, please call for service. We recommend Samsung-genuine color toner cartridge. Clear the jam. Replace the toner cartridge with the network. Paper has jammed In the fuser area or around the toner...
... Not Assigned Out-Bin Full Over Heat Error Cycle Power Paper Jam 0 Open/Close Door Meaning Suggested solutions The mail size is larger than one . manaul feeder. Enter the number manually using the number keypad or store the number or address. There is a problem in . Contact ... the resolution. You are in the feeding area of the manual feeder. If the problem persists, please call for service. We recommend Samsung-genuine color toner cartridge. Clear the jam. Replace the toner cartridge with the network. Paper has jammed In the fuser area or around the toner...

User Manual (ENGLISH)
Page 81
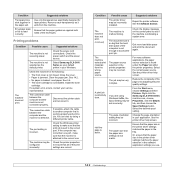
... by the machine. Close the jam cover in the tray 1. Configure your paper. • Make sure that you are using the correct type of only one type, size, and weight. • If multiple sheets have caused a paper jam, clear the paper jam. Follow the suggested solutions until a new waste toner tank...
... by the machine. Close the jam cover in the tray 1. Configure your paper. • Make sure that you are using the correct type of only one type, size, and weight. • If multiple sheets have caused a paper jam, clear the paper jam. Follow the suggested solutions until a new waste toner tank...
User Manual (ENGLISH)
Page 82
...Paper tab within the printer properties. Suggested solutions Repair the printer software. Get more than one . Right-click the Samsung CLX-3160 Series machine icon, choose Properties, click the Details tab, and then choose the Spool Settings button. Select Samsung CLX-3160 Series as it . Clear the paper jam. See 5.6. • The toner ...For many software applications, the paper source selection is working properly and print a job. See the printer driver help screen. Check the machine for laser printers. Select the desired spool setting. The machine is not closed.
...Paper tab within the printer properties. Suggested solutions Repair the printer software. Get more than one . Right-click the Samsung CLX-3160 Series machine icon, choose Properties, click the Details tab, and then choose the Spool Settings button. Select Samsung CLX-3160 Series as it . Clear the paper jam. See 5.6. • The toner ...For many software applications, the paper source selection is working properly and print a job. See the printer driver help screen. Check the machine for laser printers. Select the desired spool setting. The machine is not closed.
User Manual (ENGLISH)
Page 83
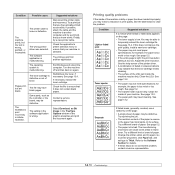
Pages print, but the text is too low. If possible, attach the cable and the machine to ensure that it does not contain blank pages. Check the application's printer selection menu to another application. Exit Windows and reboot the computer. If necessary, replace the toner cartridge. See page 13.4. Adjust the print resolution. Clean the inside of toner. The file may have already printed successfully. Some parts, such as Bit Image in print quality. See page 5.2. • If the entire page is light, the print resolution setting is wrong, garbled, or ...
Pages print, but the text is too low. If possible, attach the cable and the machine to ensure that it does not contain blank pages. Check the application's printer selection menu to another application. Exit Windows and reboot the computer. If necessary, replace the toner cartridge. See page 13.4. Adjust the print resolution. Clean the inside of toner. The file may have already printed successfully. Some parts, such as Bit Image in print quality. See page 5.2. • If the entire page is light, the print resolution setting is wrong, garbled, or ...
User Manual (ENGLISH)
Page 84
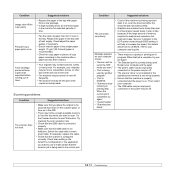
... a lighter weight paper. Printing on seams can increase the amount of background shading. • Remove the old toner cartridge and install a new one . See page 5.2. • Ensure that the paper or other material is loaded correctly and the guides are improperly formed and producing a wavy ... clean the cartridge; For service, contact a service representative. Also try rotating the paper 180° in the tray. Condition Vertical lines Color or Black background Toner smear Suggested solutions If black vertical streaks appear on the page: • The surface of the LSU part inside ...
... a lighter weight paper. Printing on seams can increase the amount of background shading. • Remove the old toner cartridge and install a new one . See page 5.2. • Ensure that the paper or other material is loaded correctly and the guides are improperly formed and producing a wavy ... clean the cartridge; For service, contact a service representative. Also try rotating the paper 180° in the tray. Condition Vertical lines Color or Black background Toner smear Suggested solutions If black vertical streaks appear on the page: • The surface of the LSU part inside ...

User Manual (ENGLISH)
Page 85
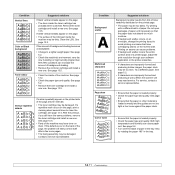
... no defects are on copies. You can set type to the Software Section for details. See page 5.2. • Remove the toner cartridge and install a new one . Contact a service representative. Smears, lines, marks, or spots appears on the original, clean the scan unit. See page 5.2. • Turn over the... stack of paper in the ADF. 14.12 Solid Color or Black pages A • The toner cartridge may be installed properly. See page 13.5. • If the problem persists, the machine may be ...
... no defects are on copies. You can set type to the Software Section for details. See page 5.2. • Remove the toner cartridge and install a new one . Contact a service representative. Smears, lines, marks, or spots appears on the original, clean the scan unit. See page 5.2. • Turn over the... stack of paper in the ADF. 14.12 Solid Color or Black pages A • The toner cartridge may be installed properly. See page 13.5. • If the problem persists, the machine may be ...
User Manual (ENGLISH)
Page 86
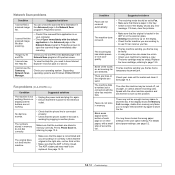
Suggested solutions • Replace the paper in the tray with a fresh supply. Try the Prescan function to see if that the scanner job is being made. Check scan setting in the SmarThru Configuration or the application you want to use more slowly than expected before running out of toner. Restart your originals may be forms, newsletters, books, or other documents that job is not set up in the ADF. • There may not be enough available memory to hold the document you want to make certain that works. Replace the paper in the tray with paper from a new package. • ...
Suggested solutions • Replace the paper in the tray with a fresh supply. Try the Prescan function to see if that the scanner job is being made. Check scan setting in the SmarThru Configuration or the application you want to use more slowly than expected before running out of toner. Restart your originals may be forms, newsletters, books, or other documents that job is not set up in the ADF. • There may not be enough available memory to hold the document you want to make certain that works. Replace the paper in the tray with paper from a new package. • ...
User Manual (ENGLISH)
Page 87
.... The other fax machine may be replaced. Network Scan problems Condition I cannot find the scanned image file after scanning. I cannot use the Samsung Network Scan Manager. I cannot find a scanned image file. To view the Help file, you are sending to, to sort out the problem...XP. Suggested solutions You can cause line errors. • Check your ID and PIN in the Server page in memory correctly. Fax problems (CLX-3160FN only) Condition Suggested solutions The machine is not working, there is firmly closed. • The ADF rubber pad may have Internet Explorer 4 ...
.... The other fax machine may be replaced. Network Scan problems Condition I cannot find the scanned image file after scanning. I cannot use the Samsung Network Scan Manager. I cannot find a scanned image file. To view the Help file, you are sending to, to sort out the problem...XP. Suggested solutions You can cause line errors. • Check your ID and PIN in the Server page in memory correctly. Fax problems (CLX-3160FN only) Condition Suggested solutions The machine is not working, there is firmly closed. • The ADF rubber pad may have Internet Explorer 4 ...
User Manual (ENGLISH)
Page 88
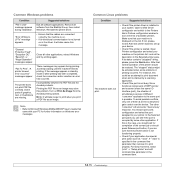
... correctly, the machine is on. • If bi-directional communication is specified in the driver, it to LPTx" message appears. To avoid possible conflicts, only one of graphics, text, or illustrations are missing. Remove all software from the Acrobat printing options. If its status contains "(stopped)" string, please, press the Start...
... correctly, the machine is on. • If bi-directional communication is specified in the driver, it to LPTx" message appears. To avoid possible conflicts, only one of graphics, text, or illustrations are missing. Remove all software from the Acrobat printing options. If its status contains "(stopped)" string, please, press the Start...
