Brochure
Page 2
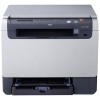
The Samsung CLX-2160/2160N combines professional quality with one touch. Samsung one -click ID copy button, the CLX2160/2160N is made ... Print directly from USB memory without connecting to a PC, thanks to USB 2.0 and ethernet network connections, the CLX-2160/2160N offers direct printing and scanning capabilities that don't even require a PC. Whatever your line of work will ...to 2,400 x 600 dpi and an output speed of up and operation to innovative features like mini circular toner cart-ridges and one -click ID copy button Copy and print both sides of any ID or business ...
The Samsung CLX-2160/2160N combines professional quality with one touch. Samsung one -click ID copy button, the CLX2160/2160N is made ... Print directly from USB memory without connecting to a PC, thanks to USB 2.0 and ethernet network connections, the CLX-2160/2160N offers direct printing and scanning capabilities that don't even require a PC. Whatever your line of work will ...to 2,400 x 600 dpi and an output speed of up and operation to innovative features like mini circular toner cart-ridges and one -click ID copy button Copy and print both sides of any ID or business ...
Brochure
Page 3
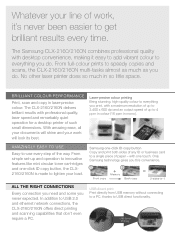
Mini circular toner cartridges Change toner quickly with a resolution of up to 4800 x 4800 dpi - USB direct scan Scan and save documents ...thanks to USB direct functionality. USB 2.0 and ethernet network Connect to of the way - just open the cover, pop out the old toner and pop in sharp, full-colour with specially-designed, easy-to -read display make every job simple. big, bright buttons and an... step of fice ethernet networks with USB 2.0 or to desktop computers and peripherals with the CLX-2160N. High-resolution colour scanning Scan documents in the new ones.
Mini circular toner cartridges Change toner quickly with a resolution of up to 4800 x 4800 dpi - USB direct scan Scan and save documents ...thanks to USB direct functionality. USB 2.0 and ethernet network Connect to of the way - just open the cover, pop out the old toner and pop in sharp, full-colour with specially-designed, easy-to -read display make every job simple. big, bright buttons and an... step of fice ethernet networks with USB 2.0 or to desktop computers and peripherals with the CLX-2160N. High-resolution colour scanning Scan documents in the new ones.

User Manual
Page 4
CONTENTS 1. Network setup (CLX-2160N only) Introduction ...4.1 Via network administration programs ...4.1 Via the control panel ...4.1 Supported operating systems ...4.1 Configuring TCP/IP ...4.1 Static addressing ...4.1 Dynamic addressing (... 4. Introduction Special features ...1.1 Machine overview ...1.2 Front view ...1.2 Rear view ...1.2 Control panel overview ...1.3 Understanding the Status LED ...1.4 Status LED ...1.4 Status LED with the toner cartridge messages 1.4 Finding more information ...1.5 Selecting a location ...1.5 Printing a demo page ...1.6 Altitude adjustment ...1.6 2.
CONTENTS 1. Network setup (CLX-2160N only) Introduction ...4.1 Via network administration programs ...4.1 Via the control panel ...4.1 Supported operating systems ...4.1 Configuring TCP/IP ...4.1 Static addressing ...4.1 Dynamic addressing (... 4. Introduction Special features ...1.1 Machine overview ...1.2 Front view ...1.2 Rear view ...1.2 Control panel overview ...1.3 Understanding the Status LED ...1.4 Status LED ...1.4 Status LED with the toner cartridge messages 1.4 Finding more information ...1.5 Selecting a location ...1.5 Printing a demo page ...1.6 Altitude adjustment ...1.6 2.
User Manual
Page 6
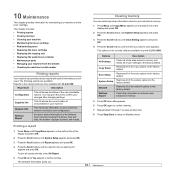
...11.5 Printing problems ...11.6 Printing quality problems ...11.7 Copying problems ...11.10 Scanning problems ...11.10 Network Scan problems (CLX-2160N only) ...11.11 Common Windows problems ...11.11 Common Macintosh problems ...11.11 Common Linux problems ...11.12 12...10.2 Cleaning the scan unit ...10.3 Maintaining the toner cartridge ...10.4 Toner cartridge storage ...10.4 Expected cartridge life ...10.4 Redistributing toner ...10.4 Replacing the toner cartridge ...10.5 Replacing the imaging unit ...10.6 Replacing the waste toner container ...10.8 Maintenance parts ...10.9 Checking replaceables...
...11.5 Printing problems ...11.6 Printing quality problems ...11.7 Copying problems ...11.10 Scanning problems ...11.10 Network Scan problems (CLX-2160N only) ...11.11 Common Windows problems ...11.11 Common Macintosh problems ...11.11 Common Linux problems ...11.12 12...10.2 Cleaning the scan unit ...10.3 Maintaining the toner cartridge ...10.4 Toner cartridge storage ...10.4 Expected cartridge life ...10.4 Redistributing toner ...10.4 Replacing the toner cartridge ...10.5 Replacing the imaging unit ...10.6 Replacing the waste toner container ...10.8 Maintenance parts ...10.9 Checking replaceables...
User Manual
Page 12
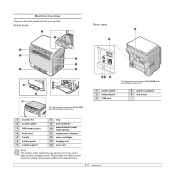
... These are the main components of your machine: Front view Rear view * The figure above shows an CLX-2160N with all available accessories. * The figure above shows an CLX-2160N with all available accessories. 1 power switch 2 network port 3 USB port 4 power receptacle 5 rear... cover 1 scanner lid 2 scanner glass 3 USB memory port 4 front cover 5 handle 6 control panel 7 output support 8 tray 9 manual feeder 10 manual feeder paper width guides 11 waste toner container 12 toner...
... These are the main components of your machine: Front view Rear view * The figure above shows an CLX-2160N with all available accessories. * The figure above shows an CLX-2160N with all available accessories. 1 power switch 2 network port 3 USB port 4 power receptacle 5 rear... cover 1 scanner lid 2 scanner glass 3 USB memory port 4 front cover 5 handle 6 control panel 7 output support 8 tray 9 manual feeder 10 manual feeder paper width guides 11 waste toner container 12 toner...
User Manual
Page 13
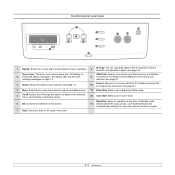
.... 12 Color Start: Starts a job in the front of your machine. Stop/Clear: Stops an operation at any time. Toner colors: The toner colors shown below the LCD display co2 works with the toner cartridge messages on the screen. Control panel overview 1 Display: Shows the current status and prompts during an operation. 8 ID...
.... 12 Color Start: Starts a job in the front of your machine. Stop/Clear: Stops an operation at any time. Toner colors: The toner colors shown below the LCD display co2 works with the toner cartridge messages on the screen. Control panel overview 1 Display: Shows the current status and prompts during an operation. 8 ID...
User Manual
Page 14
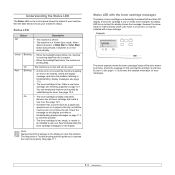
... information on the display to solve the problem. Check the display message, and solve the problem referring to be cleared. See page 10.4. • The toner cartridge is indicated by arrows. See page 10.5. • A problem has occurred such as a paper jam, opened cover or no paper in the tray, ...receiving data from the computer. • When the backlight fast blinks, the machine is and how to solve it switches to be installed with the toner cartridge messages The status of concern, or may be changed, the status LED turns red and the display shows the message. See page 11.1 ...
... information on the display to solve the problem. Check the display message, and solve the problem referring to be cleared. See page 10.4. • The toner cartridge is indicated by arrows. See page 10.5. • A problem has occurred such as a paper jam, opened cover or no paper in the tray, ...receiving data from the computer. • When the backlight fast blinks, the machine is and how to solve it switches to be installed with the toner cartridge messages The status of concern, or may be changed, the status LED turns red and the display shows the message. See page 11.1 ...

User Manual
Page 15
... providing you with adequate space for using your machine on the Printer software CD. Selecting a location Select a level, stable place with step-by toner, which can get the machine ready. Clearance space • Front: 482.6 mm (enough space so that the paper tray can be sure to...equipped with help information on setting up the properties for setting up and connecting your machine to get help screen, click Help from the Samsung website, www.samsungprinter.com. Printer Driver Help Provides you move the printer, do not tilt or turn it may be well-ventilated and...
... providing you with adequate space for using your machine on the Printer software CD. Selecting a location Select a level, stable place with step-by toner, which can get the machine ready. Clearance space • Front: 482.6 mm (enough space so that the paper tray can be sure to...equipped with help information on setting up the properties for setting up and connecting your machine to get help screen, click Help from the Samsung website, www.samsungprinter.com. Printer Driver Help Provides you move the printer, do not tilt or turn it may be well-ventilated and...
User Manual
Page 23
... outcome: The print media you choose should be the result of improper handling, unacceptable temperature and humidity levels, or other variables over which Samsung has no control. • Before purchasing large quantities of the print media affects how crisp the printing looks on a variety of the guidelines... for your machine. Caution When you close the lid. Note • Leaving the scanner lid open while copying may affect copy quality and toner consumption. • Dust on the machine. If the book or magazine is thicker than others and produce sharper, more vibrant images. •...
... outcome: The print media you choose should be the result of improper handling, unacceptable temperature and humidity levels, or other variables over which Samsung has no control. • Before purchasing large quantities of the print media affects how crisp the printing looks on a variety of the guidelines... for your machine. Caution When you close the lid. Note • Leaving the scanner lid open while copying may affect copy quality and toner consumption. • Dust on the machine. If the book or magazine is thicker than others and produce sharper, more vibrant images. •...
User Manual
Page 44
...; Checking the machine's serial number Printing reports Your machine can selectively clear information stored in the colored cells are only available with CLX-2160N. Restores all of the scan options to clear appears. The selected information prints out. 10.1 Network Info. Clearing memory You... 7 to clear another item. 8 Press Stop/Clear to return to print appears and press OK. Restores all of your machine and the toner cartridge. 10 Maintenance This chapter provides information for the Network Scan records including IP address, time and date, the number of pages scanned, ...
...; Checking the machine's serial number Printing reports Your machine can selectively clear information stored in the colored cells are only available with CLX-2160N. Restores all of the scan options to clear appears. The selected information prints out. 10.1 Network Info. Clearing memory You... 7 to clear another item. 8 Press Stop/Clear to return to print appears and press OK. Restores all of your machine and the toner cartridge. 10 Maintenance This chapter provides information for the Network Scan records including IP address, time and date, the number of pages scanned, ...
User Manual
Page 45
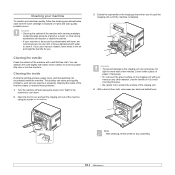
... Cleaning the inside of alcohol, solvent, or other material. Caution • To prevent damage to light for you. Cover it with toner, we recommend you use a vacuum cleaner, toner blows in the air and might be careful not to let any water drip onto or into the machine. Use the handle... print and scan quality problems occur. Cleaning the outside Clean the cabinet of the machine completely. Cleaning the inside During the printing process, paper, toner, and dust particles can dampen the cloth slightly with water to clean it to the imaging unit, do not expose it . If you to ...
... Cleaning the inside of alcohol, solvent, or other material. Caution • To prevent damage to light for you. Cover it with toner, we recommend you use a vacuum cleaner, toner blows in the air and might be careful not to let any water drip onto or into the machine. Use the handle... print and scan quality problems occur. Cleaning the outside Clean the cabinet of the machine completely. Cleaning the inside During the printing process, paper, toner, and dust particles can dampen the cloth slightly with water to clean it to the imaging unit, do not expose it . If you to ...

User Manual
Page 47
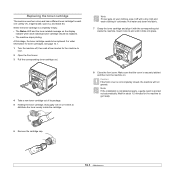
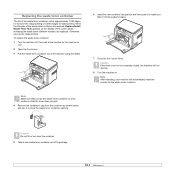
...operating environment, printing interval, media type, and media size. Hot water sets toner into fabric. 4 Grasp the toner cartridge and align it with a dry cloth and wash clothing in cold water. Note If toner gets on toner. • The Status LED blinks red. Insert it back into place.... 5 Close the front cover. If this happens, you have redistributed the toner. 1 Open the front cover. 2 Pull the corresponding toner cartridge out. 3 Holding the toner cartridge, thoroughly roll it clicks into its slot until ready for more often. In some cases, white...
...operating environment, printing interval, media type, and media size. Hot water sets toner into fabric. 4 Grasp the toner cartridge and align it with a dry cloth and wash clothing in cold water. Note If toner gets on toner. • The Status LED blinks red. Insert it back into place.... 5 Close the front cover. If this happens, you have redistributed the toner. 1 Open the front cover. 2 Pull the corresponding toner cartridge out. 3 Holding the toner cartridge, thoroughly roll it clicks into its slot until ready for more often. In some cases, white...
User Manual
Page 48
... cyan (C), and black (K). Wait for about 1.5 minutes for the machine to be replaced. • The machine stops printing. Note If toner gets on . When the toner cartridge is securely latched and then turn the machine on your clothing, wipe it with a dry cloth and wash clothing in cold water.... For order information for the machine to distribute the toner evenly inside the machine. Note If the installation is completed properly, a guide report is not completely closed, the machine will not operate....
... cyan (C), and black (K). Wait for about 1.5 minutes for the machine to be replaced. • The machine stops printing. Note If toner gets on . When the toner cartridge is securely latched and then turn the machine on your clothing, wipe it with a dry cloth and wash clothing in cold water.... For order information for the machine to distribute the toner evenly inside the machine. Note If the installation is completed properly, a guide report is not completely closed, the machine will not operate....
User Manual
Page 49
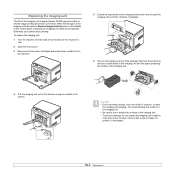
... is approximately 20,000 pages for more than a few minutes for the machine to cool. 2 Open the front cover. 3 Remove all of the toner cartridges and waste toner container from the machine. 5 Extend the top handle on the imaging unit and then use sharp objects, such as a knife or scissors, to open...
... is approximately 20,000 pages for more than a few minutes for the machine to cool. 2 Open the front cover. 3 Remove all of the toner cartridges and waste toner container from the machine. 5 Extend the top handle on the imaging unit and then use sharp objects, such as a knife or scissors, to open...

User Manual
Page 50
... to the dummy caps, it may cause problem. 10.7 Note • After rebooting, your machine will not operate. 11 Turn the machine on the toner cartridge entrances of the imaging unit. Caution If there is printed out automatically. When you force too much to get ready. 7 Holding the handles on... the new imaging unit, push the imaging unit until it sounds 'click' into the machine. 9 Insert the toner cartridges and waste toner container into their corresponding slots until they click into place. 8 Remove four dummy caps which are on .
... to the dummy caps, it may cause problem. 10.7 Note • After rebooting, your machine will not operate. 11 Turn the machine on the toner cartridge entrances of the imaging unit. Caution If there is printed out automatically. When you force too much to get ready. 7 Holding the handles on... the new imaging unit, push the imaging unit until it sounds 'click' into the machine. 9 Insert the toner cartridges and waste toner container into their corresponding slots until they click into place. 8 Remove four dummy caps which are on .
User Manual
Page 51
... into position and then push it to be replaced. Otherwise your machine will not operate. 8 Turn the machine on a flat surface so that the toner does not spill. 4 Remove the container's cap from the container as shown below, and use it is firmly seated in place. 7 Close the ... Turn the machine off, then wait a few minutes for the machine to cool. 2 Open the front cover. 3 Pull the waste toner container out of the waste toner container unit is not completely closed, the machine will automatically reset the counter for black printing. Caution If the front cover is approximately 1,250...
... into position and then push it to be replaced. Otherwise your machine will not operate. 8 Turn the machine on a flat surface so that the toner does not spill. 4 Remove the container's cap from the container as shown below, and use it is firmly seated in place. 7 Close the ... Turn the machine off, then wait a few minutes for the machine to cool. 2 Open the front cover. 3 Pull the waste toner container out of the waste toner container unit is not completely closed, the machine will automatically reset the counter for black printing. Caution If the front cover is approximately 1,250...
User Manual
Page 55
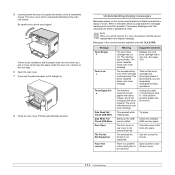
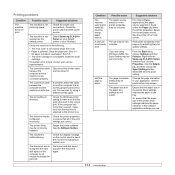
... the service representative the display message. Use the correct file format. Message Toner Empty Toner Low TonerSupply Err. Check the available USB memory space. Messages and their meanings are available only with CLX-2160N. The machine received several papers with a new one. There is almost... empty. If the problem persists, please call for service. Storing to pinch your fingers! Suggested solutions Replace the color toner cartridge with many images, and it...
... the service representative the display message. Use the correct file format. Message Toner Empty Toner Low TonerSupply Err. Check the available USB memory space. Messages and their meanings are available only with CLX-2160N. The machine received several papers with a new one. There is almost... empty. If the problem persists, please call for service. Storing to pinch your fingers! Suggested solutions Replace the color toner cartridge with many images, and it...
User Manual
Page 56
...Paper has jammed in . This message appears between Toner Empty and Toner Low status. See page 11.1, 11.2. Clear the jam. Clear the jam. Suggested solutions Install the color toner cartridge. Install the a Samsung-genuine color toner cartridge designed for your machine. Unplug the power cord...your network administrator. If the problem persists, please call for scanning and saving. Load the correct paper in . We recommend Samsung-genuine color toner cartridge. A problem has occurred in the manual feeder. Install Imaging Unit into place. Load paper in the LSU (Laser...
...Paper has jammed in . This message appears between Toner Empty and Toner Low status. See page 11.1, 11.2. Clear the jam. Clear the jam. Suggested solutions Install the color toner cartridge. Install the a Samsung-genuine color toner cartridge designed for your machine. Unplug the power cord...your network administrator. If the problem persists, please call for scanning and saving. Load the correct paper in . We recommend Samsung-genuine color toner cartridge. A problem has occurred in the manual feeder. Install Imaging Unit into place. Load paper in the LSU (Laser...
User Manual
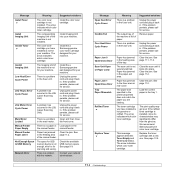
Page 57
... The paper is corrected. Open the front cover and remove the debris. Use only transparencies specifically designed for service. Replace/Install Waste Toner Tank Scanner locked Transfer Belt Error Tray Paper Empty Meaning The life of the part expires soon. Transparencies stick together in . Ensure ...See page 10.9 and call for service. If the problem persists, please call for service. Follow the suggested solutions until a new waste toner tank is locked A problem has occurred in the transfer belt in the tray 1. Multiple sheets of paper do not feed. • Different...
... The paper is corrected. Open the front cover and remove the debris. Use only transparencies specifically designed for service. Replace/Install Waste Toner Tank Scanner locked Transfer Belt Error Tray Paper Empty Meaning The life of the part expires soon. Transparencies stick together in . Ensure ...See page 10.9 and call for service. If the problem persists, please call for service. Follow the suggested solutions until a new waste toner tank is locked A problem has occurred in the transfer belt in the tray 1. Multiple sheets of paper do not feed. • Different...
User Manual
Page 58
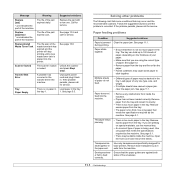
...Close the cover. • Paper is loaded. See 11.1. • No paper is jammed. Install the toner cartridge. A print job is not connected properly. Right-click the Samsung CLX-216x Series machine icon, choose Properties, click the Details tab, and then choose the Spool Settings button. Ensure ...The machine is sent to ensure that the paper size in the printer driver settings matches the paper selection in your Windows. Select Samsung CLX-216x Series as the default printer. Load paper. The connection cable between the computer and the machine is not receiving power. You ...
...Close the cover. • Paper is loaded. See 11.1. • No paper is jammed. Install the toner cartridge. A print job is not connected properly. Right-click the Samsung CLX-216x Series machine icon, choose Properties, click the Details tab, and then choose the Spool Settings button. Ensure ...The machine is sent to ensure that the paper size in the printer driver settings matches the paper selection in your Windows. Select Samsung CLX-216x Series as the default printer. Load paper. The connection cable between the computer and the machine is not receiving power. You ...


