User Manual
Page 6
...11.5 Printing problems ...11.6 Printing quality problems ...11.7 Copying problems ...11.10 Scanning problems ...11.10 Network Scan problems (CLX-2160N only) ...11.11 Common Windows problems ...11.11 Common Macintosh problems ...11.11 Common Linux problems ...11.12 12....purchase ...12.1 13. 10. Maintenance Printing reports ...10.1 Printing a report ...10.1 Clearing memory ...10.1 Cleaning your machine ...10.2 Cleaning the outside ...10.2 Cleaning the inside ...10.2 Cleaning the scan unit ...10.3 Maintaining the toner cartridge ...10.4 Toner cartridge storage ...10.4 Expected cartridge life ...
...11.5 Printing problems ...11.6 Printing quality problems ...11.7 Copying problems ...11.10 Scanning problems ...11.10 Network Scan problems (CLX-2160N only) ...11.11 Common Windows problems ...11.11 Common Macintosh problems ...11.11 Common Linux problems ...11.12 12....purchase ...12.1 13. 10. Maintenance Printing reports ...10.1 Printing a report ...10.1 Clearing memory ...10.1 Cleaning your machine ...10.2 Cleaning the outside ...10.2 Cleaning the inside ...10.2 Cleaning the scan unit ...10.3 Maintaining the toner cartridge ...10.4 Toner cartridge storage ...10.4 Expected cartridge life ...

User Manual
Page 7
... the risk of fire or electric shock. 10 Do not allow anything to conflict with the protective cover removed from the AC wall socket before cleaning. Improper adjustment of the output tray may have been followed. • If the machine has been dropped, or the cabinet appears damaged. • If the... a sudden and distinct change in the U.S. i 16 If you to chew on an unstable cart, stand or table. If possible, unplug the AC power for cleaning. 6 Do not place the machine on the AC power or PC interface cords. 11 Never push objects of any kind onto or into the machine...
... the risk of fire or electric shock. 10 Do not allow anything to conflict with the protective cover removed from the AC wall socket before cleaning. Improper adjustment of the output tray may have been followed. • If the machine has been dropped, or the cabinet appears damaged. • If the... a sudden and distinct change in the U.S. i 16 If you to chew on an unstable cart, stand or table. If possible, unplug the AC power for cleaning. 6 Do not place the machine on the AC power or PC interface cords. 11 Never push objects of any kind onto or into the machine...
User Manual
Page 23
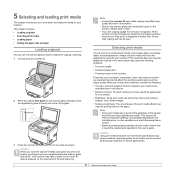
...images. • Surface smoothness: The smoothness of the print media affects how crisp the printing looks on the scanner glass and align it clean. • If you are copying a page from a book or magazine, lift the scanner lid until its hinges are not covered by ... the best scanning. Your machine may meet the guidelines outlined in this section and still not produce satisfactory results. Such repairs are caught by Samsung's warranty or service agreements. 5.1 This chapter includes: • Loading originals • Selecting print media • Loading paper • Setting...
...images. • Surface smoothness: The smoothness of the print media affects how crisp the printing looks on the scanner glass and align it clean. • If you are copying a page from a book or magazine, lift the scanner lid until its hinges are not covered by ... the best scanning. Your machine may meet the guidelines outlined in this section and still not produce satisfactory results. Such repairs are caught by Samsung's warranty or service agreements. 5.1 This chapter includes: • Loading originals • Selecting print media • Loading paper • Setting...
User Manual
Page 44
...to the factory default. The selected information prints out. 10.1 This chapter includes: • Printing reports • Clearing memory • Cleaning your machine • Maintaining the toner cartridge • Redistributing toner • Replacing the toner cartridge • Replacing the imaging unit &#... Checking the machine's serial number Printing reports Your machine can selectively clear information stored in the colored cells are only available with CLX-2160N. Supplies Info This list shows the current status of consumables in memory. 5 Press OK when Yes appears. 6 Press ...
...to the factory default. The selected information prints out. 10.1 This chapter includes: • Printing reports • Clearing memory • Cleaning your machine • Maintaining the toner cartridge • Redistributing toner • Replacing the toner cartridge • Replacing the imaging unit &#... Checking the machine's serial number Printing reports Your machine can selectively clear information stored in the colored cells are only available with CLX-2160N. Supplies Info This list shows the current status of consumables in memory. 5 Press OK when Yes appears. 6 Press ...
User Manual
Page 45
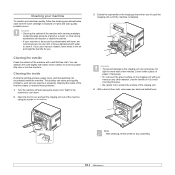
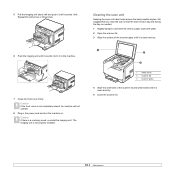
...the machine using the handle on the imaging unit and then use cloth or tissue dampened with a soft lint-free cloth. Cleaning the inside the machine. Caution • Cleaning the cabinet of the machine with water, but be harmful for the machine to let any dust and spilled toner. Wait ...for you to use it to dry completely. 10.2 You can dampen the cloth slightly with cleaning materials containing large amounts of the machine clears or reduces these problems. 1 Turn the machine off and unplug the power cord. Caution • To...
...the machine using the handle on the imaging unit and then use cloth or tissue dampened with a soft lint-free cloth. Cleaning the inside the machine. Caution • Cleaning the cabinet of the machine with water, but be harmful for the machine to let any dust and spilled toner. Wait ...for you to use it to dry completely. 10.2 You can dampen the cloth slightly with cleaning materials containing large amounts of the machine clears or reduces these problems. 1 Turn the machine off and unplug the power cord. Caution • To...
User Manual
Page 46
.... 1 Slightly dampen a soft lint-free cloth or paper towel with water. 2 Open the scanner lid. 3 Wipe the surface of the scanner glass until it is clean and dry. 1 2 3 1 white sheet 2 scanner lid 3 scanner glass 4 Wipe the underside of the scanner lid and white sheet until it sounds 'click'. Caution ... closed, the machine will not operate. 8 Plug in to the machine. 7 Close the front cover firmly. Caution If there is not properly installed. Cleaning the scan unit Keeping the scan unit clean helps ensure the best possible copies. 5 Pull the imaging unit about half and push it until it is...
.... 1 Slightly dampen a soft lint-free cloth or paper towel with water. 2 Open the scanner lid. 3 Wipe the surface of the scanner glass until it is clean and dry. 1 2 3 1 white sheet 2 scanner lid 3 scanner glass 4 Wipe the underside of the scanner lid and white sheet until it sounds 'click'. Caution ... closed, the machine will not operate. 8 Plug in to the machine. 7 Close the front cover firmly. Caution If there is not properly installed. Cleaning the scan unit Keeping the scan unit clean helps ensure the best possible copies. 5 Pull the imaging unit about half and push it until it is...
User Manual
Page 59
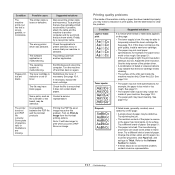
... • The transfer roller may solve this does not improve the print quality, install a new toner cartridge. • The paper may need cleaning. The manufacturing processes can cause some areas to Thick. Go to printer properties, click Paper tab, and set type to reject toner. The software... area appears on its surface. for details. • If these steps do not correct the problem, contact a service representative. 11.7 Clean the LSU. Clean the inside of paper. • Change the printer option and try again. The wrong printer driver was selected. The operating system is ...
... • The transfer roller may solve this does not improve the print quality, install a new toner cartridge. • The paper may need cleaning. The manufacturing processes can cause some areas to Thick. Go to printer properties, click Paper tab, and set type to reject toner. The software... area appears on its surface. for details. • If these steps do not correct the problem, contact a service representative. 11.7 Clean the LSU. Clean the inside of paper. • Change the printer option and try again. The wrong printer driver was selected. The operating system is ...

User Manual
Page 60
... seams can increase the amount of the page at even intervals: A aBbCc A aBbCc A aBbCc A aBbCc A aBbCc • The toner cartridge may need cleaning. See page 10.5. See page 5.1. • Check the machine's environment: very dry (low humidity) or high humidity (higher than 80% RH) conditions ...Check the paper type and quality. Remove the toner cartridge and install a new one . If white vertical streaks appear on the page, print a cleaning sheet several times to avoid printing over areas that have the same problems, remove the toner cartridge and install a new one . Try a different ...
... seams can increase the amount of the page at even intervals: A aBbCc A aBbCc A aBbCc A aBbCc A aBbCc • The toner cartridge may need cleaning. See page 10.5. See page 5.1. • Check the machine's environment: very dry (low humidity) or high humidity (higher than 80% RH) conditions ...Check the paper type and quality. Remove the toner cartridge and install a new one . If white vertical streaks appear on the page, print a cleaning sheet several times to avoid printing over areas that have the same problems, remove the toner cartridge and install a new one . Try a different ...

User Manual
Page 61
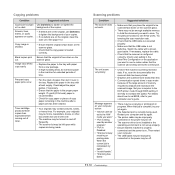
... or loose toner, light print, or contamination occurs. See page 10.5. • The machine may not meet paper specifications. Loose toner • Clean the inside of the machine. See page 10.2. • Check the paper type and quality. Remove the cartridge and reinsert it . • .... Remove the toner cartridge and install a new one. See page 10.5. • If the problem persists, the machine may require repair. Clean the inside of characters that the paper is loaded properly. • Check the paper type and quality. Condition Curl or wave Suggested solutions &#...
... or loose toner, light print, or contamination occurs. See page 10.5. • The machine may not meet paper specifications. Loose toner • Clean the inside of the machine. See page 10.2. • Check the paper type and quality. Remove the cartridge and reinsert it . • .... Remove the toner cartridge and install a new one. See page 10.5. • If the problem persists, the machine may require repair. Clean the inside of characters that the paper is loaded properly. • Check the paper type and quality. Condition Curl or wave Suggested solutions &#...
User Manual
Page 62
..., books, or other documents that the copy paper is printing received data. See page 10.3. Copying problems Condition Suggested solutions Copies are on the original, clean the scan unit. Replace the paper in the tray.
..., books, or other documents that the copy paper is printing received data. See page 10.3. Copying problems Condition Suggested solutions Copies are on the original, clean the scan unit. Replace the paper in the tray.
User Manual
Page 70
INDEX Numerics 2/4-up, special copy 6.3 B Back 1.3 background image, erase 6.5 Black Start 1.3 C cleaning inside 10.2 outside 10.2 scan unit 10.3 clone, special copy 6.4 contrast, copy 6.1 copying 2/4-up 6.3 darkness 6.1 default setting, change 6.2 erasing background 6.5 ID card copy 6.3 original type 6.2 ... R replacement parts 10.9 replacing imaging unit 10.6 toner cartridge 10.5 waste toner container 10.8 reports, print 10.1 S scan power save mode 2.2 Scan to 1.3 scanner glass cleaning 10.3
INDEX Numerics 2/4-up, special copy 6.3 B Back 1.3 background image, erase 6.5 Black Start 1.3 C cleaning inside 10.2 outside 10.2 scan unit 10.3 clone, special copy 6.4 contrast, copy 6.1 copying 2/4-up 6.3 darkness 6.1 default setting, change 6.2 erasing background 6.5 ID card copy 6.3 original type 6.2 ... R replacement parts 10.9 replacing imaging unit 10.6 toner cartridge 10.5 waste toner container 10.8 reports, print 10.1 S scan power save mode 2.2 Scan to 1.3 scanner glass cleaning 10.3


