
User Manual (ENGLISH)
Page 5
...Setting up the network ...3.1 Supported operating systems ...3.2 Configuring network protocol via the machine ...3.2 Installing the software ...3.3 Printer's basic settings ...3.4 Altitude Setting after Software Installation ...3.4 Changing the display language ...3.4 Setting job timeout ...3.4 Using power......1.2 Front view ...1.2 Rear view ...1.3 Control panel overview ...1.4 Understanding the Status LED ...1.5 Status LED with the toner cartridge messages 1.5 Understanding the menu map ...1.6 Accessing menus ...1.6 Menu overview ...1.6 Description on print media ...4.2 Media sizes supported ...
...Setting up the network ...3.1 Supported operating systems ...3.2 Configuring network protocol via the machine ...3.2 Installing the software ...3.3 Printer's basic settings ...3.4 Altitude Setting after Software Installation ...3.4 Changing the display language ...3.4 Setting job timeout ...3.4 Using power......1.2 Front view ...1.2 Rear view ...1.3 Control panel overview ...1.4 Understanding the Status LED ...1.5 Status LED with the toner cartridge messages 1.5 Understanding the menu map ...1.6 Accessing menus ...1.6 Menu overview ...1.6 Description on print media ...4.2 Media sizes supported ...

User Manual (ENGLISH)
Page 6
... a memory module ...9.1 Activating the added memory in the PS printer properties 9.2 5. Maintenance Printing a machine configuration report ...6.1 Printing a network report ...6.1 Monitoring the supplies' life ...6.1 Cleaning your machine ...6.1 Cleaning the outside ...6.1 Cleaning the inside ...6.1 Maintaining the cartridge ...6.3 toner cartridge storage ...6.3 Expected cartridge life ...6.3 Redistributing toner ...6.3 Replacing the toner cartridge ...6.4 Replacing the paper transfer belt ...6.6 Maintenance parts ...6.7 Managing...
... a memory module ...9.1 Activating the added memory in the PS printer properties 9.2 5. Maintenance Printing a machine configuration report ...6.1 Printing a network report ...6.1 Monitoring the supplies' life ...6.1 Cleaning your machine ...6.1 Cleaning the outside ...6.1 Cleaning the inside ...6.1 Maintaining the cartridge ...6.3 toner cartridge storage ...6.3 Expected cartridge life ...6.3 Redistributing toner ...6.3 Replacing the toner cartridge ...6.4 Replacing the paper transfer belt ...6.6 Maintenance parts ...6.7 Managing...

User Manual (ENGLISH)
Page 8
... can access the user's guide in other languages from the Samsung website, www.samsungprinter.com. Used to use the included software utilities. a. Some terms in this guide are used interchangeably, as CLP-6xx Series is mainly based on printer driver properties and instructions for setting up and using your machine... to provide you follow the instructions in various operating systems, and how to provide additional information or detailed specification of the toner cartridge. This explanation is synonymous with your machine from country to prepare the machine.
... can access the user's guide in other languages from the Samsung website, www.samsungprinter.com. Used to use the included software utilities. a. Some terms in this guide are used interchangeably, as CLP-6xx Series is mainly based on printer driver properties and instructions for setting up and using your machine... to provide you follow the instructions in various operating systems, and how to provide additional information or detailed specification of the toner cartridge. This explanation is synonymous with your machine from country to prepare the machine.
User Manual (ENGLISH)
Page 16
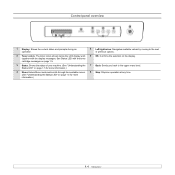
Control panel overview 1 Display: Shows the current status and prompts during an operation. 2 Toner colors: The toner colors shown below the LCD display work together with the toner cartridge messages on page 1.5. 3 Status: Shows the status of your machine. (See "Understanding the Status LED" on page 1.5 for more information.) 4 Menu: Enters Menu mode and...
Control panel overview 1 Display: Shows the current status and prompts during an operation. 2 Toner colors: The toner colors shown below the LCD display work together with the toner cartridge messages on page 1.5. 3 Status: Shows the status of your machine. (See "Understanding the Status LED" on page 1.5 for more information.) 4 Menu: Enters Menu mode and...

User Manual (ENGLISH)
Page 17
...of concern or may be changed , the status LED turns red and the display shows the message. Understanding the Status LED The color of toner cartridges is indicated by the status LED and the LCD display. Check the message on the display, and refer to browse the detailed ...information on page 7.7. See page 7.1 for the error to operate the machine properly. Example: The above example shows the magenta toner cartridge status indicated by redistributing the toner. Red Blinking • A minor error has occurred and the machine is waiting for more information. Check the...
...of concern or may be changed , the status LED turns red and the display shows the message. Understanding the Status LED The color of toner cartridges is indicated by the status LED and the LCD display. Check the message on the display, and refer to browse the detailed ...information on page 7.7. See page 7.1 for the error to operate the machine properly. Example: The above example shows the magenta toner cartridge status indicated by redistributing the toner. Red Blinking • A minor error has occurred and the machine is waiting for more information. Check the...

User Manual (ENGLISH)
Page 21
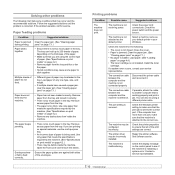
... PCL1 and PCL7 from 5 to use the Default setting for the default paper size. You can do using the TCP/IP protocol for each cartridge. Note If you have set the font type, symbol type, lines per page, and font size. • Typeface: You can clear the...to select the communication speed for text or graphics. You can automatically adjust the engine color alignment for ethernet connection. If an error occurs, the job stops processing, the error message prints, and the printer flushes the job. The machine can print the network configuration report. 1.9 Description If you...
... PCL1 and PCL7 from 5 to use the Default setting for the default paper size. You can do using the TCP/IP protocol for each cartridge. Note If you have set the font type, symbol type, lines per page, and font size. • Typeface: You can clear the...to select the communication speed for text or graphics. You can automatically adjust the engine color alignment for ethernet connection. If an error occurs, the job stops processing, the error message prints, and the printer flushes the job. The machine can print the network configuration report. 1.9 Description If you...

User Manual (ENGLISH)
Page 24
... in Software section. This chapter includes: • Setting up the hardware • Setting up the network • Installing the software • Printer's basic settings Setting up the hardware which can set up the machine. Note • If you read Quick Install Guide and complete following steps.... 1 Select a stable location. Make sure you want to the edge of the toner cartridges. 5 Load paper. (See "Loading paper" on page 4.4.) 6 Make sure that all the cables are connected to the machine. 7 Turn the ...
... in Software section. This chapter includes: • Setting up the hardware • Setting up the network • Installing the software • Printer's basic settings Setting up the hardware which can set up the machine. Note • If you read Quick Install Guide and complete following steps.... 1 Select a stable location. Make sure you want to the edge of the toner cartridges. 5 Load paper. (See "Loading paper" on page 4.4.) 6 Make sure that all the cables are connected to the machine. 7 Turn the ...

User Manual (ENGLISH)
Page 38
...cleaner, toner blown into the air may be careful not to view the supply life indicators, follow the cleaning procedures below each time the toner cartridge is contaminated with water to browse the life. If you use a cloth or tissue dampened with toner, we recommend you . Cleaning your machine... the control panel until you see System Setup on the bottom line of pages printed. • Toner Remains: displays how much toner remains in the cartridge. 8 When you press the left/right arrow button. • Total: displays the total number of the display. 2 Press OK. 3 Press the left /...
...cleaner, toner blown into the air may be careful not to view the supply life indicators, follow the cleaning procedures below each time the toner cartridge is contaminated with water to browse the life. If you use a cloth or tissue dampened with toner, we recommend you . Cleaning your machine... the control panel until you see System Setup on the bottom line of pages printed. • Toner Remains: displays how much toner remains in the cartridge. 8 When you press the left/right arrow button. • Total: displays the total number of the display. 2 Press OK. 3 Press the left /...

User Manual (ENGLISH)
Page 39
.... Caution If you leave the front cover open the front door and work you remove the paper transfer belt first. Use the handle on each cartridge in order to avoid touching this area. • Be careful not to see if dirt turns the white cotten black. 6.2 This will cause damage to... might be careful not to the OPC drum. Caution • Do not touch the green surface, the OPC drum or the front of the toner cartridge, with the some paper could avoid damaging it out of the machine. 5 Locate the long strip of glass (LSU) inside . 3 Grasp the handles on the...
.... Caution If you leave the front cover open the front door and work you remove the paper transfer belt first. Use the handle on each cartridge in order to avoid touching this area. • Be careful not to see if dirt turns the white cotten black. 6.2 This will cause damage to... might be careful not to the OPC drum. Caution • Do not touch the green surface, the OPC drum or the front of the toner cartridge, with the some paper could avoid damaging it out of the machine. 5 Locate the long strip of glass (LSU) inside . 3 Grasp the handles on the...

User Manual (ENGLISH)
Page 40
Caution • Do not touch the green surface, the OPC drum or the front of the paper transfer belt. • If you which color cartridge is low on toner. Note If toner gets on your clothing, wipe it in order to avoid touching this area. • Be careful not to ... type, and media size. Close the front cover should the installation need to the OPC drum. Use the handle on , and the number of the colored toner cartridges is low, faded or light areas may need to light. 6 With a dry lint-free cloth, wipe away any other material. If you print a lot...
Caution • Do not touch the green surface, the OPC drum or the front of the paper transfer belt. • If you which color cartridge is low on toner. Note If toner gets on your clothing, wipe it in order to avoid touching this area. • Be careful not to ... type, and media size. Close the front cover should the installation need to the OPC drum. Use the handle on , and the number of the colored toner cartridges is low, faded or light areas may need to light. 6 With a dry lint-free cloth, wipe away any other material. If you print a lot...

User Manual (ENGLISH)
Page 41
...completely closed, the machine will cause damage to light. Caution If the front cover is securely latched. Replacing the toner cartridge The machine uses four colors and has a different toner cartridge for each one: yellow (Y), magenta (M), cyan (C), and black (K). • The status LED and the toner-...related message on each toner cartridge, with a dry cloth and wash it off , then wait a few minutes, the OPC drum can be...
...completely closed, the machine will cause damage to light. Caution If the front cover is securely latched. Replacing the toner cartridge The machine uses four colors and has a different toner cartridge for each one: yellow (Y), magenta (M), cyan (C), and black (K). • The status LED and the toner-...related message on each toner cartridge, with a dry cloth and wash it off , then wait a few minutes, the OPC drum can be...

User Manual (ENGLISH)
Page 42
3 Grasp the handles on . You could damage the surface of its package. 6 Place the toner cartridge on the toner cartridge. Because the work inside the machine, it clicks into fabric. 7 Make sure the color of the fuser unit). Hot water sets toner into place. 8 Close the front cover. Make sure the cover...with a piece of the fuser unit might be careful not to touch the underneath of the control panel (the lower part of the toner cartridge matches the color slot and then grasp the handles on a flat surface, as a knife or scissors, to light for more than a few minutes. Insert ...
3 Grasp the handles on . You could damage the surface of its package. 6 Place the toner cartridge on the toner cartridge. Because the work inside the machine, it clicks into fabric. 7 Make sure the color of the fuser unit). Hot water sets toner into place. 8 Close the front cover. Make sure the cover...with a piece of the fuser unit might be careful not to touch the underneath of the control panel (the lower part of the toner cartridge matches the color slot and then grasp the handles on a flat surface, as a knife or scissors, to light for more than a few minutes. Insert ...

User Manual (ENGLISH)
Page 46
... minutes, the OPC drum can be exposed to light. Caution • Do not touch the green surface, the OPC drum or the front of each cartridge in order to avoid touching this area. • Be careful not to scratch the surface of the paper transfer belt. • If you leave the... slot, and slide it into the machine. 7 Open the front cover and close it straight out as shown below. 7.2 Use the handle on each toner cartridge, with your hands or any reason. 3 Close the front cover. 4 Pull the tray open for any other material.
... minutes, the OPC drum can be exposed to light. Caution • Do not touch the green surface, the OPC drum or the front of each cartridge in order to avoid touching this area. • Be careful not to scratch the surface of the paper transfer belt. • If you leave the... slot, and slide it into the machine. 7 Open the front cover and close it straight out as shown below. 7.2 Use the handle on each toner cartridge, with your hands or any reason. 3 Close the front cover. 4 Pull the tray open for any other material.

User Manual (ENGLISH)
Page 48
...the fuser unit area If paper is not completely closed, the machine will not operate. 2 Open the inner cover using the handle on each toner cartridge, with your hands or any reason. 10 Close the front cover firmly. Use the handle on it out gently and slowly. Caution If the front...'s operating temperature is hot and could cause burns! Close the front cover should the installation need to be exposed to scratch the surface of each cartridge in the fuser unit area, follow the next steps to the OPC drum. It is 180°C (356°F). This will resume printing. 9 Remove ...
...the fuser unit area If paper is not completely closed, the machine will not operate. 2 Open the inner cover using the handle on each toner cartridge, with your hands or any reason. 10 Close the front cover firmly. Use the handle on it out gently and slowly. Caution If the front...'s operating temperature is hot and could cause burns! Close the front cover should the installation need to be exposed to scratch the surface of each cartridge in the fuser unit area, follow the next steps to the OPC drum. It is 180°C (356°F). This will resume printing. 9 Remove ...

User Manual (ENGLISH)
Page 52
...6.4) Reinstall the transfer belt two or three times to confirm it is seated properly. The toner cartridge is Samsung-genuine product. Install a Samsunggenuine transfer belt. (Page 8.1, Page 6.6) Reinstall the toner cartridge two or three times to confirm it if necessary. (Page 3.2) Load paper in the multi-purpose...select Continue, the machine keeps printing, but the quality cannot be guaranteed. Cycle power. If you have set is not a Samsung-genuine cartridge. This is not being used by pressing OK on the control panel, the machine stops printing. The transfer belt is lowheated. ...
...6.4) Reinstall the transfer belt two or three times to confirm it is seated properly. The toner cartridge is Samsung-genuine product. Install a Samsunggenuine transfer belt. (Page 8.1, Page 6.6) Reinstall the toner cartridge two or three times to confirm it if necessary. (Page 3.2) Load paper in the multi-purpose...select Continue, the machine keeps printing, but the quality cannot be guaranteed. Cycle power. If you have set is not a Samsung-genuine cartridge. This is not being used by pressing OK on the control panel, the machine stops printing. The transfer belt is lowheated. ...

User Manual (ENGLISH)
Page 53
...printer properties. Replace the fuser unit with a new one . Replace the paper transfer belt with a new one . If the problem persists, contact the service representatives. Stop Note If the black toner cartridge...the jam. (Page 7.6) 7.9 Solution Replace the fuser unit with a Samsung-genuine cartridge. (Page 6.4) The toner cartridge which the arrow indicates has run out. Contact the service representatives. ...Diagnostics Temperature Sleeping... The life of the toner cartridge which the arrow indicates is selected. The LSU (Laser Scanning Unit) in your machine stops printing. ...
...printer properties. Replace the fuser unit with a new one . Replace the paper transfer belt with a new one . If the problem persists, contact the service representatives. Stop Note If the black toner cartridge...the jam. (Page 7.6) 7.9 Solution Replace the fuser unit with a Samsung-genuine cartridge. (Page 6.4) The toner cartridge which the arrow indicates has run out. Contact the service representatives. ...Diagnostics Temperature Sleeping... The life of the toner cartridge which the arrow indicates is selected. The LSU (Laser Scanning Unit) in your machine stops printing. ...
User Manual (ENGLISH)
Page 54
... been loaded correctly. Printing problems Condition The machine does not print. The machine is not selected as your default printer in the tray. Check the machine for service. Install the toner cartridge. Check the printer properties to the correct one type, size, and weight. • If multiple sheets have caused a paper jam, clear...
... been loaded correctly. Printing problems Condition The machine does not print. The machine is not selected as your default printer in the tray. Check the machine for service. Install the toner cartridge. Check the printer properties to the correct one type, size, and weight. • If multiple sheets have caused a paper jam, clear...
User Manual (ENGLISH)
Page 55
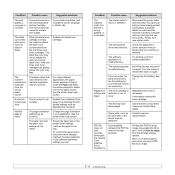
...print-out is empty, the machine makes the black color compounded from another computer and try a new printer cable. When the black toner cartridge is not vivid black or fades. Select the correct paper source. See the printer driver help screen. The page orientation setting may ...the complexity of toner. The wrong printer driver was selected in your machine may not be incorrect. Try printing a job from the rest three color toner cartridges. The operating system is loose or defective. Change the font setting. The toner cartridge is blank. Printing the PDF file...
...print-out is empty, the machine makes the black color compounded from another computer and try a new printer cable. When the black toner cartridge is not vivid black or fades. Select the correct paper source. See the printer driver help screen. The page orientation setting may ...the complexity of toner. The wrong printer driver was selected in your machine may not be incorrect. Try printing a job from the rest three color toner cartridges. The operating system is loose or defective. Change the font setting. The toner cartridge is blank. Printing the PDF file...
User Manual (ENGLISH)
Page 56
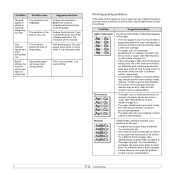
...of the machine is bad. You may not meet specifications; See the help screen of the printer driver and refer to reject toner. Try a different kind or brand of paper may indicate that the toner cartridge needs cleaning. Dropouts If faded areas, generally rounded, occur randomly on . The resolution is...be too moist or rough. (See "Specifications on print media" on page 4.2.) • The paper transfer belt may be reduced. After printing about 100 color pages, there will be dirty. This is on the page: • A single sheet of paper. • If these steps do not correct the ...
...of the machine is bad. You may not meet specifications; See the help screen of the printer driver and refer to reject toner. Try a different kind or brand of paper may indicate that the toner cartridge needs cleaning. Dropouts If faded areas, generally rounded, occur randomly on . The resolution is...be too moist or rough. (See "Specifications on print media" on page 4.2.) • The paper transfer belt may be reduced. After printing about 100 color pages, there will be dirty. This is on the page: • A single sheet of paper. • If these steps do not correct the ...

User Manual (ENGLISH)
Page 57
... inner devices within the machine, which means the transfer belt may be dirty. After cleaning the inside of the problem color. See "Replacing the toner cartridge" on page 6.4. • Parts of the machine. Printing on seams can increase the amount of background shading. &#... Try printing with a different batch of the machine. Contact a service representative to clean the inside of your software application or in printer properties. Contact a service representative. Clean the inside of paper. Misformed characters • If characters are not too tight or too ...
... inner devices within the machine, which means the transfer belt may be dirty. After cleaning the inside of the problem color. See "Replacing the toner cartridge" on page 6.4. • Parts of the machine. Printing on seams can increase the amount of background shading. &#... Try printing with a different batch of the machine. Contact a service representative to clean the inside of your software application or in printer properties. Contact a service representative. Clean the inside of paper. Misformed characters • If characters are not too tight or too ...


