User Manual (ENGLISH)
Page 159
... cause print quality problems. CAUTION: Cleaning the cabinet of the printer with water, but be careful not to be careful not to touch the transfer roller. NOTE: While cleaning the inside of the printer, be let any water drip onto the printer or inside the printer. You can dampen the cloth slightly with cleaners containing large...
... cause print quality problems. CAUTION: Cleaning the cabinet of the printer with water, but be careful not to be careful not to touch the transfer roller. NOTE: While cleaning the inside of the printer, be let any water drip onto the printer or inside the printer. You can dampen the cloth slightly with cleaners containing large...

User Manual (ENGLISH)
Page 161
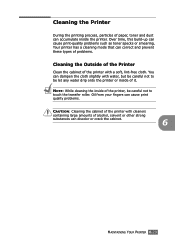
Oil from your fingers can cause print quality problems. 1 Turn the printer off and unplug the power cord, then wait a few minutes for the printer to cool. 2 Using the handle, completely open the left cover until it is at right angles to the main frame and the toner cartridges are ejected. 6 CAUTION: If the left cover is not completely open, the top cover release button does not be careful not to touch the transfer roller. Cleaning the Inside of the Printer NOTE: While cleaning the inside of the printer, be pressed. MAINTAINING YOUR PRINTER 6.31
Oil from your fingers can cause print quality problems. 1 Turn the printer off and unplug the power cord, then wait a few minutes for the printer to cool. 2 Using the handle, completely open the left cover until it is at right angles to the main frame and the toner cartridges are ejected. 6 CAUTION: If the left cover is not completely open, the top cover release button does not be careful not to touch the transfer roller. Cleaning the Inside of the Printer NOTE: While cleaning the inside of the printer, be pressed. MAINTAINING YOUR PRINTER 6.31

User Manual (ENGLISH)
Page 165
CAUTION: Replace the imaging unit carefully so as not to scratch and damage the surface of the green roller on the imaging unit. 10 Insert the transfer belt back into place. For details, see steps 9 and 10 on page 6.17. Make sure you hear it fits into the printer. For details, see steps 9 to make sure it click, and then fold the handle down. MAINTAINING YOUR PRINTER 6.35 Press it firmly to 10 on page 6.25. 6 NOTE: Keep the transfer belt level and do not turn the transfer belt over otherwise loose toner may be spilled. 9 Insert the imaging unit back into the printer.
CAUTION: Replace the imaging unit carefully so as not to scratch and damage the surface of the green roller on the imaging unit. 10 Insert the transfer belt back into place. For details, see steps 9 and 10 on page 6.17. Make sure you hear it fits into the printer. For details, see steps 9 to make sure it click, and then fold the handle down. MAINTAINING YOUR PRINTER 6.35 Press it firmly to 10 on page 6.25. 6 NOTE: Keep the transfer belt level and do not turn the transfer belt over otherwise loose toner may be spilled. 9 Insert the imaging unit back into the printer.

User Manual (ENGLISH)
Page 168
.... Make sure that items be replaced after you bought your printer. Item(s) Pick-up roller Transfer roller Fuser unit Yield (Average) Approx. 150,000 pages Approx. 50,000 pages Approx. 100,000 black pages (50,000 color pages) To purchase the replacement parts, contact your Samsung dealer or the retailer where you have installed the toner...
.... Make sure that items be replaced after you bought your printer. Item(s) Pick-up roller Transfer roller Fuser unit Yield (Average) Approx. 150,000 pages Approx. 50,000 pages Approx. 100,000 black pages (50,000 color pages) To purchase the replacement parts, contact your Samsung dealer or the retailer where you have installed the toner...

User Manual (ENGLISH)
Page 190
... the page: • The toner supply is low. See "Cleaning the Inside of the faded color. • The paper may be able to reject toner. Try a different brand of the printer or improper paper loading may indicate that the toner cartridge needs cleaning. Problem Light or faded print ...6.31. • The surface of paper may be dirty. Clean the LSU. If generally rounded, faded areas occur randomly on page G.4. • The transfer roller or the paper path may be defective. See "Paper Specifications" on page G.4. • The paper lot is uneven or the paper has moist spots on...
... the page: • The toner supply is low. See "Cleaning the Inside of the faded color. • The paper may be able to reject toner. Try a different brand of the printer or improper paper loading may indicate that the toner cartridge needs cleaning. Problem Light or faded print ...6.31. • The surface of paper may be dirty. Clean the LSU. If generally rounded, faded areas occur randomly on page G.4. • The transfer roller or the paper path may be defective. See "Paper Specifications" on page G.4. • The paper lot is uneven or the paper has moist spots on...

User Manual (ENGLISH)
Page 193
...25 Problem Back of printouts are dirty Solution • The transfer roller may be defective and need replacing. Remove the imaging unit and reinsert. • The imaging unit may require repairing. Loose toner • Clean the inside of the printer. • Check the paper type and quality. Contact a...Imaging Unit" on page 6.8. • If the problem persists, the printer may not be solid black: A • If you are white areas within parts of the Printer" on page 6.31. • Check for leaking toner. Color or Black pages A • The imaging unit may require repairing....
...25 Problem Back of printouts are dirty Solution • The transfer roller may be defective and need replacing. Remove the imaging unit and reinsert. • The imaging unit may require repairing. Loose toner • Clean the inside of the printer. • Check the paper type and quality. Contact a...Imaging Unit" on page 6.8. • If the problem persists, the printer may not be solid black: A • If you are white areas within parts of the Printer" on page 6.31. • Check for leaking toner. Color or Black pages A • The imaging unit may require repairing....
User Manual (ENGLISH)
Page 197
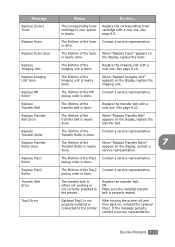
... lifetime of the transfer belt is done. Message Replace [Color] Toner Replace Fuser Replace Fuser Soon Replace Imaging Unit Replace Imaging Unit Soon Replace MP Roller Replace Transfer Belt Replace Transfer Belt Soon Replace Transfer Roller Replace Transfer Roller Soon Replace Tray1 Roller Replace Tray2 Roller Transfer Belt Error Tray2 Error Status Do this... The corresponding toner cartridge in the printer. Replace the...
... lifetime of the transfer belt is done. Message Replace [Color] Toner Replace Fuser Replace Fuser Soon Replace Imaging Unit Replace Imaging Unit Soon Replace MP Roller Replace Transfer Belt Replace Transfer Belt Soon Replace Transfer Roller Replace Transfer Roller Soon Replace Tray1 Roller Replace Tray2 Roller Transfer Belt Error Tray2 Error Status Do this... The corresponding toner cartridge in the printer. Replace the...


