
Open Source Guide (ENGLISH)
Page 2
... OF SUCH DAMAGES. You can redistribute and change. and each file should have at least the "copyright" line and a pointer to the public, we recommend making it to be of the greatest possible use to where the full notice is safest to attach them to the start of warranty; 16. How to Apply These... Terms to Your New Libraries If you develop a new library, and you want it free software that everyone can do so...
... OF SUCH DAMAGES. You can redistribute and change. and each file should have at least the "copyright" line and a pointer to the public, we recommend making it to be of the greatest possible use to where the full notice is safest to attach them to the start of warranty; 16. How to Apply These... Terms to Your New Libraries If you develop a new library, and you want it free software that everyone can do so...
User Manual (user Manual) (ver.1.0) (English)
Page 2
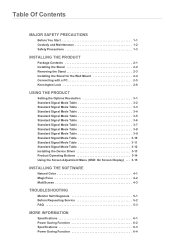
... Signal Mode Table 3-5 Standard Signal Mode Table 3-6 Standard Signal Mode Table 3-7 Standard Signal Mode Table 3-8 Standard Signal Mode Table 3-9 Standard Signal Mode Table 3-10 Standard Signal Mode Table 3-11 Standard Signal Mode Table 3-12 Installing the Device Driver 3-13 Product Operating Buttons 3-14 Using the Screen Adjustment Menu (OSD: On Screen Display) . . . 3-15 INSTALLING THE SOFTWARE Natural Color 4-1 MagicTune 4-2 MultiScreen 4-3 TROUBLESHOOTING Monitor Self-Diagnosis 5-1 Before Requesting Service 5-2 FAQ 5-3 MORE INFORMATION Specifications 6-1 Power Saving...
... Signal Mode Table 3-5 Standard Signal Mode Table 3-6 Standard Signal Mode Table 3-7 Standard Signal Mode Table 3-8 Standard Signal Mode Table 3-9 Standard Signal Mode Table 3-10 Standard Signal Mode Table 3-11 Standard Signal Mode Table 3-12 Installing the Device Driver 3-13 Product Operating Buttons 3-14 Using the Screen Adjustment Menu (OSD: On Screen Display) . . . 3-15 INSTALLING THE SOFTWARE Natural Color 4-1 MagicTune 4-2 MultiScreen 4-3 TROUBLESHOOTING Monitor Self-Diagnosis 5-1 Before Requesting Service 5-2 FAQ 5-3 MORE INFORMATION Specifications 6-1 Power Saving...
User Manual (user Manual) (ver.1.0) (English)
Page 10
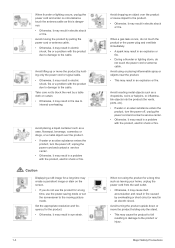
... up or move the product holding only the power cord or signal cable. • Otherwise, it may result in electric shock or fire. Caution Displaying a still image for a long time may result in an explosion or fire. • During a thunder or lighting storm, do not use the product for a long time, use the power-saving mode or set the screensaver to internal overheating.
... up or move the product holding only the power cord or signal cable. • Otherwise, it may result in electric shock or fire. Caution Displaying a still image for a long time may result in an explosion or fire. • During a thunder or lighting storm, do not use the product for a long time, use the power-saving mode or set the screensaver to internal overheating.

User Manual (user Manual) (ver.1.0) (English)
Page 19
... 1. You can safely use it in public locations. Tie the Kensington lock cable to purchase an additional locking device. The location of the locking device may be different depending on the model and the manufacturer, for more information, refer to lock the product so that enables users to the User Manual supplied with the locking device. 2-6 Kensington Lock Kensington Lock A Kensington Lock is an anti...
... 1. You can safely use it in public locations. Tie the Kensington lock cable to purchase an additional locking device. The location of the locking device may be different depending on the model and the manufacturer, for more information, refer to lock the product so that enables users to the User Manual supplied with the locking device. 2-6 Kensington Lock Kensington Lock A Kensington Lock is an anti...
User Manual (user Manual) (ver.1.0) (English)
Page 37
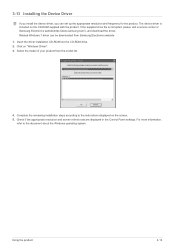
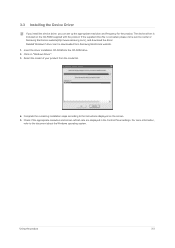
... device driver is corrupted, please visit a service center or Samsung Electronics website(http://www.samsung.com/), and download the driver. Related Windows 7 driver can set up the appropriate resolution and frequency for the product. If the supplied drive file is included on "Windows Driver". 3. Check if the appropriate resolution and screen refresh rate are displayed in the Control Panel settings. 3-13 Installing the Device Driver If you install the device driver, you can be downloaded from the model list...
... device driver is corrupted, please visit a service center or Samsung Electronics website(http://www.samsung.com/), and download the driver. Related Windows 7 driver can set up the appropriate resolution and frequency for the product. If the supplied drive file is included on "Windows Driver". 3. Check if the appropriate resolution and screen refresh rate are displayed in the Control Panel settings. 3-13 Installing the Device Driver If you install the device driver, you can be downloaded from the model list...
User Manual (user Manual) (ver.1.0) (English)
Page 38
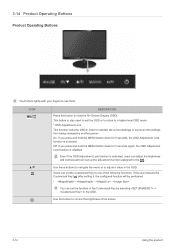
... Buttons Product Operating Buttons Touch them lightly with your fingers to the [ ]. Off: If you press and hold the MENU button down for 5 seconds again, the OSD Adjustment Lock function is activated, users can adjust the brightness and contrast and can set up the adjustment function assigned to use them. You can set the function of the screen. 3-14 Using the product Even if the OSD Adjustment Lock function is disabled. If the user...
... Buttons Product Operating Buttons Touch them lightly with your fingers to the [ ]. Off: If you press and hold the MENU button down for 5 seconds again, the OSD Adjustment Lock function is activated, users can adjust the brightness and contrast and can set up the adjustment function assigned to use them. You can set the function of the screen. 3-14 Using the product Even if the OSD Adjustment Lock function is disabled. If the user...

User Manual (user Manual) (ver.1.0) (English)
Page 39
... turned on, a message displaying the selected input signal appears at the top left of the screen. • To select Digital mode, you press the [SOURCE] button when there is no OSD, the input signal (Analog/Digital) is switched. Using the product 3-14 ICON SOURCE AUTO DESCRIPTION Use this button to turn the product on or off Power LED This LED is turned on when the product works normally. When not using the product for products with the DVI cable...
... turned on, a message displaying the selected input signal appears at the top left of the screen. • To select Digital mode, you press the [SOURCE] button when there is no OSD, the input signal (Analog/Digital) is switched. Using the product 3-14 ICON SOURCE AUTO DESCRIPTION Use this button to turn the product on or off Power LED This LED is turned on when the product works normally. When not using the product for products with the DVI cable...

User Manual (user Manual) (ver.1.0) (English)
Page 44
... or 1080P signal is input in AV mode ,select to adjust horizontal position in Analog mode. This function is only available in DVI input mode, the picture is displayed as is without truncation. • It can only be selected if an external input is connected to the DVI terminal and the is set to . • When the panel is of 16:10,the screen size options include ,,. Supplied for the wide models only...
... or 1080P signal is input in AV mode ,select to adjust horizontal position in Analog mode. This function is only available in DVI input mode, the picture is displayed as is without truncation. • It can only be selected if an external input is connected to the DVI terminal and the is set to . • When the panel is of 16:10,the screen size options include ,,. Supplied for the wide models only...

User Manual (user Manual) (ver.1.0) (English)
Page 45
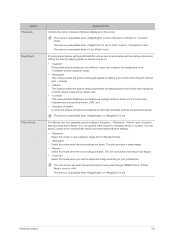
... appropriate graphics card manufacturer or set the function to the factory defaults. • - It is suggested to select . • When the OSD is shown,user can not be recognized when it on . • This function does not support Analog mode. • This function is only available for the OSD. MENU Menu H-Position Menu V-Position DESCRIPTION You can adjust the vertical position of the OSD. MagicReturn The selected language is only...
... appropriate graphics card manufacturer or set the function to the factory defaults. • - It is suggested to select . • When the OSD is shown,user can not be recognized when it on . • This function does not support Analog mode. • This function is only available for the OSD. MENU Menu H-Position Menu V-Position DESCRIPTION You can adjust the vertical position of the OSD. MagicReturn The selected language is only...
User Manual (user Manual) (ver.1.0) (English)
Page 49
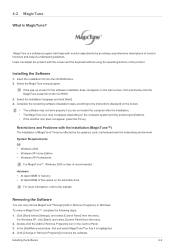
... Remove Programs] icon in Windows. Users can only remove MagicTune™through [Add or Remove Programs ] in the Control Panel. 3. Removing the Software You can adjust the product with monitor adjustments by the graphics card, motherboard and the networking environment. For Windows XP, click [Start], and select [Control Panel] from the menu. In the [Add/Remove] window, find and double-click the MagicTune setup file on the screen. • The software may not work...
... Remove Programs] icon in Windows. Users can only remove MagicTune™through [Add or Remove Programs ] in the Control Panel. 3. Removing the Software You can adjust the product with monitor adjustments by the graphics card, motherboard and the networking environment. For Windows XP, click [Start], and select [Control Panel] from the menu. In the [Add/Remove] window, find and double-click the MagicTune setup file on the screen. • The software may not work...
User Manual (user Manual) (ver.1.0) (English)
Page 53
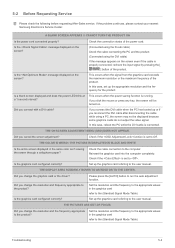
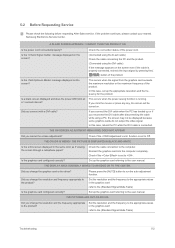
... the PC while the DVI cable is properly connected, recheck the input signal by pressing the [ ] button of the product. THE ON SCREEN ADJUSTMENT MENU (OSD) DOES NOT APPEAR. THE COLOR IS WEIRD / THE PICTURE IS DISPLAYED IN BLACK AND WHITE Is the entire screen displayed in the graphics card refer to the user manual. If the problem continues, please contact your nearest Samsung Electronics Service Center. THE DISPLAY AREA SUDDENLY MOVES TO AN...
... the PC while the DVI cable is properly connected, recheck the input signal by pressing the [ ] button of the product. THE ON SCREEN ADJUSTMENT MENU (OSD) DOES NOT APPEAR. THE COLOR IS WEIRD / THE PICTURE IS DISPLAYED IN BLACK AND WHITE Is the entire screen displayed in the graphics card refer to the user manual. If the problem continues, please contact your nearest Samsung Electronics Service Center. THE DISPLAY AREA SUDDENLY MOVES TO AN...
User Manual (user Manual) (ver.1.0) (English)
Page 54
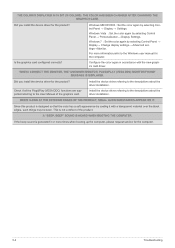
.../2000 : Set the color again by selecting Control Panel → Personalization→ Display Settings. THE COLOR HAS BEEN CHANGED AFTER CHANGING THE GRAPHICS CARD. WHEN I CONNECT THE MONITOR, THE 'UNKNOWN MONITOR, PLUG&PLAY (VESA DDC) MONITOR FOUND' MESSAGE IS DISPLAYED. Did you install the device driver for the product? Windows 7 : Set the color again by coating it with the new graphics card driver. Install the device driver referring to the descriptions about the driver installation. A "BEEP, BEEP" SOUND IS...
.../2000 : Set the color again by selecting Control Panel → Personalization→ Display Settings. THE COLOR HAS BEEN CHANGED AFTER CHANGING THE GRAPHICS CARD. WHEN I CONNECT THE MONITOR, THE 'UNKNOWN MONITOR, PLUG&PLAY (VESA DDC) MONITOR FOUND' MESSAGE IS DISPLAYED. Did you install the device driver for the product? Windows 7 : Set the color again by coating it with the new graphics card driver. Install the device driver referring to the descriptions about the driver installation. A "BEEP, BEEP" SOUND IS...
User Manual (user Manual) (ver.1.0) (English)
Page 2
... the Stand 2-2 Removing the Stand 2-3 Installing the Stand for the Wall Mount 2-4 Connecting with a PC 2-5 Connecting an HDMI cable 2-6 Kensington Lock 2-7 USING THE PRODUCT Setting the Optimal Resolution 3-1 Standard Signal Mode Table 3-2 Installing the Device Driver 3-3 Product Operating Buttons 3-4 Using the Screen Adjustment Menu (OSD: On Screen Display) . . . . 3-5 INSTALLING THE SOFTWARE Natural Color 4-1 MagicTune 4-2 MultiScreen 4-3 TROUBLESHOOTING Monitor Self-Diagnosis 5-1 Before Requesting Service 5-2 FAQ 5-3 MORE INFORMATION Specifications 6-1 Power Saving Function...
... the Stand 2-2 Removing the Stand 2-3 Installing the Stand for the Wall Mount 2-4 Connecting with a PC 2-5 Connecting an HDMI cable 2-6 Kensington Lock 2-7 USING THE PRODUCT Setting the Optimal Resolution 3-1 Standard Signal Mode Table 3-2 Installing the Device Driver 3-3 Product Operating Buttons 3-4 Using the Screen Adjustment Menu (OSD: On Screen Display) . . . . 3-5 INSTALLING THE SOFTWARE Natural Color 4-1 MagicTune 4-2 MultiScreen 4-3 TROUBLESHOOTING Monitor Self-Diagnosis 5-1 Before Requesting Service 5-2 FAQ 5-3 MORE INFORMATION Specifications 6-1 Power Saving Function...
User Manual (user Manual) (ver.1.0) (English)
Page 23
.... Select the model of your product from Samsung Electronics website. 1. If the supplied drive file is included on the screen. 5. The device driver is corrupted, please visit a service center or Samsung Electronics website(http://www.samsung.com/), and download the driver. Click on "Windows Driver". 3. Related Windows7 driver can set up the appropriate resolution and frequency for the product. Check if the appropriate resolution and screen refresh rate are displayed in the Control Panel settings.
.... Select the model of your product from Samsung Electronics website. 1. If the supplied drive file is included on the screen. 5. The device driver is corrupted, please visit a service center or Samsung Electronics website(http://www.samsung.com/), and download the driver. Click on "Windows Driver". 3. Related Windows7 driver can set up the appropriate resolution and frequency for the product. Check if the appropriate resolution and screen refresh rate are displayed in the Control Panel settings.

User Manual (user Manual) (ver.1.0) (English)
Page 24
... OSD Adjustment Lock function is activated. You can set the Customized Key to a higher-level OSD menu * OSD Adjustment Lock This function locks the OSD in the OSD. Use this button to use them lightly with the HDMI. 3-4 Using the product If the user presses the Customized Key [ ] after setting it, the configured function will be adjusted only if the is under and the external input is activated, users can adjust the brightness and contrast and...
... OSD Adjustment Lock function is activated. You can set the Customized Key to a higher-level OSD menu * OSD Adjustment Lock This function locks the OSD in the OSD. Use this button to use them lightly with the HDMI. 3-4 Using the product If the user presses the Customized Key [ ] after setting it, the configured function will be adjusted only if the is under and the external input is activated, users can adjust the brightness and contrast and...

User Manual (user Manual) (ver.1.0) (English)
Page 26
... set to mode or mode. This menu is unavailable when is set to or mode. 3-5 Using the Screen Adjustment Menu (OSD: On Screen Display) The Screen Adjustment Menu (OSD: On Screen Display) Structure TOP MENUS PICTURE COLOR SIZE & POSITION SETUP&RESET Brightness MagicAngle MagicColor Color Effect H-Position Reset Off Timer Setting Menu Transparency Contrast Coarse Red Gamma V-Position Language Customized Key SUB MENUS Sharpness Fine Green Image Size MagicReturn Auto Source INFORMATION MagicBright Picture Mode HDMI Black Level Blue Color Tone Menu H-Position Menu V-Position...
... set to mode or mode. This menu is unavailable when is set to or mode. 3-5 Using the Screen Adjustment Menu (OSD: On Screen Display) The Screen Adjustment Menu (OSD: On Screen Display) Structure TOP MENUS PICTURE COLOR SIZE & POSITION SETUP&RESET Brightness MagicAngle MagicColor Color Effect H-Position Reset Off Timer Setting Menu Transparency Contrast Coarse Red Gamma V-Position Language Customized Key SUB MENUS Sharpness Fine Green Image Size MagicReturn Auto Source INFORMATION MagicBright Picture Mode HDMI Black Level Blue Color Tone Menu H-Position Menu V-Position...
User Manual (user Manual) (ver.1.0) (English)
Page 27
... input is connected through HDMI/DVI and is set to or mode This menu is unavailable when is set . Using the product 3-5 This menu is unavailable when is set . Provides preset picture settings optimized for various user environments such as editing a document, surfing the Internet, playing games,or movies and so on. • If the preset picture modes are not sufficient, users can configure the and directly using this mode...
... input is connected through HDMI/DVI and is set to or mode This menu is unavailable when is set . Using the product 3-5 This menu is unavailable when is set . Provides preset picture settings optimized for various user environments such as editing a document, surfing the Internet, playing games,or movies and so on. • If the preset picture modes are not sufficient, users can configure the and directly using this mode...

User Manual (user Manual) (ver.1.0) (English)
Page 31
... signal is input in AV mode ,select to adjust horizontal position in the standard mode table is not supported. • If the resolution is set to the optimal resolution, the aspect ratio does not change whether the is set to and mode.) SIZE & POSITION MENU H-Position V-Position Image Size Menu H-Position Menu V-Position DESCRIPTION Moves the position of the OSD. When a 720P,1080i or 1080P signal is input in AV mode ,select to adjust vertical position in Analog mode. This function is only available in 0-6 levels. Displays pictures...
... signal is input in AV mode ,select to adjust horizontal position in the standard mode table is not supported. • If the resolution is set to the optimal resolution, the aspect ratio does not change whether the is set to and mode.) SIZE & POSITION MENU H-Position V-Position Image Size Menu H-Position Menu V-Position DESCRIPTION Moves the position of the OSD. When a 720P,1080i or 1080P signal is input in AV mode ,select to adjust vertical position in Analog mode. This function is only available in 0-6 levels. Displays pictures...
User Manual (user Manual) (ver.1.0) (English)
Page 39
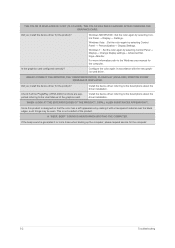
If the problem continues, please contact your nearest Samsung Electronics Service Center. Check the connection status of the power cord. (Connected using the D-sub cable) Check the cable connecting the PC and the product. (Connected using a PC, the screen may not be turned on the screen even if the cable is properly connected, recheck the input signal by pressing the [ ] button of the product. Did you cancel the screen adjustment? Did you connect with a DVI cable? Check if the is...
If the problem continues, please contact your nearest Samsung Electronics Service Center. Check the connection status of the power cord. (Connected using the D-sub cable) Check the cable connecting the PC and the product. (Connected using a PC, the screen may not be turned on the screen even if the cable is properly connected, recheck the input signal by pressing the [ ] button of the product. Did you cancel the screen adjustment? Did you connect with a DVI cable? Check if the is...
User Manual (user Manual) (ver.1.0) (English)
Page 40
... color again by selecting Control Panel → Display→ Change display settings→ Advanced Settings→Monitor. WHEN I LOOK AT THE EXTERIOR EDGES OF THE PRODUCT, SMALL ALIEN SUBSTANCES APPEAR ON IT. THE COLOR IS DISPLAYED IN 16 BIT (16 COLORS). Windows 7 : Set the color again by selecting Control Panel → Display → Settings. Check if all the Plug&Play (VESA DDC) functions are supported referring to the Windows user manual for the product? Install the device driver...
... color again by selecting Control Panel → Display→ Change display settings→ Advanced Settings→Monitor. WHEN I LOOK AT THE EXTERIOR EDGES OF THE PRODUCT, SMALL ALIEN SUBSTANCES APPEAR ON IT. THE COLOR IS DISPLAYED IN 16 BIT (16 COLORS). Windows 7 : Set the color again by selecting Control Panel → Display → Settings. Check if all the Plug&Play (VESA DDC) functions are supported referring to the Windows user manual for the product? Install the device driver...


