
User Manual (ENGLISH)
Page 10
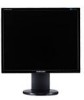
Your Monitor Initial Settings Select the language using the up to adjust the resolution of your PC resolution so that it is the same as the optimal resolution for highly polished black products as a product feature. It can be displayed again. Turn the Power button off and on the screen is the optimal... 40 seconds. Cables Introduction D-Sub Cable Others Power Cord DVI Cable (option) Cleaning Cloth Note This is only provided for this product. Note The resolution displayed on . Make sure to three (3) times. Adjust your PC before reaching the maximum count. The...
Your Monitor Initial Settings Select the language using the up to adjust the resolution of your PC resolution so that it is the same as the optimal resolution for highly polished black products as a product feature. It can be displayed again. Turn the Power button off and on the screen is the optimal... 40 seconds. Cables Introduction D-Sub Cable Others Power Cord DVI Cable (option) Cleaning Cloth Note This is only provided for this product. Note The resolution displayed on . Make sure to three (3) times. Adjust your PC before reaching the maximum count. The...
User Manual (ENGLISH)
Page 11
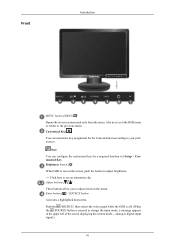
Also use to exit the OSD menu or return to adjust items in the upper left of the screen displaying the current mode -- Brightness button [ ] When OSD is pressed to your preferences. Note You can customize key assignment for a required function via Setup > Customized Key. ...
Also use to exit the OSD menu or return to adjust items in the upper left of the screen displaying the current mode -- Brightness button [ ] When OSD is pressed to your preferences. Note You can customize key assignment for a required function via Setup > Customized Key. ...
User Manual (ENGLISH)
Page 18
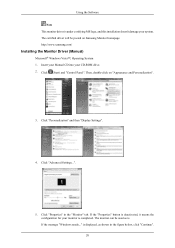
...driver will be used as is displayed, as shown in the "Monitor" tab. If the message "Windows needs..." http://www.samsung.com/ Installing the Monitor Driver (Manual) Microsoft® Windows Vista™, Operating System 1. Then, double-click on Samsung Monitor homepage. If the "Properties" button... is deactivated, it means the configuration for your monitor is under certifying MS logo, and this installation doesn't damage your CD-ROM drive. 2. The monitor can be posted on "Appearance and ...
...driver will be used as is displayed, as shown in the "Monitor" tab. If the message "Windows needs..." http://www.samsung.com/ Installing the Monitor Driver (Manual) Microsoft® Windows Vista™, Operating System 1. Then, double-click on Samsung Monitor homepage. If the "Properties" button... is deactivated, it means the configuration for your monitor is under certifying MS logo, and this installation doesn't damage your CD-ROM drive. 2. The monitor can be posted on "Appearance and ...
User Manual (ENGLISH)
Page 20
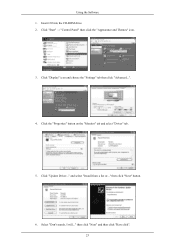
Microsoft® Windows® XP Operating System 22 Click "Close" → "Close" → "OK" → "OK" on the screen, and click "Next". 10. Select the model that matches your monitor from the list of monitor models on the following screens displayed in sequence. Using the Software 9.
Microsoft® Windows® XP Operating System 22 Click "Close" → "Close" → "OK" → "OK" on the screen, and click "Next". 10. Select the model that matches your monitor from the list of monitor models on the following screens displayed in sequence. Using the Software 9.
User Manual (ENGLISH)
Page 21
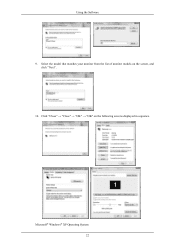
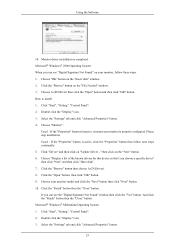
Using the Software 1. Click "Start" → "Control Panel" then click the "Appearance and Themes" icon. 3. Click "Display" icon and choose the "Settings" tab then click "Advanced...". 4. and select "Install from a list or..." Insert CD into the CD-ROM drive. 2. Click the "Properties" button on the "Monitor" tab and select "Driver" tab. 5. then click "Next" button. 6. then click "Next" and then click "Have disk". 23 Click "Update Driver..." Select "Don't search, I will..."
Using the Software 1. Click "Start" → "Control Panel" then click the "Appearance and Themes" icon. 3. Click "Display" icon and choose the "Settings" tab then click "Advanced...". 4. and select "Install from a list or..." Insert CD into the CD-ROM drive. 2. Click the "Properties" button on the "Monitor" tab and select "Driver" tab. 5. then click "Next" button. 6. then click "Next" and then click "Have disk". 23 Click "Update Driver..." Select "Don't search, I will..."
User Manual (ENGLISH)
Page 23
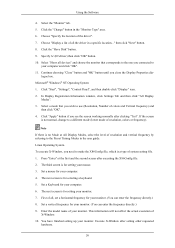
...on "Update Driver..." Double click the "Display" icon. 3. And click the "Finish" button then the "Close" button. Choose "Display a list of the known drivers for this device so that I can see "Digital Signature Not Found" on your monitor model and click the "Next" button ...then click "Next" button. 10. Double click the "Display" icon. 3. Monitor driver installation is properly configured. Click "Start", "Setting", "Control Panel". 2. Click the...
...on "Update Driver..." Double click the "Display" icon. 3. And click the "Finish" button then the "Close" button. Choose "Display a list of the known drivers for this device so that I can see "Digital Signature Not Found" on your monitor model and click the "Next" button ...then click "Next" button. 10. Double click the "Display" icon. 3. Monitor driver installation is properly configured. Click "Start", "Setting", "Control Panel". 2. Click the...
User Manual (ENGLISH)
Page 24
...computer. 4. Execute X-Window after clicking "Test". Note If there is for setting your mouse. 3. Set a Keyboard for setting your monitor. 7. Choose "Display a list of colors and Vertical frequency) and then click "OK". 4. Specify A:\(D:\driver) then click "OK" button. 10. Continue ... the location of X-Window. 10. Set a mouse for your monitor. (You can enter the frequency directly.) 9. Click the "Have Disk" button. 9. Click "Start", "Settings", "Control Panel", and then double-click "Display" icon. 2. logue box. Set a vertical frequency for your ...
...computer. 4. Execute X-Window after clicking "Test". Note If there is for setting your mouse. 3. Set a Keyboard for setting your monitor. 7. Choose "Display a list of colors and Vertical frequency) and then click "OK". 4. Specify A:\(D:\driver) then click "OK" button. 10. Continue ... the location of X-Window. 10. Set a mouse for your monitor. (You can enter the frequency directly.) 9. Click the "Have Disk" button. 9. Click "Start", "Settings", "Control Panel", and then double-click "Display" icon. 2. logue box. Set a vertical frequency for your ...

User Manual (ENGLISH)
Page 26
...into the CD-ROM drive. 2. Select "I agree to the terms of the license agreement" to install the software for the main screen is not displayed, proceed with the installation using MagicTune™ in Windows® 2000 or later. Double-click the icon to install the MagicTune™ program. 7.... by such factors as the video card, motherboard and the network environment. Note If the popup window to accept the terms of computer system or monitor. If that happens, press F5 Key. System Requirements OS • Windows 2000 • Windows XP Home Edition • Windows XP Professional &#...
...into the CD-ROM drive. 2. Select "I agree to the terms of the license agreement" to install the software for the main screen is not displayed, proceed with the installation using MagicTune™ in Windows® 2000 or later. Double-click the icon to install the MagicTune™ program. 7.... by such factors as the video card, motherboard and the network environment. Note If the popup window to accept the terms of computer system or monitor. If that happens, press F5 Key. System Requirements OS • Windows 2000 • Windows XP Home Edition • Windows XP Professional &#...

User Manual (ENGLISH)
Page 27
... the terms of the license agreement" to remove the program. 5. Note Visit the MagicTune™ website for technical support for the main screen is not displayed, proceed with the installation using the "Add or Remove Programs" option of use. 29 Note If the popup window to highlight it to install the...
... the terms of the license agreement" to remove the program. 5. Note Visit the MagicTune™ website for technical support for the main screen is not displayed, proceed with the installation using the "Add or Remove Programs" option of use. 29 Note If the popup window to highlight it to install the...

User Manual (ENGLISH)
Page 28
...function as per the orientation mode selected (90, 180, 270). If you are not displaying movie files properly in Full Screen Mode will not function as per pixel (Bit depth/Color Quality). 7. The "Display Driver" should be properly loaded for 24 bits per the orientation mode selected (90,... installation of MagicRotation can be the latest driver supplied by such factors as the video card, motherboard and the network environment. The installed "Display Driver" should fix the problem. 3. If some applications like Windows Media Player, Real Player, etc. In most cases this should be ...
...function as per the orientation mode selected (90, 180, 270). If you are not displaying movie files properly in Full Screen Mode will not function as per pixel (Bit depth/Color Quality). 7. The "Display Driver" should be properly loaded for 24 bits per the orientation mode selected (90,... installation of MagicRotation can be the latest driver supplied by such factors as the video card, motherboard and the network environment. The installed "Display Driver" should fix the problem. 3. If some applications like Windows Media Player, Real Player, etc. In most cases this should be ...

User Manual (ENGLISH)
Page 32
Customized key You can customize key assignment for a required function via Setup > Customized Key. 34 MagicColor - Color Effect) Note You can still adjust the brightness and contrast, and adjust Customized Key ( ) using the Direct button. To view the operating screen displayed when pressing the [ tomized key for a function, click the name of each function. ] button after configuring the cus- (MagicBright - Adjusting the Monitor Note Though the OSD adjustment lock function is activated, you can configure the customized key for the Custom button according to your preferences.
Customized key You can customize key assignment for a required function via Setup > Customized Key. 34 MagicColor - Color Effect) Note You can still adjust the brightness and contrast, and adjust Customized Key ( ) using the Direct button. To view the operating screen displayed when pressing the [ tomized key for a function, click the name of each function. ] button after configuring the cus- (MagicBright - Adjusting the Monitor Note Though the OSD adjustment lock function is activated, you can configure the customized key for the Custom button according to your preferences.

User Manual (ENGLISH)
Page 34
MENU MENU Contrast (Not available in MagicBright mode of Dynamic Contrast.) 36 Display Time cy Auto Source Picture Brightness (Not available in MagicBright mode of Dynamic Contrast.) You can use the on-screen menus to change the brightness according to personal preference. Color Effect Gamma trol Sharpness H-Position V-Position OSD Language Setup Reset Information H-Position V-Position Customized Off Timer Key Transparen- Adjusting the Monitor OSD Function Picture Brightness Contrast MagicBright Color Image MagicColor Color Tone Coarse Fine Color Con-
MENU MENU Contrast (Not available in MagicBright mode of Dynamic Contrast.) 36 Display Time cy Auto Source Picture Brightness (Not available in MagicBright mode of Dynamic Contrast.) You can use the on-screen menus to change the brightness according to personal preference. Color Effect Gamma trol Sharpness H-Position V-Position OSD Language Setup Reset Information H-Position V-Position Customized Off Timer Key Transparen- Adjusting the Monitor OSD Function Picture Brightness Contrast MagicBright Color Image MagicColor Color Tone Coarse Fine Color Con-

User Manual (ENGLISH)
Page 37
The screen before applying MagicColor appears on the right and the screen after applying MagicColor appears on the left. • Full - Displays vivid natural color with clearness. • Intelligent - Returns to display natural color more realistic natural skin color with clearness. MagicColor Adjusting the Monitor MagicColor is a new technology that Samsung has exclusively developed to improve digital image and to the original mode. • Demo - MENU MENU 39 Displays not only vivid natural color but also more clearly without disturbing image quality. • Off -
The screen before applying MagicColor appears on the right and the screen after applying MagicColor appears on the left. • Full - Displays vivid natural color with clearness. • Intelligent - Returns to display natural color more realistic natural skin color with clearness. MagicColor Adjusting the Monitor MagicColor is a new technology that Samsung has exclusively developed to improve digital image and to the original mode. • Demo - MENU MENU 39 Displays not only vivid natural color but also more clearly without disturbing image quality. • Off -

User Manual (ENGLISH)
Page 40
... green color effect to a black and white screen. MENU MENU Gamma Gamma correction changes the luminance of black and white are displayed. • Green - This applies the Sepia color effect to a black and white screen. • Aqua - Adjusting the Monitor • Off • Grayscale • Green • Aqua • Sepia • Off -
... green color effect to a black and white screen. MENU MENU Gamma Gamma correction changes the luminance of black and white are displayed. • Green - This applies the Sepia color effect to a black and white screen. • Aqua - Adjusting the Monitor • Off • Grayscale • Green • Aqua • Sepia • Off -

User Manual (ENGLISH)
Page 43
Adjusting the Monitor ( Not available in MagicColor mode of Full and Intelligent. ) MENU MENU H-Position Changes the horizontal position of the monitor's entire display. (Available in Analog mode only) MENU MENU V-Position 45
Adjusting the Monitor ( Not available in MagicColor mode of Full and Intelligent. ) MENU MENU H-Position Changes the horizontal position of the monitor's entire display. (Available in Analog mode only) MENU MENU V-Position 45
User Manual (ENGLISH)
Page 44
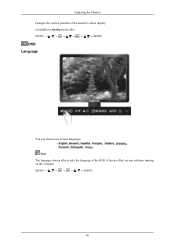
MENU MENU 46 It has no effect on any software running on the computer. Note The language chosen affects only the language of nine languages. Adjusting the Monitor Changes the vertical position of the monitor's entire display. (Available in Analog mode only) MENU MENU OSD Language You can choose one of the OSD.
MENU MENU 46 It has no effect on any software running on the computer. Note The language chosen affects only the language of nine languages. Adjusting the Monitor Changes the vertical position of the monitor's entire display. (Available in Analog mode only) MENU MENU OSD Language You can choose one of the OSD.

User Manual (ENGLISH)
Page 46
You can set the amount of the OSD. • Off • On MENU MENU Display Time The menu will wait before it is turned off if no adjustments are made for a certain time period. Transparency Adjusting the Monitor Change the transparency of the background of time the menu will be automatically turned off . 48
You can set the amount of the OSD. • Off • On MENU MENU Display Time The menu will wait before it is turned off if no adjustments are made for a certain time period. Transparency Adjusting the Monitor Change the transparency of the background of time the menu will be automatically turned off . 48

User Manual (ENGLISH)
Page 50
Adjusting the Monitor Information Shows a video source, display mode on the OSD screen. MENU → , →MENU 52
Adjusting the Monitor Information Shows a video source, display mode on the OSD screen. MENU → , →MENU 52
User Manual (ENGLISH)
Page 52
...message is on, reboot the computer to analog. If the display exceeds 85 Hz, the display will work properly 54 In this message when the signal from the computer while the monitor is still powered on. Q: If the power is displayed. A: You can handle properly. A: Adjust the maximum resolution... and frequency that the monitor can see "Not Optimum Mode", "Recommended Mode 1280 x 1024 60 Hz" ...
...message is on, reboot the computer to analog. If the display exceeds 85 Hz, the display will work properly 54 In this message when the signal from the computer while the monitor is still powered on. Q: If the power is displayed. A: You can handle properly. A: Adjust the maximum resolution... and frequency that the monitor can see "Not Optimum Mode", "Recommended Mode 1280 x 1024 60 Hz" ...

User Manual (ENGLISH)
Page 53
... during this one minute and then disappears. Please change to the video card manual. Then press any key on the keyboard again to activate the monitor and restore the image on the screen. plications? Q: Connected using the OSD. A: Reboot the computer. A: Set the video card by referring to a crash between ... one color as certain types of the video card signals. A: Check the signal cable connection. Q: Have you locked the On Screen Display (OSD) Menu to the cycle of graphic cards do not send out video signals. A: If there is in its slot. Q: Have the screen colors ...
... during this one minute and then disappears. Please change to the video card manual. Then press any key on the keyboard again to activate the monitor and restore the image on the screen. plications? Q: Connected using the OSD. A: Reboot the computer. A: Set the video card by referring to a crash between ... one color as certain types of the video card signals. A: Check the signal cable connection. Q: Have you locked the On Screen Display (OSD) Menu to the cycle of graphic cards do not send out video signals. A: If there is in its slot. Q: Have the screen colors ...


