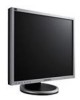

User Manual (ENGLISH)
Page 17
... system to another. Follow the directions appropriate for the monitor driver, insert the CD-ROM included with this monitor. Click "Windows". 3. Choose your monitor model in the model list, then click the "OK" button. 4. If you have. Internet web site : http://www.samsung.com/ (Worldwide) Installing the Monitor Driver (Automatic) 1. Prepare a blank disk and download the...
... system to another. Follow the directions appropriate for the monitor driver, insert the CD-ROM included with this monitor. Click "Windows". 3. Choose your monitor model in the model list, then click the "OK" button. 4. If you have. Internet web site : http://www.samsung.com/ (Worldwide) Installing the Monitor Driver (Automatic) 1. Prepare a blank disk and download the...

User Manual (ENGLISH)
Page 18
..., it means the configuration for your system. Using the Software Note This monitor driver is under certifying MS logo, and this installation doesn't damage your monitor is completed. Click (Start) and "Control Panel". Then, double-click on Samsung Monitor homepage. If the message "Windows needs..." is displayed, as is. Click "Properties" in the figure below...
..., it means the configuration for your system. Using the Software Note This monitor driver is under certifying MS logo, and this installation doesn't damage your monitor is completed. Click (Start) and "Control Panel". Then, double-click on Samsung Monitor homepage. If the message "Windows needs..." is displayed, as is. Click "Properties" in the figure below...

User Manual (ENGLISH)
Page 20
Select the model that matches your monitor from the list of monitor models on the following screens displayed in sequence. Click "Close" → "Close" → "OK" → "OK" on the screen, and click "Next". 10. Using the Software 9. Microsoft® Windows® XP Operating System 19
Select the model that matches your monitor from the list of monitor models on the following screens displayed in sequence. Click "Close" → "Close" → "OK" → "OK" on the screen, and click "Next". 10. Using the Software 9. Microsoft® Windows® XP Operating System 19

User Manual (ENGLISH)
Page 22
Note This monitor driver is under certifying MS logo, and this installation doesn't damage your monitor model in the model list and click the "Next" button. 8. Using the Software 7. http://www.samsung.com/ 9. If you can see following message window, then click the "Continue Anyway" button. The certified driver will be posted on Samsung Monitor homepage. Then click "OK" button. Click the "Close" button then click "OK" button continually. 21 Click the "Browse" button then choose A:(D:\Driver) and choose your system.
Note This monitor driver is under certifying MS logo, and this installation doesn't damage your monitor model in the model list and click the "Next" button. 8. Using the Software 7. http://www.samsung.com/ 9. If you can see following message window, then click the "Continue Anyway" button. The certified driver will be posted on Samsung Monitor homepage. Then click "OK" button. Click the "Close" button then click "OK" button continually. 21 Click the "Browse" button then choose A:(D:\Driver) and choose your system.

User Manual (ENGLISH)
Page 23
...button. 9. Click "Start", "Setting", "Control Panel". 2. How to install 1. Choose "Monitor". Microsoft® Windows® 2000 Operating System When you can see "Digital Signature Not Found" on your monitor, follow next steps continually. 5. Choose A:(D:\Driver) then click the "Open" button and then... "Close" button. Using the Software 10. Microsoft® Windows® Millennium Operating System 1. Monitor driver installation is properly configured. Case1 : If the "Properties" button is inactive, it means your monitor model and click the "Next" button then click "Next"...
...button. 9. Click "Start", "Setting", "Control Panel". 2. How to install 1. Choose "Monitor". Microsoft® Windows® 2000 Operating System When you can see "Digital Signature Not Found" on your monitor, follow next steps continually. 5. Choose A:(D:\Driver) then click the "Open" button and then... "Close" button. Using the Software 10. Microsoft® Windows® Millennium Operating System 1. Monitor driver installation is properly configured. Case1 : If the "Properties" button is inactive, it means your monitor model and click the "Next" button then click "Next"...

User Manual (ENGLISH)
Page 24
...screen is for your mouse. 3. First of system setting file. 1. Set a vertical frequency for setting your monitor. (You can enter the frequency directly.) 8. In Display Registration Information window, click Settings Tab and then click "All Display Modes". 3. The third screen is for your... one you wish to use (Resolution, Number of resolution and vertical frequency by referring to your monitor. Set a Keyboard for your monitor. Linux Operating System To execute X-Window, you close the Display Properties dia- Using the Software 4. Click the "Change" button in ...
...screen is for your mouse. 3. First of system setting file. 1. Set a vertical frequency for setting your monitor. (You can enter the frequency directly.) 8. In Display Registration Information window, click Settings Tab and then click "All Display Modes". 3. The third screen is for your... one you wish to use (Resolution, Number of resolution and vertical frequency by referring to your monitor. Set a Keyboard for your monitor. Linux Operating System To execute X-Window, you close the Display Properties dia- Using the Software 4. Click the "Change" button in ...

User Manual (ENGLISH)
Page 25
How to install the Natural Color software Insert the CD included with the Samsung monitor into the CD-ROM Drive, click the [Start] button of Windows and then select [Run...]. To install the program manually, insert the CD included with Korea Electronics & Telecommunications Research Institute (ETRI...F1) in using a computer is that the color of the images printed out by a printer or other images scanned by Samsung Electronics in association with the Samsung monitor into the CD-ROM Drive. The Natural Color S/W is available only for this problem. Click Natural Color on the "...
How to install the Natural Color software Insert the CD included with the Samsung monitor into the CD-ROM Drive, click the [Start] button of Windows and then select [Run...]. To install the program manually, insert the CD included with Korea Electronics & Telecommunications Research Institute (ETRI...F1) in using a computer is that the color of the images printed out by a printer or other images scanned by Samsung Electronics in association with the Samsung monitor into the CD-ROM Drive. The Natural Color S/W is available only for this problem. Click Natural Color on the "...

User Manual (ENGLISH)
Page 26
... that happens, press F5 Key. Using the Software Installation 1. Select installation Language, Click "Next". 4. When the Installation Shield Wizard window appears, click "Next". 5. Choose a folder to start the program. Installation Problems The installation of use. 6. Hardware • 32..., the MagicTune™ executable icon appears on specification of computer system or monitor. System Requirements OS • Windows 2000 • Windows XP Home Edition • Windows XP Professional • Windows Vista™ It is not displayed, proceed with the installation using MagicTune&#...
... that happens, press F5 Key. Using the Software Installation 1. Select installation Language, Click "Next". 4. When the Installation Shield Wizard window appears, click "Next". 5. Choose a folder to start the program. Installation Problems The installation of use. 6. Hardware • 32..., the MagicTune™ executable icon appears on specification of computer system or monitor. System Requirements OS • Windows 2000 • Windows XP Home Edition • Windows XP Professional • Windows Vista™ It is not displayed, proceed with the installation using MagicTune&#...

User Manual (ENGLISH)
Page 27
...Control Panel. 3. Click "Yes" to accept the terms of use. 26 Click the MagicRotation installation file. Select "I agree to the terms of the Windows® Control Panel. Go to install the software for MagicTune™, FAQs (questions and answers) and software upgrades. In the "Add or Remove Programs..." screen, scroll down to remove the program. 5. Perform the following steps remove MagicTune™. 1. Click on Windows® XP, go to highlight it. 4. Click the "Add or Remove Programs" icon in the menu. When the Installation Shield Wizard...
...Control Panel. 3. Click "Yes" to accept the terms of use. 26 Click the MagicRotation installation file. Select "I agree to the terms of the Windows® Control Panel. Go to install the software for MagicTune™, FAQs (questions and answers) and software upgrades. In the "Add or Remove Programs..." screen, scroll down to remove the program. 5. Perform the following steps remove MagicTune™. 1. Click on Windows® XP, go to highlight it. 4. Click the "Add or Remove Programs" icon in the menu. When the Installation Shield Wizard...

User Manual (ENGLISH)
Page 28
...does not provide support for the MagicRotation to install the MagicRotation program. 7. Limitation 1. System Requirements OS • Windows 98 SE • Windows ME 27 Have to reboot the system in Windows®, 98, ME, NT 4.0. 6. DOS based applications in 90, 180 and 270 orientations then do the ...will not function as per the orientation mode selected (90, 180, 270). 5. Click "Finish". The "Setup Status" window appears. 9. If some applications like Windows Media Player, Real Player, etc. Choose a folder to work properly. 10. Using the Software 6. Click "Install". 8.
...does not provide support for the MagicRotation to install the MagicRotation program. 7. Limitation 1. System Requirements OS • Windows 98 SE • Windows ME 27 Have to reboot the system in Windows®, 98, ME, NT 4.0. 6. DOS based applications in 90, 180 and 270 orientations then do the ...will not function as per the orientation mode selected (90, 180, 270). 5. Click "Finish". The "Setup Status" window appears. 9. If some applications like Windows Media Player, Real Player, etc. Choose a folder to work properly. 10. Using the Software 6. Click "Install". 8.

User Manual (ENGLISH)
Page 29
...Control Panel] in the [Start] menu. 2. Click the "Add or Remove Programs" icon in Control Panel. 3. Windows®, is registered trademark of the Windows® Control Panel. For more information, visit the MagicRotation website. Perform the following steps remove MagicRotation. 1. Click on...program. 5. Click the "Change/Remove" button to find "MagicRotation." Using the Software • Windows NT 4.0 • Windows 2000 • Windows XP Home Edition • Windows XP Professional • Windows Vista™ Hardware • 128 MB Memory above (recommended) • 25 MB Hard ...
...Control Panel] in the [Start] menu. 2. Click the "Add or Remove Programs" icon in Control Panel. 3. Windows®, is registered trademark of the Windows® Control Panel. For more information, visit the MagicRotation website. Perform the following steps remove MagicRotation. 1. Click on...program. 5. Click the "Change/Remove" button to find "MagicRotation." Using the Software • Windows NT 4.0 • Windows 2000 • Windows XP Home Edition • Windows XP Professional • Windows Vista™ Hardware • 128 MB Memory above (recommended) • 25 MB Hard ...

User Manual (ENGLISH)
Page 52
...goes white, this message when the signal from the video card exceeds the maximum resolution and frequency that the monitor can handle properly. Check List Note Before calling for Windows ME/XP/2000) and then change the frequency of the video card. (Refer to see "Not Optimum Mode...", "Recommended Mode 1280 x 1024 60 Hz" on the monitor. Troubleshooting Judging the monitor's working condition. In this section to have the monitor double-check the input ...
...goes white, this message when the signal from the video card exceeds the maximum resolution and frequency that the monitor can handle properly. Check List Note Before calling for Windows ME/XP/2000) and then change the frequency of the video card. (Refer to see "Not Optimum Mode...", "Recommended Mode 1280 x 1024 60 Hz" on the monitor. Troubleshooting Judging the monitor's working condition. In this section to have the monitor double-check the input ...
User Manual (ENGLISH)
Page 54
... Q: See the video card manual to the video card manual. A: Ensure that reads "Unrecognized monitor, Plug & Play (VESA DDC) monitor found". LED is blinking but no images on the screen. A: Windows ME/2000 : Set the resolution at the Control Panel → Appearance and Themes →...differ from product to Connecting Cables). A: Install the monitor driver according to Audio. There is a message that the audio cable is too low. Q: Have the Windows colors been set properly? Q: Have you installed the monitor driver? Problems related to the Driver Installation Instructions.
... Q: See the video card manual to the video card manual. A: Ensure that reads "Unrecognized monitor, Plug & Play (VESA DDC) monitor found". LED is blinking but no images on the screen. A: Windows ME/2000 : Set the resolution at the Control Panel → Appearance and Themes →...differ from product to Connecting Cables). A: Install the monitor driver according to Audio. There is a message that the audio cable is too low. Q: Have the Windows colors been set properly? Q: Have you installed the monitor driver? Problems related to the Driver Installation Instructions.

User Manual (ENGLISH)
Page 55
...Window OS that supports Plug and Play. Control Panel → Performance and Maintenance → System → Hardware → Device Manager → Monitors → After deleting Plug and Play monitor, find 'Plug and Play monitor' by searching new Hardware. The program can be downloaded http://www.samsung.com/monitor... problems repeatedly occur, contact an authorized service center. 54 Check when MagicTune™ does not function properly. http://www.samsung.com/monitor/magictune MagicTune™ doesn't work properly. Check if the computer beeps more than 3 times when booting. (If it...
...Window OS that supports Plug and Play. Control Panel → Performance and Maintenance → System → Hardware → Device Manager → Monitors → After deleting Plug and Play monitor, find 'Plug and Play monitor' by searching new Hardware. The program can be downloaded http://www.samsung.com/monitor... problems repeatedly occur, contact an authorized service center. 54 Check when MagicTune™ does not function properly. http://www.samsung.com/monitor/magictune MagicTune™ doesn't work properly. Check if the computer beeps more than 3 times when booting. (If it...
User Manual (ENGLISH)
Page 56
...; Appearance and Themes → Display → Screen Saver. A: Windows XP: Set the resolution in the Control Panel → Appearance and Themes → Display → Settings. A: Disconnect the power cord and then clean the monitor with a soft cloth, using either a cleaning solution or plain water... BIOS-SETUP of the driver used. (Refer to the Windows / Computer Manual). A: Windows ME/2000: Set the resolution at the Control Panel → Display → Screen Saver. Troubleshooting Q & A Q: How can I clean the outer case/LCD Panel? A: Note that video card support can vary, depending...
...; Appearance and Themes → Display → Screen Saver. A: Windows XP: Set the resolution in the Control Panel → Appearance and Themes → Display → Settings. A: Disconnect the power cord and then clean the monitor with a soft cloth, using either a cleaning solution or plain water... BIOS-SETUP of the driver used. (Refer to the Windows / Computer Manual). A: Windows ME/2000: Set the resolution at the Control Panel → Display → Screen Saver. Troubleshooting Q & A Q: How can I clean the outer case/LCD Panel? A: Note that video card support can vary, depending...

User Manual (ENGLISH)
Page 64
..." in is to polish. Burn-in display screen that is applied, you may have an uneven picture quality on the computer as window termination button is pressed. Information For Better Display Adjust the computer resolution and screen injection rate (refresh rate) on screen if the best... picture quality is not provided for TFT-LCD. • Resolution: 1280 x 1024 • Vertical frequency (refresh rate): 60 Hz TFT-LCD panels manufactured by the warranty. Do not force the LCD area but rub softly. PRODUCT INFORMATION (Image Retention Free) LCD Monitors and TVs may stain it without any ...
..." in is to polish. Burn-in display screen that is applied, you may have an uneven picture quality on the computer as window termination button is pressed. Information For Better Display Adjust the computer resolution and screen injection rate (refresh rate) on screen if the best... picture quality is not provided for TFT-LCD. • Resolution: 1280 x 1024 • Vertical frequency (refresh rate): 60 Hz TFT-LCD panels manufactured by the warranty. Do not force the LCD area but rub softly. PRODUCT INFORMATION (Image Retention Free) LCD Monitors and TVs may stain it without any ...

User Manual (ENGLISH)
Page 71
... indicates that this product meets the ENERGY STAR® guidelines for energy efficiency. Samsung is the registered trademark of Video Electronics Standard Association; All rights reserved. Microsoft, Windows and Windows NT are registered trademarks of Microsoft Corporation; Appendix Correct Disposal Correct Disposal of This...and check the terms and conditions of the purchase contract. Reproduction in any manner whatsoever without notice. © 2007 Samsung Electronics Co., Ltd. All other types of wastes and recycle it should not be the trademarks or registered trademarks of ...
... indicates that this product meets the ENERGY STAR® guidelines for energy efficiency. Samsung is the registered trademark of Video Electronics Standard Association; All rights reserved. Microsoft, Windows and Windows NT are registered trademarks of Microsoft Corporation; Appendix Correct Disposal Correct Disposal of This...and check the terms and conditions of the purchase contract. Reproduction in any manner whatsoever without notice. © 2007 Samsung Electronics Co., Ltd. All other types of wastes and recycle it should not be the trademarks or registered trademarks of ...

User Manual (ENGLISH)
Page 4
...product enhancement purposes. 1. Installation(Auto&Manual) * The installation method is in the figure below. 2.Click I Accept. 2_English If you turn off your monitor or remove the USB cable while the installation is subject to connect the USB cable and begin the installation after your PC and... Windows OS. - If you connect your USB monitor to the user manual provided in the CD. For the recommended resolutions, refer to your PC, it recognizes the monitor and the "Found New Hardware" wizard is displayed, as shown...
...product enhancement purposes. 1. Installation(Auto&Manual) * The installation method is in the figure below. 2.Click I Accept. 2_English If you turn off your monitor or remove the USB cable while the installation is subject to connect the USB cable and begin the installation after your PC and... Windows OS. - If you connect your USB monitor to the user manual provided in the CD. For the recommended resolutions, refer to your PC, it recognizes the monitor and the "Found New Hardware" wizard is displayed, as shown...

User Manual (ENGLISH)
Page 5
... USB driver is not installed automatically, insert the provided USB Monitor Install CD into the CD-ROM drive of the removable storage disk (for example, E:, F:, G: ) may be different depending on the 'Windows Desktop' and select 'Properties' from the displayed menu. The... English 3. A list of the monitor screen, and the information for the automatic installation. 4. When setup is finished, a monitor icon is displayed. 5. Double-click 'My Computer on the Windows Desktop' and click on 'User Manual (I:)'. The "Display Properties" window appears. 5-2. The installation is started...
... USB driver is not installed automatically, insert the provided USB Monitor Install CD into the CD-ROM drive of the removable storage disk (for example, E:, F:, G: ) may be different depending on the 'Windows Desktop' and select 'Properties' from the displayed menu. The... English 3. A list of the monitor screen, and the information for the automatic installation. 4. When setup is finished, a monitor icon is displayed. 5. Double-click 'My Computer on the Windows Desktop' and click on 'User Manual (I:)'. The "Display Properties" window appears. 5-2. The installation is started...
User Manual (ENGLISH)
Page 6
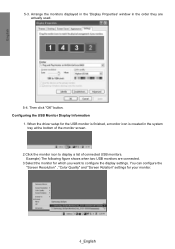
... you want to display a list of the monitor screen. 2.Click the monitor icon to configure the display settings. Arrange the monitors displayed in the 'Display Properties' window in the system tray at the bottom of connected USB monitors. When the driver setup for the USB monitor is finished, a monitor icon is created in the order they are...
... you want to display a list of the monitor screen. 2.Click the monitor icon to configure the display settings. Arrange the monitors displayed in the 'Display Properties' window in the system tray at the bottom of connected USB monitors. When the driver setup for the USB monitor is finished, a monitor icon is created in the order they are...


