
User Manual (ENGLISH)
Page 7
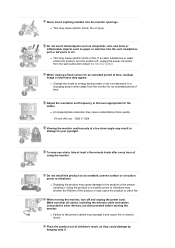
.... Do not move the monitor by pulling only the wire...water containers, chemical products or small metal objects on the monitor cabinet. z This may cause electric shock, fire or...combustible chemical sprays or inflammable substances. Do not cover the vents on the monitor. z This may cause an explosion or fire. z Failure to the cable...or if it is damaged, turn the monitor off and unplug the power cord. If the monitor is dropped or the casing is not ...or fire. z The monitor may cause a breakdown, electric shock or fire due to damage to move the monitor right or left by ...
.... Do not move the monitor by pulling only the wire...water containers, chemical products or small metal objects on the monitor cabinet. z This may cause electric shock, fire or...combustible chemical sprays or inflammable substances. Do not cover the vents on the monitor. z This may cause an explosion or fire. z Failure to the cable...or if it is damaged, turn the monitor off and unplug the power cord. If the monitor is dropped or the casing is not ...or fire. z The monitor may cause a breakdown, electric shock or fire due to damage to move the monitor right or left by ...

User Manual (ENGLISH)
Page 12
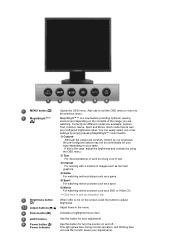
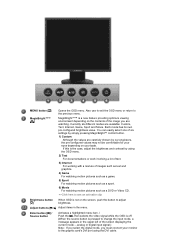
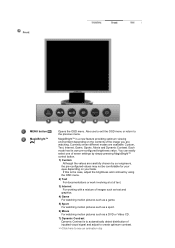
... a new feature providing optimum viewing environment depending on the contents of the image you must connect your taste. If this is not on your monitor to the graphic card's DVI port using the OSD menu. 2) Text For documentations or work involving a lot of text. 3) Internet For ... MagicBright™ control button. 1) Custom Although the values are carefully chosen by using the DVI cable. MENU button [ ] MagicBright™™ [] Opens the OSD menu. MagicBright™™ is pressed to change the input mode, a message appears in the menu. analog or digital input signal.) Note...
... a new feature providing optimum viewing environment depending on the contents of the image you must connect your taste. If this is not on your monitor to the graphic card's DVI port using the OSD menu. 2) Text For documentations or work involving a lot of text. 3) Internet For ... MagicBright™ control button. 1) Custom Although the values are carefully chosen by using the DVI cable. MENU button [ ] MagicBright™™ [] Opens the OSD menu. MagicBright™™ is pressed to change the input mode, a message appears in the menu. analog or digital input signal.) Note...
User Manual (ENGLISH)
Page 15
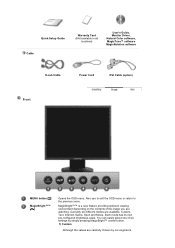
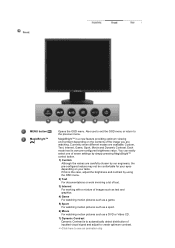
... Although the values are available: Custom, Text, Internet, Game, Sport and Movie. Quick Setup Guide Cable Warranty Card (Not available in all locations) User's Guide, Monitor Driver, Natural Color software, MagicTune™ software MagicRotation software D-sub Cable Power Cord DVI Cable (option) Front MENU button [ ] MagicBright™™...
... Although the values are available: Custom, Text, Internet, Game, Sport and Movie. Quick Setup Guide Cable Warranty Card (Not available in all locations) User's Guide, Monitor Driver, Natural Color software, MagicTune™ software MagicRotation software D-sub Cable Power Cord DVI Cable (option) Front MENU button [ ] MagicBright™™...
User Manual (ENGLISH)
Page 20
... new feature providing optimum viewing environment depending on your taste. Enter button [ ] Activates a highlighted menu item. AUTO button Use this button for turn the monitor on the screen, push the button to the previous menu. You can easily select one of six settings by simply pressing MagicBright™ control button...Game, Sport and Movie. Power button [ ]/ Power indicator Use this button for your adjustments. Adjust items in the menu. MENU button [ ] MagicBright™™ [] Opens the OSD menu. Also use to exit the OSD menu or return to adjust brightness.
... new feature providing optimum viewing environment depending on your taste. Enter button [ ] Activates a highlighted menu item. AUTO button Use this button for turn the monitor on the screen, push the button to the previous menu. You can easily select one of six settings by simply pressing MagicBright™ control button...Game, Sport and Movie. Power button [ ]/ Power indicator Use this button for your adjustments. Adjust items in the menu. MENU button [ ] MagicBright™™ [] Opens the OSD menu. Also use to exit the OSD menu or return to adjust brightness.
User Manual (ENGLISH)
Page 23
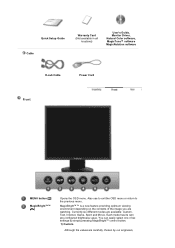
..., Text, Internet, Game, Sport and Movie. Currently six different modes are watching. Quick Setup Guide Cable Warranty Card (Not available in all locations) User's Guide, Monitor Driver, Natural Color software, MagicTune™ software MagicRotation software D-sub Cable Power Cord Front MENU button [ ] MagicBright™™...
..., Text, Internet, Game, Sport and Movie. Currently six different modes are watching. Quick Setup Guide Cable Warranty Card (Not available in all locations) User's Guide, Monitor Driver, Natural Color software, MagicTune™ software MagicRotation software D-sub Cable Power Cord Front MENU button [ ] MagicBright™™...

User Manual (ENGLISH)
Page 27
Front MENU button [ ] Opens the OSD menu. Currently six different modes are carefully chosen by our engineers, the pre-configured values may not be comfortable for your taste. Each ...
Front MENU button [ ] Opens the OSD menu. Currently six different modes are carefully chosen by our engineers, the pre-configured values may not be comfortable for your taste. Each ...
User Manual (ENGLISH)
Page 31
... or Video CD. >>Click here to see an animation clip Brightness button When OSD is pressed to the previous menu. MENU button [ ] MagicBright™™ [] Opens the OSD menu. MagicBright™™ is a new feature providing optimum viewing environment depending on your...
... or Video CD. >>Click here to see an animation clip Brightness button When OSD is pressed to the previous menu. MENU button [ ] MagicBright™™ [] Opens the OSD menu. MagicBright™™ is a new feature providing optimum viewing environment depending on your...

User Manual (ENGLISH)
Page 34
... the image you are available: Custom, Text, Internet, Game, Sport and Movie. Quick Setup Guide Cable Warranty Card (Not available in all locations) User's Guide, Monitor Driver, Natural Color software, MagicTune™ software MagicRotation software D-sub Cable Power Cord DVI Cable (option) Front MENU button [ ] MagicBright™™...
... the image you are available: Custom, Text, Internet, Game, Sport and Movie. Quick Setup Guide Cable Warranty Card (Not available in all locations) User's Guide, Monitor Driver, Natural Color software, MagicTune™ software MagicRotation software D-sub Cable Power Cord DVI Cable (option) Front MENU button [ ] MagicBright™™...
User Manual (ENGLISH)
Page 51
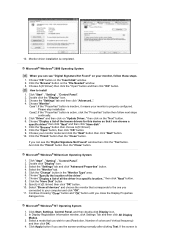
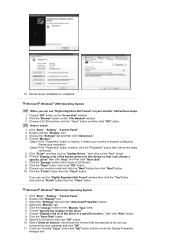
...All Display Modes. 3. Specify A:\(D:\driver) then click "OK" button. 10. Select a mode that I can see "Digital Signature Not Found" on your monitor model and click the "Next" button then click "Next" button. 10. Click "Start" , "Setting" , "Control Panel". 2. Choose "OK" button... on the "Next" button. 6. Choose A:(D:\Driver) then click the "Open" button and then click "OK" button. Select "Show all the driver in the "Monitor Type" area. 6. Click the "Open" button, then click "OK" button. 9. Click Apply button if you connected to install 1.
...All Display Modes. 3. Specify A:\(D:\driver) then click "OK" button. 10. Select a mode that I can see "Digital Signature Not Found" on your monitor model and click the "Next" button then click "Next" button. 10. Click "Start" , "Setting" , "Control Panel". 2. Choose "OK" button... on the "Next" button. 6. Choose A:(D:\Driver) then click the "Open" button and then click "OK" button. Select "Show all the driver in the "Monitor Type" area. 6. Click the "Open" button, then click "OK" button. 9. Click Apply button if you connected to install 1.

User Manual (ENGLISH)
Page 54
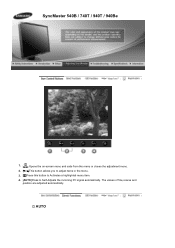
AUTO SyncMaster 740B / 940B 1. [ ]Opens the on-screen menu and exits from the menu or closes the adjustment menu. 2. [ ]This button allows you to adjust items in the menu. 3. [ ]Press this button to Activates a highlighted menu item. 4. [AUTO]Press to Self-Adjusts the incoming PC signal automatically. The values of fine,coarse and position are adjusted automatically.
AUTO SyncMaster 740B / 940B 1. [ ]Opens the on-screen menu and exits from the menu or closes the adjustment menu. 2. [ ]This button allows you to adjust items in the menu. 3. [ ]Press this button to Activates a highlighted menu item. 4. [AUTO]Press to Self-Adjusts the incoming PC signal automatically. The values of fine,coarse and position are adjusted automatically.

User Manual (ENGLISH)
Page 64
AUTO SyncMaster 740N / 940N 1. [ ]Opens the on-screen menu and exits from the menu or closes the adjustment menu. 2. [ ]This button allows you to adjust items in the menu. 3. [ ]Press this button to Activates a highlighted menu item. 4. [AUTO]Press to Self-Adjusts the incoming PC signal automatically. The values of fine,coarse and position are adjusted automatically.
AUTO SyncMaster 740N / 940N 1. [ ]Opens the on-screen menu and exits from the menu or closes the adjustment menu. 2. [ ]This button allows you to adjust items in the menu. 3. [ ]Press this button to Activates a highlighted menu item. 4. [AUTO]Press to Self-Adjusts the incoming PC signal automatically. The values of fine,coarse and position are adjusted automatically.

User Manual (ENGLISH)
Page 73
The values of fine,coarse and position are adjusted automatically. SyncMaster 940Fn 1. [ ]Opens the on-screen menu and exits from the menu or closes the adjustment menu. 2. [ ]This button allows you to adjust items in the menu. 3. [ ]Press this button to Activates a highlighted menu item. 4. [AUTO]Press to Self-Adjusts the incoming PC signal automatically. AUTO
The values of fine,coarse and position are adjusted automatically. SyncMaster 940Fn 1. [ ]Opens the on-screen menu and exits from the menu or closes the adjustment menu. 2. [ ]This button allows you to adjust items in the menu. 3. [ ]Press this button to Activates a highlighted menu item. 4. [AUTO]Press to Self-Adjusts the incoming PC signal automatically. AUTO
User Manual (ENGLISH)
Page 83
AUTO SyncMaster 540B / 740T / 940T / 940Be 1. [ ]Opens the on-screen menu and exits from the menu or closes the adjustment menu. 2. [ ]This button allows you to adjust items in the menu. 3. [ ]Press this button to Activates a highlighted menu item. 4. [AUTO]Press to Self-Adjusts the incoming PC signal automatically. The values of fine,coarse and position are adjusted automatically.
AUTO SyncMaster 540B / 740T / 940T / 940Be 1. [ ]Opens the on-screen menu and exits from the menu or closes the adjustment menu. 2. [ ]This button allows you to adjust items in the menu. 3. [ ]Press this button to Activates a highlighted menu item. 4. [AUTO]Press to Self-Adjusts the incoming PC signal automatically. The values of fine,coarse and position are adjusted automatically.

User Manual (ENGLISH)
Page 93
SyncMaster 540N 1. [ ]Opens the on-screen menu and exits from the menu or closes the adjustment menu. 2. [ ]This button allows you to adjust items in the menu. 3. [ ]Press this button to Activates a highlighted menu item. 4. [AUTO]Press to Self-Adjusts the incoming PC signal automatically. AUTO The values of fine,coarse and position are adjusted automatically.
SyncMaster 540N 1. [ ]Opens the on-screen menu and exits from the menu or closes the adjustment menu. 2. [ ]This button allows you to adjust items in the menu. 3. [ ]Press this button to Activates a highlighted menu item. 4. [AUTO]Press to Self-Adjusts the incoming PC signal automatically. AUTO The values of fine,coarse and position are adjusted automatically.

User Manual (ENGLISH)
Page 111
... or running MagicTune™ . PIP Source Select the input source for the PIP. Changing languages in MagicTune™ will be applied to monitor OSD(On Screen Display) languages.OSD language will be changed to the factory defaults. Source Select Set Customized Key to Source Select ColorTone Set... Customized Key to use the Help feature. Help Visit the MagicTune™ website or click to open the Help files (User Manual) if you to ColorTone Support Tab Definition Shows the Asset ID and the version number of MagicTune™ ...
... or running MagicTune™ . PIP Source Select the input source for the PIP. Changing languages in MagicTune™ will be applied to monitor OSD(On Screen Display) languages.OSD language will be changed to the factory defaults. Source Select Set Customized Key to Source Select ColorTone Set... Customized Key to use the Help feature. Help Visit the MagicTune™ website or click to open the Help files (User Manual) if you to ColorTone Support Tab Definition Shows the Asset ID and the version number of MagicTune™ ...
User Manual (user Manual) (ver.1.0) (English)
Page 4
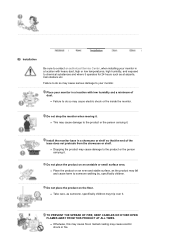
TO PREVENT THE SPREAD OF FIRE, KEEP CANDLES OR OTHER OPEN FLAMES AWAY FROM THIS PRODUCT AT ALL TIMES. z Failure to your monitor. Do not drop the monitor when moving it . Install the monitor base in a showcase or shelf so that the end of dust. z Place the product on an even and stable... . Do not place the product on the floor. z Otherwise, this may cause fire.A melted coating may cause electric shock or fire inside the monitor. Place your monitor in a location with heavy dust, high or low temperatures, high humidity, and exposed to the product or the person carrying it . z Take ...
TO PREVENT THE SPREAD OF FIRE, KEEP CANDLES OR OTHER OPEN FLAMES AWAY FROM THIS PRODUCT AT ALL TIMES. z Failure to your monitor. Do not drop the monitor when moving it . Install the monitor base in a showcase or shelf so that the end of dust. z Place the product on an even and stable... . Do not place the product on the floor. z Otherwise, this may cause fire.A melted coating may cause electric shock or fire inside the monitor. Place your monitor in a location with heavy dust, high or low temperatures, high humidity, and exposed to the product or the person carrying it . z Take ...
User Manual (user Manual) (ver.1.0) (English)
Page 8
..., including the antenna cable and cables connected to disconnect cables may shorten the lifetime of children's reach, as paper or matches into the monitor openings. Never insert anything metallic into the vent, headphone port or AV ports or etc. z This may cause electric shock, fire or injury... the product out of the product or may appear. z An inappropriate resolution may cause undesirable picture quality. 19 inch (48 cm) - 1280 X 1024 Viewing the monitor continuously at least a five-minute break after every hour of time, residual image or blurriness may cause the product to ...
..., including the antenna cable and cables connected to disconnect cables may shorten the lifetime of children's reach, as paper or matches into the monitor openings. Never insert anything metallic into the vent, headphone port or AV ports or etc. z This may cause electric shock, fire or injury... the product out of the product or may appear. z An inappropriate resolution may cause undesirable picture quality. 19 inch (48 cm) - 1280 X 1024 Viewing the monitor continuously at least a five-minute break after every hour of time, residual image or blurriness may cause the product to ...
User Manual (user Manual) (ver.1.0) (English)
Page 11
... as a DVD or Video CD. 7) Dynamic Contrast Dynamic Contrast is a new feature providing optimum viewing environment depending on your taste. Front MENU button [ ] MagicBright™ [] Opens the OSD menu. Also use to exit the OSD menu or return to see an animation clip
... as a DVD or Video CD. 7) Dynamic Contrast Dynamic Contrast is a new feature providing optimum viewing environment depending on your taste. Front MENU button [ ] MagicBright™ [] Opens the OSD menu. Also use to exit the OSD menu or return to see an animation clip
User Manual (user Manual) (ver.1.0) (English)
Page 15
Front MENU button [ ] MagicBright™ [] Opens the OSD menu. Also use to exit the OSD menu or return to see an animation clip MagicBright™ is a new feature providing optimum viewing ...
Front MENU button [ ] MagicBright™ [] Opens the OSD menu. Also use to exit the OSD menu or return to see an animation clip MagicBright™ is a new feature providing optimum viewing ...
User Manual (user Manual) (ver.1.0) (English)
Page 25
..." button and "OK" button until you can see "Digital Signature Not Found" on your monitor model and click the "Next" button then click "Next" button. 10. Choose A:(D:\Driver) then click the "Open" button and then click "OK" button. Choose "Monitor". Choose "Display a list of the driver". 7. Click "Start" , "Setting" , "Control Panel". 2. Choose "Specify...
..." button and "OK" button until you can see "Digital Signature Not Found" on your monitor model and click the "Next" button then click "Next" button. 10. Choose A:(D:\Driver) then click the "Open" button and then click "OK" button. Choose "Monitor". Choose "Display a list of the driver". 7. Click "Start" , "Setting" , "Control Panel". 2. Choose "Specify...


