
User Manual (ENGLISH)
Page 7
... so may cause electric shock or fire. Do not cover the vents on the monitor. z This may cause a breakdown or fire. Never insert anything metallic into the monitor openings. z Bad ventilation may cause a malfunction, electric shock or fire. z The monitor may cause an explosion or fire. Do not try to the cable. Disconnect the...
... so may cause electric shock or fire. Do not cover the vents on the monitor. z This may cause a breakdown or fire. Never insert anything metallic into the monitor openings. z Bad ventilation may cause a malfunction, electric shock or fire. z The monitor may cause an explosion or fire. Do not try to the cable. Disconnect the...

User Manual (ENGLISH)
Page 12
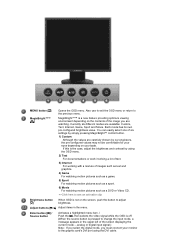
.... / Push the ' ', then selects the video signal while the OSD is off. (When the source button is not on your monitor to the previous menu. MENU button [ ] MagicBright™™ [] Opens the OSD menu. You can easily select one of the image you must connect your taste. Also use to exit the...
.... / Push the ' ', then selects the video signal while the OSD is off. (When the source button is not on your monitor to the previous menu. MENU button [ ] MagicBright™™ [] Opens the OSD menu. You can easily select one of the image you must connect your taste. Also use to exit the...
User Manual (ENGLISH)
Page 15
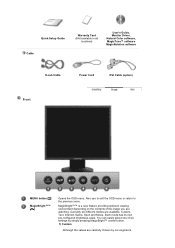
Quick Setup Guide Cable Warranty Card (Not available in all locations) User's Guide, Monitor Driver, Natural Color software, MagicTune™ software MagicRotation software D-sub Cable Power Cord DVI Cable (option) Front MENU button [ ] MagicBright™™ [] Opens the OSD menu. Each mode has its own pre-configured brightness value. You can easily select...
Quick Setup Guide Cable Warranty Card (Not available in all locations) User's Guide, Monitor Driver, Natural Color software, MagicTune™ software MagicRotation software D-sub Cable Power Cord DVI Cable (option) Front MENU button [ ] MagicBright™™ [] Opens the OSD menu. Each mode has its own pre-configured brightness value. You can easily select...
User Manual (ENGLISH)
Page 20
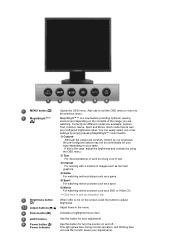
... mode has its own pre-configured brightness value. AUTO button Use this button for turn the monitor on and off. / This light glows blue during normal operation, and blinking blue once as... such as a game. 5) Sport For watching motion pictures such as a sport. 6) Movie For watching motion pictures such as the monitor saves your taste. Also use to exit the OSD menu or return to adjust brightness. Currently six different modes are watching. Enter button...you are available: Custom, Text, Internet, Game, Sport and Movie. MENU button [ ] MagicBright™™ [] Opens the OSD menu.
... mode has its own pre-configured brightness value. AUTO button Use this button for turn the monitor on and off. / This light glows blue during normal operation, and blinking blue once as... such as a game. 5) Sport For watching motion pictures such as a sport. 6) Movie For watching motion pictures such as the monitor saves your taste. Also use to exit the OSD menu or return to adjust brightness. Currently six different modes are watching. Enter button...you are available: Custom, Text, Internet, Game, Sport and Movie. MENU button [ ] MagicBright™™ [] Opens the OSD menu.
User Manual (ENGLISH)
Page 23
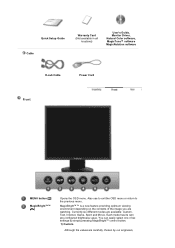
... by our engineers, Quick Setup Guide Cable Warranty Card (Not available in all locations) User's Guide, Monitor Driver, Natural Color software, MagicTune™ software MagicRotation software D-sub Cable Power Cord Front MENU button [ ] MagicBright™™ [] Opens the OSD menu. Currently six different modes are available: Custom, Text, Internet, Game, Sport and...
... by our engineers, Quick Setup Guide Cable Warranty Card (Not available in all locations) User's Guide, Monitor Driver, Natural Color software, MagicTune™ software MagicRotation software D-sub Cable Power Cord Front MENU button [ ] MagicBright™™ [] Opens the OSD menu. Currently six different modes are available: Custom, Text, Internet, Game, Sport and...

User Manual (ENGLISH)
Page 27
... watching motion pictures such as a DVD or Video CD. >>Click here to the previous menu. Adjust buttons [ ] Adjust items in the menu. Front MENU button [ ] Opens the OSD menu. Currently six different modes are watching. MagicBright™™ [] MagicBright™™ is not on your taste. You can easily select one...
... watching motion pictures such as a DVD or Video CD. >>Click here to the previous menu. Adjust buttons [ ] Adjust items in the menu. Front MENU button [ ] Opens the OSD menu. Currently six different modes are watching. MagicBright™™ [] MagicBright™™ is not on your taste. You can easily select one...
User Manual (ENGLISH)
Page 31
... Brightness button When OSD is the case, adjust the brightness and contrast by our engineers, the pre-configured values may not be comfortable for your monitor to the previous menu. If this is not on the screen, push the button to change the input mode, a message appears in the menu. Currently...
... Brightness button When OSD is the case, adjust the brightness and contrast by our engineers, the pre-configured values may not be comfortable for your monitor to the previous menu. If this is not on the screen, push the button to change the input mode, a message appears in the menu. Currently...

User Manual (ENGLISH)
Page 34
... six different modes are available: Custom, Text, Internet, Game, Sport and Movie. Quick Setup Guide Cable Warranty Card (Not available in all locations) User's Guide, Monitor Driver, Natural Color software, MagicTune™ software MagicRotation software D-sub Cable Power Cord DVI Cable (option) Front MENU button [ ] MagicBright™™...
... six different modes are available: Custom, Text, Internet, Game, Sport and Movie. Quick Setup Guide Cable Warranty Card (Not available in all locations) User's Guide, Monitor Driver, Natural Color software, MagicTune™ software MagicRotation software D-sub Cable Power Cord DVI Cable (option) Front MENU button [ ] MagicBright™™...
User Manual (ENGLISH)
Page 51
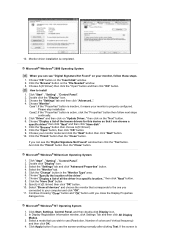
... a list of the driver". 7. Click the "Browse" button then choose A:(D:\Driver). 8. Select the "Monitor" tab. 5. Choose A:(D:\Driver) then click the "Open" button and then click "OK" button. Click the "Open" button, then click "OK" button. 9. If you see the "Digital Signature Not Found" window then..."Close" button and "OK" button until you wish to install 1. Choose the "Settings" tab and then click "Advanced..". 4. Choose your monitor is completed. Click the "Finish" button then the "Close" button. Choose "Specify the location of the known drivers for this device so that...
... a list of the driver". 7. Click the "Browse" button then choose A:(D:\Driver). 8. Select the "Monitor" tab. 5. Choose A:(D:\Driver) then click the "Open" button and then click "OK" button. Click the "Open" button, then click "OK" button. 9. If you see the "Digital Signature Not Found" window then..."Close" button and "OK" button until you wish to install 1. Choose the "Settings" tab and then click "Advanced..". 4. Choose your monitor is completed. Click the "Finish" button then the "Close" button. Choose "Specify the location of the known drivers for this device so that...

User Manual (ENGLISH)
Page 54
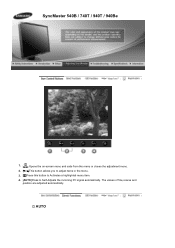
The values of fine,coarse and position are adjusted automatically. SyncMaster 740B / 940B 1. [ ]Opens the on-screen menu and exits from the menu or closes the adjustment menu. 2. [ ]This button allows you to adjust items in the menu. 3. [ ]Press this button to Activates a highlighted menu item. 4. [AUTO]Press to Self-Adjusts the incoming PC signal automatically. AUTO
The values of fine,coarse and position are adjusted automatically. SyncMaster 740B / 940B 1. [ ]Opens the on-screen menu and exits from the menu or closes the adjustment menu. 2. [ ]This button allows you to adjust items in the menu. 3. [ ]Press this button to Activates a highlighted menu item. 4. [AUTO]Press to Self-Adjusts the incoming PC signal automatically. AUTO

User Manual (ENGLISH)
Page 64
SyncMaster 740N / 940N 1. [ ]Opens the on-screen menu and exits from the menu or closes the adjustment menu. 2. [ ]This button allows you to adjust items in the menu. 3. [ ]Press this button to Activates a highlighted menu item. 4. [AUTO]Press to Self-Adjusts the incoming PC signal automatically. AUTO The values of fine,coarse and position are adjusted automatically.
SyncMaster 740N / 940N 1. [ ]Opens the on-screen menu and exits from the menu or closes the adjustment menu. 2. [ ]This button allows you to adjust items in the menu. 3. [ ]Press this button to Activates a highlighted menu item. 4. [AUTO]Press to Self-Adjusts the incoming PC signal automatically. AUTO The values of fine,coarse and position are adjusted automatically.

User Manual (ENGLISH)
Page 73
AUTO The values of fine,coarse and position are adjusted automatically. SyncMaster 940Fn 1. [ ]Opens the on-screen menu and exits from the menu or closes the adjustment menu. 2. [ ]This button allows you to adjust items in the menu. 3. [ ]Press this button to Activates a highlighted menu item. 4. [AUTO]Press to Self-Adjusts the incoming PC signal automatically.
AUTO The values of fine,coarse and position are adjusted automatically. SyncMaster 940Fn 1. [ ]Opens the on-screen menu and exits from the menu or closes the adjustment menu. 2. [ ]This button allows you to adjust items in the menu. 3. [ ]Press this button to Activates a highlighted menu item. 4. [AUTO]Press to Self-Adjusts the incoming PC signal automatically.
User Manual (ENGLISH)
Page 83
The values of fine,coarse and position are adjusted automatically. SyncMaster 540B / 740T / 940T / 940Be 1. [ ]Opens the on-screen menu and exits from the menu or closes the adjustment menu. 2. [ ]This button allows you to adjust items in the menu. 3. [ ]Press this button to Activates a highlighted menu item. 4. [AUTO]Press to Self-Adjusts the incoming PC signal automatically. AUTO
The values of fine,coarse and position are adjusted automatically. SyncMaster 540B / 740T / 940T / 940Be 1. [ ]Opens the on-screen menu and exits from the menu or closes the adjustment menu. 2. [ ]This button allows you to adjust items in the menu. 3. [ ]Press this button to Activates a highlighted menu item. 4. [AUTO]Press to Self-Adjusts the incoming PC signal automatically. AUTO

User Manual (ENGLISH)
Page 93
The values of fine,coarse and position are adjusted automatically. AUTO SyncMaster 540N 1. [ ]Opens the on-screen menu and exits from the menu or closes the adjustment menu. 2. [ ]This button allows you to adjust items in the menu. 3. [ ]Press this button to Activates a highlighted menu item. 4. [AUTO]Press to Self-Adjusts the incoming PC signal automatically.
The values of fine,coarse and position are adjusted automatically. AUTO SyncMaster 540N 1. [ ]Opens the on-screen menu and exits from the menu or closes the adjustment menu. 2. [ ]This button allows you to adjust items in the menu. 3. [ ]Press this button to Activates a highlighted menu item. 4. [AUTO]Press to Self-Adjusts the incoming PC signal automatically.

User Manual (ENGLISH)
Page 111
...ColorTone Set Customized Key to ColorTone Support Tab Definition Shows the Asset ID and the version number of the PIP window. To reset the monitor settings to MagicColor. Customized Key MagicColor Set Customized Key to the factory defaults. z Custom - PIP Source Select the input source for ... you to use the Help feature. The User Manual opens within a basic browser window. When external A/V devices such as VCRs or DVDs are connected to the monitor, PIP allows you to watch video from those devices in specific monitors. Help Visit the MagicTune™ website or click to...
...ColorTone Set Customized Key to ColorTone Support Tab Definition Shows the Asset ID and the version number of the PIP window. To reset the monitor settings to MagicColor. Customized Key MagicColor Set Customized Key to the factory defaults. z Custom - PIP Source Select the input source for ... you to use the Help feature. The User Manual opens within a basic browser window. When external A/V devices such as VCRs or DVDs are connected to the monitor, PIP allows you to watch video from those devices in specific monitors. Help Visit the MagicTune™ website or click to...


