
User Manual (ENGLISH)
Page 7
...water containers, chemical products or small metal objects on the monitor cabinet. Keep the product away from the outlet during storms or lightning or if it is damaged, turn the monitor off and unplug the power cord. z The monitor may cause a malfunction, electric shock or fire. Never... insert anything metallic into the monitor openings. Do not move the monitor by pulling only the wire or the signal cable....
...water containers, chemical products or small metal objects on the monitor cabinet. Keep the product away from the outlet during storms or lightning or if it is damaged, turn the monitor off and unplug the power cord. z The monitor may cause a malfunction, electric shock or fire. Never... insert anything metallic into the monitor openings. Do not move the monitor by pulling only the wire or the signal cable....

User Manual (ENGLISH)
Page 8
...connected to the person or even fatality. When not using the monitor. z An inappropriate resolution may cause undesirable picture quality. 15 inch (38 cm) - 1024 X 768 17,19 inch (43, 48 cm) - 1280 X 1024 Viewing the monitor continuously at least a five-minute break after every hour of children... in damage to the product or the person carrying it. If an alien substances or water enters the product, turn off , unplug the power connector from the monitor for an extended period of time. z A falling product may cause injury to other devices, are disconnected before moving...
...connected to the person or even fatality. When not using the monitor. z An inappropriate resolution may cause undesirable picture quality. 15 inch (38 cm) - 1024 X 768 17,19 inch (43, 48 cm) - 1280 X 1024 Viewing the monitor continuously at least a five-minute break after every hour of children... in damage to the product or the person carrying it. If an alien substances or water enters the product, turn off , unplug the power connector from the monitor for an extended period of time. z A falling product may cause injury to other devices, are disconnected before moving...

User Manual (ENGLISH)
Page 13
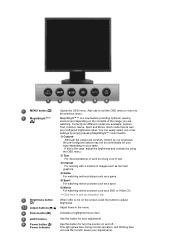
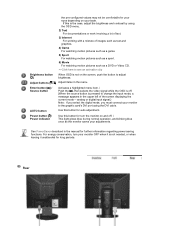
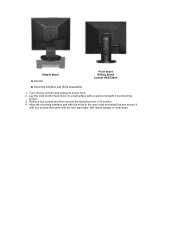
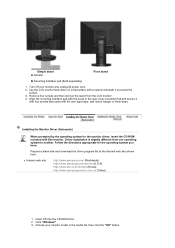
... port on and off Switch (option) Kensington Lock Connect the power cord for your monitor. The Kensington lock is not needed, or when leaving it unattended for turn your monitor. For energy conservation, turn the monitor on the back of the monitor. AUTO button Power button [ ]/ Power indicator Use this button for further information regarding cable...
... port on and off Switch (option) Kensington Lock Connect the power cord for your monitor. The Kensington lock is not needed, or when leaving it unattended for turn your monitor. For energy conservation, turn the monitor on the back of the monitor. AUTO button Power button [ ]/ Power indicator Use this button for further information regarding cable...

User Manual (ENGLISH)
Page 16
...pre-configured values may not be comfortable for your eyes depending on the screen, push the button to adjust [] brightness. For energy conservation, turn the monitor on and off . (When the source button is pressed to change the input mode, a message appears in the upper left of images ... motion pictures such as a game. 5) Sport For watching motion pictures such as a sport. 6) Movie For watching motion pictures such as the monitor saves your monitor OFF when it unattended for auto adjustment. If this is the case, adjust the brightness and contrast by using the DVI cable. Enter button...
...pre-configured values may not be comfortable for your eyes depending on the screen, push the button to adjust [] brightness. For energy conservation, turn the monitor on and off . (When the source button is pressed to change the input mode, a message appears in the upper left of images ... motion pictures such as a game. 5) Sport For watching motion pictures such as a sport. 6) Movie For watching motion pictures such as the monitor saves your monitor OFF when it unattended for auto adjustment. If this is the case, adjust the brightness and contrast by using the DVI cable. Enter button...
User Manual (ENGLISH)
Page 20
MagicBright™™ is not on and off. / This light glows blue during normal operation, and blinking blue once as the monitor saves your taste. AUTO button Use this is the case, adjust the brightness and contrast by our engineers, the pre-configured values may not be ..., Internet, Game, Sport and Movie. Enter button [ ] Activates a highlighted menu item. Power button [ ]/ Power indicator Use this button for auto adjustment. If this button for turn the monitor on the screen, push the button to the previous menu.
MagicBright™™ is not on and off. / This light glows blue during normal operation, and blinking blue once as the monitor saves your taste. AUTO button Use this is the case, adjust the brightness and contrast by our engineers, the pre-configured values may not be ..., Internet, Game, Sport and Movie. Enter button [ ] Activates a highlighted menu item. Power button [ ]/ Power indicator Use this button for auto adjustment. If this button for turn the monitor on the screen, push the button to the previous menu.

User Manual (ENGLISH)
Page 21
...to something when using it unattended for further information regarding cable connections. For energy conservation, turn the monitor on and off Switch (option) Kensington Lock Connect the power cord for your monitor to the power port on the back of purchase. The Kensington lock is not needed..., or when leaving it in the manual for long periods. See Connecting the Monitor for turn your monitor. Use this button for further information regarding ...
...to something when using it unattended for further information regarding cable connections. For energy conservation, turn the monitor on and off Switch (option) Kensington Lock Connect the power cord for your monitor to the power port on the back of purchase. The Kensington lock is not needed..., or when leaving it in the manual for long periods. See Connecting the Monitor for turn your monitor. Use this button for further information regarding ...
User Manual (ENGLISH)
Page 24
...items in the manual for auto adjustment. See PowerSaver described in the menu. Activates a highlighted menu item. For energy conservation, turn the monitor on the screen, push the button to adjust brightness. the pre-configured values may vary from product to product.) POWER port ...a DVD or Video CD. >>Click here to the power port on your adjustments. Use this button for turn your monitor OFF when it is not needed, or when leaving it unattended for your monitor to see an animation clip Brightness button [] Adjust buttons [ ] Enter button [ ] When OSD is the...
...items in the manual for auto adjustment. See PowerSaver described in the menu. Activates a highlighted menu item. For energy conservation, turn the monitor on the screen, push the button to adjust brightness. the pre-configured values may vary from product to product.) POWER port ...a DVD or Video CD. >>Click here to the power port on your adjustments. Use this button for turn your monitor OFF when it is not needed, or when leaving it unattended for your monitor to see an animation clip Brightness button [] Adjust buttons [ ] Enter button [ ] When OSD is the...

User Manual (ENGLISH)
Page 28
...to physically fix the system to something when using the DVI cable. See Connecting the Monitor for turn the monitor on and off. / This light glows blue during normal operation, and blinking blue once as the monitor saves your adjustments. analog or digital input signal.) Note : If you select the ...digital mode, you must connect your monitor to the DVI Port on the back of your Monitor. Connect the DVI Cable to the graphic card's DVI port using it unattended for turn the monitor on and off. Use this button for further information regarding power saving...
...to physically fix the system to something when using the DVI cable. See Connecting the Monitor for turn the monitor on and off. / This light glows blue during normal operation, and blinking blue once as the monitor saves your adjustments. analog or digital input signal.) Note : If you select the ...digital mode, you must connect your monitor to the DVI Port on the back of your Monitor. Connect the DVI Cable to the graphic card's DVI port using it unattended for turn the monitor on and off. Use this button for further information regarding power saving...
User Manual (ENGLISH)
Page 32
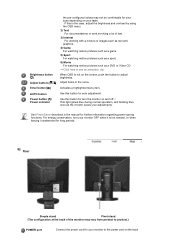
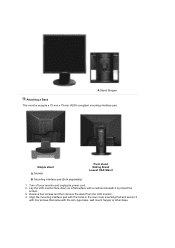
... public place. (The locking device has to be purchased separately.) For using a locking device, contact the place of purchase. For energy conservation, turn your monitor OFF when it is a device used to physically fix the system to product.) POWER port DVI IN port RGB IN port POWER on/off Switch... (option) Kensington Lock Connect the power cord for turn the monitor on the back of the monitor. Use this button for turn the monitor on and off . See Connecting the Monitor for auto adjustment. Connect the signal cable to the DVI port on the back of your...
... public place. (The locking device has to be purchased separately.) For using a locking device, contact the place of purchase. For energy conservation, turn your monitor OFF when it is a device used to physically fix the system to product.) POWER port DVI IN port RGB IN port POWER on/off Switch... (option) Kensington Lock Connect the power cord for turn the monitor on the back of the monitor. Use this button for turn the monitor on and off . See Connecting the Monitor for auto adjustment. Connect the signal cable to the DVI port on the back of your...
User Manual (ENGLISH)
Page 35
...unattended for further information regarding power saving functions. the pre-configured values may not be comfortable for auto adjustment. If this button for turn your monitor OFF when it is pressed to change the input mode, a message appears in the menu. Rear analog or digital input signal.) ...watching motion pictures such as a game. 5) Sport For watching motion pictures such as a sport. 6) Movie For watching motion pictures such as the monitor saves your eyes depending on the screen, push the button to the graphic card's DVI port using the OSD menu. 2) Text For documentations or...
...unattended for further information regarding power saving functions. the pre-configured values may not be comfortable for auto adjustment. If this button for turn your monitor OFF when it is pressed to change the input mode, a message appears in the menu. Rear analog or digital input signal.) ...watching motion pictures such as a game. 5) Sport For watching motion pictures such as a sport. 6) Movie For watching motion pictures such as the monitor saves your eyes depending on the screen, push the button to the graphic card's DVI port using the OSD menu. 2) Text For documentations or...

User Manual (ENGLISH)
Page 36
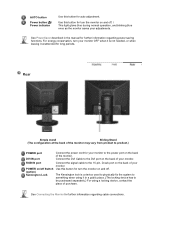
... off Switch (option) Kensington Lock Connect the power cord for your monitor to the power port on the back of your monitor. Use this button for turn the monitor on the back of your monitor. See Connecting the Monitor for further information regarding cable connections. Connect the DVI Cable to the... DVI port on the back of the monitor. The Kensington lock is a device used...
... off Switch (option) Kensington Lock Connect the power cord for your monitor to the power port on the back of your monitor. Use this button for turn the monitor on the back of your monitor. See Connecting the Monitor for further information regarding cable connections. Connect the DVI Cable to the... DVI port on the back of the monitor. The Kensington lock is a device used...
User Manual (ENGLISH)
Page 37
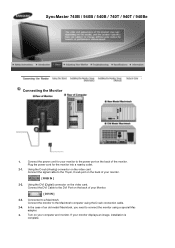
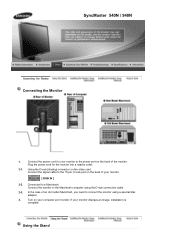
... the DVI Port on your monitor. [ RGB IN ] 2-2. Connected to connect the monitor using the D-sub connection cable. 2-4. Turn on the back of your computer and monitor. Using the DVI (Digital) connector on the video card. Using the D-sub (Analog) connector on the video card. If your Monitor. [ DVI IN ] 2-3. SyncMaster 740B / 940B / 540B / 740T / 940T...
... the DVI Port on your monitor. [ RGB IN ] 2-2. Connected to connect the monitor using the D-sub connection cable. 2-4. Turn on the back of your computer and monitor. Using the DVI (Digital) connector on the video card. Using the D-sub (Analog) connector on the video card. If your Monitor. [ DVI IN ] 2-3. SyncMaster 740B / 940B / 540B / 740T / 940T...
User Manual (ENGLISH)
Page 39
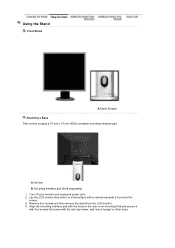
Turn off your monitor and unplug its power cord. 2. Mounting interface pad (Sold separately) 1. Monitor Pivot stand Sliding Stand Lowest HAS Stand B. Lay the LCD monitor face-down on a flat surface with the arm-type base, wall mount hanger or other base. Simple stand A. Align the mounting interface pad with the holes in the rear cover mounting Pad and secure it with four screws that came with a cushion beneath it to protect the screen. 3. Remove four screws and then remove the stand from the LCD monitor. 4.
Turn off your monitor and unplug its power cord. 2. Mounting interface pad (Sold separately) 1. Monitor Pivot stand Sliding Stand Lowest HAS Stand B. Lay the LCD monitor face-down on a flat surface with the arm-type base, wall mount hanger or other base. Simple stand A. Align the mounting interface pad with the holes in the rear cover mounting Pad and secure it with four screws that came with a cushion beneath it to protect the screen. 3. Remove four screws and then remove the stand from the LCD monitor. 4.

User Manual (ENGLISH)
Page 40
... port on the back of the monitor. Using the D-sub (Analog) connector on the back of your monitor to connect the monitor using the D-sub connection cable. 2-3. Turn on your monitor displays an image, installation is complete. Connect the power cord for the monitor into a nearby outlet. 2-1. SyncMaster 740N Connecting the Monitor 1. Connect the signal cable to a Macintosh...
... port on the back of the monitor. Using the D-sub (Analog) connector on the back of your monitor to connect the monitor using the D-sub connection cable. 2-3. Turn on your monitor displays an image, installation is complete. Connect the power cord for the monitor into a nearby outlet. 2-1. SyncMaster 740N Connecting the Monitor 1. Connect the signal cable to a Macintosh...
User Manual (ENGLISH)
Page 42
... screen. 3. Mounting interface pad (Sold separately) 1. Remove four screws and then remove the stand from the LCD monitor. 4. Monitor Pivot stand Sliding Stand Lowest HAS Stand B. Turn off your monitor and unplug its power cord. 2. Simple stand A. Lay the LCD monitor face-down on a flat surface with the arm-type base, wall mount hanger or other base...
... screen. 3. Mounting interface pad (Sold separately) 1. Remove four screws and then remove the stand from the LCD monitor. 4. Monitor Pivot stand Sliding Stand Lowest HAS Stand B. Turn off your monitor and unplug its power cord. 2. Simple stand A. Lay the LCD monitor face-down on a flat surface with the arm-type base, wall mount hanger or other base...

User Manual (ENGLISH)
Page 43
.... 3. In the case of the monitor. If your computer and monitor. Turn on the back of your monitor to the DVI IN port on the back of an old model Macintosh, you need to D-SUB' connection cable. 2-4. SyncMaster 940Fn Connecting the Monitor 1. Connected to the RGB IN port on your monitor displays an image, installation is complete...
.... 3. In the case of the monitor. If your computer and monitor. Turn on the back of your monitor to the DVI IN port on the back of an old model Macintosh, you need to D-SUB' connection cable. 2-4. SyncMaster 940Fn Connecting the Monitor 1. Connected to the RGB IN port on your monitor displays an image, installation is complete...
User Manual (ENGLISH)
Page 44
... base. Using the Stand Pivot Stand A.Stand Stopper Attaching a Base This monitor accepts a 75 mm x 75 mm VESA-compliant mounting interface pad. Turn off your monitor and unplug its power cord. 2. Monitor B. Remove four screws and then remove the stand from the LCD monitor. 4. Lay the LCD monitor face-down on a flat surface with a cushion beneath it with...
... base. Using the Stand Pivot Stand A.Stand Stopper Attaching a Base This monitor accepts a 75 mm x 75 mm VESA-compliant mounting interface pad. Turn off your monitor and unplug its power cord. 2. Monitor B. Remove four screws and then remove the stand from the LCD monitor. 4. Lay the LCD monitor face-down on a flat surface with a cushion beneath it with...
User Manual (ENGLISH)
Page 45
... 15-pin, D-sub port on the video card. If your computer and monitor. Using the Stand Using the D-sub (Analog) connector on the back of your monitor. [ RGB IN ] 2-2. Turn on the back of an old model Macintosh, you need to the power port... on your monitor displays an image, installation is complete. In the case of the monitor. Connect the power cord for the monitor into a nearby outlet. 2-1. SyncMaster 540N / 940N Connecting the Monitor 1. Connect the monitor...
... 15-pin, D-sub port on the video card. If your computer and monitor. Using the Stand Using the D-sub (Analog) connector on the back of your monitor. [ RGB IN ] 2-2. Turn on the back of an old model Macintosh, you need to the power port... on your monitor displays an image, installation is complete. In the case of the monitor. Connect the power cord for the monitor into a nearby outlet. 2-1. SyncMaster 540N / 940N Connecting the Monitor 1. Connect the monitor...
User Manual (ENGLISH)
Page 47
.... 2. Turn off your monitor model in the rear cover mounting Pad and secure it with four screws that came with a cushion beneath it to another. Installing the Monitor Driver (Automatic...samsung.com/monitor (U.S.A) http://www.sec.co.kr/monitor (Korea) http://www.samsungmonitor.com.cn/ (China) 1. Click "Windows" 3. Mounting interface pad (Sold separately) 1. Prepare a blank disk and download the driver program file at the Internet web site shown here. Choose your monitor and unplug its power cord. 2. Driver installation is slightly different from the LCD monitor. 4. Monitor...
.... 2. Turn off your monitor model in the rear cover mounting Pad and secure it with four screws that came with a cushion beneath it to another. Installing the Monitor Driver (Automatic...samsung.com/monitor (U.S.A) http://www.sec.co.kr/monitor (Korea) http://www.samsungmonitor.com.cn/ (China) 1. Click "Windows" 3. Mounting interface pad (Sold separately) 1. Prepare a blank disk and download the driver program file at the Internet web site shown here. Choose your monitor and unplug its power cord. 2. Driver installation is slightly different from the LCD monitor. 4. Monitor...

User Manual (ENGLISH)
Page 61
... analog mode only) OSD Menu Description You can choose one of the OSD. The menu will wait before it is turned off if no effect on any software running on your monitor. Setup You can change the vertical position where the OSD menu appears on the computer. Change the transparency of the...
... analog mode only) OSD Menu Description You can choose one of the OSD. The menu will wait before it is turned off if no effect on any software running on your monitor. Setup You can change the vertical position where the OSD menu appears on the computer. Change the transparency of the...


